Sketcher CreatePolyline/pl: Difference between revisions
(Updating to match new version of source page) |
No edit summary |
||
| Line 2: | Line 2: | ||
{{Docnav|[[Sketcher_CreatePeriodicBSpline|Create periodic B-pline]]|[[Sketcher_CreateRectangle|Rectangle]]|[[Sketcher_Workbench|Sketcher]]|IconL=Sketcher_Create_Periodic_BSpline.svg|IconC=Workbench_Sketcher.svg|IconR=Sketcher_CreateRectangle.svg}} |
{{Docnav|[[Sketcher_CreatePeriodicBSpline|Create periodic B-pline]]|[[Sketcher_CreateRectangle|Rectangle]]|[[Sketcher_Workbench|Sketcher]]|IconL=Sketcher_Create_Periodic_BSpline.svg|IconC=Workbench_Sketcher.svg|IconR=Sketcher_CreateRectangle.svg}} |
||
{{GuiCommand/pl |
|||
<div class="mw-translate-fuzzy"> |
|||
|Name=Sketcher CreatePolyline |
|||
{{GuiCommand/pl|Name=Sketcher CreatePolyline|Name/pl=Sketcher CreatePolyline|Workbenches=[[Sketcher Workbench/pl|Sketcher]]|MenuLocation=Sketch → Sketcher geometries → Create polyline|SeeAlso=[[Sketcher CreateLine/pl|Sketcher Line]]}} |
|||
|Name/pl=Sketcher: CreatePolyline |
|||
</div> |
|||
|Workbenches=[[Sketcher Workbench/pl|Sketcher]] |
|||
|MenuLocation=Sketch → Elementy geometryczne szkicownika → Utwórz linię łamaną |
|||
|SeeAlso=[[Sketcher CreateLine/pl|Sketcher: Linia]] |
|||
}} |
|||
==Description== |
==Description== |
||
Revision as of 10:19, 27 September 2020
|
|
| Lokalizacja w menu |
|---|
| Sketch → Elementy geometryczne szkicownika → Utwórz linię łamaną |
| Środowisko pracy |
| Sketcher |
| Domyślny skrót |
| brak |
| Wprowadzono w wersji |
| - |
| Zobacz także |
| Sketcher: Linia |
Description
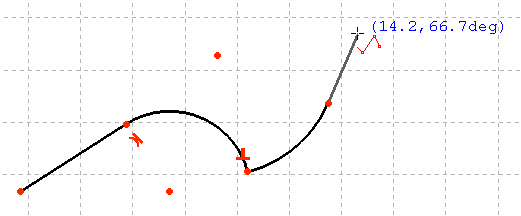
This tool works like the Sketcher Line tool, but creates continuous line and arc segments connected by their vertices. When starting the tool, the mouse pointer changes to a white cross with a red polyline icon. The coordinates of the pointer are shown beside it in blue in real time.
Polyline started with a line, a tangent arc, a perpendicular arc then a tangent line.
Usage
The polyline always starts with a straight line segment: click - move the mouse - click. Move the mouse again. After placing the first line segment, the Sketcher polyline tool has multiple modes that can be toggled with the M key. For example you can draw tangent or perpendicular arcs following a line or arc segment. Repeatedly pressing the M key toggles through these different modes:
- Press the M key: the new segment is a line which is perpendicular to the previous segment.
- Press the M key again: the new segment is a line which is tangential to the previous segment.
- Press the M key again: the new segment is an arc which is tangential to the previous segment.
- Press the M key again: the new segment is an arc which is perpendicular (left) to the previous segment.
- Press the M key again: the new segment is an arc which is perpendicular(right) to the previous segment.
- Press the M key again: You are again in the state where you started; the line is only connected with a coincidence to the previous segment.
- v0.18 and above While in any of the arc modes, holding down the Ctrl key (MacOS: CMD key) and moving the cursor causes the arc to snap by increments of 45 degrees, relative to the previously created polyline segment.
- Pick points on an empty area of the 3D view, or on an existing object (auto constraints must be active in TaskView).
- Pressing Esc or clicking the right mouse button before closing the polyline to a loop ends the current polyline and you can continue with a new one. Pressing Esc or clicking the right mouse button again ends the polyline function.
- Pressing Esc or clicking the right mouse button after closing the polyline to a loop ends the polyline function.
- Przybory: Nowy szkic, Edycja szkicu, Mapuj szkic na powierzchnię, Zmień orientację szkicu, Sprawdź poprawność szkicu, Połącz szkice, Odbicie lustrzane szkicu, Zamknij szkic, Widok szkicu, Widok przekroju, Włącz / wyłącz siatkę, Włącz / wyłącz przyciąganie, Kolejność renderowania, Przerwij operację
- Geometrie szkicownika: Punkt, Linia, Komponent utwórz łuk, Łuk, Utwórz łuk przez 3 punkty, Komponent utwórz okrąg, Okrąg, Utwórz okrąg przez 3 punkty, Komponent utwórz stożek, Utwórz elipsę względem środka, Utwórz elipsę przez 3 punkty, Utwórz łuk elipsy, Utwórz łuk hyperboli, Utwórz łuk paraboli, Komponent utwórz krzywą złożoną, Utwórz krzywą złożoną, Utwórz okresową utwórz krzywą złożoną, Polylinia (linia wielopunktowa), Prostokąt, Komponent utwórz wielokąt foremny, Trójkąt, Kwadrat, Pięciokąt, Sześciokąt, Siedmiokąt, Ośmiokąt, Utwórz wielokąt foremny, Rowek, Zaokrąglenie, Zaokrąglenie z zachowaniem wiązań, Przytnij, Rozszerz, Geometria zewnętrzna, Kalka techniczna, Tryb konstrukcyjny
- Wiązania szkicownika
- Wiązania geometryczne Wiązanie zbieżności punktów, Wiązanie punktu na obiekcie, Wiązanie pionowe, Wiązanie poziome, Wiązanie równoległości, Wiązanie prostopadłości, Wiązanie styczności, Wiązanie równości, Wiązanie symetrii, Wiązanie zablokowania
- Wiązania wymiarów Wiązanie blokady odległości, Zwiąż odległość poziomą, Zwiąż odległość pionową, Wiązanie odległości, Wiązanie promienia, Wiązanie średnicy, Zwiąż automatycznie promień / średnicę, Wiązanie kąta, Wiązanie prawo Snella
- Narzędzia wiązań: Przełącz kontrolę wiązania, Przełącz aktywność wiązania
- Narzędzia szkicownika Wybierz elementy bez wiązań, Wybierz powiązane więzy, Wybierz powiązaną geometrię, Wybierz zbędne wiązania, Wybierz wiązania konfliktowe, Pokaż / ukryj geometrię wewnętrzną, Wybierz odniesienie położenia, Wybierz oś poziomą, Wybierz oś pionową, Odbicie lustrzane, Klonuj, Kopiuj, Przesuń, Szyk prostokątny, Usuń wyrównanie osi, Usuń wszystkie geometrie, Usuń wszystkie wiązania
- Narzędzia B-spline dla szkicownika. Pokaż / ukryj stopień krzywej złożonej, Pokaż/ukryj ramkę kontrolną krzywej złożonej, Pokaż / ukryj grzebień krzywizny krzywej złożonej, Pokaż / ukryj wyświetlanie węzłów krzywej złożonej, Pokaż / ukryj wagę punktu kontrolnego krzywej złożonej, Konwertuj geometrię na krzywą złożoną, Zwiększ stopień krzywej złożonej, Zmniejsz stopień krzywej złożonej, Zwiększ krotność węzłów krzywej złożonej, Zmniejsz krotność węzła krzywej złożonej, Wstaw węzeł, Połącz krzywe
- Przestrzeń wirtualna szkicownika Przełącz przestrzeń wirtualną
- Dodatkowe: Okienko dialogowe Szkicownika, Preferencje, Skrypty Szkicownika
- Jak zacząć
- Instalacja: Pobieranie programu, Windows, Linux, Mac, Dodatkowych komponentów, Docker, AppImage, Ubuntu Snap
- Podstawy: Informacje na temat FreeCAD, Interfejs użytkownika, Profil nawigacji myszką, Metody wyboru, Nazwa obiektu, Edytor ustawień, Środowiska pracy, Struktura dokumentu, Właściwości, Pomóż w rozwoju FreeCAD, Dotacje
- Pomoc: Poradniki, Wideo poradniki
- Środowiska pracy: Strona Startowa, Architektura, Assembly, CAM, Rysunek Roboczy, MES, Inspekcja, Siatka, OpenSCAD, Część, Projekt Części, Punkty, Inżynieria Wsteczna, Robot, Szkicownik, Arkusz Kalkulacyjny, Powierzchnia 3D, Rysunek Techniczny, Test Framework
