PartDesign MultiTransform/pl: Difference between revisions
(Created page with "# Sprawdź właściwość {{PropertyData|Oryginały}} istniejących przekształceń, aby upewnić się, że zostały one zastosowane do tych samych elementów. # Wybierz te cechy w Widoku Drzewa. # Istnieje kilka sposobów wywołania narzędzia: #* Naciśnij przycisk {{Button|16px Utwórz transformację wielokrotną}}. #* Wybierz z menu opcję {{MenuCommand|Projekt Części → Zast...") |
(Created page with "==Opcje==") |
||
| Line 73: | Line 73: | ||
# Opcjonalnie [[#Edycja|edytuj]] obiekt Transformacji wielokrotnej, patrz wyżej. |
# Opcjonalnie [[#Edycja|edytuj]] obiekt Transformacji wielokrotnej, patrz wyżej. |
||
= |
<span id="Options"></span> |
||
==Opcje== |
|||
* To add features: |
* To add features: |
||
Revision as of 09:44, 18 June 2023
|
|
| Lokalizacja w menu |
|---|
| Projekt Części → Zastosuj przekształcenie → Utwórz transformację wielokrotną |
| Środowisko pracy |
| Projekt Części |
| Domyślny skrót |
| brak |
| Wprowadzono w wersji |
| - |
| Zobacz także |
| Odbicie lustrzane, Szyk liniowy, Szyk kołowy, Skaluj |
Opis
Narzędzie Transformacja wielokrotna tworzy szyk jednego lub więcej elementów. Szyk może zawierać wiele przekształceń, gdzie każde kolejne przekształcenie jest stosowane do wyniku poprzedniego przekształcenia.
Dostępne transformacje to: Odbicie lustrzane,
Szyk liniowy,
Szyk kołowy i
. Skaluj. Pierwsze trzy są również dostępne jako osobne narzędzia.
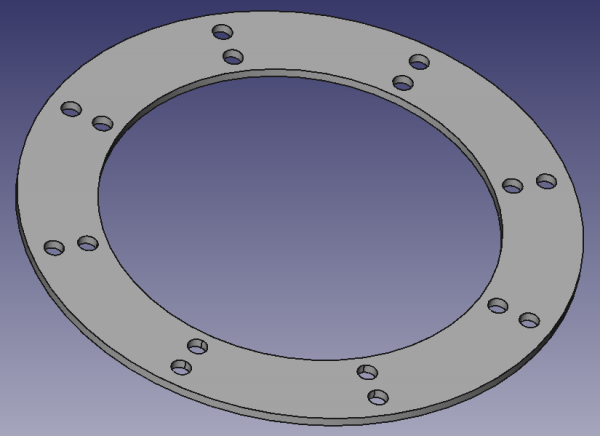
Wzór otworów utworzony z pojedynczej cechy Otwór poprzez zastosowanie Szyku liniowego z 2 wystąpieniami, a następnie Szyku kołowego z 8 wystąpieniami.
Użycie
Tworzenie
- Opcjonalnie aktywuj właściwą bryłę.
- Opcjonalnie wybierz jedną lub więcej cech w oknie widoku drzewa lub w oknie widoku 3D.
- Istnieje kilka sposobów wywołania narzędzia:
- Jeśli nie ma aktywnej Zawartości, a w dokumencie są dwie lub więcej Zawartości, otworzy się okno dialogowe Wymagana jest aktywna zawartość i poprosi o uaktywnienie jednej z nich. Jeśli istnieje jedna Zawartość, zostanie ona aktywowana automatycznie.
- Jeśli nie wybrano żadnych cech, zostanie wyświetlone okno dialogowe Wybierz cechę otworzy się panel zadań: wybierz jedną lub więcej (przytrzymaj klawisz Ctrl) z listy i naciśnij przycisk OK.
- Otworzy się panel zadań Parametry Transformacji wielokrotnej. Więcej informacji można znaleźć w sekcji Opcje.
- Naciśnij przycisk OK, aby zakończyć.
Edycja
- Wykonaj jedną z poniższych czynności:
- Kliknij dwukrotnie obiekt Transformacja wielokrotna w oknie Widok drzewa.
- Kliknij obiekt Transformacja wielokrotna prawym przyciskiem myszy w oknie Widok drzewa i wybierz Edycja funkcji transformacji wielokrotnej z menu podręcznego.
- Otworzy się panel Panel zadań Parametry odbicia lustrzanego. Więcej informacji można znaleźć w punkcie Opcje.
- Naciśnij przycisk OK, aby zakończyć.
Łączenie istniejących transformacji
Możliwe jest utworzenie obiektu Transformacji wielokrotnej z istniejących przekształceń Odbicia lustrzanego, Szyku linowego i Szyku kołowego.
- Sprawdź właściwość DANEOryginały istniejących przekształceń, aby upewnić się, że zostały one zastosowane do tych samych elementów.
- Wybierz te cechy w Widoku Drzewa.
- Istnieje kilka sposobów wywołania narzędzia:
- Naciśnij przycisk
Utwórz transformację wielokrotną.
- Wybierz z menu opcję Projekt Części → Zastosuj przekształcenie →
Utwórz transformację wielokrotną.
- Naciśnij przycisk
- Otworzy się panel zadań Parametry Transformacji wielokrotnej .
- Naciśnij przycisk OK u góry.
- Edytuj właściwość DANETransformacje utworzonego obiektu Transformacji wielokrotnej:
- Kliknij pole.
- Naciśnij przycisk …, który się pojawi.
- Otworzy się okno dialogowe Łącze.
- Przytrzymaj klawisz Ctrl i wybierz istniejące transformacje.
- Naciśnij przycisk OK.
- Opcjonalnie edytuj obiekt Transformacji wielokrotnej, patrz wyżej.
Opcje
- To add features:
- To remove features:
- If there are several features in the pattern, their order can be important. See PartDesign PolarPattern.
- To add transformations:
- If there are existing transformations: select the transformation after which the new transformation should be added.
- Right-click the Transformations list.
- Select one the following options from the context menu:
- Add mirrored transformation. See PartDesign Mirrored.
- Add linear pattern. See PartDesign LinearPattern.
- Add polar pattern See PartDesign PolarPattern.
- Add scaled transformation. See PartDesign Scaled.
- The selected transformation is added to the list and the settings for the transformation are displayed below the list.
- Adjust the settings to suit.
- Press the OK bar at the bottom.
- Repeat to add more transformations.
- To edit a transformation:
- Right-click the transformation in the Transformations list.
- Select Edit from the context menu.
- Adjust the settings to suit.
- Press the OK bar at the bottom.
- To change the order of the transformations:
- Right-click a transformation in the Transformations list.
- Select Move up or Move down from the context menu.
- If the Update view checkbox is checked the view will update in real time.
Limitations
Example
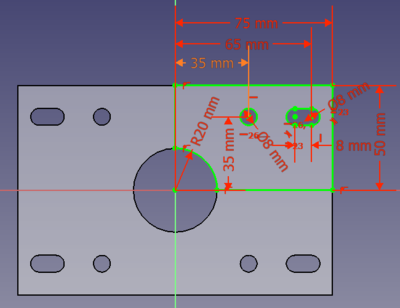
You can use this tool to create a fully parametric part that is symmetrical about two axes from a sketch.
This could be a 150x100x10mm large mounting plate for a motor with symmetric holes.
- Create a
Body and add a
sketch on one of its base planes.
- In the sketch create geometry for one quadrant of the part (i.e. the upper right quadrant).
- Note that the constraints must also only cover a quarter of the part, e.g. instead of the full dimension of
150mmenter150/2mmor75mm. - Make sure the sketch is closed by adding lines along the vertical and horizontal axes.
- Note that the constraints must also only cover a quarter of the part, e.g. instead of the full dimension of
- Extrude the part with
PartDesign Pad.
- Select
PartDesign MultiTransform.
- The task dialog opens.
- The last feature of the Body is already selected. Since we want to mirror that feature we can ignore the Add feature and Remove feature buttons.
- Right-click in the Transformations field and select Add mirrored transform from the context menu.
- For the Plane select Vertical sketch axis.
- If the Update view checkbox is checked, you should now see the part mirrored about one axis.
- Again select Add mirrored transform from the context menu of the Transformations field.
- Now for the Plane select Horizontal sketch axis.
- Press the OK button to finish.
- To remove the edges along the axes of symmetry in the final result, set the DANERefine property of the new feature to
truein the Property editor.
To verify that the part is fully parametric open the initial sketch with the quarter part and change one dimension, say a hole diameter. After closing the sketch the three other holes will have changed accordingly. This works with all other dimensions as well. A sketch modelling the full part with a single extrusion and no mirroring would be a lot more complex and all later changes would be more complicated.
- Narzędzia struktury: Część, Grupa
- Narzędzia wspomagające: Utwórz zawartość, Nowy szkic, Edycja szkicu, Mapuj szkic na ścianę
- Narzędzia do modelowania
- Narzędzia do ustalania położenia punktów odniesienia: Utwórz punkt odniesienia, Utwórz linię odniesienia, Utwórz płaszczyznę odniesienia, Układ współrzędnych, Łącznik kształtu, Łącznik kształtów podrzędnych, Utwórz klon
- Narzędzia addytywne: Wyciągnięcie, Wyciągnij przez obrót, Wyciągnięcie przez profile, Wyciągnięcie po ścieżce, Addytywna helisa, Addytywny sześcian, Addytywny walec,Addytywna sfera, Addytywny stożek, Addytywna elipsoida, Addytywny torus, Addytywny graniastosłup, Addytywny klin
- Narzędzia subtraktywne: Kieszeń, Otwór, Rowek, Subtraktywne wyciągnięcie przez profile, Subtraktywne wyciągnięcie po ścieżce, Subtraktywna helisa, Subtraktywny sześcian, Subtraktywny walec, Subtraktywna sfera, Subtraktywny stożek, Subtraktywna elipsoida, Subtraktywny torus,Subtraktywny graniastosłup, Subtraktywny klin
- Narzędzia do transformacji: Odbicie lustrzane, Szyk liniowy, Szyk kołowy, Transformacja wielokrotna, Skaluj
- Narzędzia ulepszające: Zaokrąglenie, Fazka, Pochylenie ścian, Grubość
- Funkcje logiczne Funkcje logiczne
- Dodatki: Przenieś, Koło łańcuchowe, Koło zębate ewolwentowe, Kreator projektowania wału
- Narzędzia menu kontekstowego: Ustaw czubek, Przenieś cechę, Przenieś cechę w drzewie, Wygląd zewnętrzny, Ustaw kolor
- Jak zacząć
- Instalacja: Pobieranie programu, Windows, Linux, Mac, Dodatkowych komponentów, Docker, AppImage, Ubuntu Snap
- Podstawy: Informacje na temat FreeCAD, Interfejs użytkownika, Profil nawigacji myszką, Metody wyboru, Nazwa obiektu, Edytor ustawień, Środowiska pracy, Struktura dokumentu, Właściwości, Pomóż w rozwoju FreeCAD, Dotacje
- Pomoc: Poradniki, Wideo poradniki
- Środowiska pracy: Strona Startowa, Architektura, Assembly, CAM, Rysunek Roboczy, MES, Inspekcja, Siatka, OpenSCAD, Część, Projekt Części, Punkty, Inżynieria Wsteczna, Robot, Szkicownik, Arkusz Kalkulacyjny, Powierzchnia 3D, Rysunek Techniczny, Test Framework

