PartDesign Draft/pl: Difference between revisions
(Created page with "===Użycie===") |
(Updating to match new version of source page) |
||
| Line 17: | Line 17: | ||
}} |
}} |
||
<div class="mw-translate-fuzzy"> |
|||
==Opis== |
==Opis== |
||
</div> |
|||
<div class="mw-translate-fuzzy"> |
|||
Narzędzie to tworzy pochylenie kątowe wybranych ścian obiektu. W drzewie projektu tworzony jest nowy osobny wpis Rysunek roboczy ''(po którym następuje kolejny numer, jeśli w dokumencie istnieją już Rysunki robocze)''. |
Narzędzie to tworzy pochylenie kątowe wybranych ścian obiektu. W drzewie projektu tworzony jest nowy osobny wpis Rysunek roboczy ''(po którym następuje kolejny numer, jeśli w dokumencie istnieją już Rysunki robocze)''. |
||
</div> |
|||
<div class="mw-translate-fuzzy"> |
|||
{| |
{| |
||
| |
| |
||
| Line 30: | Line 35: | ||
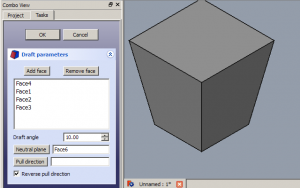
[[Image:PartDesign_Draft-06.png|thumb|left|Zaznaczenie pola wyboru Kierunek odwrotny spowodowało zastosowanie zanurzenia do wewnątrz zamiast na zewnątrz..]] |
[[Image:PartDesign_Draft-06.png|thumb|left|Zaznaczenie pola wyboru Kierunek odwrotny spowodowało zastosowanie zanurzenia do wewnątrz zamiast na zewnątrz..]] |
||
| |
| |
||
</div> |
|||
{{Clear}} |
|||
<div class="mw-translate-fuzzy"> |
|||
===Użycie=== |
===Użycie=== |
||
</div> |
|||
=== Add a draft === |
|||
<div class="mw-translate-fuzzy"> |
|||
* Zaznacz jedną lub więcej ścian na obiekcie, a następnie uruchom narzędzie klikając jego ikonę lub wchodząc do menu. |
* Zaznacz jedną lub więcej ścian na obiekcie, a następnie uruchom narzędzie klikając jego ikonę lub wchodząc do menu. |
||
* W zakładce Parametry szkicu w [[Task_panel/pl|Panelu zadań]] ustaw wymagane parametry i/lub opcje, jak opisano poniżej. |
* W zakładce Parametry szkicu w [[Task_panel/pl|Panelu zadań]] ustaw wymagane parametry i/lub opcje, jak opisano poniżej. |
||
* Kliknij przycisk {{Button|OK}}, aby zatwierdzić. |
* Kliknij przycisk {{Button|OK}}, aby zatwierdzić. |
||
* Aby edytować projekt po zatwierdzeniu funkcji, kliknij dwukrotnie etykietę Pochylenie ścian w [[Tree_view/pl|widoku drzewa]] lub kliknij prawym przyciskiem myszy i wybierz '''Edytuj pochylenie ścian'''. |
* Aby edytować projekt po zatwierdzeniu funkcji, kliknij dwukrotnie etykietę Pochylenie ścian w [[Tree_view/pl|widoku drzewa]] lub kliknij prawym przyciskiem myszy i wybierz '''Edytuj pochylenie ścian'''. |
||
</div> |
|||
:''Remember'': |
|||
:* Since there must be at least one face for the feature, the last remaining face in the list cannot be removed. |
|||
=== Edit a draft === |
|||
# Do one of the following: |
|||
#* Double-click the Draft item in the [[Tree_view|Tree view]]. |
|||
#* Right-click the Draft item in the [[Tree_view|Tree view]] and select {{MenuCommand|Edit Draft}} from the context menu. |
|||
# The {{MenuCommand|Draft parameters}} [[Task_panel|task panel]] opens. See [[#Options|Options]] for more information. |
|||
# Press the {{Button|OK}} button to finish. |
|||
<div class="mw-translate-fuzzy"> |
|||
===Opcje i parametry=== |
===Opcje i parametry=== |
||
</div> |
|||
* {{MenuCommand|Draft angle}}: Set the Draft angle either by entering a value or by clicking the up/down arrows. |
|||
====Dodaj ścianę / Usuń ścianę==== |
|||
* {{MenuCommand|Add}}: Add faces to the selection by pressing the {{Button|Add}} button and selecting more faces. |
|||
* {{MenuCommand|Remove}}: Choose a way to remove faces from the selection: |
|||
** Select one or more faces in the list and press the {{KEY|Del}} key or right-click the list and select {{MenuCommand|Remove}} from the context menu. |
|||
** Press the {{Button|Remove}} button. All previously selected faces are highlighted in purple. Select each face to be removed. |
|||
* {{MenuCommand|Neutral plane}}: Set the the neutral plane by pressing the {{Button|Neutral plane}} button and selecting the plane that must not change dimensionally. |
|||
* {{MenuCommand|Pull direction}}: Set the the pull direction by pressing the {{Button|Pull direction}} button, then select an edge. Pull Direction is only effective if the Neutral Plane has been set. Results can be unpredictable. |
|||
* {{MenuCommand|Reverse pull direction}}: Invert the pull direction by checking the {{MenuCommand|Reverse pull direction}} checkbox. This will toggle the draft between positive and negative angles. |
|||
== Notes == |
|||
Kliknij przycisk Dodaj ścianę lub Usuń ścianę, a następnie wybierz jedną ścianę, aby zaktualizować listę aktywnych ścian. Powtórz czynności w razie potrzeby. |
|||
<div class="mw-translate-fuzzy"> |
|||
==== Draft Angle ==== |
|||
| ⚫ | Narzędzie Pochylenie ścian działa tylko na powierzchniach, które są normalne względem siebie. Jeśli do powierzchni, do której ma zostać zastosowane narzędzie, są dołączone powierzchnie styczne, operacja nie powiedzie się. Częstą przyczyną niepowodzenia jest próba zastosowania funkcji na powierzchni, na której zastosowano już zaokrąglenie lub fazkę. W takim przypadku należy usunąć powierzchnię styczną, zastosować ścięcie, a następnie ponownie zastosować zaokrąglenie lub fazkę. |
||
| ⚫ | |||
</div> |
|||
==Properties== |
|||
Ustaw kąt pochylenia wpisując wartość lub klikając na strzałki góra/dół. Zastosowany kąt pochylenia jest wyświetlany w czasie rzeczywistym. |
|||
See also: [[Property_editor|Property editor]]. |
|||
====Płaszczyzna neutralna==== |
|||
A PartDesign Draft object is derived from a [[Part_Feature|Part Feature]] object and inherits all its properties. It also has the following additional properties: |
|||
Kliknij w opcję Płaszczyzna neutralna, a następnie wybierz płaszczyznę, której wymiary nie mogą ulec zmianie. Zmiana jest dokonywana w czasie rzeczywistym. |
|||
=== |
===Data=== |
||
{{Properties_Title|Base}} |
|||
Kliknij przycisk Kierunek ścinania, a następnie wybierz krawędź. Funkcja Kierunek ścinania działa tylko wtedy, gdy ustawiona jest płaszczyzna neutralna. Wyniki mogą być nieprzewidywalne. |
|||
* {{PropertyData|Angle|Angle}}: Cannot be negative. Default: {{value|1.5 °}}. |
|||
====Odwróć kierunek ścinania==== |
|||
* {{PropertyData|Reversed|Bool}}: Default: {{FALSE}}. |
|||
* {{PropertyData|Base|LinkSub}}: Sub-link to the parent feature's list of selected edges and faces. |
|||
* {{PropertyData|Support Transform|Bool}}: "Include the base additive/subtractive shape when used in pattern features. If disabled, only the dressed part of the shape is used for patterning". Default: {{FALSE}}. |
|||
* {{PropertyData|Add Sub Shape|PartShape|hidden}} |
|||
* {{PropertyData|Base Feature|Link|hidden}}: Link to the parent feature. |
|||
* {{PropertyData|_ Body|LinkHidden|hidden}}: Link to the parent body. |
|||
{{Properties_Title|Draft}} |
|||
Zaznaczenie opcji Odwróć kierunek ścinania spowoduje przełączenie ścinania pomiędzy dodatnimi i ujemnymi kątami. |
|||
* {{PropertyData|Neutral Plane|LinkSub}}: Sub-link to the parent feature's list containing the neutral plane. |
|||
===Przypadki specjalne=== |
|||
* {{PropertyData|Pull Direction|LinkSub}} |
|||
{{Properties_Title|Part Design}} |
|||
| ⚫ | Narzędzie Pochylenie ścian działa tylko na powierzchniach, które są normalne względem siebie. Jeśli do powierzchni, do której ma zostać zastosowane narzędzie, są dołączone powierzchnie styczne, operacja nie powiedzie się. Częstą przyczyną niepowodzenia jest próba zastosowania funkcji na powierzchni, na której zastosowano już zaokrąglenie lub fazkę. W takim przypadku należy usunąć powierzchnię styczną, zastosować ścięcie, a następnie ponownie zastosować zaokrąglenie lub fazkę. |
||
| ⚫ | |||
* {{PropertyData|Refine|Bool}}: "Refine shape (clean up redundant edges) after adding/subtracting". The default value is determined by the {{MenuCommand|Automatically refine model after sketch-based operation}} preference. See [[PartDesign_Preferences#General|PartDesign Preferences]]. |
|||
Revision as of 10:18, 4 June 2022
|
|
| Lokalizacja w menu |
|---|
| Projekt Części → Zastosuj funkcje ulepszenia → Pochylenie ścian |
| Środowisko pracy |
| Projekt Części |
| Domyślny skrót |
| brak |
| Wprowadzono w wersji |
| - |
| Zobacz także |
| brak |
Opis
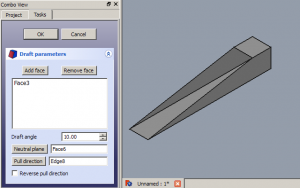
Narzędzie to tworzy pochylenie kątowe wybranych ścian obiektu. W drzewie projektu tworzony jest nowy osobny wpis Rysunek roboczy (po którym następuje kolejny numer, jeśli w dokumencie istnieją już Rysunki robocze).
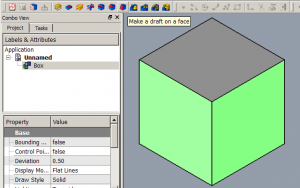 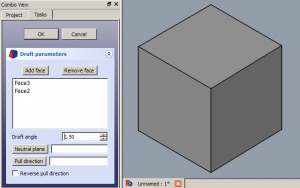 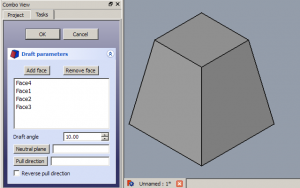 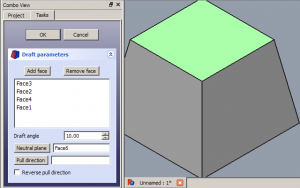   |
UżycieAdd a draft
Edit a draft
Opcje i parametry
NotesNarzędzie Pochylenie ścian działa tylko na powierzchniach, które są normalne względem siebie. Jeśli do powierzchni, do której ma zostać zastosowane narzędzie, są dołączone powierzchnie styczne, operacja nie powiedzie się. Częstą przyczyną niepowodzenia jest próba zastosowania funkcji na powierzchni, na której zastosowano już zaokrąglenie lub fazkę. W takim przypadku należy usunąć powierzchnię styczną, zastosować ścięcie, a następnie ponownie zastosować zaokrąglenie lub fazkę. |
Properties
See also: Property editor.
A PartDesign Draft object is derived from a Part Feature object and inherits all its properties. It also has the following additional properties:
Data
Base
- DANEAngle (
Angle): Cannot be negative. Default:1.5 °. - DANEReversed (
Bool): Default:false. - DANEBase (
LinkSub): Sub-link to the parent feature's list of selected edges and faces. - DANESupport Transform (
Bool): "Include the base additive/subtractive shape when used in pattern features. If disabled, only the dressed part of the shape is used for patterning". Default:false. - DANE (hidden)Add Sub Shape (
PartShape) - DANE (hidden)Base Feature (
Link): Link to the parent feature. - DANE (hidden)_ Body (
LinkHidden): Link to the parent body.
Draft
- DANENeutral Plane (
LinkSub): Sub-link to the parent feature's list containing the neutral plane. - DANEPull Direction (
LinkSub)
Part Design
- DANERefine (
Bool): "Refine shape (clean up redundant edges) after adding/subtracting". The default value is determined by the Automatically refine model after sketch-based operation preference. See PartDesign Preferences.
- Narzędzia struktury: Część, Grupa
- Narzędzia wspomagające: Utwórz zawartość, Nowy szkic, Edycja szkicu, Mapuj szkic na ścianę
- Narzędzia do modelowania
- Narzędzia do ustalania położenia punktów odniesienia: Utwórz punkt odniesienia, Utwórz linię odniesienia, Utwórz płaszczyznę odniesienia, Układ współrzędnych, Łącznik kształtu, Łącznik kształtów podrzędnych, Utwórz klon
- Narzędzia addytywne: Wyciągnięcie, Wyciągnij przez obrót, Wyciągnięcie przez profile, Wyciągnięcie po ścieżce, Addytywna helisa, Addytywny sześcian, Addytywny walec,Addytywna sfera, Addytywny stożek, Addytywna elipsoida, Addytywny torus, Addytywny graniastosłup, Addytywny klin
- Narzędzia subtraktywne: Kieszeń, Otwór, Rowek, Subtraktywne wyciągnięcie przez profile, Subtraktywne wyciągnięcie po ścieżce, Subtraktywna helisa, Subtraktywny sześcian, Subtraktywny walec, Subtraktywna sfera, Subtraktywny stożek, Subtraktywna elipsoida, Subtraktywny torus,Subtraktywny graniastosłup, Subtraktywny klin
- Narzędzia do transformacji: Odbicie lustrzane, Szyk liniowy, Szyk kołowy, Transformacja wielokrotna, Skaluj
- Narzędzia ulepszające: Zaokrąglenie, Fazka, Pochylenie ścian, Grubość
- Funkcje logiczne Funkcje logiczne
- Dodatki: Przenieś, Koło łańcuchowe, Koło zębate ewolwentowe, Kreator projektowania wału
- Narzędzia menu kontekstowego: Ustaw czubek, Przenieś cechę, Przenieś cechę w drzewie, Wygląd zewnętrzny, Ustaw kolor
- Jak zacząć
- Instalacja: Pobieranie programu, Windows, Linux, Mac, Dodatkowych komponentów, Docker, AppImage, Ubuntu Snap
- Podstawy: Informacje na temat FreeCAD, Interfejs użytkownika, Profil nawigacji myszką, Metody wyboru, Nazwa obiektu, Edytor ustawień, Środowiska pracy, Struktura dokumentu, Właściwości, Pomóż w rozwoju FreeCAD, Dotacje
- Pomoc: Poradniki, Wideo poradniki
- Środowiska pracy: Strona Startowa, Architektura, Assembly, CAM, Rysunek Roboczy, MES, Inspekcja, Siatka, OpenSCAD, Część, Projekt Części, Punkty, Inżynieria Wsteczna, Robot, Szkicownik, Arkusz Kalkulacyjny, Powierzchnia 3D, Rysunek Techniczny, Test Framework