Mesh Evaluation/pl: Difference between revisions
(Created page with "==Uwagi==") |
(Created page with "* Naprawa siatki może oznaczać, że problematyczne elementy zostaną usunięte z siatki, co spowoduje powstanie dziur. Dziury można zamknąć za pomocą poleceń Mesh_Fil...") |
||
| Line 49: | Line 49: | ||
==Uwagi== |
==Uwagi== |
||
* |
* Naprawa siatki może oznaczać, że problematyczne elementy zostaną usunięte z siatki, co spowoduje powstanie dziur. Dziury można zamknąć za pomocą poleceń [[Mesh_FillupHoles/pl|Wypełnienie otworów]], [[Mesh_FillInteractiveHole/pl|Interaktywne wypełnienie otworów]] i [[Mesh_AddFacet/pl|Dodaj element]]. |
||
* |
* Zobacz [https://forum.freecadweb.org/viewtopic.php?f=3&p=533252#p533252 ten post na forum], aby uzyskać wyjaśnienie struktury danych siatki. Ta informacja może pomóc zrozumieć, dlaczego w danej siatce występują problemy. |
||
==Preferences== |
==Preferences== |
||
Revision as of 17:44, 27 September 2022
|
|
| Lokalizacja w menu |
|---|
| Siatki → Analizuj → Oceń i napraw siatkę ... |
| Środowisko pracy |
| Siatka |
| Domyślny skrót |
| brak |
| Wprowadzono w wersji |
| - |
| Zobacz także |
| brak |
Opis
Polecenie Analizuj ocenia i naprawia obiekt siatkowy.
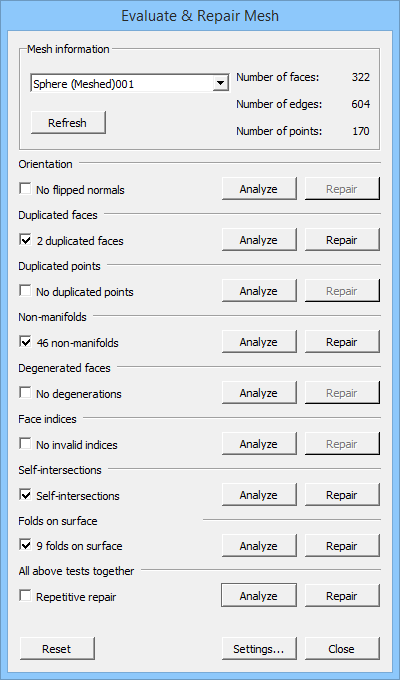
Okno dialogowe Oceń i napraw siatkę z włączoną opcją Fałdy na powierzchni
Użycie
- Optionally select a single mesh object.
- There are several ways to invoke the command:
- Press the
Mesh Evaluation button.
- Select the Meshes → Analyze →
Evaluate and repair mesh... option from the menu.
- Press the
- The Evaluate & Repair Mesh dialog box opens.
- Optionally press the Settings... button to change the following settings:
- Check for non-manifold points
- Enable check for folds on surface
- Only consider zero area faces as degenerated
- If you have not yet selected a mesh object: select one from the dropdown list at the top of the dialog box.
- The dialog contains 7 or 8 (if the Folds on surface option is enabled) test options.
- Do not use the checkboxes, they will be checked automatically if errors are found.
- Press any of the Analyze buttons to start a test.
- Or use the Analyze button from the All above tests together option to run all 7 or 8 tests together.
- Errors will be indicated in the dialog box, and also, with yellow and red markers, in the 3D view.
- Optionally press one or more Repair buttons to repair the errors that were found.
- Optionally press the Reset button to reset all test results. This will reset the dialog and remove the colored markers from the 3D view. If you want to repeat the same test or run all tests together there is no need to do this.
- Optionally select a different mesh object from the dropdown list to continue testing and repairing.
- Press the Close button to close the dialog box and finish the command.
- The Refresh button does not work properly at this time.
Uwagi
- Naprawa siatki może oznaczać, że problematyczne elementy zostaną usunięte z siatki, co spowoduje powstanie dziur. Dziury można zamknąć za pomocą poleceń Wypełnienie otworów, Interaktywne wypełnienie otworów i Dodaj element.
- Zobacz ten post na forum, aby uzyskać wyjaśnienie struktury danych siatki. Ta informacja może pomóc zrozumieć, dlaczego w danej siatce występują problemy.
Preferences
- The Check for non-manifold points setting is stored: Tools → Edit parameters... → BaseApp → Preferences → Mod → Mesh → Evaluation → CheckNonManifoldPoints.
- The Enable check for folds on surface setting is stored: Tools → Edit parameters... → BaseApp → Preferences → Mod → Mesh → Evaluation → EnableFoldsCheck.
- The Only consider zero area faces as degenerated setting is stored: Tools → Edit parameters... → BaseApp → Preferences → Mod → Mesh → Evaluation → StrictlyDegenerated.
Środowisko pracy Siatka 
- Różności: Import siatki, Eksport siatki, Siatka z kształtu, Utwórz bryłę regularną, Rozwiń siatkę, Rozwiń powierzchnię
- Modyfikacja: Ujednolicenie wektorów normalnych, Odwróć wektory normalne, Wypełnij otworów, Wypełnij interaktywnie otwory, Dodaj element, Usuń elementy, Usuń interaktywnie elementy, Wygładzanie, Uprość przez Gmsh, Uprość, Skala
- Logiczne: Połączenie, Przecięcie, Różnica
- Krojenie: Przetnij, Przytnij, Przytnij siatkę płaszczyzną, Przekrój płaszczyzną, Wiele przekrojów
- Części składowe i segmenty: Scal, Rozbij na komponenty, Utwórz segment siatki, Tworzenie segmentów siatki z najlepiej dopasowanych powierzchni
- Jak zacząć
- Instalacja: Pobieranie programu, Windows, Linux, Mac, Dodatkowych komponentów, Docker, AppImage, Ubuntu Snap
- Podstawy: Informacje na temat FreeCAD, Interfejs użytkownika, Profil nawigacji myszką, Metody wyboru, Nazwa obiektu, Edytor ustawień, Środowiska pracy, Struktura dokumentu, Właściwości, Pomóż w rozwoju FreeCAD, Dotacje
- Pomoc: Poradniki, Wideo poradniki
- Środowiska pracy: Strona Startowa, Architektura, Assembly, CAM, Rysunek Roboczy, MES, Inspekcja, Siatka, OpenSCAD, Część, Projekt Części, Punkty, Inżynieria Wsteczna, Robot, Szkicownik, Arkusz Kalkulacyjny, Powierzchnia 3D, Rysunek Techniczny, Test Framework
