Draft Arc 3Points/de: Difference between revisions
(Created page with "{{Caption|Bogen definiert durch drei Punkte, die auf einem Umfang liegen}}") |
(Created page with "==Anwendung==") |
||
| Line 22: | Line 22: | ||
{{Caption|Bogen definiert durch drei Punkte, die auf einem Umfang liegen}} |
{{Caption|Bogen definiert durch drei Punkte, die auf einem Umfang liegen}} |
||
== |
==Anwendung== |
||
# Press the {{Button|[[Image:Draft Arc 3Points.svg|16px]] [[Draft Arc 3Points|Draft Arc 3Points]]}} button, or press {{KEY|A}} then {{KEY|T}} keys. |
# Press the {{Button|[[Image:Draft Arc 3Points.svg|16px]] [[Draft Arc 3Points|Draft Arc 3Points]]}} button, or press {{KEY|A}} then {{KEY|T}} keys. |
||
Revision as of 21:59, 24 November 2019
|
|
| Menüeintrag |
|---|
| Draft → Arc 3 points |
| Arbeitsbereich |
| Draft, Arch |
| Standardtastenkürzel |
| A T |
| Eingeführt in Version |
| 0.19 |
| Siehe auch |
| Draft Circle, Draft Ellipse |
Beschreibung
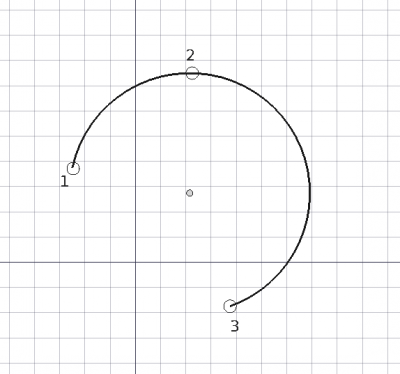
Das Werkzeug Arc 3Points erzeugt einen Kreisbogen in der aktuellen Arbeitsebene, durch Eingabe von drei Punkten, die auf dem Umfang liegen; aus diesen drei Punkten werden Mittelpunkt und Radius bestimmt. Es verwendet das Entwurf Linienstil , das auf dem Draft Tray gesetzt ist.
Verwende das Werkzeug Entwurf Bogen, um einen Kreisbogen zu erstellen, inde Du den Mittelpunkt, den Radius sowie den Start- und Endwinkel angibst. Um einen elliptischen Bogen zu zeichnen, verwende Entwurf Ellipse. Du kannst einen Kreisbogen auch mit den Werkzeugen Draft BSpline, Draft BezCurve, und Draft CubicBezCurve approximieren.
Bogen definiert durch drei Punkte, die auf einem Umfang liegen
Anwendung
- Press the
Draft Arc 3Points button, or press A then T keys.
- Click a first point on the 3D view, or type a coordinate and press the
add point button.
- Click a second point on the 3D view, or type a coordinate and press the
add point button.
- Click a third point in the 3D view, or type a coordinate and press the
add point button.
- The arc will be created after the third point is given.
Options
- Press X, Y or Z after one point to constrain the following point on the given axis.
- To enter coordinates manually, simply enter the numbers, then press Enter between each X, Y and Z component.
- You can press the
add point button when you have entered the desired values to insert the point.
- You can press the
- Press R or click the checkbox to toggle relative mode. If relative mode is on, the coordinates of the following point are relative to the previous one; if not, they are absolute, taken from the origin
(0, 0, 0). - Hold Shift while drawing to constrain your next point horizontally or vertically in relation to the previous one.
- Press Esc or the Close button to abort the current command.
Properties
An Arc object shares all properties from a Draft Circle, but some properties only make sense for the circle. See Draft Arc for more information.
Scripting
See also: Draft API and FreeCAD Scripting Basics.
There is no specific function to create an arc by three points.
To create an arc use the same function to create circles, with additional arguments. See the information in Draft Arc and Draft Circle.
- Drafting: Line, Polyline, Fillet, Arc, Arc by 3 points, Circle, Ellipse, Rectangle, Polygon, B-spline, Cubic Bézier curve, Bézier curve, Point, Facebinder, ShapeString, Hatch
- Annotation: Text, Dimension, Label, Annotation styles, Annotation scale
- Modification: Move, Rotate, Scale, Mirror, Offset, Trimex, Stretch, Clone, Array, Polar array, Circular array, Path array, Path link array, Point array, Point link array, Edit, Subelement highlight, Join, Split, Upgrade, Downgrade, Wire to B-spline, Draft to sketch, Set slope, Flip dimension, Shape 2D view
- Draft Tray: Select plane, Set style, Toggle construction mode, AutoGroup
- Snapping: Snap lock, Snap endpoint, Snap midpoint, Snap center, Snap angle, Snap intersection, Snap perpendicular, Snap extension, Snap parallel, Snap special, Snap near, Snap ortho, Snap grid, Snap working plane, Snap dimensions, Toggle grid
- Miscellaneous: Apply current style, Layer, Manage layers, Add a new named group, Move to group, Select group, Add to construction group, Toggle normal/wireframe display, Create working plane proxy, Heal, Show snap toolbar
- Additional: Constraining, Pattern, Preferences, Import Export Preferences, DXF/DWG, SVG, OCA, DAT
- Context menu:
- Layer container: Merge layer duplicates, Add new layer
- Layer: Activate this layer, Select layer contents
- Text: Open hyperlinks
- Wire: Flatten
- Working plane proxy: Write camera position, Write objects state
- Getting started
- Installation: Download, Windows, Linux, Mac, Additional components, Docker, AppImage, Ubuntu Snap
- Basics: About FreeCAD, Interface, Mouse navigation, Selection methods, Object name, Preferences, Workbenches, Document structure, Properties, Help FreeCAD, Donate
- Help: Tutorials, Video tutorials
- Workbenches: Std Base, Arch, Assembly, CAM, Draft, FEM, Inspection, Mesh, OpenSCAD, Part, PartDesign, Points, Reverse Engineering, Robot, Sketcher, Spreadsheet, Surface, TechDraw, Test Framework
- Hubs: User hub, Power users hub, Developer hub
