Getting started/pl: Difference between revisions
(Created page with "Podwójne kliknięcie środkowym przyciskiem myszy ustawia nowy punkt obrotu. |Rotate_view_mode_text=Tryb obracania: Przytrzymaj klawisz {{KEY|Shift}}, naciśnij raz prawy prz...") |
(Created page with "W tej metodzie środkowy przycisk myszy może zostać puszczony po naciśnięciu prawego przycisku myszy.") |
||
| Line 72: | Line 72: | ||
|Rotate_view_alt_text=Przytrzymaj środkowy przycisk myszy, a następnie naciśnij i przytrzymaj prawy przycisk myszy, po czym przesuń kursor. |
|Rotate_view_alt_text=Przytrzymaj środkowy przycisk myszy, a następnie naciśnij i przytrzymaj prawy przycisk myszy, po czym przesuń kursor. |
||
W tej metodzie środkowy przycisk myszy może zostać puszczony po naciśnięciu prawego przycisku myszy. |
|||
With this method the middle mouse button may be released after the right mouse button is held pressed. |
|||
Users who use the mouse with their right hand may find this method easier than the first method. |
Users who use the mouse with their right hand may find this method easier than the first method. |
||
Revision as of 16:59, 8 November 2019
Przedmowa
FreeCAD jest aplikacją typu 3D CAD/CAE parametric modeling application. Został stworzony przede wszystkim do projektowania mechanicznego. Może służyć również do wszystkich pokrewnych zastosowań, w których trzeba precyzyjnie modelować obiekty przestrzenne. Dodatkowo zapewnia kontrolę nad historią modelowania.
Freecad jest już rozwijany od jakiegoś czasu i oferuje sporą listę funkcjonalności. Niektórych z nich wciąż brakuje, w porównaniu z komercyjnymi rozwiązaniami, i może nie być wystarczający do profesjonalnej pracy. Jednak w zupełności spełnić wymagania hobbystów i osób pracujących z mniejszymi projektami. Na forum możesz znaleźć naszą szybko rozwijającą się społeczność zaangażowaną w rozwój programu FreeCAD. Tutaj możesz znaleźć wiele wartościowych przykładowych projektów dla FreeCAD.
Jak wszystkie projekty open-source, projekt FreeCAD nie jest projektem realizowanym jednorazowo przez jego twórców. To społeczność tworzy nowe funkcje i naprawia błędy. Nie zapominaj o tym używając programu FreeCAD. Jeśli chcesz możesz nam pomóc rozwijać projekt.
Instalacja
Przede wszystkim (jeśli tego jeszcze nie zrobiłeś) pobierz i zainstaluj program FreeCAD. Zajrzyj na stronę Download po informacje o aktualnych wydaniach i uaktualnieniach. Znajdują tam się pakiety instalacyjne Ubuntu i Debiana (.deb) openSUSE (.rpm) oraz Mac OS X, i dla Windows (.msi).
Poznaj program FreeCAD od środka

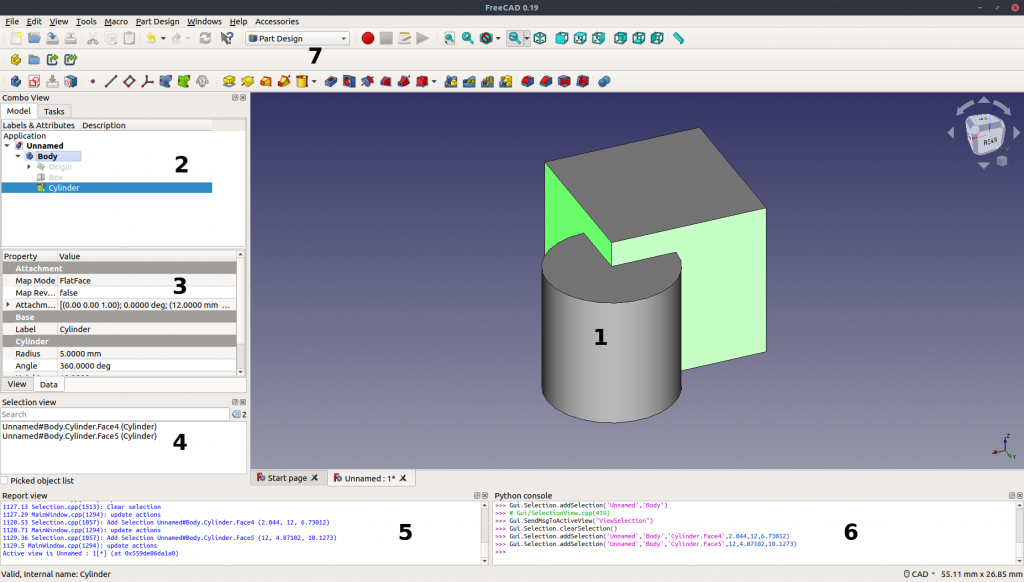
Standardowy interfejs FreeCAD w wersji 0.19.
zobacz szczególowa prezentację Interface.
- 1. Widok 3D, pokazujący obiekty geometryczne w dokumencie.
- 2. Widok drzewa. (część widoku zestawu), pokazujący hierarchię i historię konstrukcji obiektów w dokumencie; może również wyświetlać panel zadań dla aktywnych poleceń.
- 3. Edytor właściwości. (część widoku zestawu), która umożliwia przeglądanie i modyfikację właściwości wybranych obiektów.
- 4. Widok wybranego elementu, który wskazuje obiekty lub podelementy obiektów (wierzchołki, krawędzie, ściany), które są aktualnie zaznaczone.
- 5. Widok raportu. (lub okno wyjściowe), gdzie FreeCAD wyświetla komunikaty, ostrzeżenia i błędy.
- 6. Konsola Pythona, w której wypisywane są wszystkie polecenia wykonywane przez FreeCAD i gdzie można wpisać kod Python.
- 7. Pasek stanu, to szczególne miejsce gdzie pojawiają się niektóre komunikaty i podpowiedzi.
- 8. Obszar paska narzędzi, gdzie dokowane są paski narzędzi.
- 9. Okienko umożliwiające wybór Środowisk pracy, dla wykonania zamierzonych prac.
- 10. Standardowe menu, które zawiera zbiór podstawowych funkcji programu.
Główna koncepcja interfejsu FreeCAD opiera się na tym, że jest on podzielony na Środowiska pracy. Każde z nich jest zbiorem narzędzi dostosowanych do realizacji konkretnych zadań, takich jak praca z siatkami, lub rysowanie obiektów 2D, lub ograniczone szkice. Możesz przełączyć bieżące Środowisko pracy za pomocą okna wyboru. Możesz dostosowywać ustawienia narzędzi zawartych w każdym stole warsztatowym, dodawać narzędzia z innych stołów warsztatowych. Możliwe jest również dodanie narzędzi utworzonych samodzielnie, które nazywamy makrodefinicjami (w skrócie makro). Najczęściej stosowanymi narzędziami bazowymi są PartDesign i Part.
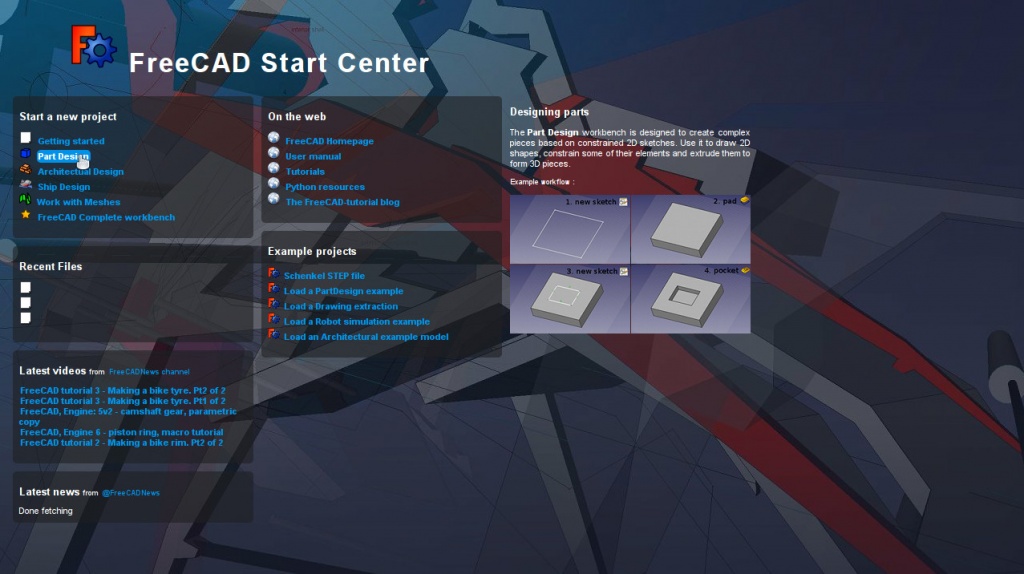
Kiedy uruchamiasz FreeCAD po raz pierwszy, otrzymujesz centrum startowe. Oto jak to wygląda dla wersji 0.16:

Prezentacja interfejsu dla FreeCAD 0.17. start center screenshot.
Centrum startowe pozwala na szybkie przejście do jednego z najchętniej używanych Środowisk pracy, otwarcie jednego z ostatnich plików lub zobaczenie najnowszych wiadomości ze świata FreeCAD. Możesz zmienić domyślne środowisko pracy w Edytorze preferencji.
Nawigacja w przestrzeni 3D
FreeCAD udostępnia kilka różnych trybów nawigacji, które zmieniają sposób używania myszy do interakcji z obiektami w widoku 3D i samego widoku. Jedna z nich została stworzona specjalnie dla touchpad, gdzie środkowy przycisk myszy nie jest używany. Poniższa tabela opisuje domyślny tryb zwany "Nawigacją CAD" (możesz szybko zmienić bieżący tryb nawigacji, klikając prawym przyciskiem myszy pusty obszar widoku 3D):
| Wybór | Przesuń | Przybliż - Oddal | Obróć widok Metoda pierwsza |
Obróć widok Metoda druga |
|---|---|---|---|---|

|

|

|

|

|
| W tym celu należy nacisnąć lewy przycisk myszki nad obiektem, który ma zostać wybrany.
Przytrzymanie przycisku Ctrl umożliwia wybór wielu obiektów. |
Trzymaj środkowy przycisk myszy, a następnie przesuń kursor. | Użyj pokrętła myszy, aby przybliżyć lub oddalić widok.
Kliknięcie środkowego przycisku myszy ponownie wyśrodkuje widok w pozycji kursora. |
Przytrzymaj środkowy przycisk myszy, następnie naciśnij i przytrzymaj lewy przycisk myszy, kolejnie przesuń wskaźnik.
Położenie kursora po naciśnięciu środkowego przycisku myszy określa środek obrotu. Obrót działa jak obracanie piłki, która obraca się wokół jej punktu środka. Jeśli przyciski zostaną zwolnione przed zatrzymaniem ruchu myszy, widok jest kontynuowany jeśli opcja obracania jest włączona. Podwójne kliknięcie środkowym przyciskiem myszy ustawia nowy punkt obrotu. |
Przytrzymaj środkowy przycisk myszy, a następnie naciśnij i przytrzymaj prawy przycisk myszy, po czym przesuń kursor.
W tej metodzie środkowy przycisk myszy może zostać puszczony po naciśnięciu prawego przycisku myszy. Users who use the mouse with their right hand may find this method easier than the first method. |
Ctrl+
|
Ctrl+Shift+
|
Shift+
|
||
| Pan mode: przytrzymaj klawisz Ctrl, naciśnij raz prawy przycisk myszy, kolejnie przesuń wskaźnik. Template:Wersja | Zoom mode: Przytrzymaj klawisze Ctrl i {Shift, naciśnij raz prawy przycisk myszy, a następnie przesuń kursor. Template:Wersja} | Tryb obracania: Przytrzymaj klawisz Shift, naciśnij raz prawy przycisk myszy, a następnie przesuń kursor. introduced in version 0.17 |
You also have several view presets (top view, front view, etc) available in the View menu, on the View toolbar, and by numeric shortcuts (1, 2, etc...). By right-clicking on an object or on an empty area of the 3D view, you have quick access to some common operations, such as setting a particular view, or locating an object in the Tree view.
First steps with FreeCAD
FreeCAD's focus is to allow you to make high-precision 3D models, to keep tight control over those models (being able to go back into modelling history and change parameters), and eventually to build those models (via 3D printing, CNC machining or even construction worksite). It is therefore very different from some other 3D applications made for other purposes, such as animation film or gaming. Its learning curve can be steep, especially if this is your first contact with 3D modeling. If you are struck at some point, don't forget that the friendly community of users on the FreeCAD forum might be able to get you out in no time.
The workbench you will start using in FreeCAD depends on the type of job you need to do: If you are going to work on mechanical models, or more generally any small-scale objects, you'll probably want to try the PartDesign Workbench. If you will work in 2D, then switch to the Draft Workbench, or the Sketcher Workbench if you need constraints. If you want to do BIM, launch the Arch Workbench. If you are working with ship design, there is a special Ship Workbench for you. And if you come from the OpenSCAD world, try the OpenSCAD Workbench.
You can switch workbenches at any time, and also customize your favorite workbench to add tools from other workbenches.
Warsztaty PartDesign i Sketcher
warsztat PartDesign jest używany głównie do tworzenia złożonych obiektów, zaczynając od prostych kształtów, a następnie dodając lub usuwając inne kawałki/kształty do/od niego(będziemy to nazywać "funkcją??"), aż stworzymy końcowy obiekt. Wszystkie funkcje jakie zastosowałeś podczas modelowania są przechowywane w oddzielnym widoku zwanym widok drzewa, który zawiera też inne obiekty w twoim dokumencie. Możesz myśleć o obiekcie PartDesign jako o serii operacji, z których każda jest stosowana do wyniku poprzedniego, tworząc jeden duży łańcuch. W widoku drzewa widzisz swój końcowy obiekt, ale możesz go rozwinąć (klikając na plus w drzewie) i zobaczyć wszystkie jego poprzednie wersje, razem z operacjami jakie zostały na nim wykonane. Zmieniając jeden z parametrów takich operacji automatycznie aktualizujesz swój końcowy obiekt.
The PartDesign workbench makes heavy use of another workbench, the Sketcher Workbench. The sketcher allows you to draw 2D shapes, which are defined by applying Constraints to the 2D shape. For example, you might draw a rectangle and set the size of a side by applying a length constraint to one of the sides. That side then cannot be resized anymore (unless the constraint is changed).
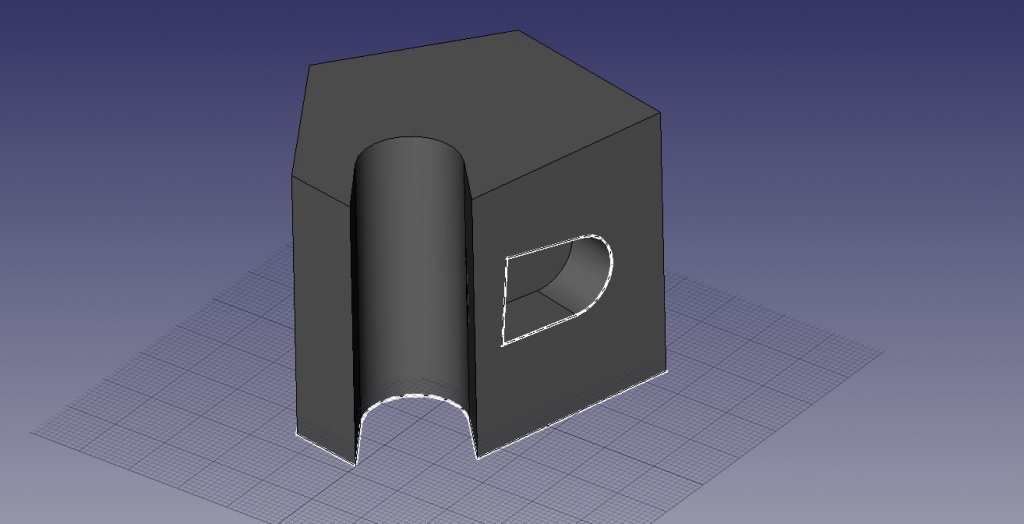
Those 2D shapes made with the sketcher are used a lot in the PartDesign workbench, for example to create 3D volumes, or to draw areas on the faces of your object that will then be hollowed from its main volume. This is a typical PartDesign workflow:
- Create a new sketch
- Draw a closed shape (make sure all points are joined)
- Close the sketch
- Expand the sketch into a 3D solid by using the pad tool
- Select one face of the solid
- Create a second sketch (this time it will be drawn on the selected face)
- Draw a closed shape
- Close the sketch
- Create a pocket from the second sketch, on the first object
Which gives you an object like this:

At any moment, you can select the original sketches and modify them, or change the extrusion parameters of the pad or pocket operations, which will update the final object.
Working with the Draft and Arch workbenches
The Draft Workbench and Arch Workbench behave a bit differently than the other workbenches above, although they follow the same rules, which are common to all of FreeCAD. In short, while the Sketcher and PartDesign are made primarily to design single pieces, Draft and Arch are made to ease your work when working with several, simpler objects.
The Draft Workbench offers you 2D tools somewhat similar to what you can find in traditional 2D CAD applications such as AutoCAD. However, 2D drafting being far away from the scope of FreeCAD, don't expect to find there the full array of tools that these dedicated applications offer. Most of the Draft tools work not only in a 2D plane but also in the full 3D space, and benefit from special helper systems such as Work planes and object snapping.
The Arch Workbench adds BIM tools to FreeCAD, allowing you to build architectural models with parametric objects. The Arch workbench relies extensively on other modules such as Draft and Sketcher. All the Draft tools are also present in the Arch workbench, and most Arch tools make use of the Draft helper systems.
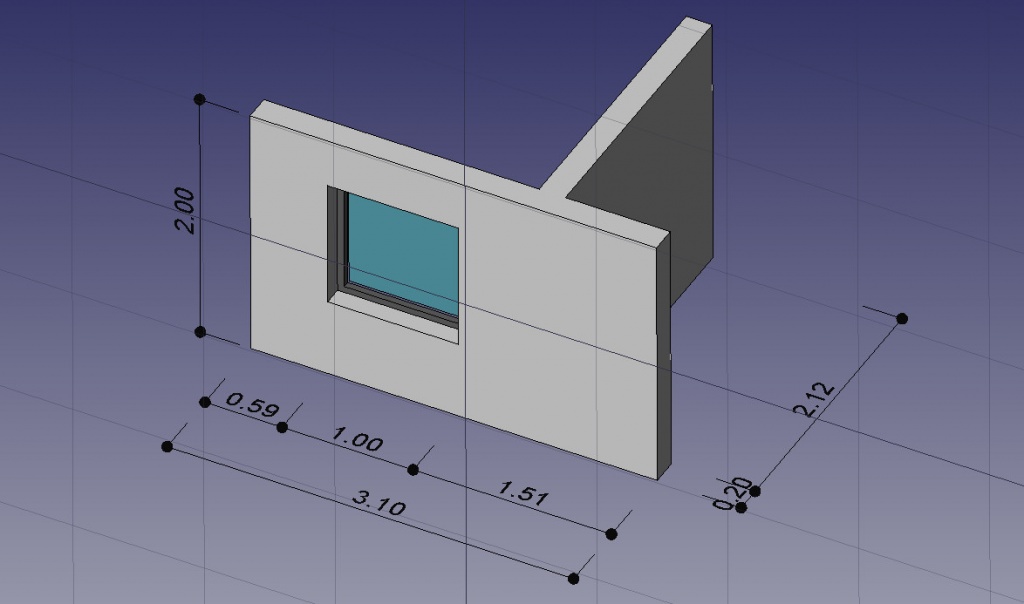
A typical workflow with Arch and Draft workbenches might be:
- Draw a couple of lines with the Draft Line tool
- Select each line and press the Wall tool to build a wall on each of them
- Join the walls by selecting them and pressing the Arch Add tool
- Create a floor object, and move your walls in it from the Tree view
- Create a building object, and move your floor in it from the Tree view
- Create a window by clicking the Window tool, select a preset in its panel, then click on a face of a wall
- Add dimensions by first setting the working plane if necessary, then using the Draft Dimension tool
Which will give you this:
More on the Tutorials page.
Tworzenie skryptów
I ostatecznie, jedną z najpotężniejszych cech FreeCADa jest środowisko skryptów. Ze zintegrowanej konsoli Pythona (lub z dowolnego zewnętrznego skryptu Pythona), możesz uzyskać dostęp do niemal każdej części FreeCADa, tworzyć lub modyfikować geometrię, modyfikować reprezentację tych obiektów w scenie 3D lub uzyskać dostęp do interfejsu FreeCADa. Skrypty Pythona mogą być także używane w makrach, które dostarczają łatwe metody na tworzenie zindywidualizowanych komend.
Freecad, as an open source software, offers the possibility to supplement its workbenches with addons.
The Addon principle is based on the development of a workbench complement. Any user can develop a function that he or she deems to be missing for her/his own needs or, ultimately, for the community. With the forum, the user can request an opinion, help on the forum. It can share, or not, the object of its development according to copyright rules to define. Free to her/him. To develop, the user has available scripting functions.
There are two types of addons:
- Macros: short snippets of Python code that provide a new tool or functionality. Macros usually start as a way to simplify or automate the task of drawing or editing a particular object. If many of these macros are collected inside a directory, the entire directory may be distributed as a new workbench.
- External workbenches: collections of tools programmed in Python or C++ that extend FreeCAD in an important way. If a workbench is sufficiently developed and is well documented, it may be included as one of the base workbenches in FreeCAD. Under External workbenches, you'll find the principle and a list of existing library.
Scripting
And finally, one of the most powerful features of FreeCAD is the scripting environment. From the integrated python console (or from any other external Python script), you can gain access to almost any part of FreeCAD, create or modify geometry, modify the representation of those objects in the 3D scene or access and modify the FreeCAD interface. Python scripting can also be used in macros, which provide an easy method to create custom commands.
What's new
- See the release notes for the detailed list of features.
- Jak zacząć
- Instalacja: Pobieranie programu, Windows, Linux, Mac, Dodatkowych komponentów, Docker, AppImage, Ubuntu Snap
- Podstawy: Informacje na temat FreeCAD, Interfejs użytkownika, Profil nawigacji myszką, Metody wyboru, Nazwa obiektu, Edytor ustawień, Środowiska pracy, Struktura dokumentu, Właściwości, Pomóż w rozwoju FreeCAD, Dotacje
- Pomoc: Poradniki, Wideo poradniki
- Środowiska pracy: Strona Startowa, Architektura, Assembly, CAM, Rysunek Roboczy, MES, Inspekcja, Siatka, OpenSCAD, Część, Projekt Części, Punkty, Inżynieria Wsteczna, Robot, Szkicownik, Arkusz Kalkulacyjny, Powierzchnia 3D, Rysunek Techniczny, Test Framework
