Toothbrush Head Stand: Difference between revisions
(adding a precision on the order to use the distance tool) |
m (Grammar. Removed space before exclamation marks.) |
||
| (12 intermediate revisions by 5 users not shown) | |||
| Line 1: | Line 1: | ||
<languages/> |
<languages/> |
||
<translate> |
<translate> |
||
<!--T:1--> |
<!--T:1--> |
||
{{TutorialInfo |
|||
{{TutorialInfo|Topic=Modeling|Level=Beginner|Author=[[User:EmmanuelG|EmmanuelG]]|Time=1 hour|FCVersion=0.16 or greater|Files=[https://www.thingiverse.com/thing:2403310 Thingiverse 2403310]}} |
|||
|Topic=Modeling |
|||
|Level=Beginner |
|||
|Author=[[User:EmmanuelG|EmmanuelG]] |
|||
|Time=1 hour |
|||
|FCVersion=0.16 or greater |
|||
|Files=[https://www.thingiverse.com/thing:2403310 Thingiverse 2403310] |
|||
}} |
|||
== A daily-life problem == <!--T:2--> |
== A daily-life problem == <!--T:2--> |
||
| Line 10: | Line 18: | ||
<!--T:4--> |
<!--T:4--> |
||
This tutorial will take you through the steps needed to model the part shown in the image below using basic tools from the [[ |
This tutorial will take you through the steps needed to model the part shown in the image below using basic tools from the [[PartDesign_Workbench|Part Design Workbench]] (many of the tools and capabilities are not covered). |
||
</translate> |
</translate> |
||
| Line 16: | Line 24: | ||
<translate> |
<translate> |
||
== First idea : a plate == <!--T: |
== First idea : a plate == <!--T:120--> |
||
<!--T:5--> |
|||
*From the start-page, select [[Image:Workbench_PartDesign.svg]] ''Part Design'', or create a new document and select the ''Part Design'' workbench. |
*From the start-page, select [[Image:Workbench_PartDesign.svg]] ''Part Design'', or create a new document and select the ''Part Design'' workbench. |
||
</translate> |
|||
[[Image:TBHS-0.png|center]] |
[[Image:TBHS-0.png|center]] |
||
<translate> |
|||
=== Create a sketch === <!--T: |
=== Create a sketch === <!--T:121--> |
||
<!--T:6--> |
|||
*Click on [[Image:Sketcher_NewSketch.svg|32px]] [[Sketcher_NewSketch|'''New sketch''']]. Either from the contextual task menu at the left, or the toolbar above or from the Part Design menu at the top. |
*Click on [[Image:Sketcher_NewSketch.svg|32px]] [[Sketcher_NewSketch|'''New sketch''']]. Either from the contextual task menu at the left, or the toolbar above or from the Part Design menu at the top. |
||
[[File:TBHS-1.JPG|800px|center]] |
|||
</translate> |
|||
[[File:TBHS-1.JPG|800px|center]] |
|||
<translate> |
|||
<!--T:7--> |
<!--T:7--> |
||
| Line 31: | Line 48: | ||
*We will pick the XY Plane as shown in the image above (that orientation correspond to the common build plate of most 3D printers), then click OK. |
*We will pick the XY Plane as shown in the image above (that orientation correspond to the common build plate of most 3D printers), then click OK. |
||
</translate> |
|||
<!--T:9--> |
|||
[[File:TBHS-2.JPG|800px|center]] |
[[File:TBHS-2.JPG|800px|center]] |
||
<translate> |
|||
<!--T:10--> |
<!--T:10--> |
||
| Line 44: | Line 61: | ||
* Press {{KEY|ESC}} or click the right mouse button to stop using the tool. |
* Press {{KEY|ESC}} or click the right mouse button to stop using the tool. |
||
</translate> |
|||
<!--T:12--> |
|||
[[File:TBHS-3.JPG|800px|center]] |
[[File:TBHS-3.JPG|800px|center]] |
||
<translate> |
|||
<!--T:13--> |
<!--T:13--> |
||
| Line 53: | Line 70: | ||
<!--T:14--> |
<!--T:14--> |
||
* Click on a line of the rectangle, you now have access to the constraint tools at the right of the toolbar (depending of the size of your screen you may need to drag them to the left in order to see them all) |
* Click on a line of the rectangle, you now have access to the constraint tools at the right of the toolbar (depending of the size of your screen you may need to drag them to the left in order to see them all) |
||
* Click on [[File:Constraint_Length.png|32px]] [[ |
* Click on [[File:Constraint_Length.png|32px]] [[Sketcher_ConstrainDistance|'''Distance''']] |
||
* A dialog prompts you to set a dimension. Enter 80mm, click OK. |
* A dialog prompts you to set a dimension. Enter 80mm, click OK. |
||
* Repeat with the other side of the rectangle, also 80mm. |
* Repeat with the other side of the rectangle, also 80mm. |
||
</translate> |
|||
<!--T:15--> |
|||
[[File:TBHS-4.JPG|800px|center]] |
[[File:TBHS-4.JPG|800px|center]] |
||
<translate> |
|||
<!--T:16--> |
<!--T:16--> |
||
| Line 69: | Line 86: | ||
* Click on [[File:Constraint_PointOnPoint.svg|32px]] [[Sketcher ConstrainCoincident |'''Coincident''']]. |
* Click on [[File:Constraint_PointOnPoint.svg|32px]] [[Sketcher ConstrainCoincident |'''Coincident''']]. |
||
</translate> |
|||
<!--T:18--> |
|||
[[File:TBHS-5.JPG|800px|center]] |
[[File:TBHS-5.JPG|800px|center]] |
||
<translate> |
|||
<!--T:19--> |
<!--T:19--> |
||
You now have a totally constrained sketch, as you are told by the solver on the left and the change of color. |
You now have a totally constrained sketch, as you are told by the solver on the left and the change of color. It is a good practice to always have a totally constrained sketch. |
||
It is a good practice to always have a totally constrained sketch. |
|||
<!--T:20--> |
<!--T:20--> |
||
An under-constrained sketch can leave room for unwanted change, if you modify something later on. |
An under-constrained sketch can leave room for unwanted change, if you modify something later on. |
||
<!--T:139--> |
|||
On the opposite, an over-constrained sketch is also not good. In that case the solver warn you of redundant constraints and you should remove some of them. |
On the opposite, an over-constrained sketch is also not good. In that case the solver warn you of redundant constraints and you should remove some of them. |
||
| Line 84: | Line 102: | ||
* To leave the sketch, click either on the "Close" button on the left, or the [[File:Sketcher_LeaveSketch.png|32px]] icon in the toolbar, or press {{KEY|ESC}}. |
* To leave the sketch, click either on the "Close" button on the left, or the [[File:Sketcher_LeaveSketch.png|32px]] icon in the toolbar, or press {{KEY|ESC}}. |
||
</translate> |
|||
<!--T:22--> |
|||
[[File:TBHS-6.JPG|800px|center]] |
[[File:TBHS-6.JPG|800px|center]] |
||
<translate> |
|||
<!--T:23--> |
<!--T:23--> |
||
You now only see the square, and the contextual task menu on the left show you more options than before. |
You now only see the square, and the contextual task menu on the left show you more options than before. |
||
=== Create a pad === <!--T: |
=== Create a pad === <!--T:122--> |
||
<!--T:24--> |
|||
* Click on [[Image:View-axometric.svg|32px]] '''Axonometric''' among the standard views, to better see what will happen. |
* Click on [[Image:View-axometric.svg|32px]] '''Axonometric''' among the standard views, to better see what will happen. |
||
* Click on [[File:PartDesign_Pad.svg|32px]] '''Pad'''. |
* Click on [[File:PartDesign_Pad.svg|32px]] '''Pad'''. |
||
* Enter 4mm and click OK. |
* Enter 4mm and click OK. |
||
</translate> |
|||
<!--T:25--> |
|||
[[File:TBHS-7.JPG|800px|center]] |
[[File:TBHS-7.JPG|800px|center]] |
||
<translate> |
|||
<!--T:26--> |
<!--T:26--> |
||
Your sketch is now in volume |
Your sketch is now in volume! |
||
=== Create a sketch on it === <!--T: |
=== Create a sketch on it === <!--T:123--> |
||
<!--T:27--> |
|||
* Select the upper face |
* Select the upper face |
||
</translate> |
|||
<!--T:28--> |
|||
[[File:TBHS-8.JPG|800px|center]] |
[[File:TBHS-8.JPG|800px|center]] |
||
<translate> |
|||
<!--T:29--> |
<!--T:29--> |
||
| Line 116: | Line 138: | ||
* Click on [[Image:Sketcher_NewSketch.svg|32px]] '''New sketch'''. As a face was selected it will not ask you to choose a plane. |
* Click on [[Image:Sketcher_NewSketch.svg|32px]] '''New sketch'''. As a face was selected it will not ask you to choose a plane. |
||
</translate> |
|||
<!--T:31--> |
|||
[[File:TBHS-9.JPG|800px|center]] |
[[File:TBHS-9.JPG|800px|center]] |
||
<translate> |
|||
<!--T:32--> |
<!--T:32--> |
||
| Line 125: | Line 147: | ||
* Press {{KEY|ESC}} or click the right mouse button to stop using the tool. |
* Press {{KEY|ESC}} or click the right mouse button to stop using the tool. |
||
</translate> |
|||
<!--T:33--> |
|||
[[File:TBHS-10.JPG|800px|center]] |
[[File:TBHS-10.JPG|800px|center]] |
||
<translate> |
|||
<!--T:34--> |
<!--T:34--> |
||
* Select the circles |
* Select the circles |
||
* Click on [[File:Constraint_EqualLength.png|32px]] [[ |
* Click on [[File:Constraint_EqualLength.png|32px]] [[Sketcher_ConstrainEqual|'''Equal Length''']] |
||
</translate> |
|||
<!--T:35--> |
|||
[[File:TBHS-11.JPG|800px|center]] |
[[File:TBHS-11.JPG|800px|center]] |
||
<translate> |
|||
<!--T:36--> |
<!--T:36--> |
||
| Line 144: | Line 166: | ||
* Click on the four sides of the square, it add lines, color magenta. |
* Click on the four sides of the square, it add lines, color magenta. |
||
</translate> |
|||
<!--T:38--> |
|||
[[File:TBHS-12.JPG|800px|center]] |
[[File:TBHS-12.JPG|800px|center]] |
||
<translate> |
|||
<!--T:39--> |
<!--T:39--> |
||
| Line 152: | Line 174: | ||
<!--T:40--> |
<!--T:40--> |
||
* Click on [[File:Constraint_Length.png|32px]] [[ |
* Click on [[File:Constraint_Length.png|32px]] [[Sketcher_ConstrainDistance|'''Distance''']]. |
||
* Click on a center of a circle |
* Click on a center of a circle. |
||
* Click on a magenta line |
* Click on a magenta line. |
||
* Set distance (20mm |
* Set distance (20mm from each side). |
||
</translate> |
|||
<!--T:41--> |
|||
[[File:TBHS-13.JPG|800px|center]] |
[[File:TBHS-13.JPG|800px|center]] |
||
<translate> |
|||
<!--T:42--> |
<!--T:42--> |
||
* Click on a circle |
* Click on a circle |
||
* Click on [[File: |
* Click on [[File:Sketcher_ConstrainRadius.svg|32px]] [[Sketcher_ConstrainRadius|'''Radius''']] and set it at 1,5mm. |
||
</translate> |
|||
<!--T:43--> |
|||
[[File:TBHS-14.JPG|800px|center]] |
[[File:TBHS-14.JPG|800px|center]] |
||
<translate> |
|||
<!--T:44--> |
<!--T:44--> |
||
* To leave the sketch, click either on the "Close" button on the left, or the [[File:Sketcher_LeaveSketch.png|32px]] icon in the toolbar, or press {{KEY|ESC}}. |
* To leave the sketch, click either on the "Close" button on the left, or the [[File:Sketcher_LeaveSketch.png|32px]] icon in the toolbar, or press {{KEY|ESC}}. |
||
</translate> |
|||
<!--T:45--> |
|||
[[File:TBHS-15.JPG|800px|center]] |
[[File:TBHS-15.JPG|800px|center]] |
||
<translate> |
|||
=== Create a pad=== <!--T:124--> |
|||
<!--T:46--> |
|||
* Click on [[Image:View-axometric.svg|32px]] '''Axonometric''' among the standard views, to better see what will happen. |
* Click on [[Image:View-axometric.svg|32px]] '''Axonometric''' among the standard views, to better see what will happen. |
||
* Click on [[File:PartDesign_Pad.svg|32px]] '''Pad'''. |
* Click on [[File:PartDesign_Pad.svg|32px]] '''Pad'''. |
||
* Enter 25mm and click OK. |
* Enter 25mm and click OK. |
||
</translate> |
|||
<!--T:47--> |
|||
[[File:TBHS-16.JPG|800px|center]] |
[[File:TBHS-16.JPG|800px|center]] |
||
<translate> |
|||
<!--T:48--> |
<!--T:48--> |
||
You have the basic shape, it just need final touches. |
You have the basic shape, it just need final touches. |
||
=== Rounding the corners === <!--T: |
=== Rounding the corners === <!--T:140--> |
||
<!--T:49--> |
|||
* Holding {{KEY|CTRL}} click on the vertical edge at each corner to select the four of them. |
* Holding {{KEY|CTRL}} click on the vertical edge at each corner to select the four of them. |
||
| Line 193: | Line 220: | ||
Don't hesitate to help you by switching the display mode (just at the left of the Axonometric View) between [[File:DrawStyleWireFrame.svg|32px]] '''Wireframe''' and [[File:DrawStyleFlatLines.svg|32px]] '''Wireframe and shadow'''. |
Don't hesitate to help you by switching the display mode (just at the left of the Axonometric View) between [[File:DrawStyleWireFrame.svg|32px]] '''Wireframe''' and [[File:DrawStyleFlatLines.svg|32px]] '''Wireframe and shadow'''. |
||
</translate> |
|||
<!--T:51--> |
|||
[[File:TBHS-17.JPG|800px|center]] |
[[File:TBHS-17.JPG|800px|center]] |
||
<translate> |
|||
<!--T:52--> |
<!--T:52--> |
||
| Line 201: | Line 228: | ||
* Set the radius at 20mm. |
* Set the radius at 20mm. |
||
</translate> |
|||
<!--T:53--> |
|||
[[File:TBHS-18.JPG|800px|center]] |
[[File:TBHS-18.JPG|800px|center]] |
||
<translate> |
|||
<!--T:54--> |
<!--T:54--> |
||
Much better. |
Much better. |
||
=== Making it more robust === <!--T: |
=== Making it more robust === <!--T:125--> |
||
<!--T:55--> |
|||
We need to add material at the base of the cylinders to make them less prone to snap. Because of the printing orientation these small surfaces will be fragile at the junction with the base. |
We need to add material at the base of the cylinders to make them less prone to snap. Because of the printing orientation these small surfaces will be fragile at the junction with the base. |
||
| Line 214: | Line 243: | ||
* Select the circles at the base of the cylinders |
* Select the circles at the base of the cylinders |
||
</translate> |
|||
<!--T:57--> |
|||
[[File:TBHS-19.JPG|800px|center]] |
[[File:TBHS-19.JPG|800px|center]] |
||
<translate> |
|||
<!--T:58--> |
<!--T:58--> |
||
| Line 222: | Line 251: | ||
* Set it to 2mm. |
* Set it to 2mm. |
||
</translate> |
|||
<!--T:59--> |
|||
[[File:TBHS-20.JPG|800px|center]] |
[[File:TBHS-20.JPG|800px|center]] |
||
<translate> |
|||
=== Chamfer the edges === <!--T: |
=== Chamfer the edges === <!--T:126--> |
||
<!--T:60--> |
|||
* Select the face under the base, add a [[File:PartDesign_Chamfer.svg|32px]] '''Chamfer''' of 0,5mm. |
* Select the face under the base, add a [[File:PartDesign_Chamfer.svg|32px]] '''Chamfer''' of 0,5mm. |
||
| Line 231: | Line 263: | ||
The first layer of plastic is often being squashed a little too much, this will compensate that and save you time in cleaning the model. If the first layer is ok that will make it only nicer |
The first layer of plastic is often being squashed a little too much, this will compensate that and save you time in cleaning the model. If the first layer is ok that will make it only nicer |
||
</translate> |
|||
<!--T:62--> |
|||
[[File:TBHS-21.JPG|800px|center]] |
[[File:TBHS-21.JPG|800px|center]] |
||
<translate> |
|||
<!--T:63--> |
<!--T:63--> |
||
* Select the edges at the border of the upper face (holding {{KEY|CTRL}} ). |
* Select the edges at the border of the upper face (holding {{KEY|CTRL}} ). |
||
</translate> |
|||
<!--T:64--> |
|||
[[File:TBHS-23.JPG|800px|center]] |
[[File:TBHS-23.JPG|800px|center]] |
||
<translate> |
|||
<!--T:65--> |
<!--T:65--> |
||
* Add a [[File:PartDesign_Chamfer.svg|32px]] '''Chamfer''' of 1mm. This one is only aesthetic. |
* Add a [[File:PartDesign_Chamfer.svg|32px]] '''Chamfer''' of 1mm. This one is only aesthetic. |
||
</translate> |
|||
<!--T:66--> |
|||
[[File:TBHS-22.JPG|800px|center]] |
[[File:TBHS-22.JPG|800px|center]] |
||
<translate> |
|||
<!--T:67--> |
<!--T:67--> |
||
Tadaa |
Tadaa! |
||
== Export as a .STL == <!--T: |
== Export as a .STL == <!--T:127--> |
||
<!--T:68--> |
|||
* In the Combo View on the left, select the tree view instead of the contextual task menu, click on the last feature (the chamfer). |
* In the Combo View on the left, select the tree view instead of the contextual task menu, click on the last feature (the chamfer). |
||
</translate> |
|||
<!--T:69--> |
|||
[[File:TBHS-24.JPG|800px|center]] |
[[File:TBHS-24.JPG|800px|center]] |
||
<translate> |
|||
<!--T:70--> |
<!--T:70--> |
||
| Line 263: | Line 297: | ||
* Just print it :-) |
* Just print it :-) |
||
== Inspiration == <!--T: |
== Inspiration == <!--T:128--> |
||
<!--T:71--> |
|||
The above model make a good starting point to use FreeCAD, but as a toothbrush head stand it have its flaws : due to the print orientation and small surface the sticks are prone to break. |
The above model make a good starting point to use FreeCAD, but as a toothbrush head stand it have its flaws : due to the print orientation and small surface the sticks are prone to break. |
||
| Line 269: | Line 305: | ||
Inspired by the variety of solutions other people came up with, we will make this second version which will be much better. |
Inspired by the variety of solutions other people came up with, we will make this second version which will be much better. |
||
</translate> |
|||
<!--T:73--> |
|||
[[File:TBHS-v2.jpg|800px|center]] |
[[File:TBHS-v2.jpg|800px|center]] |
||
<translate> |
|||
<!--T:74--> |
<!--T:74--> |
||
| Line 279: | Line 315: | ||
In this second part you will also learn to use more tools, like the powerful ''Linear repetition''. |
In this second part you will also learn to use more tools, like the powerful ''Linear repetition''. |
||
== Second idea : a band == <!--T: |
== Second idea : a band == <!--T:129--> |
||
<!--T:77--> |
<!--T:77--> |
||
*Create a new document and select the [[Image:Workbench_PartDesign.svg]] ''Part Design'' workbench. |
*Create a new document and select the [[Image:Workbench_PartDesign.svg]] ''Part Design'' workbench. |
||
=== Create a sketch === <!--T: |
=== Create a sketch === <!--T:130--> |
||
<!--T:79--> |
<!--T:79--> |
||
*Create a [[Image:Sketcher_NewSketch.svg|32px]] '''New sketch''', on the XY plane. |
*Create a [[Image:Sketcher_NewSketch.svg|32px]] '''New sketch''', on the XY plane. |
||
[[File:TBHS-1.JPG|800px|center]] |
|||
</translate> |
|||
[[File:TBHS-1.JPG|800px|center]] |
|||
<translate> |
|||
<!--T:80--> |
<!--T:80--> |
||
| Line 296: | Line 334: | ||
**Move to define the length and radius |
**Move to define the length and radius |
||
**Click to set the second center. |
**Click to set the second center. |
||
[[File:TBHS2-1.JPG|800px|center]] |
|||
</translate> |
|||
[[File:TBHS2-1.JPG|800px|center]] |
|||
<translate> |
|||
<!--T:81--> |
<!--T:81--> |
||
| Line 307: | Line 347: | ||
* A dialog prompts you to set a dimension. Enter 75mm, click OK. |
* A dialog prompts you to set a dimension. Enter 75mm, click OK. |
||
** that's for a 3 head stand, count 25mm for each, if you want more |
** that's for a 3 head stand, count 25mm for each, if you want more |
||
[[File:TBHS2-2.JPG|800px|center]] |
|||
</translate> |
|||
[[File:TBHS2-2.JPG|800px|center]] |
|||
<translate> |
|||
<!--T:83--> |
<!--T:83--> |
||
* Click on one point of the horizontal line |
* Click on one point of the horizontal line |
||
* Click on one point of the other horizontal line |
* Click on one point of the other horizontal line |
||
* Click on [[File:Constraint_Length.png|32px]] [[ |
* Click on [[File:Constraint_Length.png|32px]] [[Sketcher_ConstrainDistance|'''Distance''']] |
||
* A dialog prompts you to set a dimension. Enter 29mm, click OK. |
* A dialog prompts you to set a dimension. Enter 29mm, click OK. |
||
</translate> |
|||
[[File:TBHS2-3.JPG|800px|center]] |
[[File:TBHS2-3.JPG|800px|center]] |
||
<translate> |
|||
<!--T:84--> |
<!--T:84--> |
||
*Draw a [[Image:Sketcher_CreateSlot.svg|32px]] [[Sketcher_CreateSlot|'''Slot''']] around the first slot. |
*Draw a [[Image:Sketcher_CreateSlot.svg|32px]] [[Sketcher_CreateSlot|'''Slot''']] around the first slot. |
||
</translate> |
|||
[[File:TBHS2-4.JPG|800px|center]] |
[[File:TBHS2-4.JPG|800px|center]] |
||
<translate> |
|||
<!--T:85--> |
<!--T:85--> |
||
*Make the centers of the second slot coincident with the centers of the first slot with [[File:Constraint_PointOnPoint.svg|32px]] |
*Make the centers of the second slot coincident with the centers of the first slot with [[File:Constraint_PointOnPoint.svg|32px]] [[Sketcher ConstrainCoincident |'''Coincident''']]. |
||
[[File:TBHS2-5.JPG|800px|center]] |
|||
</translate> |
|||
[[File:TBHS2-5.JPG|800px|center]] |
|||
<translate> |
|||
<!--T:86--> |
<!--T:86--> |
||
| Line 333: | Line 381: | ||
* Click on [[File:Constraint_Length.png|32px]] [[Sketcher ConstrainDistance|'''Distance''']] |
* Click on [[File:Constraint_Length.png|32px]] [[Sketcher ConstrainDistance|'''Distance''']] |
||
* A dialog prompts you to set a dimension. Enter 3mm, click OK. |
* A dialog prompts you to set a dimension. Enter 3mm, click OK. |
||
</translate> |
|||
[[File:TBHS2-6.JPG|800px|center]] |
[[File:TBHS2-6.JPG|800px|center]] |
||
<translate> |
|||
<!--T:87--> |
<!--T:87--> |
||
| Line 341: | Line 391: | ||
**Click on the origin of the XY plan |
**Click on the origin of the XY plan |
||
**Click on [[File:Constraint_PointOnPoint.svg|32px]] [[Sketcher ConstrainCoincident |'''Coincident''']] |
**Click on [[File:Constraint_PointOnPoint.svg|32px]] [[Sketcher ConstrainCoincident |'''Coincident''']] |
||
</translate> |
|||
[[File:TBHS2-7.JPG|800px|center]] |
[[File:TBHS2-7.JPG|800px|center]] |
||
<translate> |
|||
<!--T:88--> |
<!--T:88--> |
||
* To leave the sketch, click either on the "Close" button on the left, or the [[File:Sketcher_LeaveSketch.png|32px]] icon in the toolbar, or press {{KEY|ESC}}. |
* To leave the sketch, click either on the "Close" button on the left, or the [[File:Sketcher_LeaveSketch.png|32px]] icon in the toolbar, or press {{KEY|ESC}}. |
||
</translate> |
|||
[[File:TBHS2-8.JPG|800px|center]] |
[[File:TBHS2-8.JPG|800px|center]] |
||
<translate> |
|||
=== Create a pad === <!--T:131--> |
|||
<!--T:89--> |
|||
* Click on [[Image:View-axometric.svg|32px]] '''Axonometric''' among the standard views, to better see what will happen. |
* Click on [[Image:View-axometric.svg|32px]] '''Axonometric''' among the standard views, to better see what will happen. |
||
* Click on [[File:PartDesign_Pad.svg|32px]] '''Pad'''. |
* Click on [[File:PartDesign_Pad.svg|32px]] '''Pad'''. |
||
* Enter 30mm and click OK. |
* Enter 30mm and click OK. |
||
</translate> |
|||
[[File:TBHS2-9.JPG|800px|center]] |
[[File:TBHS2-9.JPG|800px|center]] |
||
<translate> |
|||
=== Create a sketch on it === <!--T:132--> |
|||
<!--T:90--> |
|||
*Select the upper face |
*Select the upper face |
||
</translate> |
|||
[[File:TBHS2-10.JPG|800px|center]] |
[[File:TBHS2-10.JPG|800px|center]] |
||
<translate> |
|||
<!--T:91--> |
<!--T:91--> |
||
*Create a [[Image:Sketcher_NewSketch.svg|32px]] '''New sketch'''. As a face was selected it will not ask you to choose a plane. |
*Create a [[Image:Sketcher_NewSketch.svg|32px]] '''New sketch'''. As a face was selected it will not ask you to choose a plane. |
||
[[File:TBHS2-11.JPG|800px|center]] |
|||
</translate> |
|||
[[File:TBHS2-11.JPG|800px|center]] |
|||
<translate> |
|||
<!--T:92--> |
<!--T:92--> |
||
| Line 370: | Line 435: | ||
**Move to define the radius |
**Move to define the radius |
||
**Click to set |
**Click to set |
||
</translate> |
|||
[[File:TBHS2-12.JPG|800px|center]] |
[[File:TBHS2-12.JPG|800px|center]] |
||
<translate> |
|||
<!--T:93--> |
<!--T:93--> |
||
| Line 384: | Line 451: | ||
* Click on [[File:Constraint_Length.png|32px]] [[Sketcher ConstrainDistance|'''Distance''']] |
* Click on [[File:Constraint_Length.png|32px]] [[Sketcher ConstrainDistance|'''Distance''']] |
||
* A dialog prompts you to set a dimension. Enter 15mm, click OK. |
* A dialog prompts you to set a dimension. Enter 15mm, click OK. |
||
</translate> |
|||
[[File:TBHS2-14.JPG|800px|center]] |
[[File:TBHS2-14.JPG|800px|center]] |
||
<translate> |
|||
<!--T:95--> |
<!--T:95--> |
||
| Line 392: | Line 461: | ||
* Click on [[File:Constraint_Length.png|32px]] [[Sketcher ConstrainDistance|'''Distance''']] |
* Click on [[File:Constraint_Length.png|32px]] [[Sketcher ConstrainDistance|'''Distance''']] |
||
* A dialog prompts you to set a dimension. Enter 10mm, click OK. |
* A dialog prompts you to set a dimension. Enter 10mm, click OK. |
||
</translate> |
|||
[[File:TBHS2-15.JPG|800px|center]] |
[[File:TBHS2-15.JPG|800px|center]] |
||
<translate> |
|||
<!--T:96--> |
<!--T:96--> |
||
* Click on the blue circle of the hexagon |
* Click on the blue circle of the hexagon |
||
* Click on [[File: |
* Click on [[File:Sketcher_ConstrainRadius.svg|32px]] [[Sketcher ConstrainRadius|'''Radius''']] |
||
* A dialog prompts you to set a dimension. Enter 8mm, click OK. |
* A dialog prompts you to set a dimension. Enter 8mm, click OK. |
||
[[File:TBHS2-16.JPG|800px|center]] |
|||
</translate> |
|||
[[File:TBHS2-16.JPG|800px|center]] |
|||
<translate> |
|||
<!--T:97--> |
<!--T:97--> |
||
* To leave the sketch, click either on the "Close" button on the left, or the [[File:Sketcher_LeaveSketch.png|32px]] icon in the toolbar, or press {{KEY|ESC}}. |
* To leave the sketch, click either on the "Close" button on the left, or the [[File:Sketcher_LeaveSketch.png|32px]] icon in the toolbar, or press {{KEY|ESC}}. |
||
</translate> |
|||
[[File:TBHS2-17.JPG|800px|center]] |
[[File:TBHS2-17.JPG|800px|center]] |
||
<translate> |
|||
=== Create a hole === <!--T:141--> |
|||
<!--T:98--> |
|||
* Click on [[Image:View-axometric.svg|32px]] '''Axonometric''' among the standard views, to better see what will happen. |
* Click on [[Image:View-axometric.svg|32px]] '''Axonometric''' among the standard views, to better see what will happen. |
||
* Click on [[File:PartDesign_Pocket.svg|32px]] [[PartDesign_Pocket|'''Pocket''']]. |
* Click on [[File:PartDesign_Pocket.svg|32px]] [[PartDesign_Pocket|'''Pocket''']]. |
||
* Select ''to the first'' in the dropdown menu and click OK. |
* Select ''to the first'' in the dropdown menu and click OK. |
||
</translate> |
|||
[[File:TBHS2-18.JPG|800px|center]] |
[[File:TBHS2-18.JPG|800px|center]] |
||
<translate> |
|||
=== Linear repetition === <!--T:133--> |
|||
<!--T:99--> |
|||
* In the Combo View on the left, select the tree view instead of the contextual task menu, click on the pocket feature. |
* In the Combo View on the left, select the tree view instead of the contextual task menu, click on the pocket feature. |
||
* Click on [[File:PartDesign_LinearPattern.svg|32px]] [[PartDesign_LinearPattern|'''LinearPattern''']]. |
* Click on [[File:PartDesign_LinearPattern.svg|32px]] [[PartDesign_LinearPattern|'''LinearPattern''']]. |
||
* Set the length at 55mm and occurencies at 3, then click OK. |
* Set the length at 55mm and occurencies at 3, then click OK. |
||
</translate> |
|||
[[File:TBHS2-19.JPG|800px|center]] |
[[File:TBHS2-19.JPG|800px|center]] |
||
<translate> |
|||
=== Create a sketch on it === <!--T: |
=== Create a sketch on it === <!--T:142--> |
||
<!--T:100--> |
|||
*Select the inner face |
*Select the inner face |
||
[[File:TBHS2-20.JPG|800px|center]] |
|||
</translate> |
|||
[[File:TBHS2-20.JPG|800px|center]] |
|||
<translate> |
|||
<!--T:101--> |
<!--T:101--> |
||
*Create a [[Image:Sketcher_NewSketch.svg|32px]] '''New sketch'''. As a face was selected it will not ask you to choose a plane. |
*Create a [[Image:Sketcher_NewSketch.svg|32px]] '''New sketch'''. As a face was selected it will not ask you to choose a plane. |
||
</translate> |
|||
[[File:TBHS2-21.JPG|800px|center]] |
[[File:TBHS2-21.JPG|800px|center]] |
||
<translate> |
|||
<!--T:102--> |
<!--T:102--> |
||
* Click on [[File:Sketcher_Circle.svg|32px]] [[Sketcher_CreateCircle|'''Circle''']], click to place the center, move the pointer and click to define the radius. |
* Click on [[File:Sketcher_Circle.svg|32px]] [[Sketcher_CreateCircle|'''Circle''']], click to place the center, move the pointer and click to define the radius. |
||
</translate> |
|||
[[File:TBHS2-22.JPG|800px|center]] |
[[File:TBHS2-22.JPG|800px|center]] |
||
<translate> |
|||
<!--T:103--> |
<!--T:103--> |
||
| Line 439: | Line 532: | ||
* Click on [[File:Constraint_Length.png|32px]] [[Sketcher ConstrainDistance|'''Distance''']] |
* Click on [[File:Constraint_Length.png|32px]] [[Sketcher ConstrainDistance|'''Distance''']] |
||
* A dialog prompts you to set a dimension. Enter 15mm, click OK. |
* A dialog prompts you to set a dimension. Enter 15mm, click OK. |
||
</translate> |
|||
[[File:TBHS2-23.JPG|800px|center]] |
[[File:TBHS2-23.JPG|800px|center]] |
||
<translate> |
|||
<!--T:104--> |
<!--T:104--> |
||
| Line 447: | Line 542: | ||
* Click on [[File:Constraint_Length.png|32px]] [[Sketcher ConstrainDistance|'''Distance''']] |
* Click on [[File:Constraint_Length.png|32px]] [[Sketcher ConstrainDistance|'''Distance''']] |
||
* A dialog prompts you to set a dimension. Enter 10mm, click OK. |
* A dialog prompts you to set a dimension. Enter 10mm, click OK. |
||
</translate> |
|||
[[File:TBHS2-24.JPG|800px|center]] |
[[File:TBHS2-24.JPG|800px|center]] |
||
<translate> |
|||
<!--T:105--> |
<!--T:105--> |
||
* Click on the circle |
* Click on the circle |
||
* Click on [[File: |
* Click on [[File:Sketcher_ConstrainRadius.svg|32px]] [[Sketcher ConstrainRadius|'''Radius''']] |
||
* A dialog prompts you to set a dimension. Enter 3.5mm, click OK. |
* A dialog prompts you to set a dimension. Enter 3.5mm, click OK. |
||
</translate> |
|||
[[File:TBHS2-25.JPG|800px|center]] |
[[File:TBHS2-25.JPG|800px|center]] |
||
<translate> |
|||
<!--T:106--> |
<!--T:106--> |
||
* To leave the sketch, click either on the "Close" button on the left, or the [[File:Sketcher_LeaveSketch.png|32px]] icon in the toolbar, or press {{KEY|ESC}}. |
* To leave the sketch, click either on the "Close" button on the left, or the [[File:Sketcher_LeaveSketch.png|32px]] icon in the toolbar, or press {{KEY|ESC}}. |
||
</translate> |
|||
[[File:TBHS2-26.JPG|800px|center]] |
[[File:TBHS2-26.JPG|800px|center]] |
||
<translate> |
|||
=== Create a pad === <!--T:134--> |
|||
<!--T:107--> |
|||
* Click on [[Image:View-axometric.svg|32px]] '''Axonometric''' among the standard views, to better see what will happen. |
* Click on [[Image:View-axometric.svg|32px]] '''Axonometric''' among the standard views, to better see what will happen. |
||
* Click on [[File:PartDesign_Pad.svg|32px]] '''Pad'''. |
* Click on [[File:PartDesign_Pad.svg|32px]] '''Pad'''. |
||
* Enter 4mm and click OK. |
* Enter 4mm and click OK. |
||
</translate> |
|||
[[File:TBHS2-27.JPG|800px|center]] |
[[File:TBHS2-27.JPG|800px|center]] |
||
<translate> |
|||
=== Linear repetition === <!--T: |
=== Linear repetition === <!--T:135--> |
||
<!--T:108--> |
|||
* In the Combo View on the left, select the tree view instead of the contextual task menu, click on the pad feature. |
* In the Combo View on the left, select the tree view instead of the contextual task menu, click on the pad feature. |
||
* Click on [[File:PartDesign_LinearPattern.svg|32px]] [[PartDesign_LinearPattern|'''LinearPattern''']]. |
* Click on [[File:PartDesign_LinearPattern.svg|32px]] [[PartDesign_LinearPattern|'''LinearPattern''']]. |
||
* Set the length at 55mm and occurencies at 3, then click OK. |
* Set the length at 55mm and occurencies at 3, then click OK. |
||
</translate> |
|||
[[File:TBHS2-28.JPG|800px|center]] |
[[File:TBHS2-28.JPG|800px|center]] |
||
<translate> |
|||
=== Draft === <!--T:136--> |
|||
<!--T:109--> |
|||
*Select the side of each round pads |
*Select the side of each round pads |
||
[[File:TBHS2-29.JPG|800px|center]] |
|||
</translate> |
|||
[[File:TBHS2-29.JPG|800px|center]] |
|||
<translate> |
|||
<!--T:110--> |
<!--T:110--> |
||
| Line 485: | Line 599: | ||
* Click on "Neutral plane" and select the face on which the sketch is drawn. |
* Click on "Neutral plane" and select the face on which the sketch is drawn. |
||
* Tick "Invert the draft direction". |
* Tick "Invert the draft direction". |
||
[[File:TBHS2-30.JPG|800px|center]] |
|||
</translate> |
|||
[[File:TBHS2-30.JPG|800px|center]] |
|||
<translate> |
|||
<!--T:111--> |
<!--T:111--> |
||
| Line 494: | Line 610: | ||
Chamfer = left / Draft = right |
Chamfer = left / Draft = right |
||
</translate> |
|||
<!--T:113--> |
|||
[[File:TBHS2-30-chamfer.JPG|200px]][[File:TBHS2-30-draft.JPG|200px]] |
[[File:TBHS2-30-chamfer.JPG|200px]][[File:TBHS2-30-draft.JPG|200px]] |
||
<translate> |
|||
=== Finishes === <!--T:137--> |
|||
<!--T:114--> |
|||
*Holding {{KEY|CTRL}} select the bottom and top faces. |
*Holding {{KEY|CTRL}} select the bottom and top faces. |
||
</translate> |
|||
[[File:TBHS2-31-bottom.JPG|200px]][[File:TBHS2-31-top.JPG|200px]] |
[[File:TBHS2-31-bottom.JPG|200px]][[File:TBHS2-31-top.JPG|200px]] |
||
<translate> |
|||
<!--T:115--> |
<!--T:115--> |
||
** Add a [[File:PartDesign_Chamfer.svg|32px]] '''Chamfer''' of 0,5mm. |
** Add a [[File:PartDesign_Chamfer.svg|32px]] '''Chamfer''' of 0,5mm. |
||
</translate> |
|||
[[File:TBHS2-31.JPG|800px|center]] |
[[File:TBHS2-31.JPG|800px|center]] |
||
<translate> |
|||
<!--T:116--> |
<!--T:116--> |
||
Perfect |
Perfect! |
||
== Export as a .STL == <!--T:138--> |
|||
<!--T:117--> |
|||
* In the Combo View on the left, select the tree view instead of the contextual task menu, click on the last feature (the chamfer). |
* In the Combo View on the left, select the tree view instead of the contextual task menu, click on the last feature (the chamfer). |
||
</translate> |
|||
<!--T:118--> |
|||
[[File:TBHS2-32.JPG|800px|center]] |
[[File:TBHS2-32.JPG|800px|center]] |
||
<translate> |
|||
<!--T:119--> |
<!--T:119--> |
||
* Now you can select "Export..." from the File menu at the top left, and select the file format .STL. |
* Now you can select "Export..." from the File menu at the top left, and select the file format .STL. |
||
* Print it instead of the first version or to replace it if it eventually broke ;-) |
* Print it instead of the first version or to replace it if it eventually broke ;-) |
||
</translate> |
|||
{{Tutorials navi{{#translation:}}}} |
|||
</translate> |
|||
{{PartDesign Tools navi{{#translation:}}}} |
{{PartDesign Tools navi{{#translation:}}}} |
||
{{Sketcher Tools navi{{#translation:}}}} |
{{Sketcher Tools navi{{#translation:}}}} |
||
Latest revision as of 16:17, 23 February 2024
| Topic |
|---|
| Modeling |
| Level |
| Beginner |
| Time to complete |
| 1 hour |
| Authors |
| EmmanuelG |
| FreeCAD version |
| 0.16 or greater |
| Example files |
| Thingiverse 2403310 |
| See also |
| None |
A daily-life problem
Electric toothbrushes rarely come with a head stand, while in a family you will often see multiple heads used with one body. Many people facing a common problem lead us to a variety of solutions, as you can see on Thingiverse (200-800 projects are related to that). Here is the first answer and how to design it.
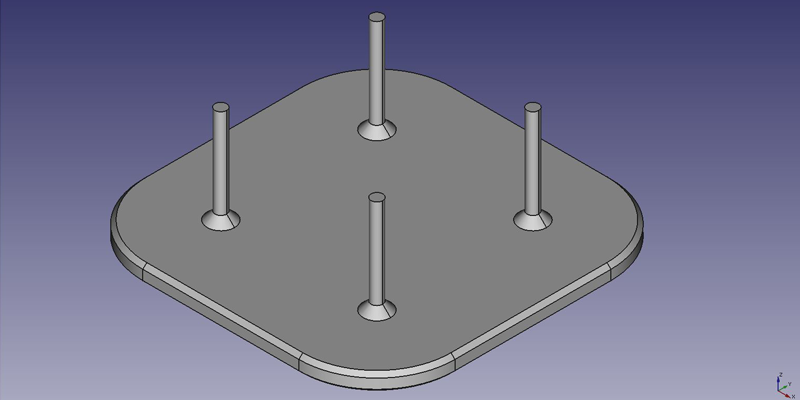
This tutorial will take you through the steps needed to model the part shown in the image below using basic tools from the Part Design Workbench (many of the tools and capabilities are not covered).
First idea : a plate
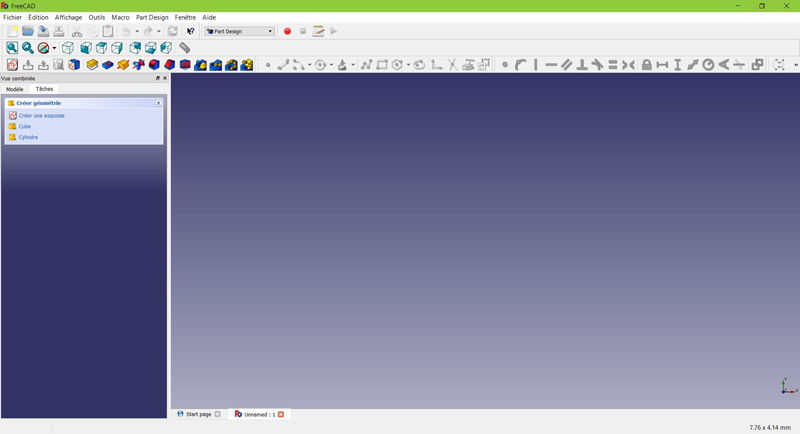
- From the start-page, select
Part Design, or create a new document and select the Part Design workbench.
Create a sketch
- Click on
New sketch. Either from the contextual task menu at the left, or the toolbar above or from the Part Design menu at the top.
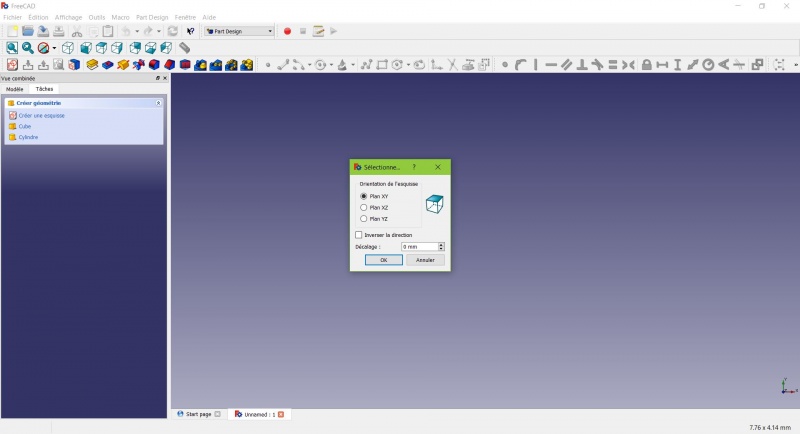
A dialog prompts you to choose the sketch orientation and provide an offset.
- We will pick the XY Plane as shown in the image above (that orientation correspond to the common build plate of most 3D printers), then click OK.
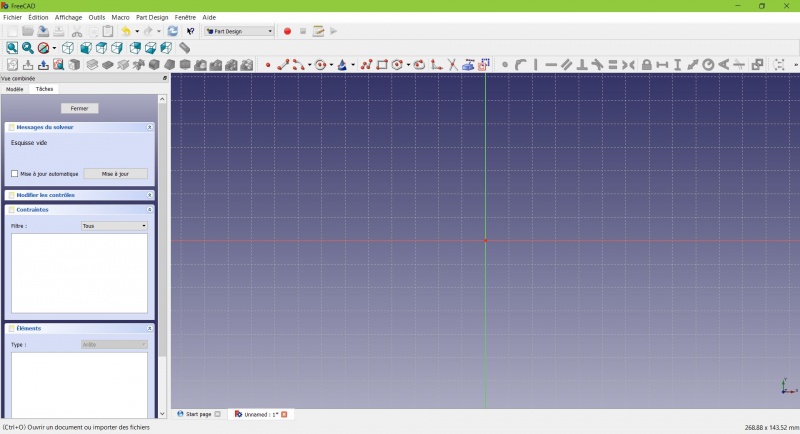
You now are facing the XY plane from above, and have access to the drawing tools.
- Click on
Rectangle.
- Click to place a first point.
- Click to place the opposite corner.
- Press ESC or click the right mouse button to stop using the tool.
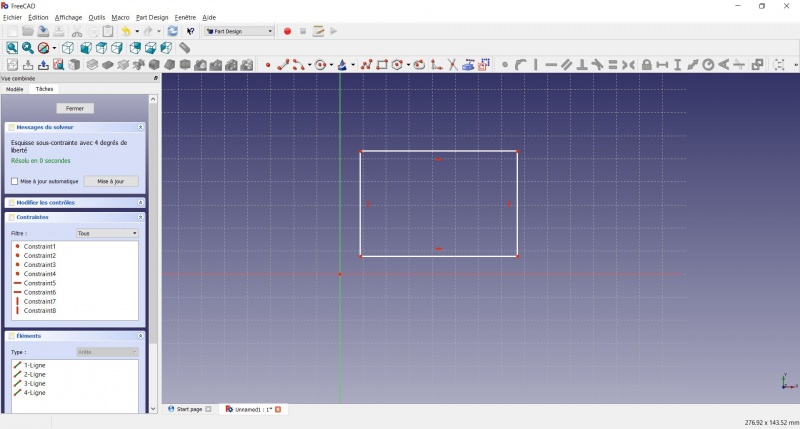
You now have a floating rectangle of unspecified dimensions.
- Click on a line of the rectangle, you now have access to the constraint tools at the right of the toolbar (depending of the size of your screen you may need to drag them to the left in order to see them all)
- Click on
 Distance
 - A dialog prompts you to set a dimension. Enter 80mm, click OK.
- Repeat with the other side of the rectangle, also 80mm.
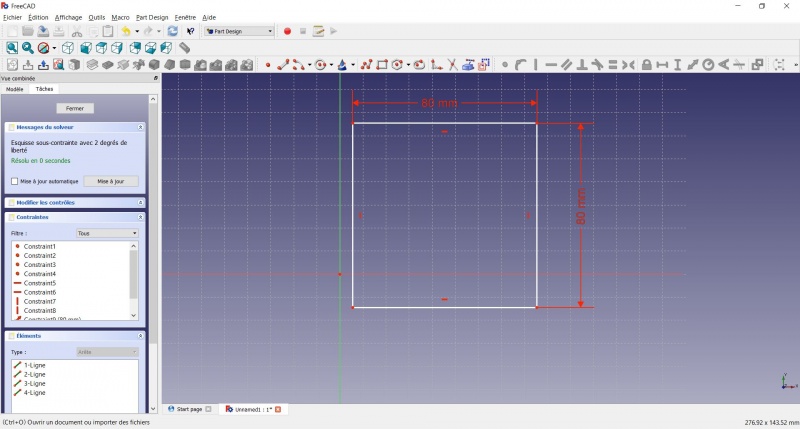
You now have a floating square.
- Click on the lower left point of the square.
- Click on the origin of the XY plane (at the intersection of the two thick lines).
- Click on
Coincident.
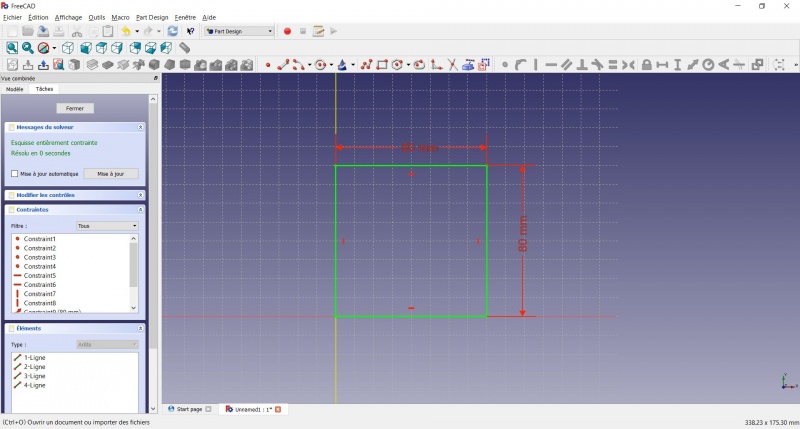
You now have a totally constrained sketch, as you are told by the solver on the left and the change of color. It is a good practice to always have a totally constrained sketch.
An under-constrained sketch can leave room for unwanted change, if you modify something later on.
On the opposite, an over-constrained sketch is also not good. In that case the solver warn you of redundant constraints and you should remove some of them.
- To leave the sketch, click either on the "Close" button on the left, or the
 icon in the toolbar, or press ESC.
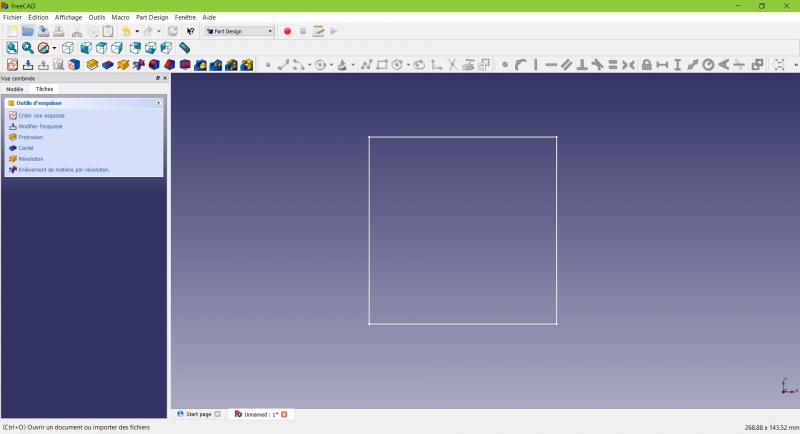
You now only see the square, and the contextual task menu on the left show you more options than before.
Create a pad
- Click on
Axonometric among the standard views, to better see what will happen.
- Click on
Pad.
- Enter 4mm and click OK.
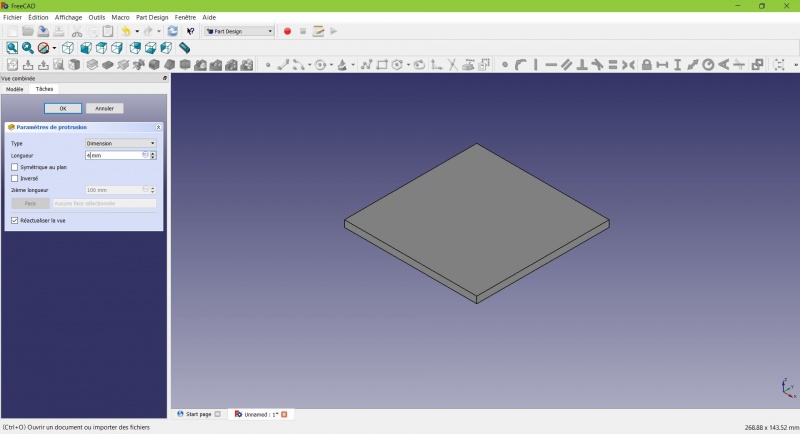
Your sketch is now in volume!
Create a sketch on it
- Select the upper face
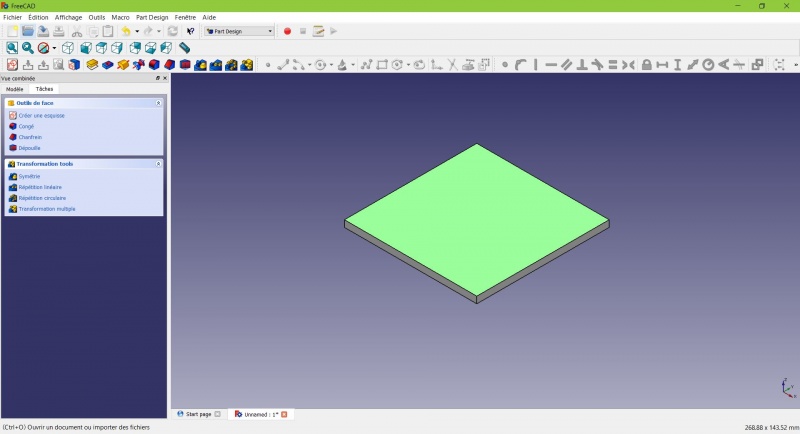
The color of the face change and you have more options in the contextual task menu.
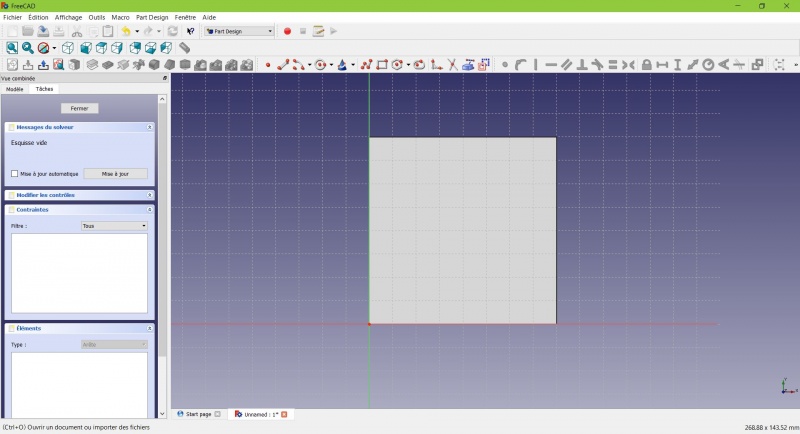
- Click on
Circle, click to place the center, move the pointer and click to define the radius.
- Draw 4 circles on the pad (of any size)
- Press ESC or click the right mouse button to stop using the tool.
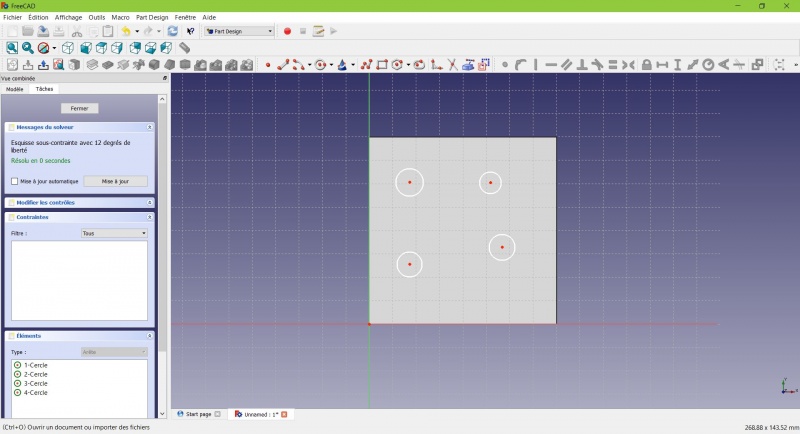
- Select the circles
- Click on
 Equal Length
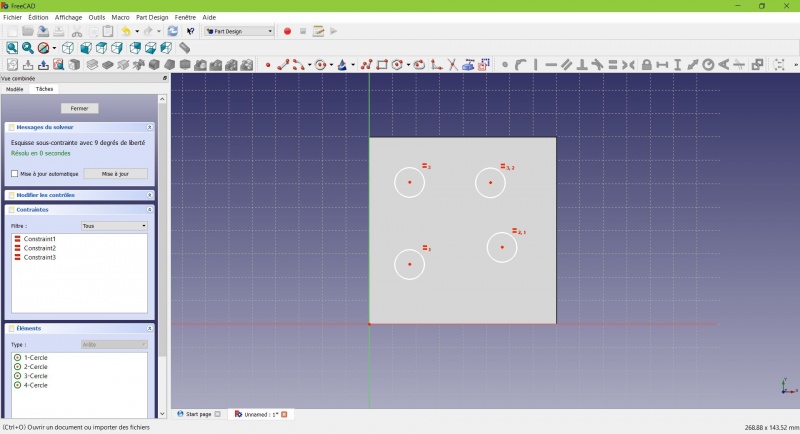
Now the circles share the same radius.
- Click on
External geometry.
- Click on the four sides of the square, it add lines, color magenta.
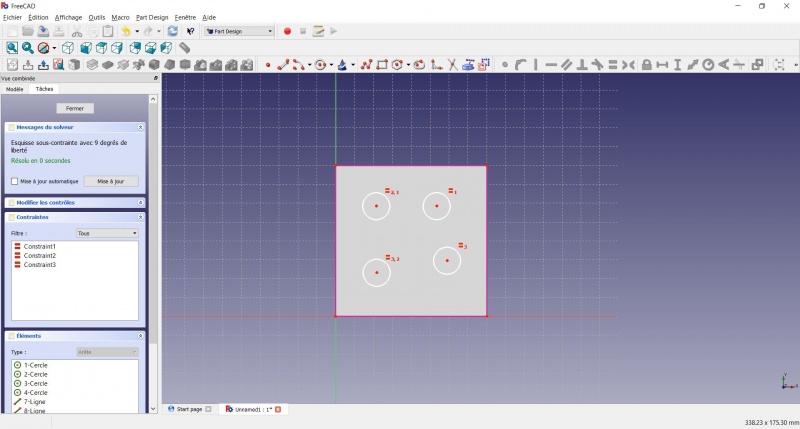
Theses lines will serve as reference to position the circles.
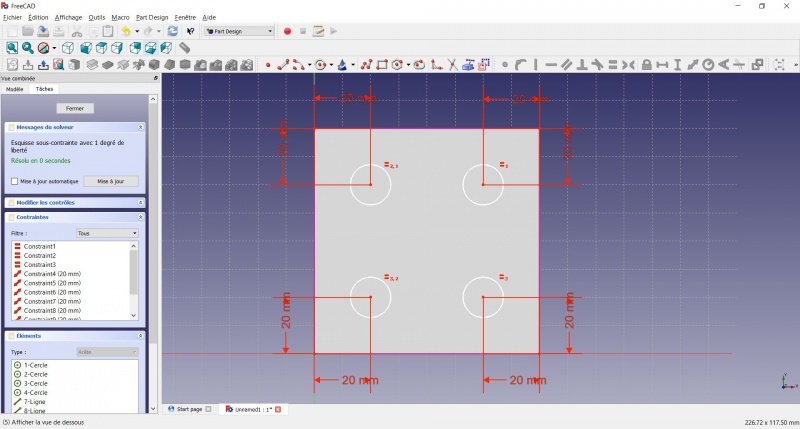
- Click on
 Distance.
 - Click on a center of a circle.
- Click on a magenta line.
- Set distance (20mm from each side).
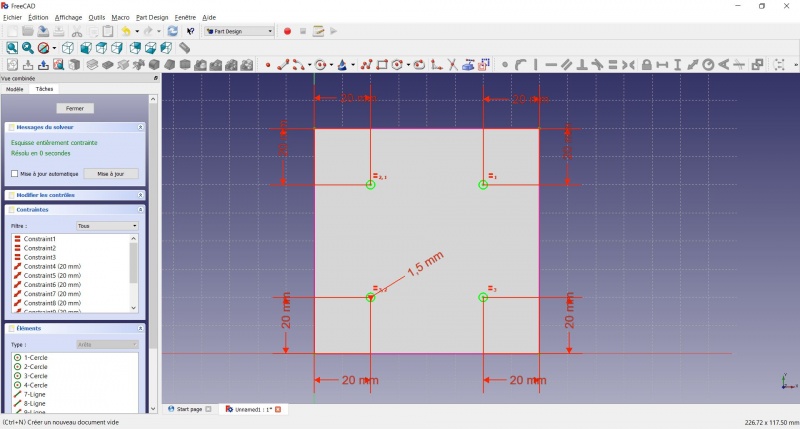
- Click on a circle
- Click on
Radius and set it at 1,5mm.
- To leave the sketch, click either on the "Close" button on the left, or the
 icon in the toolbar, or press ESC.
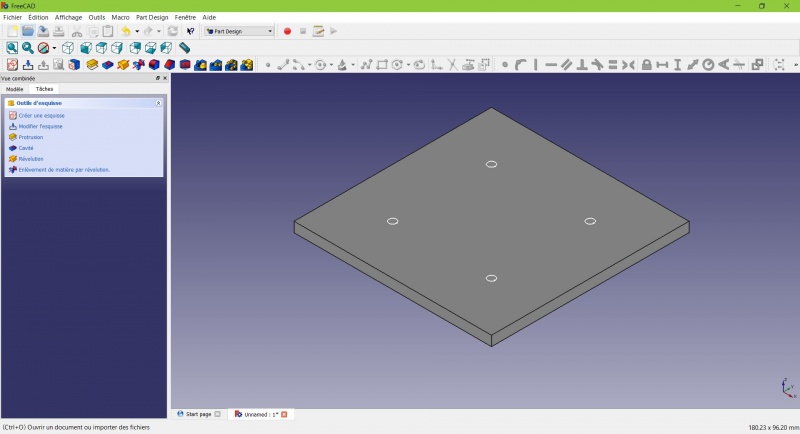
Create a pad
- Click on
Axonometric among the standard views, to better see what will happen.
- Click on
Pad.
- Enter 25mm and click OK.
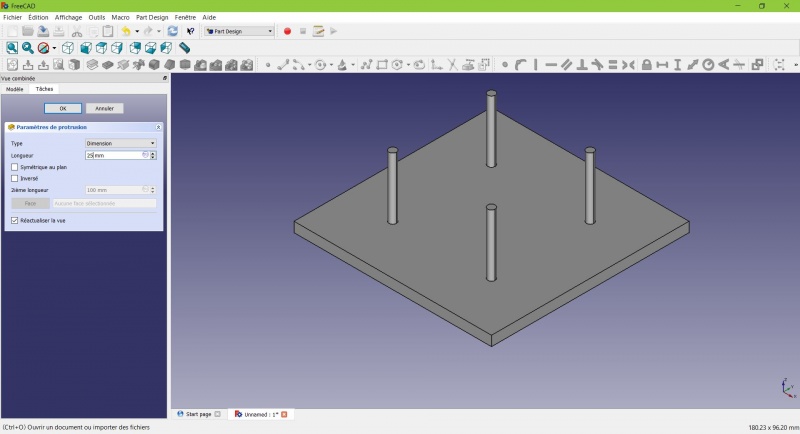
You have the basic shape, it just need final touches.
Rounding the corners
- Holding CTRL click on the vertical edge at each corner to select the four of them.
Don't hesitate to help you by switching the display mode (just at the left of the Axonometric View) between Wireframe and
Wireframe and shadow.
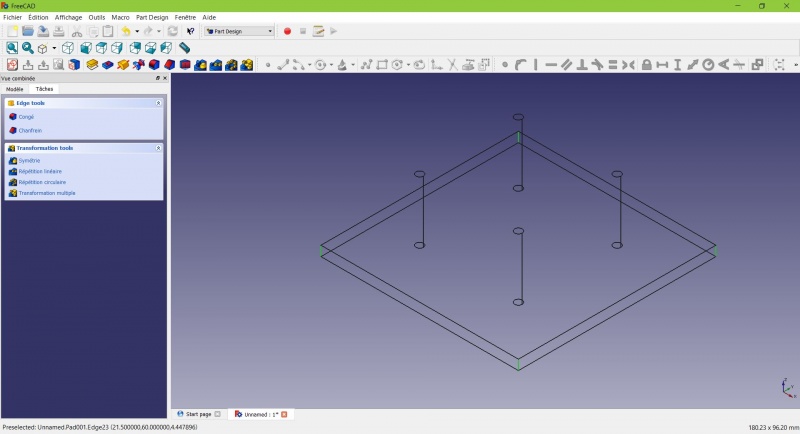
- Click on
Fillet.
- Set the radius at 20mm.
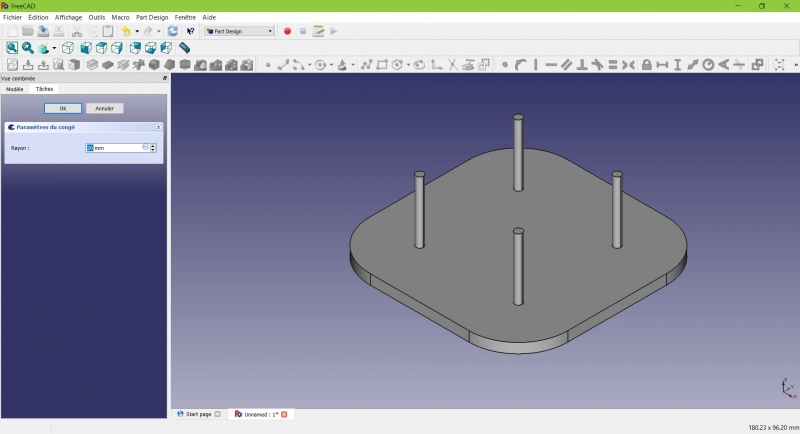
Much better.
Making it more robust
We need to add material at the base of the cylinders to make them less prone to snap. Because of the printing orientation these small surfaces will be fragile at the junction with the base.
- Select the circles at the base of the cylinders
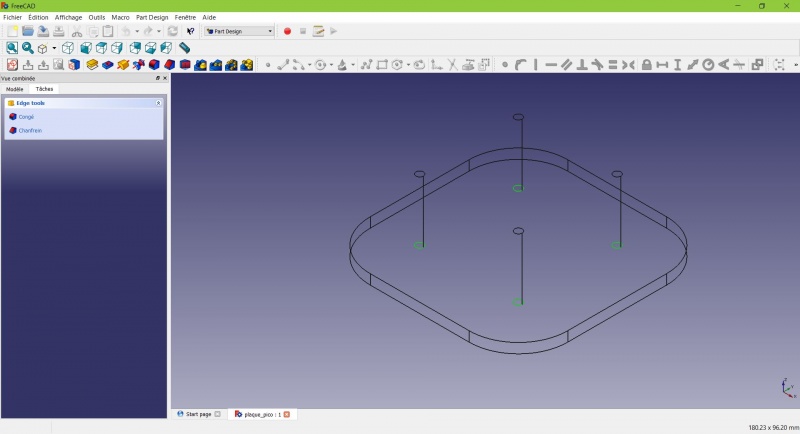
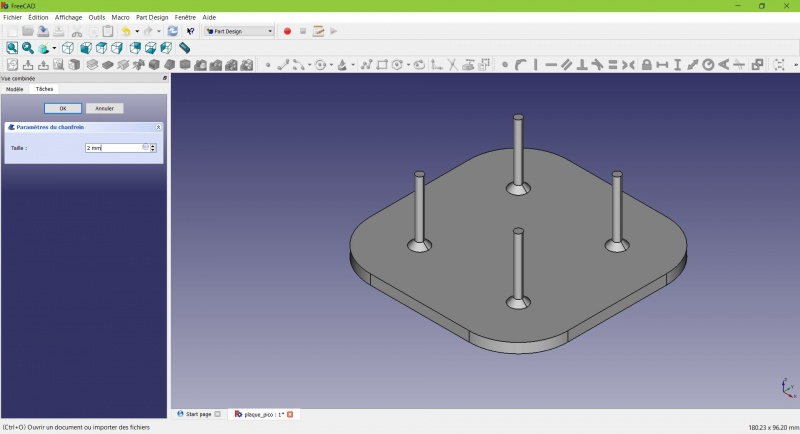
- Click on
Chamfer.
- Set it to 2mm.
Chamfer the edges
The first layer of plastic is often being squashed a little too much, this will compensate that and save you time in cleaning the model. If the first layer is ok that will make it only nicer
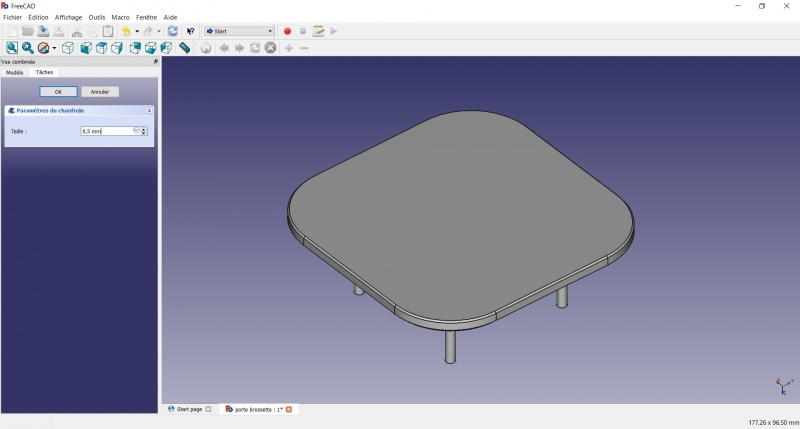
- Select the edges at the border of the upper face (holding CTRL ).
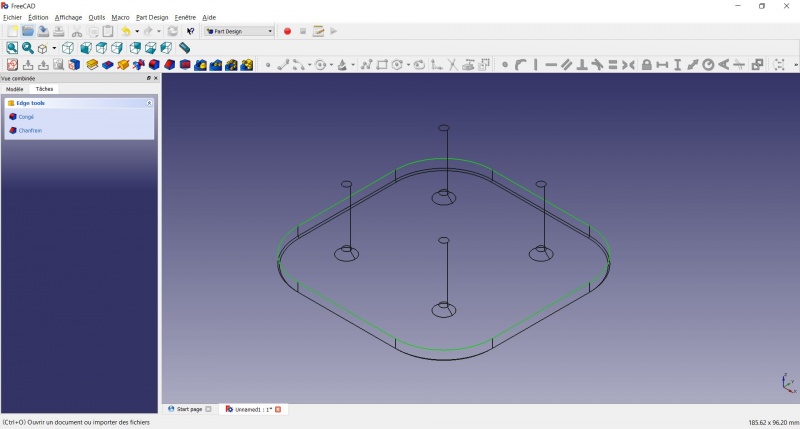
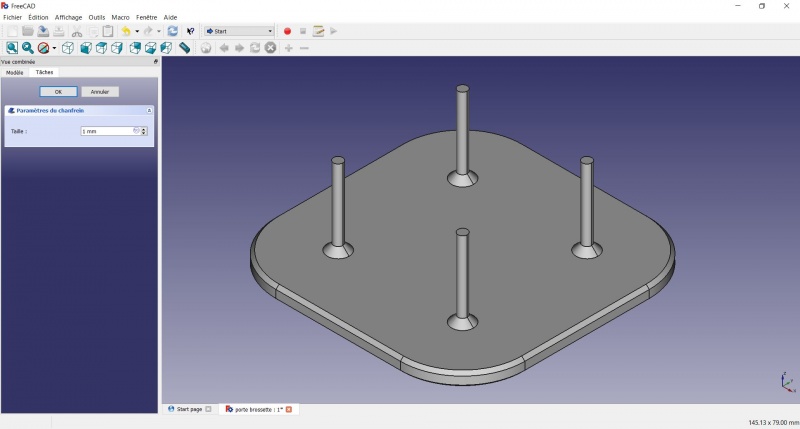
Tadaa!
Export as a .STL
- In the Combo View on the left, select the tree view instead of the contextual task menu, click on the last feature (the chamfer).
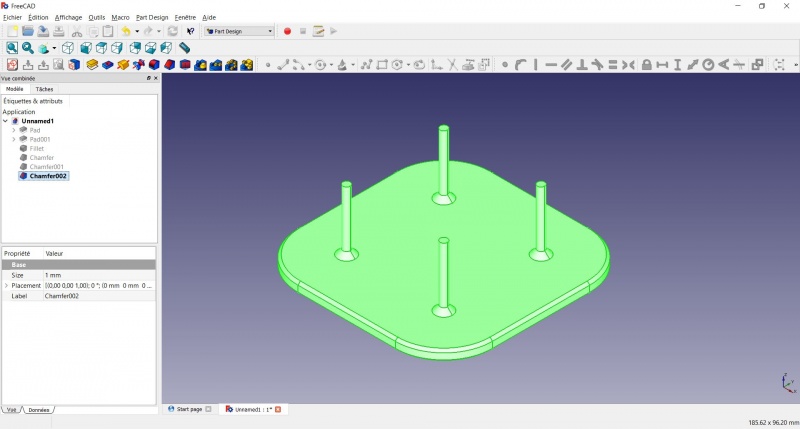
- Now you can select "Export..." from the File menu at the top left, and select the file format .STL.
- Just print it :-)
Inspiration
The above model make a good starting point to use FreeCAD, but as a toothbrush head stand it have its flaws : due to the print orientation and small surface the sticks are prone to break.
Inspired by the variety of solutions other people came up with, we will make this second version which will be much better.
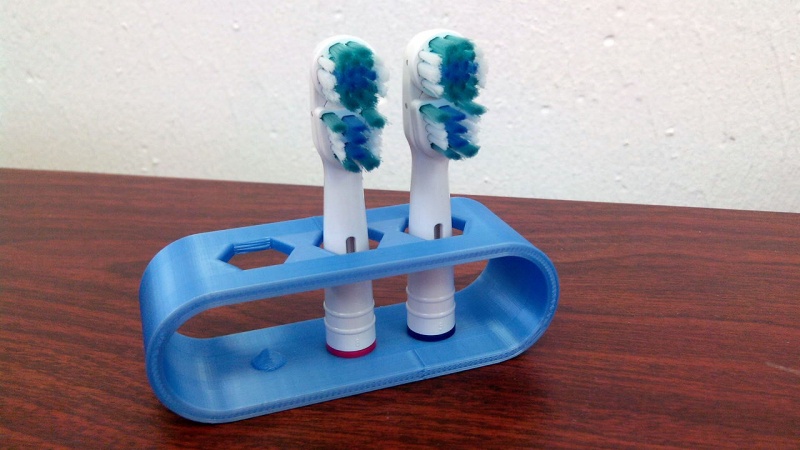
Don't worry it is often needed to go through several revision for an idea (e.g. : once the prototype on the picture was used, we added more space between the heads so that they should not touch).
In this second part you will also learn to use more tools, like the powerful Linear repetition.
Second idea : a band
Create a sketch

- Draw a
Slot
- Click to place the first center
- Move to define the length and radius
- Click to set the second center.
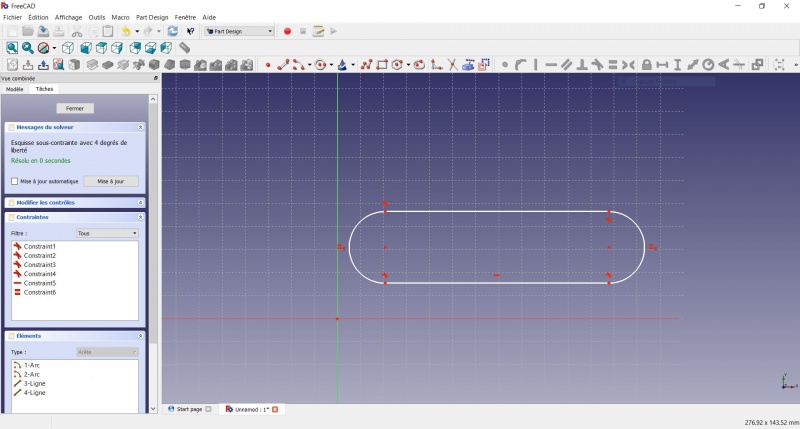
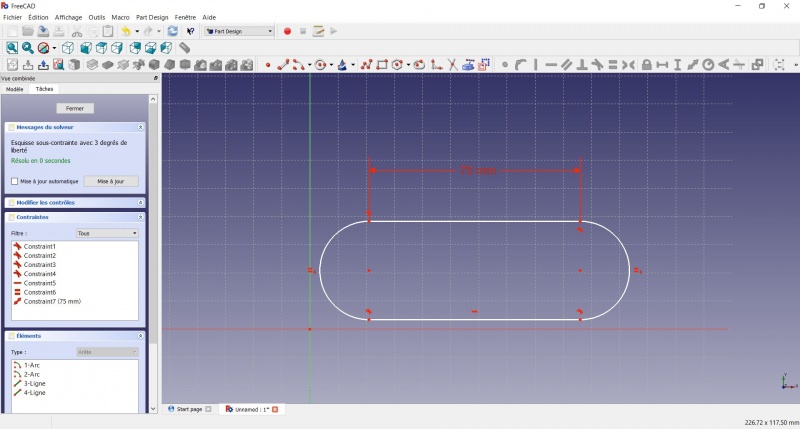
You now have a floating slot of unspecified dimensions.
- Click on one of the horizontal lines of the slot
- Click on
 Distance
 - A dialog prompts you to set a dimension. Enter 75mm, click OK.
- that's for a 3 head stand, count 25mm for each, if you want more
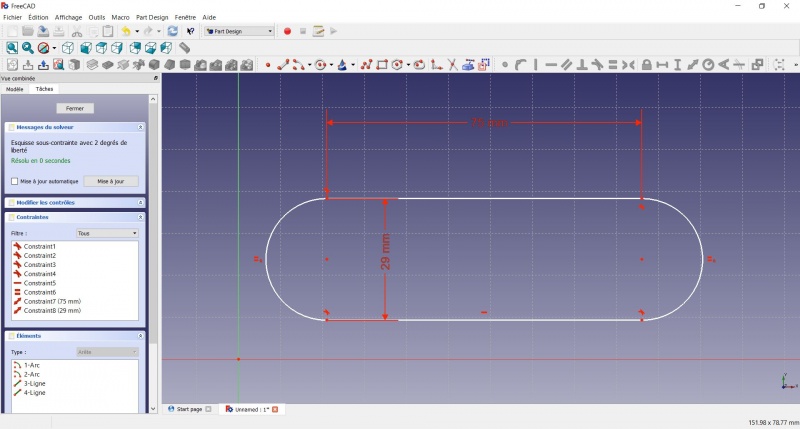
- Click on one point of the horizontal line
- Click on one point of the other horizontal line
- Click on
 Distance
 - A dialog prompts you to set a dimension. Enter 29mm, click OK.
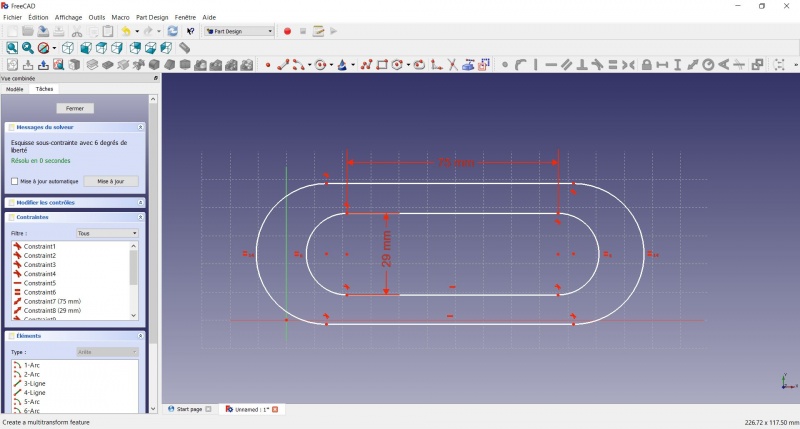
- Draw a
Slot around the first slot.
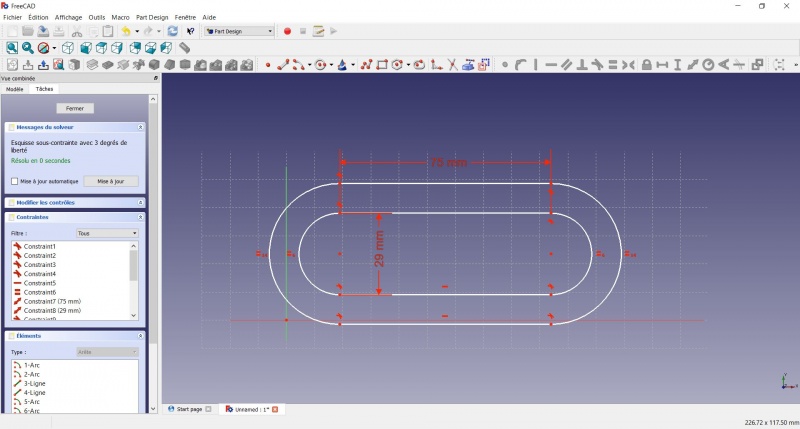
- Make the centers of the second slot coincident with the centers of the first slot with
Coincident.
- Click on one point of the horizontal line of the first slot
- Click on one point of the nearest horizontal line of the second slot
- Click on
 Distance
 - A dialog prompts you to set a dimension. Enter 3mm, click OK.
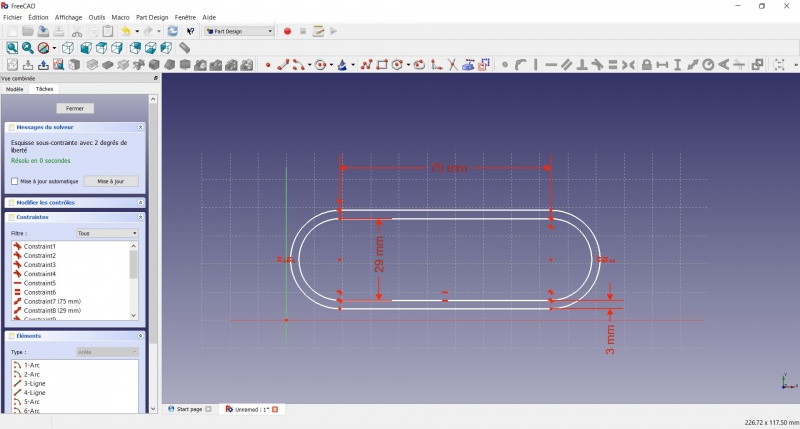
- To make the sketch fully constrained
- Click on the lower left point of the second slot
- Click on the origin of the XY plan
- Click on
Coincident
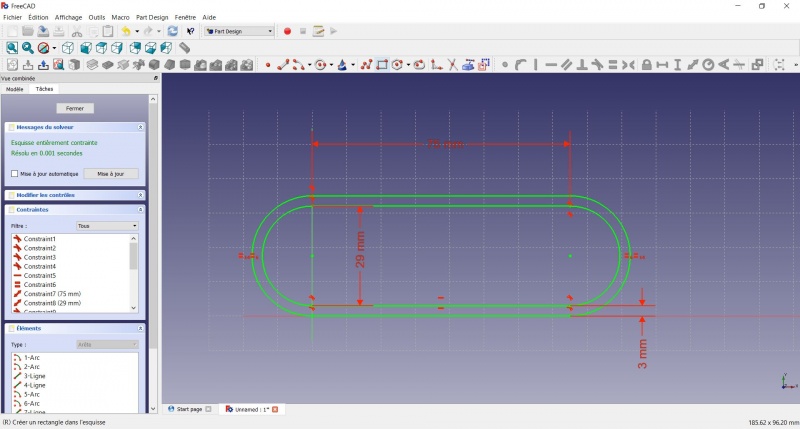
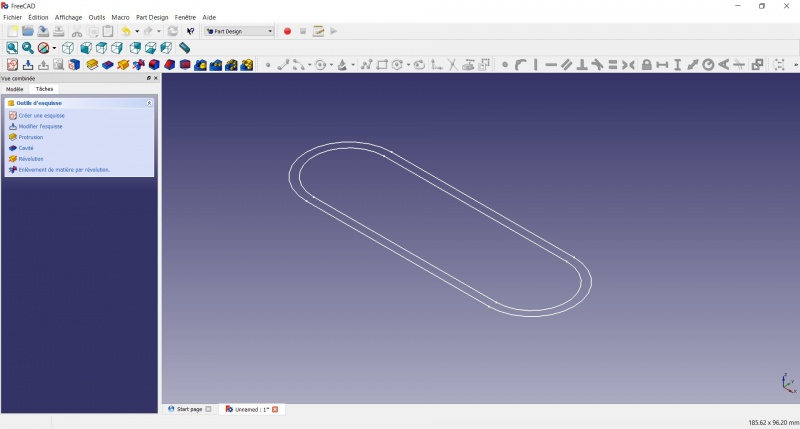
- To leave the sketch, click either on the "Close" button on the left, or the
 icon in the toolbar, or press ESC.
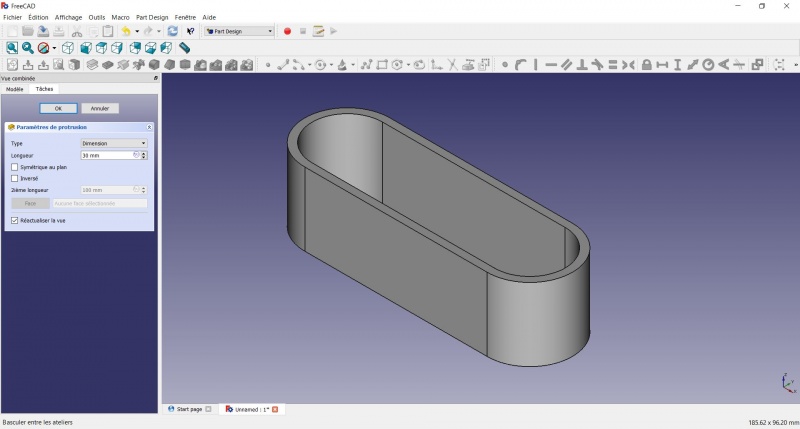
Create a pad
- Click on
Axonometric among the standard views, to better see what will happen.
- Click on
Pad.
- Enter 30mm and click OK.
Create a sketch on it
- Select the upper face
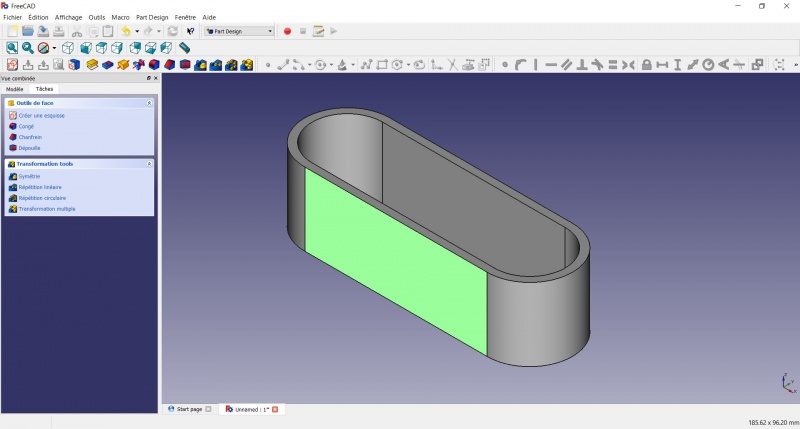
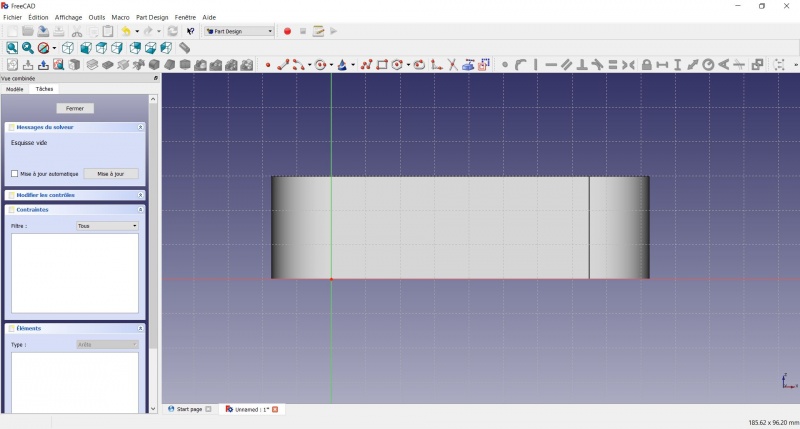
- Draw an
Hexagon
- Click to place the center
- Move to define the radius
- Click to set
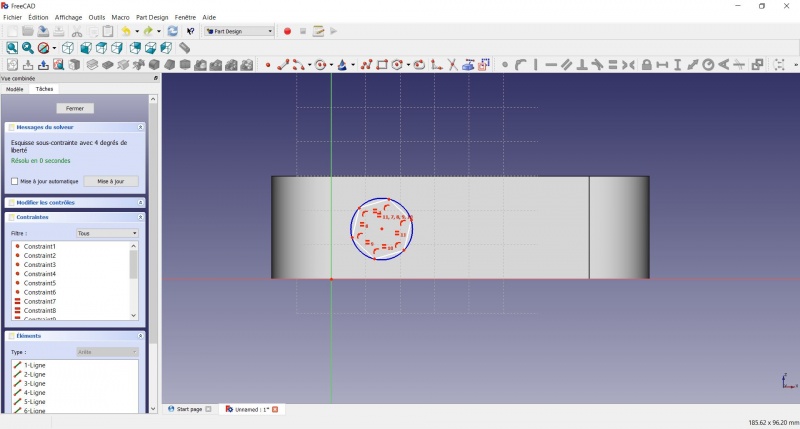
- Click on an edge of the hexagon
- Click on
Horizontal
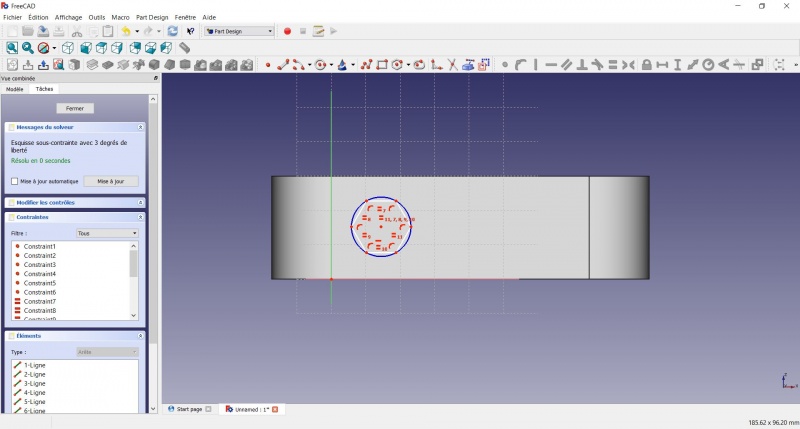
- Click on the center of the hexagon
- Click on the horizontal line of the XY plane
- Click on
 Distance
 - A dialog prompts you to set a dimension. Enter 15mm, click OK.
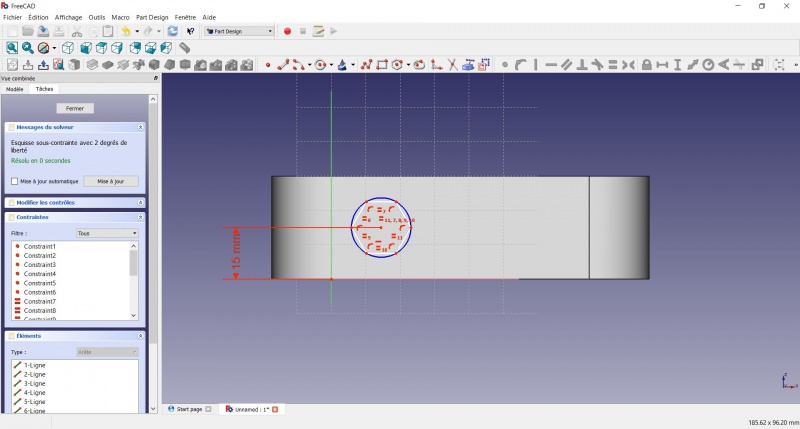
- Click on the center of the hexagon
- Click on the vertical of the XY plane
- Click on
 Distance
 - A dialog prompts you to set a dimension. Enter 10mm, click OK.
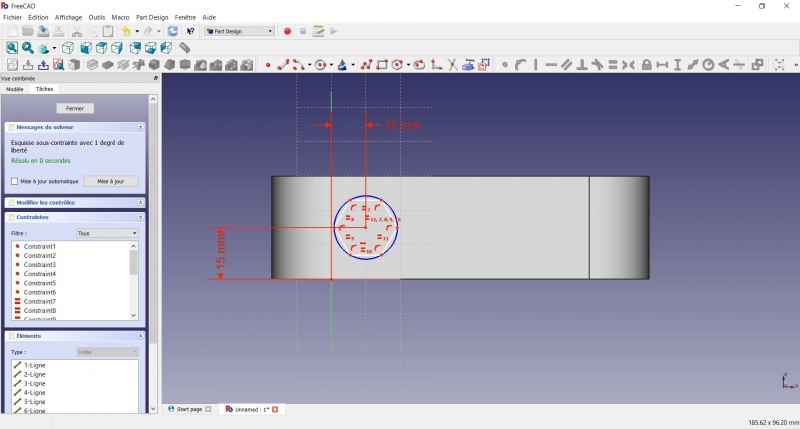
- Click on the blue circle of the hexagon
- Click on
Radius
- A dialog prompts you to set a dimension. Enter 8mm, click OK.
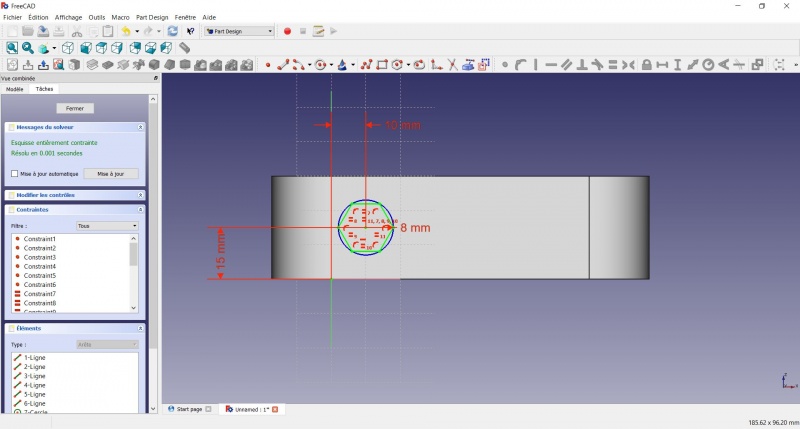
- To leave the sketch, click either on the "Close" button on the left, or the
 icon in the toolbar, or press ESC.
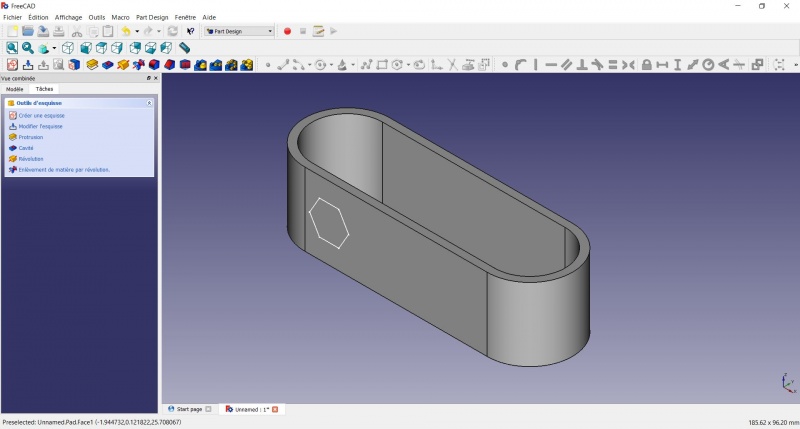
Create a hole
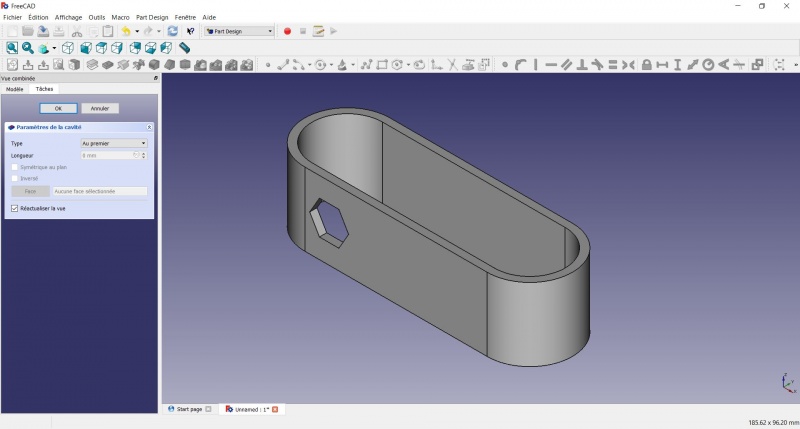
- Click on
Axonometric among the standard views, to better see what will happen.
- Click on
Pocket.
- Select to the first in the dropdown menu and click OK.
Linear repetition
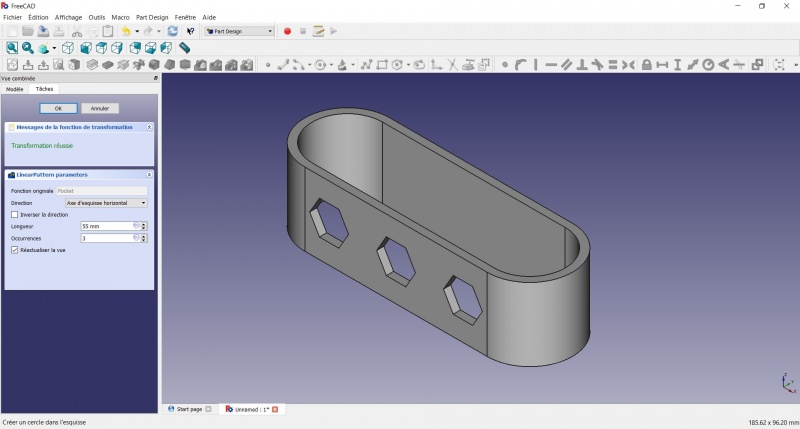
- In the Combo View on the left, select the tree view instead of the contextual task menu, click on the pocket feature.
- Click on
LinearPattern.
- Set the length at 55mm and occurencies at 3, then click OK.
Create a sketch on it
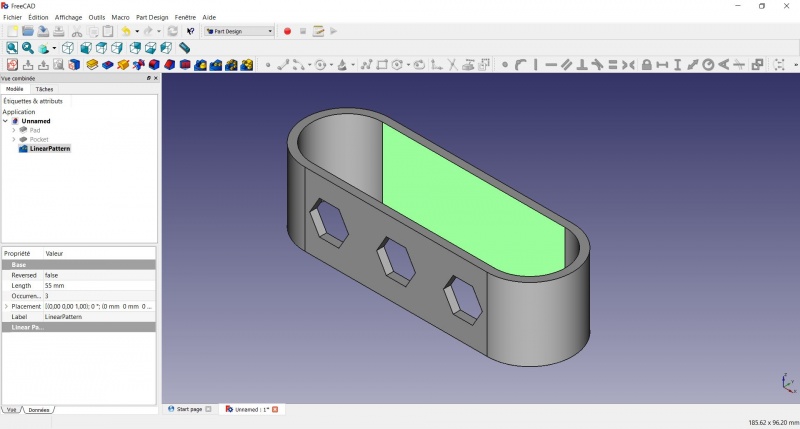
- Select the inner face
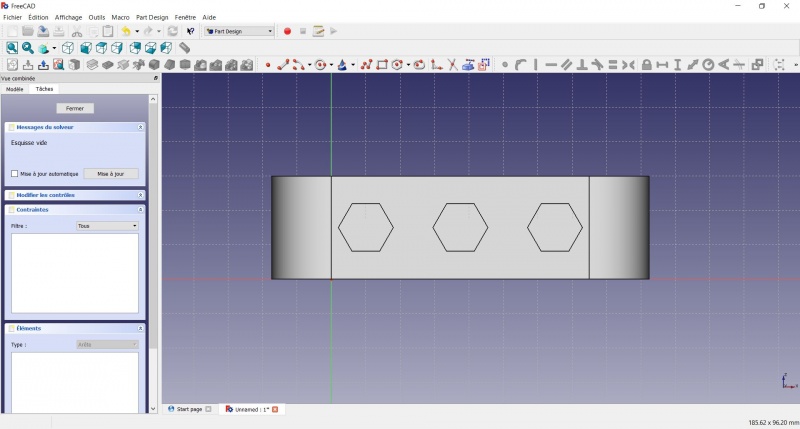
- Click on
Circle, click to place the center, move the pointer and click to define the radius.
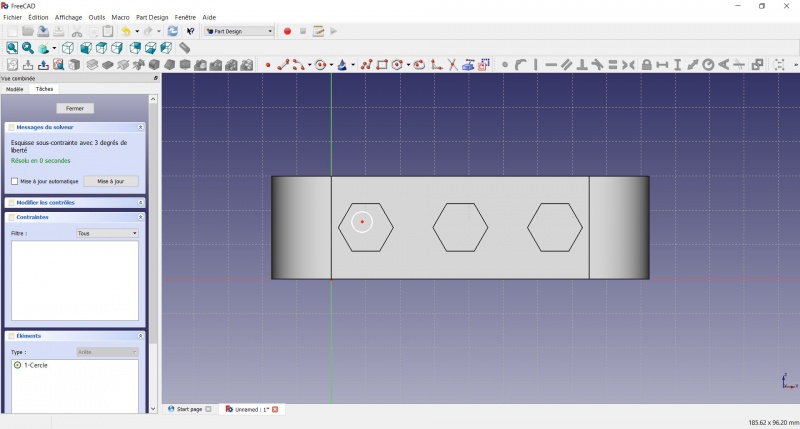
- Click on the center of the circle
- Click on the horizontal line of the XY plane
- Click on
 Distance
 - A dialog prompts you to set a dimension. Enter 15mm, click OK.
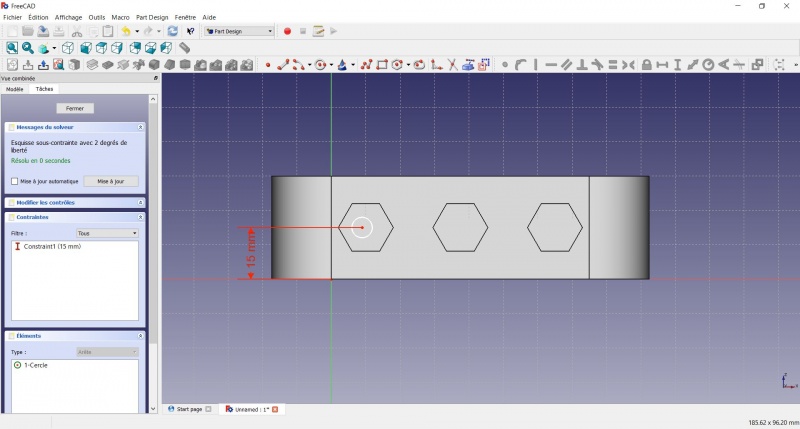
- Click on the center of the circle
- Click on the vertical of the XY plane
- Click on
 Distance
 - A dialog prompts you to set a dimension. Enter 10mm, click OK.
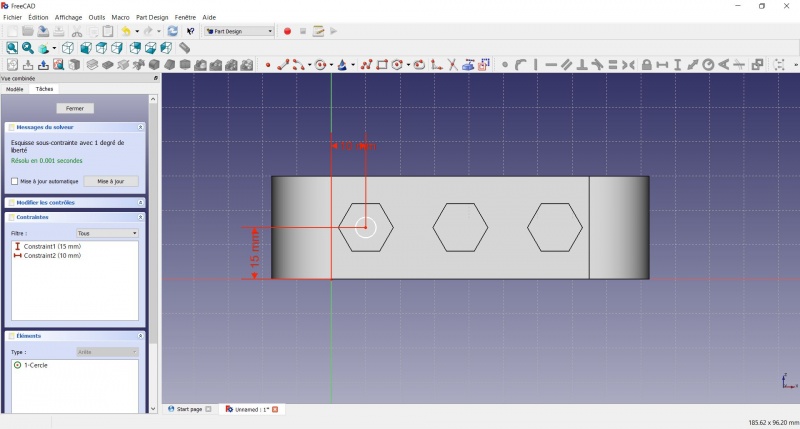
- Click on the circle
- Click on
Radius
- A dialog prompts you to set a dimension. Enter 3.5mm, click OK.
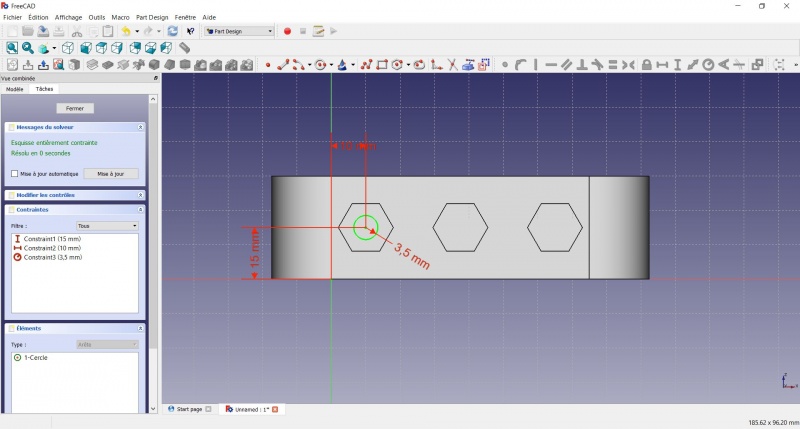
- To leave the sketch, click either on the "Close" button on the left, or the
 icon in the toolbar, or press ESC.
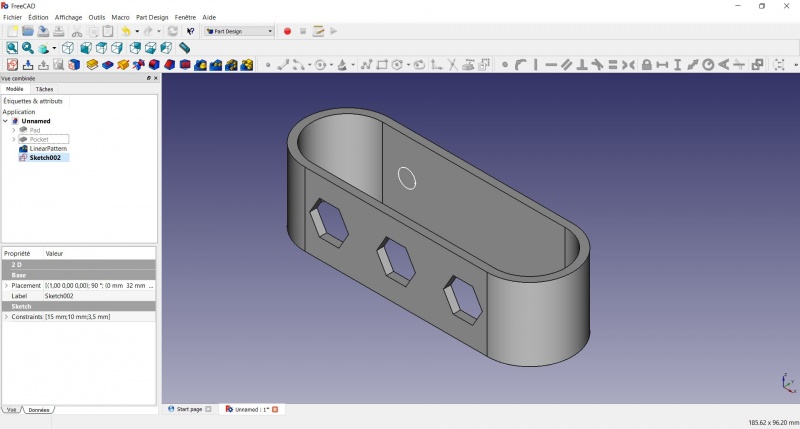
Create a pad
- Click on
Axonometric among the standard views, to better see what will happen.
- Click on
Pad.
- Enter 4mm and click OK.

Linear repetition
- In the Combo View on the left, select the tree view instead of the contextual task menu, click on the pad feature.
- Click on
LinearPattern.
- Set the length at 55mm and occurencies at 3, then click OK.
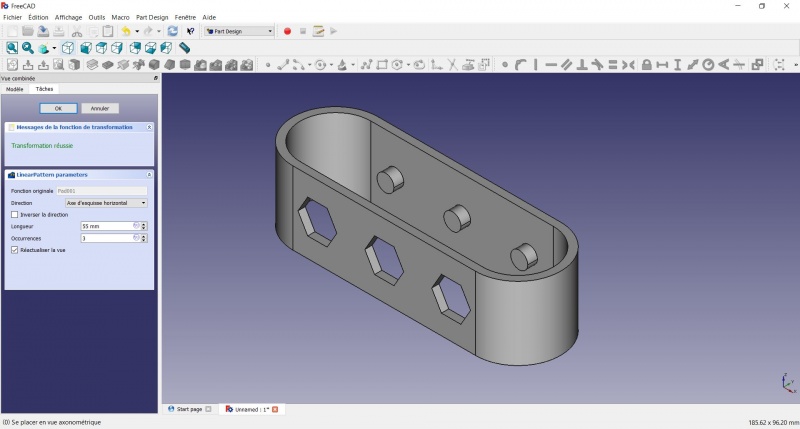
Draft
- Select the side of each round pads
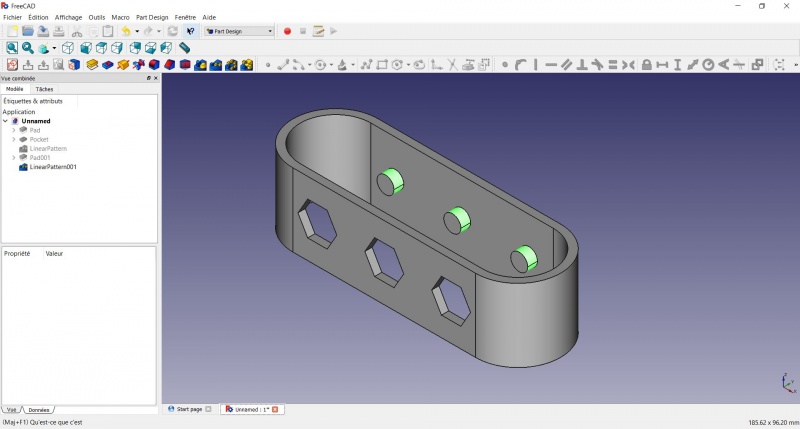
- Click on
Draft.
- Set the draft angle at 40°.
- Click on "Neutral plane" and select the face on which the sketch is drawn.
- Tick "Invert the draft direction".
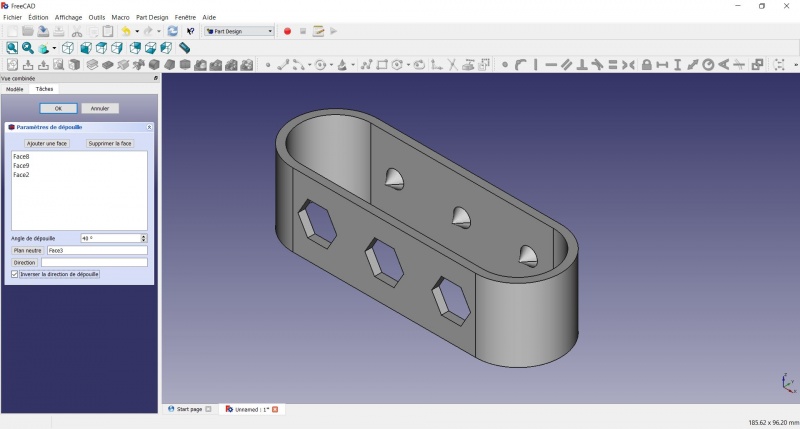
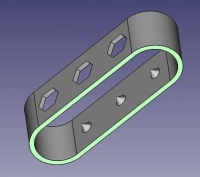
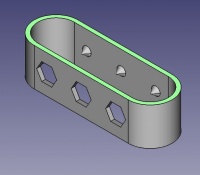
We could have used a chamfer to do something similar, but the draft is more appropriate in this case.
Chamfer = left / Draft = right
Finishes
- Holding CTRL select the bottom and top faces.
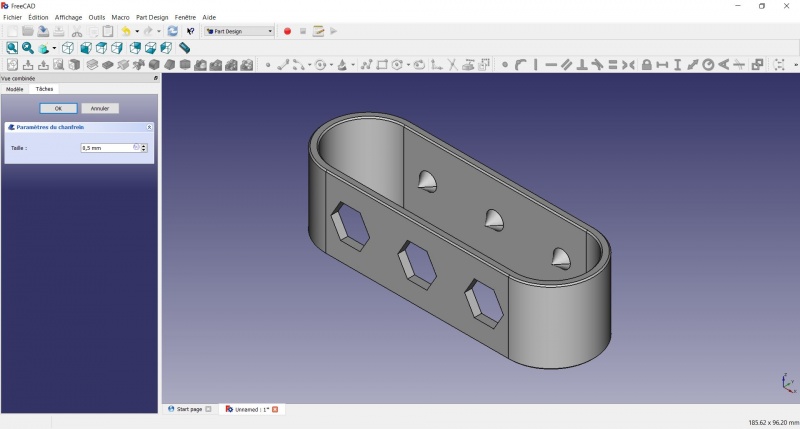
Perfect!
Export as a .STL
- In the Combo View on the left, select the tree view instead of the contextual task menu, click on the last feature (the chamfer).
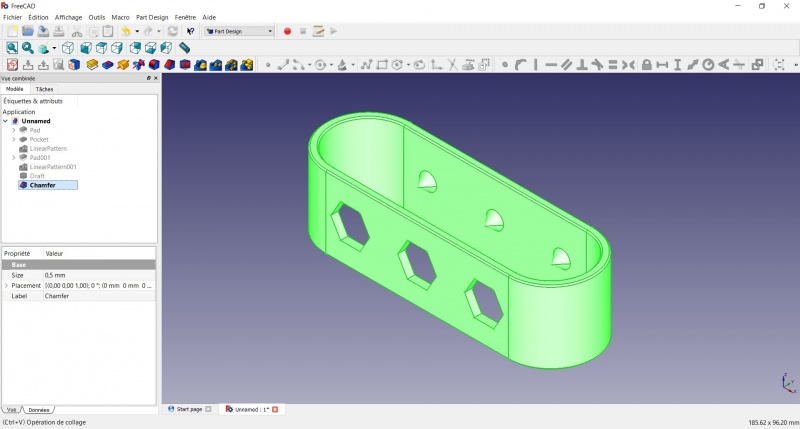
- Now you can select "Export..." from the File menu at the top left, and select the file format .STL.
- Print it instead of the first version or to replace it if it eventually broke ;-)
- Structure tools: Part, Group
- Helper tools: Create body, Create sketch, Edit sketch, Map sketch to face
- Modeling tools
- Datum tools: Create a datum point, Create a datum line, Create a datum plane, Create a local coordinate system, Create a shape binder, Create a sub-object(s) shape binder, Create a clone
- Additive tools: Pad, Revolution, Additive loft, Additive pipe, Additive helix, Additive box, Additive cylinder, Additive sphere, Additive cone, Additive ellipsoid, Additive torus, Additive prism, Additive wedge
- Subtractive tools: Pocket, Hole, Groove, Subtractive loft, Subtractive pipe, Subtractive helix, Subtractive box, Subtractive cylinder, Subtractive sphere, Subtractive cone, Subtractive ellipsoid, Subtractive torus, Subtractive prism, Subtractive wedge
- Transformation tools: Mirrored, Linear Pattern, Polar Pattern, Create MultiTransform, Scaled
- Dress-up tools: Fillet, Chamfer, Draft, Thickness
- Boolean: Boolean operation
- Extras: Migrate, Sprocket, Involute gear, Shaft design wizard
- Context menu: Set tip, Move object to other body, Move object after other object, Appearance, Color per face
- General: Create sketch, Edit sketch, Map sketch to face, Reorient sketch, Validate sketch, Merge sketches, Mirror sketch, Leave sketch, View sketch, View section, Toggle grid, Toggle snap, Configure rendering order, Stop operation
- Sketcher geometries: Point, Line, Arc, Arc by 3 points, Circle, Circle by 3 points, Ellipse, Ellipse by 3 points, Arc of ellipse, Arc of hyperbola, Arc of parabola, B-spline by control points, Periodic B-spline by control points, B-spline by knots, Periodic B-spline by knots, Polyline, Rectangle, Centered rectangle, Rounded rectangle, Triangle, Square, Pentagon, Hexagon, Heptagon, Octagon, Regular polygon, Slot, Fillet, Corner-preserving fillet, Trim, Extend, Split, External geometry, Carbon copy, Toggle construction geometry
- Sketcher constraints:
- Geometric constraints: Coincident, Point on object, Vertical, Horizontal, Parallel, Perpendicular, Tangent, Equal, Symmetric, Block
- Dimensional constraints: Lock, Horizontal distance, Vertical distance, Distance, Radius or weight, Diameter, Auto radius/diameter, Angle, Refraction (Snell's law)
- Constraint tools: Toggle driving/reference constraint, Activate/deactivate constraint
- Sketcher tools: Select unconstrained DoF, Select associated constraints, Select associated geometry, Select redundant constraints, Select conflicting constraints, Show/hide internal geometry, Select origin, Select horizontal axis, Select vertical axis, Symmetry, Clone, Copy, Move, Rectangular array, Remove axes alignment, Delete all geometry, Delete all constraints
- Sketcher B-spline tools: Show/hide B-spline degree, Show/hide B-spline control polygon, Show/hide B-spline curvature comb, Show/hide B-spline knot multiplicity, Show/hide B-spline control point weight, Convert geometry to B-spline, Increase B-spline degree, Decrease B-spline degree, Increase knot multiplicity, Decrease knot multiplicity, Insert knot, Join curves
- Sketcher virtual space: Switch virtual space
- Additional: Sketcher Dialog, Preferences, Sketcher scripting
- Getting started
- Installation: Download, Windows, Linux, Mac, Additional components, Docker, AppImage, Ubuntu Snap
- Basics: About FreeCAD, Interface, Mouse navigation, Selection methods, Object name, Preferences, Workbenches, Document structure, Properties, Help FreeCAD, Donate
- Help: Tutorials, Video tutorials
- Workbenches: Std Base, Arch, Assembly, CAM, Draft, FEM, Inspection, Mesh, OpenSCAD, Part, PartDesign, Points, Reverse Engineering, Robot, Sketcher, Spreadsheet, Surface, TechDraw, Test Framework
- Hubs: User hub, Power users hub, Developer hub
