Std ProjectUtil/it: Difference between revisions
Renatorivo (talk | contribs) No edit summary |
Renatorivo (talk | contribs) No edit summary |
||
| Line 2: | Line 2: | ||
{{Docnav/it |
{{Docnav/it |
||
|[[ |
|[[Std DependencyGraph/it|Grafico delle dipendenze]] |
||
|[[Std_MeasureDistance/it|Misura la distanza]] |
|[[Std_MeasureDistance/it|Misura la distanza]] |
||
|[[Std_Tools_Menu/it|Menu Strumenti]] |
|[[Std_Tools_Menu/it|Menu Strumenti]] |
||
Revision as of 20:20, 21 June 2020
|
Utilità di progetto |
| Posizione nel menu |
|---|
| Strumenti → Utilità di progetto... |
| Ambiente |
| Tutti |
| Avvio veloce |
| Nessuno |
| Introdotto nella versione |
| - |
| Vedere anche |
| Nessuno |
Descrizione
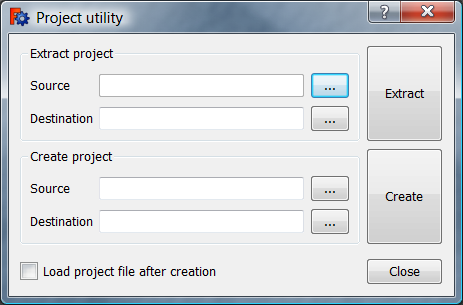
Con il comando Std ProjectUtil è possibile estrarre i file da un file di progetto FreeCAD (*.FCStd), che in realtà è un file ZIP e, dopo le modifiche manuali, creare un nuovo file di progetto da essi.
La finestra di dialogo Utilità di progetto
Utilizzo
Estrai progetto
- Select the Tools → Project utility... option from the menu.
- The Project utility dialog box opens.
- Press the ... button to the right of Extract project → Source.
- Select the *.FCStd file you want to edit.
- Press the ... button to the right of Extract project → Destination.
- Select a folder where the project file should be extracted. It is advisable to select an empty folder.
- Press the Extract button.
- Press the Close button to close the dialog box.
Manual edits
It is important to realize that the files inside a FreeCAD project file are interlinked. Only editing a single file will typically lead to errors. To make consistent edits across multiple files use a good code editor, such as Notepad++ (for the Windows OS).
Crea progetto
- Select the Tools → Project utility... option from the menu.
- The Project utility dialog box opens.
- Press the ... button to the right of Create project → Source.
- Select the Document.xml file. The command will be automatically find all linked files.
- Press the ... button to the right of Create project → Destination.
- Select a folder where the new project file should be created.
- Press the Create button.
- A new project file with a fixed name, project.fcstd, is created in the selected folder. There is no warning if a file with that name already exists.
- Optionally check the
Load project file after creation checkbox.
- Press the Close button to close the dialog box.
Note
- Per ulteriori informazioni sul formato del file di progetto di FreeCAD, consultare Formato dei file FCStd.
- File: New, Open, Close, Close All, Save, Save As, Save a Copy, Save All, Revert, Import, Export,Merge project, Project information, Print, Print preview, Export PDF, Recent files, Exit
- Edit: Undo, Redo, Cut, Copy, Paste, Duplicate selection, Refresh, Box selection, Box element selection, Select All, Delete, Send to Python Console, Placement, Transform, Alignment, Toggle Edit mode, Edit mode, Preferences
- View:
- Miscellaneous: Create new view, Orthographic view, Perspective view, Fullscreen, Bounding box, Toggle axis cross, Clipping plane, Texture mapping, Toggle navigation/Edit mode, Appearance, Random color, Workbench, Status bar
- Standard views: Fit all, Fit selection, Isometric, Dimetric, Trimetric, Home, Front, Top, Right, Rear, Bottom, Left, Rotate Left, Rotate Right
- Freeze display: Save views, Load views, Freeze view, Clear views
- Draw style: As is, Points, Wireframe, Hidden line, No shading, Shaded, Flat lines
- Stereo: Stereo red/cyan, Stereo quad buffer, Stereo Interleaved Rows, Stereo Interleaved Columns, Stereo Off, Issue camera position
- Zoom: Zoom In, Zoom Out, Box zoom
- Document window: Docked, Undocked, Fullscreen
- Visibility: Toggle visibility, Show selection, Hide selection, Select visible objects, Toggle all objects, Show all objects, Hide all objects, Toggle selectability, Toggle measurement, Clear measurement
- Toolbars: File, Edit, Clipboard, Workbench, Macro, View, Structure, Help
- Panels: Tree view, Property view, Selection view, Tasks, Python console, DAG view, Model, Report view
- Link navigation: Go to linked object, Go to the deepest linked object, Select all links
- Tree view actions: Sync view, Sync selection, Sync placement, Pre-selection, Record selection, Single document, Multi document, Collapse/Expand, Initiate dragging, Go to selection, Selection Back, Selection Forward
- Tools: Edit parameters, Save image, Load image, Scene inspector, Dependency graph, Project utility, Measure distance, Add text document, View turntable, Units calculator, Customize, Addon manager
- Macro: Macro recording, Macros, Recent macros, Execute macro, Attach to remote debugger, Debug macro, Stop debugging, Step over, Step into, Toggle breakpoint
- Help: Help, FreeCAD Website, Donate, Users documentation, Python scripting documentation, Automatic Python modules documentation, FreeCAD Forum, FreeCAD FAQ, Report a bug, About FreeCAD, What's This
- Getting started
- Installation: Download, Windows, Linux, Mac, Additional components, Docker, AppImage, Ubuntu Snap
- Basics: About FreeCAD, Interface, Mouse navigation, Selection methods, Object name, Preferences, Workbenches, Document structure, Properties, Help FreeCAD, Donate
- Help: Tutorials, Video tutorials
- Workbenches: Std Base, Arch, Assembly, CAM, Draft, FEM, Inspection, Mesh, OpenSCAD, Part, PartDesign, Points, Reverse Engineering, Robot, Sketcher, Spreadsheet, Surface, TechDraw, Test Framework
- Hubs: User hub, Power users hub, Developer hub
