PartDesign PolarPattern/de: Difference between revisions
No edit summary |
(Created page with "# Optional activiere den gewünschten Körper. # Optional wähle eine oder mehrere Features im Modellbaum oder in der 3D Ansicht. # Es gibt mehrere Möglichkeiten um das Werkzeug zu starten: #* Drücke die {{Button|16px PolarPattern}} Schaltfläche. #* Wähle die {{MenuCommand|Part Design → Apply a pattern → Image:PartDesign_PolarPattern.svg...") |
||
| Line 18: | Line 18: | ||
}} |
}} |
||
<span id="Description"></span> |
|||
==Beschreibung== |
==Beschreibung== |
||
| Line 25: | Line 26: | ||
{{Caption|Eine schlitzförmige Tasche (B), die in einem Grundkörper (A, auch als Träger bezeichnet) eingebracht ist, wird für ein polares Muster verwendet. Das Ergebnis (C) ist rechts dargestellt.}} |
{{Caption|Eine schlitzförmige Tasche (B), die in einem Grundkörper (A, auch als Träger bezeichnet) eingebracht ist, wird für ein polares Muster verwendet. Das Ergebnis (C) ist rechts dargestellt.}} |
||
<span id="Usage"></span> |
|||
==Anwendung== |
==Anwendung== |
||
<span id="Create"></span> |
|||
===Erstellen=== |
===Erstellen=== |
||
# |
# Optional [[PartDesign_Body#Active_status|activiere]] den gewünschten Körper. |
||
# |
# Optional wähle eine oder mehrere Features im [[Tree_view|Modellbaum]] oder in der [[3D_view|3D Ansicht]]. |
||
# Es gibt mehrere Möglichkeiten um das Werkzeug zu starten: |
|||
# There are several ways to invoke the tool: |
|||
#* |
#* Drücke die {{Button|[[Image:PartDesign_PolarPattern.svg|16px]] [[PartDesign_PolarPattern|PolarPattern]]}} Schaltfläche. |
||
#* |
#* Wähle die {{MenuCommand|Part Design → Apply a pattern → [[Image:PartDesign_PolarPattern.svg|16px]] PolarPattern}} Option aus dem Menü. |
||
# |
# Wenn es keinen aktiven Körper gibt, oder mehr als zwei Körper im Dokument vorhanden sind, dann öffnet der {{MenuCommand|Active Body Required}} Dialog und zeigt an, dass einer aktiviert werden muss. Wenn es einen einzelnen Körper gibt, dann wird dieser automatisch aktiviert. |
||
# |
# IWenn keine Features ausgewählt wurden, dann öffnet das {{MenuCommand|Select feature}} [[Task_panel|Eingabefenster]]: wähle eine oder mehrere (drücke die {{KEY|Ctrl}} Taste) aus der Liste und wähle die {{Button|OK}} Schaltfläche. |
||
# |
# Das {{MenuCommand|PolarPattern parameters}} [[Task_panel|Eingabefenster]] öffnet. Siehe [[#Options|Optionen]] für weitere Informationen. |
||
# |
# Drücke die {{Button|OK}} Schaltfläche um zu beenden. |
||
<span id="Edit"></span> |
|||
===Bearbeiten=== |
===Bearbeiten=== |
||
| Line 47: | Line 51: | ||
# Press the {{Button|OK}} button to finish. |
# Press the {{Button|OK}} button to finish. |
||
<span id="Options"></span> |
|||
==Optionen== |
==Optionen== |
||
| Line 75: | Line 80: | ||
* If the {{MenuCommand|Update view}} checkbox is checked the view will update in real time. |
* If the {{MenuCommand|Update view}} checkbox is checked the view will update in real time. |
||
<span id="Ordering_features"></span> |
|||
==Formelemente ordnen== |
==Formelemente ordnen== |
||
| Line 82: | Line 88: | ||
{{Caption|Auswirkung der Formelement-Reihenfolge}} |
{{Caption|Auswirkung der Formelement-Reihenfolge}} |
||
<span id="Limitations"></span> |
|||
==Einschränkungen== |
==Einschränkungen== |
||
Revision as of 07:12, 30 April 2023
|
|
| Menüeintrag |
|---|
| Part Design → Muster anwenden → Polares Muster |
| Arbeitsbereich |
| PartDesign |
| Standardtastenkürzel |
| Keiner |
| Eingeführt in Version |
| - |
| Siehe auch |
| PartDesign MehrfachTransformation |
Beschreibung
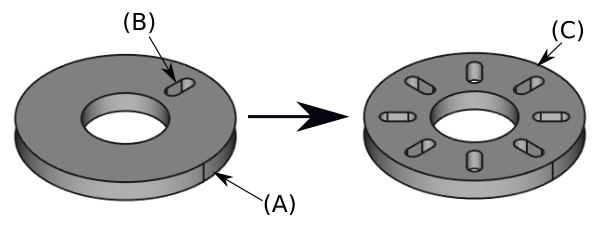
Das Werkzeug PolaresMuster erstellt aus einem Formelement ein polares Muster (d.h. eine Reihe von Kopien, die auf einer Ebene um eine Achse (Pol) herum angeordnet werden.)

Eine schlitzförmige Tasche (B), die in einem Grundkörper (A, auch als Träger bezeichnet) eingebracht ist, wird für ein polares Muster verwendet. Das Ergebnis (C) ist rechts dargestellt.
Anwendung
Erstellen
- Optional activiere den gewünschten Körper.
- Optional wähle eine oder mehrere Features im Modellbaum oder in der 3D Ansicht.
- Es gibt mehrere Möglichkeiten um das Werkzeug zu starten:
- Drücke die
PolarPattern Schaltfläche.
- Wähle die Part Design → Apply a pattern →
PolarPattern Option aus dem Menü.
- Drücke die
- Wenn es keinen aktiven Körper gibt, oder mehr als zwei Körper im Dokument vorhanden sind, dann öffnet der Active Body Required Dialog und zeigt an, dass einer aktiviert werden muss. Wenn es einen einzelnen Körper gibt, dann wird dieser automatisch aktiviert.
- IWenn keine Features ausgewählt wurden, dann öffnet das Select feature Eingabefenster: wähle eine oder mehrere (drücke die Ctrl Taste) aus der Liste und wähle die OK Schaltfläche.
- Das PolarPattern parameters Eingabefenster öffnet. Siehe Optionen für weitere Informationen.
- Drücke die OK Schaltfläche um zu beenden.
Bearbeiten
- Do one of the following:
- The PolarPattern parameters task panel opens. See Options for more information.
- Press the OK button to finish.
Optionen
- To add features:
- To remove features:
- If there are several features in the pattern, their order can be important. See Ordering features.
- Specify the Axis of the pattern:
- Normal sketch axis: The Z axis of the sketch (only available for sketch-based features).
- Vertical sketch axis: The Y axis of the sketch (idem).
- Horizontal sketch axis: The X axis of the sketch (idem).
- Construction line #: A separate entry for each construction line in the sketch (idem).
- Base X axis: The X axis of the Body.
- Base Y axis: The Y axis of the Body.
- Base Z axis: The Z axis of the Body.
- Select reference...: Select a Datum Line in the Tree view or a Datum Line or edge in the 3D view.
- Check the Reverse direction checkbox to reverse the pattern.
- Specify the Angle to be covered by the pattern. If the angle is less than 360°, the instances are evenly distributed from 0° (first instance) to the given angle (last instance). If the angle is a full 360° circle, the instances are evenly distributed around the circle. This means that for n instances an angle of 360° is equivalent to an angle of 360°*(1-1/n).
- Specify the number of Occurrences (including the original feature).
- If the Update view checkbox is checked the view will update in real time.
Formelemente ordnen
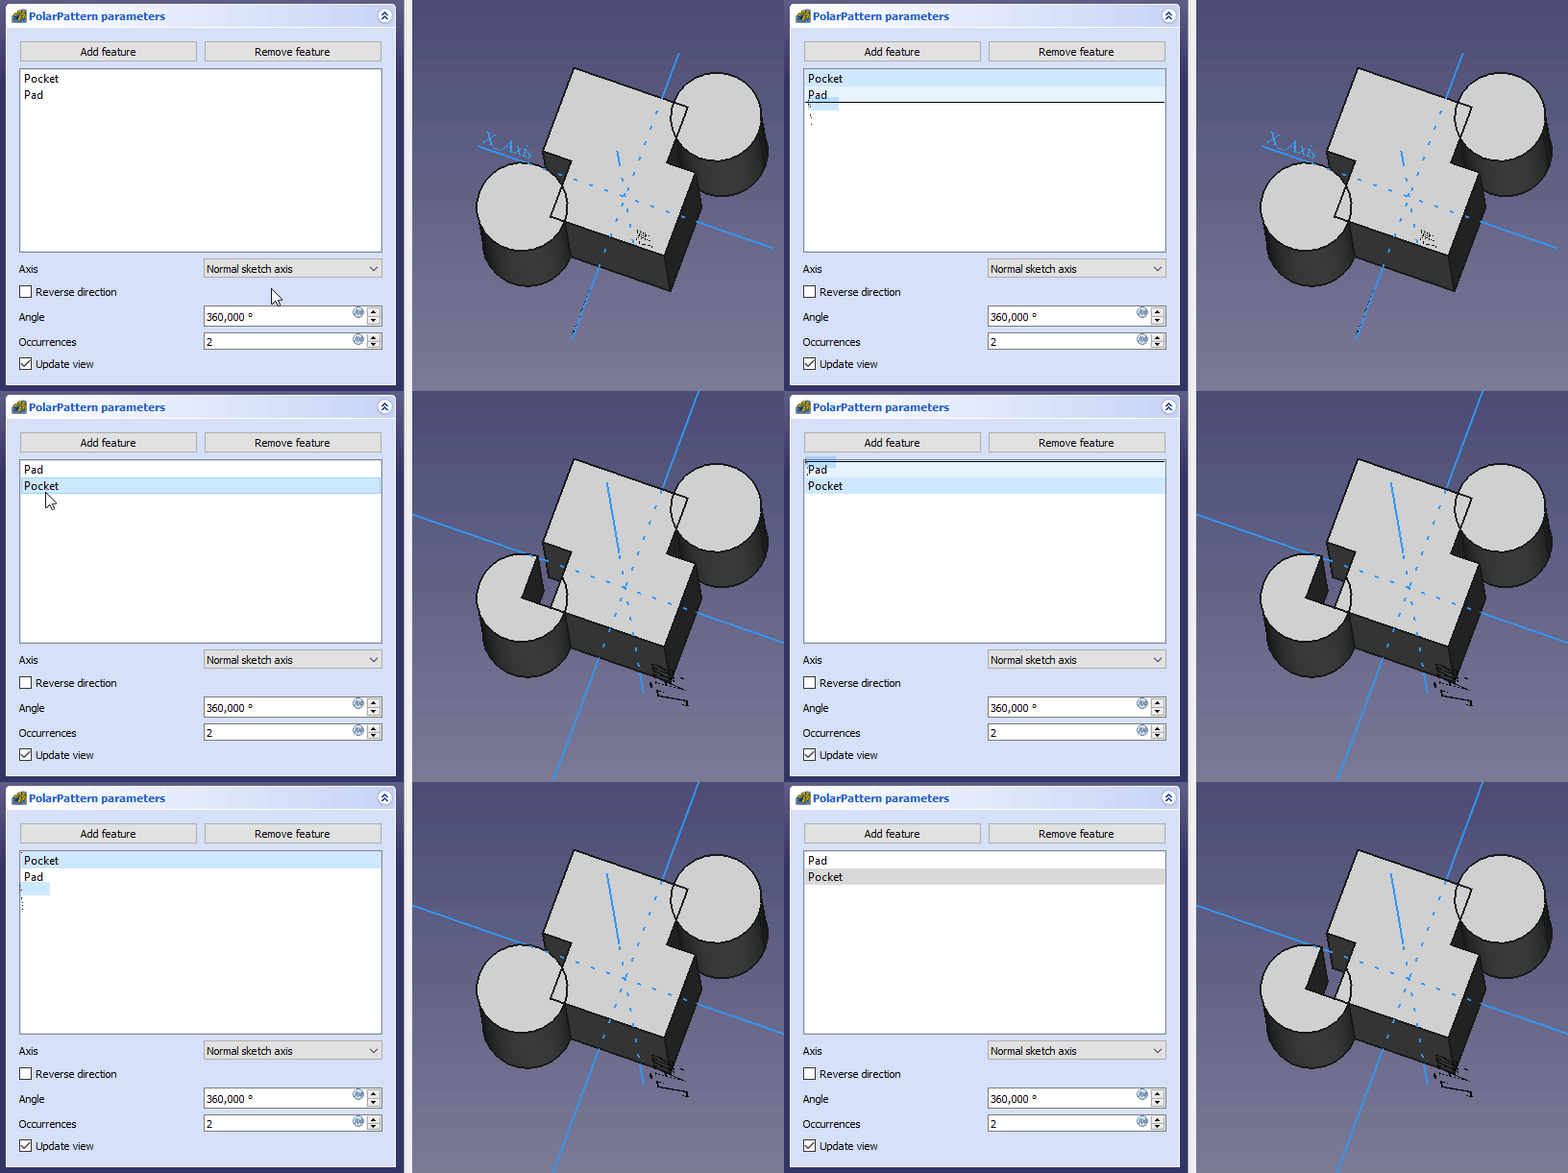
Wenn einige der ausgewählten Formelemente additiv und andere subtraktiv sind, kann ihre Reihenfolge letztlich das Ergebnis beeinflussen. Die Reihenfolge kann durch bewegen einzelner Formelemente innerhalb der Liste verändert werden. eingeführt mit Version 0.19
Auswirkung der Formelement-Reihenfolge
Einschränkungen
- Any shape in the pattern that does not overlap the parent feature will be excluded. This ensures that a PartDesign Body always consists of a single, connected solid.
- The PartDesign patterns are not yet as optimized as their Draft counterparts. So for a large number of instances you should consider using a Draft PolarArray instead, combined with a Part boolean operation. This may require major changes to your model as you are leaving PartDesign and therefore cannot simply continue with further PartDesign features in the same body. An example is shown in this Forum topic.
- A pattern cannot be applied directly to another pattern, be it polar, linear or a mirror. For this you need a PartDesign MultiTransform.
PartDesign-Arbeitsbereich 
- Struktur-Werkzeuge: Part-Arbeitsbereich, Gruppe
- Part Design-Hilfswerkzeuge: Körper erstellen, Skizze erstellen, Skizze bearbeiten, Skizze einer Fläche zuordnen
- Part Design-Modellierungswerkzeuge
- Datum tools: Bezugspunkt erstellen, Bezugslinie erstellen, Bezugsebene erstellen, Lokales Koordinatensystem erzeugen, Referenzobjekt erstellen, Klon erzeugen
- Additive tools: Aufpolstern (Pad), Rotation, Ausformung, Additives Rohr, Erzeugen eines zusätzlichen geometrischen Körpers
- Subtractive tools: Tasche, Bohrung, Nut, Abziehbarer Loft, Abziehbares Rohr, Erzeuge einen abzuziehenden Grundkörper
- Transformation Werkzeuge: Spiegeln, Lineares Muster, Polares Muster, Create MultiTransform
- Verschönerungswerkzeuge: Verrundung, Fase, Draft-Arbeitsbereich, Dicke
- Boolesche Operationen: Boolesche Operationen
- Extras: Migrieren, Shaft design wizard, Involute gear
- Contextual Menu tools: Spitze festlegen, Move object to other body, Objekt nach einem anderen Objekt verschieben
- Erste Schritte
- Installation: Herunterladen, Windows, Linux, Mac, Zusätzlicher Komponenten, Docker, AppImage, Ubuntu Snap
- Grundlagen: Über FreeCAD, Graphische Oberfläche, Mausbedienung, Auswahlmethoden, Objektname, Programmeinstellungen, Arbeitsbereiche, Dokumentstruktur, Objekteigenschaften, Hilf FreeCAD, Spende
- Hilfe: Tutorien, Video Tutorien
- Arbeitsbereiche: Std Base, Arch, Assembly, CAM, Draft, FEM, Inspection, Mesh, OpenSCAD, Part, PartDesign, Points, Reverse Engineering, Robot, Sketcher, Spreadsheet, Start, Surface, TechDraw, Test Framework, Web
