Sketcher Extend: Difference between revisions
No edit summary |
No edit summary |
||
| Line 47: | Line 47: | ||
# The cursor changes to a white cross with the tool icon. |
# The cursor changes to a white cross with the tool icon. |
||
# Select a line or an arc. |
# Select a line or an arc. |
||
# Move the cursor |
# Move the cursor in the direction to extend or shorten. |
||
# Do one of the following: |
# Do one of the following: |
||
#* Click an arbitrary point. |
#* Click an arbitrary point. |
||
Revision as of 11:26, 27 February 2024
|
|
| Menu location |
|---|
| Sketch → Sketcher geometries → Extend edge |
| Workbenches |
| Sketcher |
| Default shortcut |
| G Q |
| Introduced in version |
| 0.17 |
| See also |
| Sketcher Trim edge |
Description
The Sketcher Extend tool extends a line or an arc to an arbitrary location, or to a target edge or point.

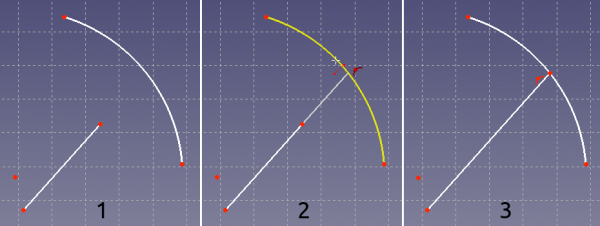
Shown on the left (1), the two sketch elements before the operation; in the middle (2), the line is being extended to the arc; to the right (3), the final result.
Usage
See also: Drawing aids.
- There are several ways to invoke the tool:
- Press the
Sketcher Extend edge button.
- Select the Sketcher → Sketcher geometries →
Extend edge option from the menu.
- Right-click in the 3D view and select the
Extend edge option from the context menu.
- Use the keyboard shortcut: G then Q.
- Press the
- If there is a previous selection it is cleared. The tool does not accept a pre-selection.
- The cursor changes to a white cross with the tool icon.
- Select a line or an arc.
- Move the cursor in the direction to extend or shorten.
- Do one of the following:
- Click an arbitrary point.
- To extend to another edge (Auto constraints must be enabled): Place the cursor over the target edge. When it is highlighted and the
Point on object constraint icon appears besides the cursor, click to confirm. The constraint is added.
- To extend to a point (Auto constraints must be enabled): Place the cursor over the target point. when it is highlighted and the
Coincident constraint icon appears besides the cursor, click to confirm. The constraint is added.
- If the tool runs in continue mode:
- Optionally keep extending edges.
- To finish, click in an empty area in the 3D view, right-click or press Esc, or start a another constraints or geometries tool.
Notes
- Only arcs and lines can be extended at this time.
- If not fully constrained, the target edge or point may be modified as well.
- General: Create sketch, Edit sketch, Map sketch to face, Reorient sketch, Validate sketch, Merge sketches, Mirror sketch, Leave sketch, View sketch, View section, Toggle grid, Toggle snap, Configure rendering order, Stop operation
- Sketcher geometries: Point, Line, Arc, Arc by 3 points, Circle, Circle by 3 points, Ellipse, Ellipse by 3 points, Arc of ellipse, Arc of hyperbola, Arc of parabola, B-spline by control points, Periodic B-spline by control points, B-spline by knots, Periodic B-spline by knots, Polyline, Rectangle, Centered rectangle, Rounded rectangle, Triangle, Square, Pentagon, Hexagon, Heptagon, Octagon, Regular polygon, Slot, Fillet, Corner-preserving fillet, Trim, Extend, Split, External geometry, Carbon copy, Toggle construction geometry
- Sketcher constraints:
- Geometric constraints: Coincident, Point on object, Vertical, Horizontal, Parallel, Perpendicular, Tangent, Equal, Symmetric, Block
- Dimensional constraints: Lock, Horizontal distance, Vertical distance, Distance, Radius or weight, Diameter, Auto radius/diameter, Angle, Refraction (Snell's law)
- Constraint tools: Toggle driving/reference constraint, Activate/deactivate constraint
- Sketcher tools: Select unconstrained DoF, Select associated constraints, Select associated geometry, Select redundant constraints, Select conflicting constraints, Show/hide internal geometry, Select origin, Select horizontal axis, Select vertical axis, Symmetry, Clone, Copy, Move, Rectangular array, Remove axes alignment, Delete all geometry, Delete all constraints
- Sketcher B-spline tools: Show/hide B-spline degree, Show/hide B-spline control polygon, Show/hide B-spline curvature comb, Show/hide B-spline knot multiplicity, Show/hide B-spline control point weight, Convert geometry to B-spline, Increase B-spline degree, Decrease B-spline degree, Increase knot multiplicity, Decrease knot multiplicity, Insert knot, Join curves
- Sketcher virtual space: Switch virtual space
- Additional: Sketcher Dialog, Preferences, Sketcher scripting
- Getting started
- Installation: Download, Windows, Linux, Mac, Additional components, Docker, AppImage, Ubuntu Snap
- Basics: About FreeCAD, Interface, Mouse navigation, Selection methods, Object name, Preferences, Workbenches, Document structure, Properties, Help FreeCAD, Donate
- Help: Tutorials, Video tutorials
- Workbenches: Std Base, Arch, Assembly, CAM, Draft, FEM, Inspection, Mesh, OpenSCAD, Part, PartDesign, Points, Reverse Engineering, Robot, Sketcher, Spreadsheet, Surface, TechDraw, Test Framework
- Hubs: User hub, Power users hub, Developer hub