Sketcher ConstrainLock/cs: Difference between revisions
(Updating to match new version of source page) |
(Updating to match new version of source page) |
||
| Line 2: | Line 2: | ||
{{Docnav |
{{Docnav |
||
|[[Sketcher_ConstrainAngle|Angle]] |
|||
|[[Sketcher_Dimension|Dimension]] |
|||
|[[Sketcher_ConstrainSnellsLaw|Refraction (Snell's law)]] |
|||
|[[Sketcher_ConstrainDistanceX|Horizontal distance]] |
|||
|[[Sketcher_Workbench|Sketcher]] |
|[[Sketcher_Workbench|Sketcher]] |
||
|IconL= |
|IconL=Sketcher_ConstrainAngle.svg |
||
|IconR= |
|IconR=Sketcher_ConstrainSnellsLaw.svg |
||
|IconC=Workbench_Sketcher.svg |
|IconC=Workbench_Sketcher.svg |
||
}} |
}} |
||
| Line 28: | Line 28: | ||
</div> |
</div> |
||
The [[Image:Sketcher_ConstrainLock.svg|24px]] [[Sketcher_ConstrainLock|Sketcher ConstrainLock]] tool applies [[Sketcher_ConstrainDistanceX|Horizontal distance]] and [[Sketcher_ConstrainDistanceY|Vertical distance]] constraints to points. If a single point is selected the constraints reference the sketch origin. If two or more points are selected the constraints reference the last selected point. |
|||
<span id="Usage"></span> |
<span id="Usage"></span> |
||
| Line 58: | Line 58: | ||
</div> |
</div> |
||
See also: [[Sketcher_Workbench#Drawing_aids|Drawing aids]]. |
|||
| ⚫ | |||
| ⚫ | |||
# To edit the constraints values, double-click on a constraint value in the 3D view, or double-click on the constraint or right-click and select '''Edit value''' in the Constraint list in the Tasks tab. |
|||
===[[Sketcher_Workbench#Continue_modes|Continue mode]]=== |
|||
'''Note:''' the constraint tool can also be started with no prior selection, but it will then only work on a single vertex, and reference the constraints to the sketch origin point. By default the command will be in continue mode to create new constraints; press the right mouse button or {{KEY|ESC}} once to quit the command. |
|||
# Make sure there is no selection. |
|||
== Scripting == |
|||
# There are several ways to invoke the tool: |
|||
#* {{Version|1.0}}: If the {{MenuCommand|Dimensioning constraints}} [[Sketcher_Preferences#General|preference]] is set to {{Value|Single tool}} (default): press the down arrow to the right of the {{Button|[[Image:Sketcher_Dimension.svg||x16px]][[Image:Toolbar_flyout_arrow.svg|x16px]]}} button and select the {{MenuCommand|[[Image:Sketcher_ConstrainLock.svg|16px]] Constrain lock}} option from the dropdown. |
|||
| ⚫ | |||
#* Select the {{MenuCommand|Sketch → Sketcher constraints → [[Image:Sketcher_ConstrainLock.svg|16px]] Constrain lock}} option from the menu. |
|||
#* {{Version|1.0}}: Right-click in the [[3D_view|3D view]] and select the {{MenuCommand|Dimension → [[Image:Sketcher_ConstrainLock.svg|16px]] Constrain lock}} option from the context menu. |
|||
#* Use the keyboard shortcut: {{KEY|K}} then {{KEY|L}}. |
|||
# The cursor changes to a cross with the tool icon. |
|||
# Select a single point. |
|||
# Two constraints are added. |
|||
# Optionally keep creating constraints. |
|||
# To finish, right-click or press {{KEY|Esc}}, or start another geometry or constraint creation tool. |
|||
===Run-once mode=== |
|||
The [[File:Sketcher_ConstrainLock.svg|24px]] [[Sketcher_ConstrainLock|Lock]] constraint is a GUI command which creates a [[File:Sketcher_ConstrainDistanceX.svg|24px]] [[Sketcher_ConstrainDistanceX|Horizontal distance]] and a [[File:Sketcher_ConstrainDistanceY.svg|24px]] [[Sketcher_ConstrainDistanceY|Vertical distance]] constraint, it is not a constraint of its own. See the [[Sketcher_scripting|Sketcher scripting]] page for details and examples on how to create these constraints from Python scripts. |
|||
| ⚫ | |||
# Invoke the tool as explained above. |
|||
# Depending on the selection two or more constraints are added. |
|||
==Notes== |
|||
* There is no automatic prompt to edit the constraint values. If required values can be [[Sketcher_Workbench#Edit_constraints|edited manually]]. |
|||
{{Docnav |
{{Docnav |
||
|[[Sketcher_ConstrainAngle|Angle]] |
|||
|[[Sketcher_Dimension|Dimension]] |
|||
|[[Sketcher_ConstrainSnellsLaw|Refraction (Snell's law)]] |
|||
|[[Sketcher_ConstrainDistanceX|Horizontal distance]] |
|||
|[[Sketcher_Workbench|Sketcher]] |
|[[Sketcher_Workbench|Sketcher]] |
||
|IconL= |
|IconL=Sketcher_ConstrainAngle.svg |
||
|IconR= |
|IconR=Sketcher_ConstrainSnellsLaw.svg |
||
|IconC=Workbench_Sketcher.svg |
|IconC=Workbench_Sketcher.svg |
||
}} |
}} |
||
Revision as of 15:23, 23 April 2024
|
|
| Umístění Menu |
|---|
| Sketch → Sketcher constraints → Constrain lock |
| Pracovní stoly |
| Sketcher, PartDesign |
| Výchozí zástupce |
| Nikdo |
| Představen ve verzi |
| - |
| Viz také |
| Constraint Coincident |
"Vytvoření zámku na vybrané položce"
Popis
Tento nástroj se pokusí plně ustavit jakoukoliv vybranou položku.
The Sketcher ConstrainLock tool applies Horizontal distance and Vertical distance constraints to points. If a single point is selected the constraints reference the sketch origin. If two or more points are selected the constraints reference the last selected point.
Díky tomu, že FreeCAD je stále ještě ve vývoji - tento nástroj předvádí podivné chování, když se pokouší 'zamknout' cokoliv jiného než bod. Například (jako ve V0.12 R4802), když uzamknete kružnici její obvodovou čárou a ne jejím středovým bodem, zobrazí se v dialogovém okně horizontální i vertikální vazební hodnoty, ale jsou nastaveny na nulu a nezobrazí se v grafickém okně.
Postup
- Nejdříve je nutné vysvítit položku, kterou chcete uzamknout. Z důvodů uvedených výše je rozumné vysvítit pouze bod.
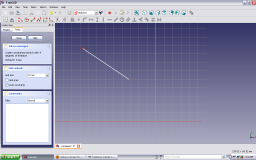
-
Vysvícení nakreselené položky je dosaženo posunutím myši nad položku a kliknutím na levé tlačítko myši.
Vysvícená položka změní barvu na zelenou.
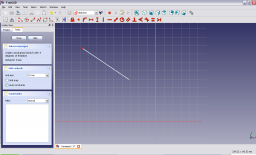
-
Jakmile je položka vysvícena, kliknutím levým tlačítkem myši na vazbu uzamknout uzamčete položku na jejím místě. Obyčejně je to představováno jako dvě vazby: horizontální vzdálenost od počátku a vertikální vzdálenost od počátku. Tyto vzdálenosti jsou obecně nastaveny na aktuální koordináty bodu.
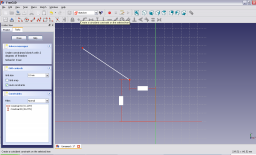
-
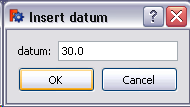
Vertikální a horizontální vazba, které určují zámek mohou být editovány buď dvojklikem na příslušnou vazbu v náčrtu nebo v záložce vazeb rozbalovacího panelu pohledu. To otevře dialogové okno pro editaci vazeb. Kliknutí na horizontální vazbu vyvolá:
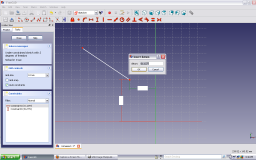 .
. - Zadejte požadovanou hodnotu v dialogovém okně a klikněte na OK.
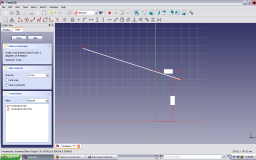
- Nová hodnota vazby je ihned aplikována výkres.
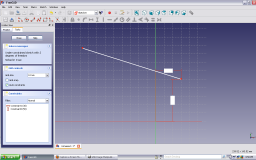
- Podobně může být editována i vertikální vazba pro ustavení bodu na požadovaném místě.
See also: Drawing aids.
Continue mode
- Make sure there is no selection.
- There are several ways to invoke the tool:
- introduced in version 1.0: If the Dimensioning constraints preference is set to
Single tool(default): press the down arrow to the right of thebutton and select the
Constrain lock option from the dropdown.
- If this preference has a different value (and in version 0.21 and below): press the
Constrain lock button.
- Select the Sketch → Sketcher constraints →
Constrain lock option from the menu.
- introduced in version 1.0: Right-click in the 3D view and select the Dimension →
Constrain lock option from the context menu.
- Use the keyboard shortcut: K then L.
- introduced in version 1.0: If the Dimensioning constraints preference is set to
- The cursor changes to a cross with the tool icon.
- Select a single point.
- Two constraints are added.
- Optionally keep creating constraints.
- To finish, right-click or press Esc, or start another geometry or constraint creation tool.
Run-once mode
- Select one or more points.
- Invoke the tool as explained above.
- Depending on the selection two or more constraints are added.
Notes
- There is no automatic prompt to edit the constraint values. If required values can be edited manually.
- General: Create sketch, Edit sketch, Map sketch to face, Reorient sketch, Validate sketch, Merge sketches, Mirror sketch, Leave sketch, View sketch, View section, Toggle grid, Toggle snap, Configure rendering order, Stop operation
- Sketcher geometries: Point, Line, Arc, Arc by 3 points, Circle, Circle by 3 points, Ellipse, Ellipse by 3 points, Arc of ellipse, Arc of hyperbola, Arc of parabola, B-spline by control points, Periodic B-spline by control points, B-spline by knots, Periodic B-spline by knots, Polyline, Rectangle, Centered rectangle, Rounded rectangle, Triangle, Square, Pentagon, Hexagon, Heptagon, Octagon, Regular polygon, Slot, Fillet, Corner-preserving fillet, Trim, Extend, Split, External geometry, Carbon copy, Toggle construction geometry
- Sketcher constraints:
- Geometric constraints: Coincident, Point on object, Vertical, Horizontal, Parallel, Perpendicular, Tangent, Equal, Symmetric, Block
- Dimensional constraints: Lock, Horizontal distance, Vertical distance, Distance, Radius or weight, Diameter, Auto radius/diameter, Angle, Refraction (Snell's law)
- Constraint tools: Toggle driving/reference constraint, Activate/deactivate constraint
- Sketcher tools: Select unconstrained DoF, Select associated constraints, Select associated geometry, Select redundant constraints, Select conflicting constraints, Show/hide internal geometry, Select origin, Select horizontal axis, Select vertical axis, Symmetry, Clone, Copy, Move, Rectangular array, Remove axes alignment, Delete all geometry, Delete all constraints
- Sketcher B-spline tools: Show/hide B-spline degree, Show/hide B-spline control polygon, Show/hide B-spline curvature comb, Show/hide B-spline knot multiplicity, Show/hide B-spline control point weight, Convert geometry to B-spline, Increase B-spline degree, Decrease B-spline degree, Increase knot multiplicity, Decrease knot multiplicity, Insert knot, Join curves
- Sketcher virtual space: Switch virtual space
- Additional: Sketcher Dialog, Preferences, Sketcher scripting
- Getting started
- Installation: Download, Windows, Linux, Mac, Additional components, Docker, AppImage, Ubuntu Snap
- Basics: About FreeCAD, Interface, Mouse navigation, Selection methods, Object name, Preferences, Workbenches, Document structure, Properties, Help FreeCAD, Donate
- Help: Tutorials, Video tutorials
- Workbenches: Std Base, Arch, Assembly, CAM, Draft, FEM, Inspection, Mesh, OpenSCAD, Part, PartDesign, Points, Reverse Engineering, Robot, Sketcher, Spreadsheet, Surface, TechDraw, Test Framework
- Hubs: User hub, Power users hub, Developer hub