Mesh Evaluation: Difference between revisions
No edit summary |
No edit summary |
||
| Line 39: | Line 39: | ||
#* {{MenuCommand|Only consider zero area faces as degenerated}} |
#* {{MenuCommand|Only consider zero area faces as degenerated}} |
||
# If you have not yet selected a mesh object you should do so in the dropdown list at the top of the dialog box. |
# If you have not yet selected a mesh object you should do so in the dropdown list at the top of the dialog box. |
||
| ⚫ | |||
# The dialog contains 7 or 8 (if the {{MenuCommand|Folds on surface}} option is enabled) tests. |
# The dialog contains 7 or 8 (if the {{MenuCommand|Folds on surface}} option is enabled) tests. |
||
# Do not use the checkboxes, they will automatically be checked to indicate that errors were found. |
# Do not use the checkboxes, they will automatically be checked to indicate that errors were found. |
||
# Press any of the {{Button|Analyze}} buttons to start a test. |
# Press any of the {{Button|Analyze}} buttons to start a test. |
||
# Or use the {{Button|Analyze}} button from the {{MenuCommand|All above test together}} option to run all 7 or 8 tests together. |
# Or use the {{Button|Analyze}} button from the {{MenuCommand|All above test together}} option to run all 7 or 8 tests together. |
||
# Errors will be indicated in the dialog box, and also, |
# Errors will be indicated in the dialog box, and also, with yellow and red markers, in the [[3D_view|3D view]]. |
||
# Optionally press one or more {{Button|Repair}} buttons to repair the mesh. |
# Optionally press one or more {{Button|Repair}} buttons to repair the mesh. |
||
# Optionally press the {{Button|Reset}} button to |
# Optionally press the {{Button|Reset}} button to reset all test results. The will reset the dialog and remove the colored markers from the 3D view. If you use the {{MenuCommand|All above test together}} {{Button|Analyze}} button for the next tests there is no need to use the {{Button|Reset}} button. |
||
# Optionally select a different mesh object from the dropdown list at the top of the dialog box. |
# Optionally select a different mesh object from the dropdown list at the top of the dialog box. |
||
# Press the {{Button|Close}} button to close the dialog box and finish the command. |
# Press the {{Button|Close}} button to close the dialog box and finish the command. |
||
| ⚫ | |||
==Notes== |
==Notes== |
||
Revision as of 14:57, 15 July 2020
|
Mesh Evaluation |
| Menu location |
|---|
| Meshes → Analyze → Evaluate and repair mesh... |
| Workbenches |
| Mesh |
| Default shortcut |
| None |
| Introduced in version |
| - |
| See also |
| None |
Description
The Mesh Evaluation command can evaluate and repair mesh objects.
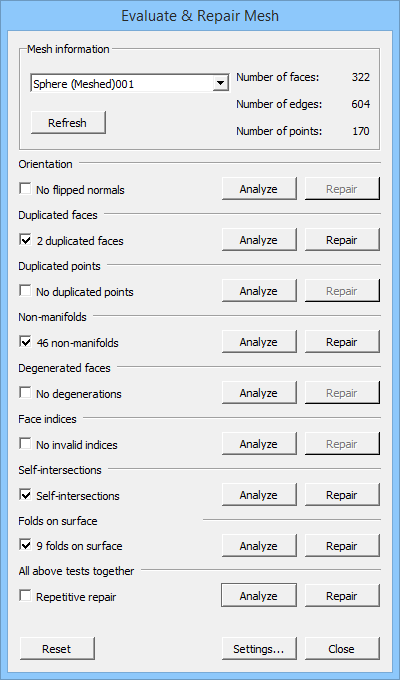
The Evaluate & Repair Mesh dialog box with the Folds on surface option enabled
Usage
- Optionally select a single mesh object.
- Select the Meshes → Analyze → Evaluate and repair mesh... option from the menu.
- Optionally press the Settings... button to change the following settings:
- Check for non-manifold points
- Enable check for folds on surface
- Only consider zero area faces as degenerated
- If you have not yet selected a mesh object you should do so in the dropdown list at the top of the dialog box.
- The dialog contains 7 or 8 (if the Folds on surface option is enabled) tests.
- Do not use the checkboxes, they will automatically be checked to indicate that errors were found.
- Press any of the Analyze buttons to start a test.
- Or use the Analyze button from the All above test together option to run all 7 or 8 tests together.
- Errors will be indicated in the dialog box, and also, with yellow and red markers, in the 3D view.
- Optionally press one or more Repair buttons to repair the mesh.
- Optionally press the Reset button to reset all test results. The will reset the dialog and remove the colored markers from the 3D view. If you use the All above test together Analyze button for the next tests there is no need to use the Reset button.
- Optionally select a different mesh object from the dropdown list at the top of the dialog box.
- Press the Close button to close the dialog box and finish the command.
- The Refresh button does not work properly at this time.
Notes
- Repairing a mesh can mean that problematic elements are simply deleted from the mesh resulting in holes. Holes can be closed with the Mesh FillupHoles, Mesh FillInteractiveHole and Mesh AddFacet commands.
Preferences
- Todo.
- Miscellaneous: Import mesh, Export mesh, Create mesh from shape, Regular solid, Unwrap Mesh, Unwrap Face
- Modifying: Harmonize normals, Flip normals, Fill holes, Close hole, Add triangle, Remove components, Remove components by hand, Smooth, Refinement, Decimation, Scale
- Boolean: Union, Intersection, Difference
- Cutting: Cut mesh, Trim mesh, Trim mesh with a plane, Create section from mesh and plane, Cross-sections
- Components and segments: Merge, Split by components, Create mesh segments, Create mesh segments from best-fit surfaces
- Getting started
- Installation: Download, Windows, Linux, Mac, Additional components, Docker, AppImage, Ubuntu Snap
- Basics: About FreeCAD, Interface, Mouse navigation, Selection methods, Object name, Preferences, Workbenches, Document structure, Properties, Help FreeCAD, Donate
- Help: Tutorials, Video tutorials
- Workbenches: Std Base, Arch, Assembly, CAM, Draft, FEM, Inspection, Mesh, OpenSCAD, Part, PartDesign, Points, Reverse Engineering, Robot, Sketcher, Spreadsheet, Surface, TechDraw, Test Framework
- Hubs: User hub, Power users hub, Developer hub
