Sketcher CreateArcOfHyperbola: Difference between revisions
No edit summary |
mNo edit summary |
||
| Line 1: | Line 1: | ||
<languages/> |
<languages/> |
||
<translate> |
<translate> |
||
<!--T:8--> |
<!--T:8--> |
||
{{Docnav |
{{Docnav |
||
| Line 37: | Line 38: | ||
# Move the mouse away from the two last selected points to see how the arc will look like. Click again when the approximate desired curvature is shown. This point will define the first end point (labelled 3 in the picture above). |
# Move the mouse away from the two last selected points to see how the arc will look like. Click again when the approximate desired curvature is shown. This point will define the first end point (labelled 3 in the picture above). |
||
# Click a fourth time in the 3D view to define the other end point (labelled 4 in the picture above). |
# Click a fourth time in the 3D view to define the other end point (labelled 4 in the picture above). |
||
<!--T:9--> |
<!--T:9--> |
||
| Line 49: | Line 51: | ||
</translate> |
</translate> |
||
{{ |
{{Sketcher_Tools_navi{{#translation:}}}} |
||
{{Userdocnavi{{#translation:}}}} |
{{Userdocnavi{{#translation:}}}} |
||
{{clear}} |
|||
Revision as of 17:04, 20 March 2022
|
|
| Menu location |
|---|
| Sketch → Sketcher geometries → Create an arc of hyperbola |
| Workbenches |
| Sketcher |
| Default shortcut |
| None |
| Introduced in version |
| 0.17 |
| See also |
| Sketcher Arc of Ellipse, Sketcher Arc of Parabola |
Description
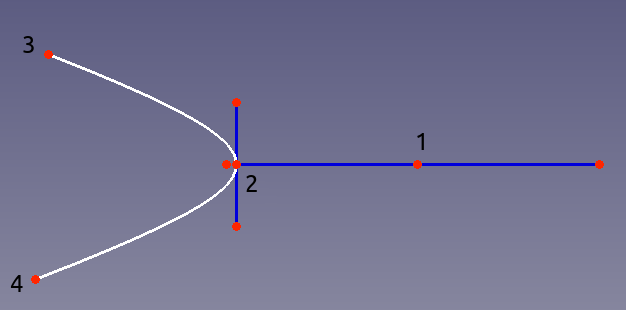
This tool creates an arc of hyperbola by center, major radius and endpoints.
Usage
- Press the
Arc of Hyperbola button.
- Click in the 3D view to define the major radius center (labelled 1 in the picture above).
- Click in the 3D view to define the major radius length, which is also the tip of the arc of hyperbola (labelled 2 in the picture above).
- Move the mouse away from the two last selected points to see how the arc will look like. Click again when the approximate desired curvature is shown. This point will define the first end point (labelled 3 in the picture above).
- Click a fourth time in the 3D view to define the other end point (labelled 4 in the picture above).
- General: Create sketch, Edit sketch, Map sketch to face, Reorient sketch, Validate sketch, Merge sketches, Mirror sketch, Leave sketch, View sketch, View section, Toggle grid, Toggle snap, Configure rendering order, Stop operation
- Sketcher geometries: Point, Line, Arc, Arc by 3 points, Circle, Circle by 3 points, Ellipse, Ellipse by 3 points, Arc of ellipse, Arc of hyperbola, Arc of parabola, B-spline by control points, Periodic B-spline by control points, B-spline by knots, Periodic B-spline by knots, Polyline, Rectangle, Centered rectangle, Rounded rectangle, Triangle, Square, Pentagon, Hexagon, Heptagon, Octagon, Regular polygon, Slot, Fillet, Corner-preserving fillet, Trim, Extend, Split, External geometry, Carbon copy, Toggle construction geometry
- Sketcher constraints:
- Geometric constraints: Coincident, Point on object, Vertical, Horizontal, Parallel, Perpendicular, Tangent, Equal, Symmetric, Block
- Dimensional constraints: Lock, Horizontal distance, Vertical distance, Distance, Radius or weight, Diameter, Auto radius/diameter, Angle, Refraction (Snell's law)
- Constraint tools: Toggle driving/reference constraint, Activate/deactivate constraint
- Sketcher tools: Select unconstrained DoF, Select associated constraints, Select associated geometry, Select redundant constraints, Select conflicting constraints, Show/hide internal geometry, Select origin, Select horizontal axis, Select vertical axis, Symmetry, Clone, Copy, Move, Rectangular array, Remove axes alignment, Delete all geometry, Delete all constraints
- Sketcher B-spline tools: Show/hide B-spline degree, Show/hide B-spline control polygon, Show/hide B-spline curvature comb, Show/hide B-spline knot multiplicity, Show/hide B-spline control point weight, Convert geometry to B-spline, Increase B-spline degree, Decrease B-spline degree, Increase knot multiplicity, Decrease knot multiplicity, Insert knot, Join curves
- Sketcher virtual space: Switch virtual space
- Additional: Sketcher Dialog, Preferences, Sketcher scripting
- Getting started
- Installation: Download, Windows, Linux, Mac, Additional components, Docker, AppImage, Ubuntu Snap
- Basics: About FreeCAD, Interface, Mouse navigation, Selection methods, Object name, Preferences, Workbenches, Document structure, Properties, Help FreeCAD, Donate
- Help: Tutorials, Video tutorials
- Workbenches: Std Base, Arch, Assembly, CAM, Draft, FEM, Inspection, Mesh, OpenSCAD, Part, PartDesign, Points, Reverse Engineering, Robot, Sketcher, Spreadsheet, Surface, TechDraw, Test Framework
- Hubs: User hub, Power users hub, Developer hub
