Part Torus/ru: Difference between revisions
(Created page with "==Использование==") |
(Updating to match new version of source page) |
||
| (30 intermediate revisions by 3 users not shown) | |||
| Line 1: | Line 1: | ||
<languages/> |
<languages/> |
||
{{Docnav/ru |
{{Docnav/ru |
||
|[[Part_Cone/ru|Конус]] |
|[[Part_Cone/ru|Конус]] |
||
|[[Part_Tube/ru| |
|[[Part_Tube/ru|Создать трубу]] |
||
|[[ |
|[[Part_Workbench/ru|Верстак Part]] |
||
|IconL=Part_Cone.svg |
|IconL=Part_Cone.svg |
||
|IconR=Part_Tube.svg |
|IconR=Part_Tube.svg |
||
| Line 13: | Line 14: | ||
|Name/ru=Тор |
|Name/ru=Тор |
||
|MenuLocation=Деталь → Примитивы → Тор |
|MenuLocation=Деталь → Примитивы → Тор |
||
|Workbenches=[[ |
|Workbenches=[[Part_Workbench/ru|Part(Деталь)]] |
||
|SeeAlso=[[Part_Primitives/ru|Создать примитивы]] |
|SeeAlso=[[Part_Primitives/ru|Создать примитивы]] |
||
}} |
}} |
||
== Описание == |
== Описание == |
||
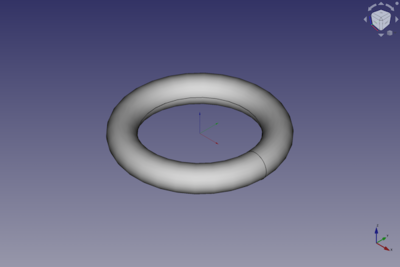
Создаёт простой параметрический тор с параметрами положение (position), угол1 (angle1), угол2 (angle2), угол3 (angle3), радиус1 (radius1) и радиус2 (radius2). |
|||
<div class="mw-translate-fuzzy"> |
|||
[[File:SimpleTorus.jpg|400px]] |
|||
Создаёт простой параметрический тор с следующими параметрами: положение (position), угол1 (angle1), угол2 (angle2), угол3 (angle3), радиус1 (radius1) и радиус2 (radius2). |
|||
</div> |
|||
A Part Torus can be turned into a segment of a torus by changing its {{PropertyData|Angle3}} property. By changing its {{PropertyData|Angle1}} and/or {{PropertyData|Angle2}} properties the swept profile can become a segment of a circle. |
|||
==Использование== |
|||
[[Image:Part_Torus_Example.png|400px]] |
|||
# Switch to the [[Image:Workbench_Part.svg|16px]] [[Part_Workbench|Part Workbench]] |
|||
# There are several ways to invoke the command: |
|||
#* Press the {{Button|[[Image:Part_Torus.svg|16px]]}} button in the toolbar. |
|||
#* Select the {{MenuCommand|Part → Primitives → [[Image:Part_Torus.svg|16px]] Torus}} from the menu bar. |
|||
<div class="mw-translate-fuzzy"> |
|||
==Применение== |
|||
</div> |
|||
<div class="mw-translate-fuzzy"> |
|||
'''Result:''' The torus will be positioned at origin (point 0,0,0) on creation.<br /> |
|||
# Переключитесь на [[Image:Workbench_Part.svg|16px]] [[Part_Workbench/ru|верстак Part]] |
|||
The angle parameters (angle1, angle2, angle3), as well as the radius parameter (radius1 , radius2) parameters permit to parametrize the torus, see next section. |
|||
# Существует несколько способов вызова команды: |
|||
#* Нажмите на иконку {{Button|[[Image:Part_Torus.svg|16px]] тора}} на панели инструментов. |
|||
#* Выберите из меню {{MenuCommand|Деталь → Примитивы → [[Image:Part_Torus.svg|16px]] Тор}}. |
|||
</div> |
|||
== |
== Example == |
||
[[Image:Part_Torus_Scripting_Example.png|thumb|Part Torus from the scripting example]] |
|||
[[File:TorusExampleOverviewParameters.jpg]] |
|||
A Part Torus object created with the [[#Scripting|scripting example]] below is shown here. |
|||
'''Parameter''' |
|||
== Notes == |
|||
A torus can be assimilated to a small disc that makes a circular orbit around an imaginary axe. Thus the parametric torus is defined by the following parameters: |
|||
* A Part Torus can also be created with the [[Image:Part_Primitives.svg|16px]] [[Part_Primitives|Part Primitives]] command. With that command you can specify the dimensions and placement at creation time. |
|||
* {{Parameter|Radius1:}} Radius of the circle around which the disc circulate |
|||
* {{Parameter|Radius2:}} Radius of the disc defining the form of the torus |
|||
* {{Parameter|Angle1:}} 1st angle to cut / define the disc of the torus |
|||
* {{Parameter|Angle2:}} 2nd angle to cut / define the disc of the torus |
|||
* {{Parameter|Angle3:}} 3rd angle to define the circumference of the torus. |
|||
as well as the standard set of placement parameters. The pictures below give a visual overview of the parameters antecedently mentioned: |
|||
<div class="mw-translate-fuzzy"> |
|||
[[File:TorusExampleRadius1.jpg]] |
[[File:TorusExampleRadius1.jpg]] |
||
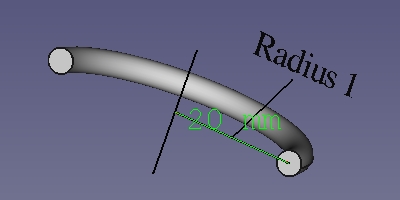
Параметр Радиус1 (Radius1) со значением 20мм. |
|||
The parameter Radius1 has a value of 20 mm. |
|||
</div> |
|||
See also: [[Property_editor|Property editor]]. |
|||
[[File:TorusExampleRadius2.jpg]] |
|||
The parameter Radius2 has a value of 2 mm. |
|||
A Part Torus object is derived from a [[Part_Feature|Part Feature]] object and inherits all its properties. It also has the following additional properties: |
|||
[[File:TorusExampleAngle1.jpg]] |
|||
The parameter Angle1 has a value of -90°. Notice that, the "angle measure" tool cannot display negative angle. Considered the displayed value in picture as "-90°". |
|||
=== Data === |
|||
[[File:TorusExampleAngle2.jpg]] |
|||
The parameter Angle2 has a value of 90°. |
|||
{{TitleProperty|Attachment}} |
|||
[[File:TorusExampleAngle3.jpg]] |
|||
The parameter Angle3 has a value of 90°. |
|||
{{clear}} |
|||
The object has the same attachment properties as a [[Part_Part2DObject#Data|Part Part2DObject]]. |
|||
{{TitleProperty|Torus}} |
|||
{{Docnav |
|||
|[[Part_Cone|Cone]] |
|||
<div class="mw-translate-fuzzy"> |
|||
|[[Part_Tube|Tube]] |
|||
* {{Parameter|Радиус1(Radius1):}} Радиус окружности, вокруг которой вращается наш диск |
|||
|[[Part_Module|Part]] |
|||
* {{Parameter|Радиус2 (Radius2):}} Радиус диска, определяющий форму тора |
|||
* {{Parameter|Угол1 (Angle1):}} 1-й угол для обрезки / построения диска тора |
|||
* {{Parameter|Угол2 (Angle2):}} 2-й угол для обрезки / построения диска тора |
|||
* {{Parameter|Угол3 (Angle3):}} 3-й угол для определения длины окружности тора. |
|||
</div> |
|||
== Scripting == |
|||
See also: [https://freecad.github.io/SourceDoc/ Autogenerated API documentation], [[Part_scripting|Part scripting]] and [[FreeCAD_Scripting_Basics|FreeCAD Scripting Basics]]. |
|||
A Part Torus can be created with the {{Incode|addObject()}} method of the document: |
|||
{{Code|code= |
|||
torus = FreeCAD.ActiveDocument.addObject("Part::Torus", "myTorus") |
|||
}} |
|||
* Where {{Incode|"myTorus"}} is the name for the object. |
|||
* The function returns the newly created object. |
|||
Example: |
|||
{{Code|code= |
|||
import FreeCAD as App |
|||
doc = App.activeDocument() |
|||
torus = doc.addObject("Part::Torus", "myTorus") |
|||
torus.Radius1 = 20 |
|||
torus.Radius2 = 10 |
|||
torus.Angle1 = -90 |
|||
torus.Angle2 = 45 |
|||
torus.Angle3 = 270 |
|||
torus.Placement = App.Placement(App.Vector(1, 2, 3), App.Rotation(30, 45, 10)) |
|||
doc.recompute() |
|||
}} |
|||
{{Docnav/ru |
|||
|[[Part_Cone/ru|Конус]] |
|||
|[[Part_Tube/ru|Создать трубу]] |
|||
|[[Part_Workbench/ru|Верстак Part]] |
|||
|IconL=Part_Cone.svg |
|IconL=Part_Cone.svg |
||
|IconR=Part_Tube.svg |
|IconR=Part_Tube.svg |
||
| Line 75: | Line 115: | ||
}} |
}} |
||
{{ |
{{Part_Tools_navi{{#translation:}}}} |
||
{{Userdocnavi{{#translation:}}}} |
{{Userdocnavi{{#translation:}}}} |
||
Latest revision as of 09:58, 3 March 2022
|
|
| Системное название |
|---|
| Part Torus |
| Расположение в меню |
| Деталь → Примитивы → Тор |
| Верстаки |
| Part(Деталь) |
| Быстрые клавиши |
| Нет |
| Представлено в версии |
| - |
| См. также |
| Создать примитивы |
Описание
Создаёт простой параметрический тор с следующими параметрами: положение (position), угол1 (angle1), угол2 (angle2), угол3 (angle3), радиус1 (radius1) и радиус2 (radius2).
A Part Torus can be turned into a segment of a torus by changing its ДанныеAngle3 property. By changing its ДанныеAngle1 and/or ДанныеAngle2 properties the swept profile can become a segment of a circle.
Применение
- Переключитесь на
верстак Part
- Существует несколько способов вызова команды:
Example

A Part Torus object created with the scripting example below is shown here.
Notes
- A Part Torus can also be created with the
Part Primitives command. With that command you can specify the dimensions and placement at creation time.
See also: Property editor.
A Part Torus object is derived from a Part Feature object and inherits all its properties. It also has the following additional properties:
Data
Attachment
The object has the same attachment properties as a Part Part2DObject.
Torus
- Радиус1(Radius1): Радиус окружности, вокруг которой вращается наш диск
- Радиус2 (Radius2): Радиус диска, определяющий форму тора
- Угол1 (Angle1): 1-й угол для обрезки / построения диска тора
- Угол2 (Angle2): 2-й угол для обрезки / построения диска тора
- Угол3 (Angle3): 3-й угол для определения длины окружности тора.
Scripting
See also: Autogenerated API documentation, Part scripting and FreeCAD Scripting Basics.
A Part Torus can be created with the addObject() method of the document:
torus = FreeCAD.ActiveDocument.addObject("Part::Torus", "myTorus")
- Where
"myTorus"is the name for the object. - The function returns the newly created object.
Example:
import FreeCAD as App

doc = App.activeDocument()

torus = doc.addObject("Part::Torus", "myTorus")
torus.Radius1 = 20
torus.Radius2 = 10
torus.Angle1 = -90
torus.Angle2 = 45
torus.Angle3 = 270
torus.Placement = App.Placement(App.Vector(1, 2, 3), App.Rotation(30, 45, 10))

doc.recompute()
- Примитивы: Куб(Параллелограмм), Конус, Цилиндр, Сфера, Тор, Полый цилиндр,Примитивы, Связующие формы
- Создание и правка: Выдавливание, Построение фигуры вращения, Отражение, Скругление, Фаска, Создать плоскость из граней, Ruled Surface, Профиль, Sweep, Section, Cross sections, 3D Offset, 2D Offset, Создать полый объект, Projection on surface, Прикрепление
- Булевы операции: Соединить, Разорвать связь, Compound Filter, Булевы операции, Cut, Fuse, Common, Connect, Embed, Cutout, Boolean fragments, Slice apart, Slice, XOR
- Измерительные: Measure Linear, Measure Angular, Measure Refresh, Clear All, Toggle All, Toggle 3D, Toggle Delta
- Начинающим
- Установка: Загрузка, Windows, Linux, Mac, Дополнительных компонентов, Docker, AppImage, Ubuntu Snap
- Базовая: О FreeCAD, Интерфейс, Навигация мыши, Методы выделения, Имя объекта, Настройки, Верстаки, Структура документа, Свойства, Помоги FreeCAD, Пожертвования
- Помощь: Учебники, Видео учебники
- Верстаки: Std Base, Arch, Assembly, CAM, Draft, FEM, Inspection, Mesh, OpenSCAD, Part, PartDesign, Points, Reverse Engineering, Robot, Sketcher, Spreadsheet, Surface, TechDraw, Test Framework

