Sketcher ConstrainTangent/it: Difference between revisions
Renatorivo (talk | contribs) (Created page with "Sketcher Vincolo tangente") |
(Updating to match new version of source page) |
||
| (58 intermediate revisions by 3 users not shown) | |||
| Line 1: | Line 1: | ||
<languages/> |
|||
{{GuiCommand|Name=Sketcher ConstrainTangent|Workbenches=[[Sketcher Workbench|Sketcher]], [[PartDesign Workbench|PartDesign]]|MenuLocation=Sketch → Sketcher constraints → Constrain tangent|SeeAlso=[[Constraint PointOnObject|Constraint point on object]]}} |
|||
<div class="mw-translate-fuzzy"> |
|||
{{Docnav/it |
|||
|[[Sketcher_ConstrainPerpendicular/it|Perpendicolare]] |
|||
|[[Sketcher_ConstrainEqual/it|Uguale lunghezza]] |
|||
|[[Sketcher_Workbench/it|Sketcher]] |
|||
|IconL=Sketcher_ConstrainPerpendicular.svg |
|||
|IconR=Sketcher_ConstrainEqual.svg |
|||
|IconC=Workbench_Sketcher.svg |
|||
}} |
|||
</div> |
|||
<div class="mw-translate-fuzzy"> |
|||
{{GuiCommand/it |
|||
|Name=Sketcher ConstrainTangent |
|||
|Name/it=Sketcher VincoloTangente |
|||
|MenuLocation=Sketch → Sketcher Vincoli → Vincolo Tangente |
|||
|Workbenches=[[Sketcher Workbench/it|Sketcher]] |
|||
|Shortcut={{KEY|T}} |
|||
|SeeAlso=[[Sketcher_ConstrainPointOnObject/it|Sketcher Vincolo Punto su oggetto]] |
|||
}} |
|||
</div> |
|||
<span id="Description"></span> |
|||
==Descrizione== |
|||
<div class="mw-translate-fuzzy"> |
|||
Il vincolo Tangente costringe due curve ad essere tangenti. Le linee sono trattate come infinite, e gli archi sono trattati come cerchi o ellissi completi. Il vincolo è anche in grado di collegare due curve costringendole ad essere tangenti nella giunzione, e quindi rende levigata la loro congiunzione. |
|||
</div> |
|||
<span id="Usage"></span> |
|||
==Utilizzo== |
|||
See also: [[Sketcher_Workbench#Drawing_aids|Drawing aids]]. |
|||
===[[Sketcher_Workbench#Continue_modes|Continue mode]]=== |
|||
# Make sure there is no selection. |
|||
# There are several ways to invoke the tool: |
|||
#* Press the {{Button|[[Image:Sketcher_ConstrainTangent.svg|16px]] [[Sketcher_ConstrainTangent|Constrain tangent or collinear]]}} button. |
|||
#* Select the {{MenuCommand|Sketch → Sketcher constraints → [[Image:Sketcher_ConstrainTangent.svg|16px]] Constrain tangent or collinear}} option from the menu. |
|||
#* {{Version|1.0}}: Right-click in the [[3D_view|3D view]] and select the {{MenuCommand|Constrain → [[Image:Sketcher_ConstrainTangent.svg|16px]] Constrain tangent or collinear}} option from the context menu. |
|||
#* Use the keyboard shortcut: {{KEY|T}}. |
|||
# The cursor changes to a cross with the tool icon. |
|||
# Do one of the following: |
|||
#* Select two edges. The edges can be any edge except a B-spline. |
|||
#* Select a point and two edges (in that order). |
|||
#* Select an edge, a point and another edge (idem). |
|||
# A Tangent constraint is added. If a point and two edges have been selected, up to two [[Sketcher_ConstrainPointOnObject|Point on object constraints]] can also be added. See [[#Between_two_edges_at_point|Examples]]. |
|||
# Optionally keep creating constraints. |
|||
# To finish, right-click or press {{KEY|Esc}}, or start another geometry or constraint creation tool. |
|||
== |
===Run-once mode=== |
||
Tangent Constraint makes two curves to touch each other (be tangent). Lines are treated infinite, and arcs are treated as full circles/ellipses. The constraint is also capable of connecting two curves, forcing them tangent at the joint, thus making the joint smooth. |
|||
# Do one of the following: |
|||
==How to use== |
|||
#* Select two edges (see above). |
|||
There are four different ways the constraint can be applied: |
|||
#* Select two endpoints belonging to different edges. |
|||
# between two curves (available not for all curves) |
|||
#* Select an edge and the endpoint of another edge (in any order). |
|||
# between two endpoints of a curve, making a smooth joint |
|||
# |
#* Select a point and two edges (idem). |
||
# Invoke the tool as explained above, or with the following additional option: |
|||
# between two curves at user-defined point |
|||
#* {{Version|1.0}}: Right-click in the [[3D_view|3D view]] and select the {{MenuCommand|[[Image:Sketcher_ConstrainTangent.svg|16px]] Constrain tangent or collinear}} option from the context menu. |
|||
# A Tangent constraint is added. If a point and two edges have been selected, up to two [[Sketcher_ConstrainPointOnObject|Point on object constraints]] can also be added. See [[#Between_two_edges_at_point|Examples]]. |
|||
==Examples== |
|||
To apply tangent constraint, one should the follow the steps: |
|||
* Select two or three entities in the sketch. |
|||
* Invoke the constraint by clicking its icon on the toolbar, or selecting the menu item, or using keyboard shortcut. |
|||
<span id="Between_two_edges"></span> |
|||
===Between two curves (direct tangency)=== |
|||
<div class="mw-translate-fuzzy"> |
|||
===Tra due curve (tangenza diretta)=== |
|||
[[Image:Sketcher ConsraintTangent mode1.png|600px]] |
[[Image:Sketcher ConsraintTangent mode1.png|600px]] |
||
</div> |
|||
[[Image:Sketcher_ConsraintTangent_mode1.png|400px]] |
|||
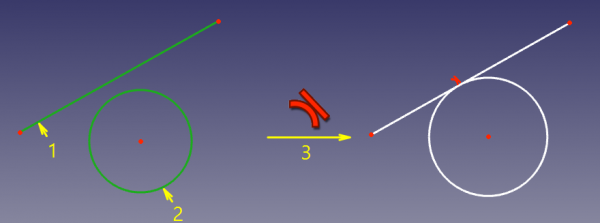
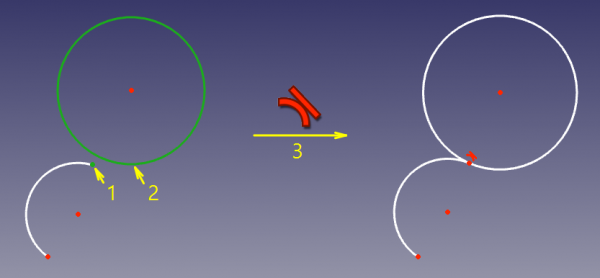
Two curves will be made tangent, and the point of tangency will be implicit. This mode is applied if two curves were selected. |
|||
The two edges are made tangent. If one of the edges is a [[Sketcher_Workbench#Sketcher_CompCreateConic|conic]], a [[Sketcher_CreatePoint|Point object]] that has a [[Sketcher_ConstrainPointOnObject|Point on object constraint]] with both (extended) edges is added. |
|||
'''Accepted selection:''' |
|||
* line + line, circle, arc, ellipse, arc-of-ellipse |
|||
* circle, arc + circle, arc |
|||
If direct tangency between selected curves is not supported (e.g. between a circle and an ellipse), a helper point will be added to sketch automatically, and tangency-via-point will be applied. |
|||
<div class="mw-translate-fuzzy"> |
|||
It is not recommended to reconstruct the point of tangency by creating a point and constraining it to lie on both curves. It will work, but the convergence will be seriously slower, jumpier, and will require about twice as many iterations to converge than normal. Use other modes of this constraint if the point of tangency is needed. |
|||
Non è consigliabile ricostruire il punto di tangenza creando un punto e vincolandolo ad appartenere ad entrambe le curve. Questo metodo funziona, ma la convergenza è molto lenta, e richiede circa il doppio delle iterazioni di una convergenza normale. Se il punto di tangenza è proprio necessario conviene utilizzare gli altri modi di applicazione di questo vincolo. |
|||
</div> |
|||
<span id="Between_two_endpoints"></span> |
|||
===Between two endpoints (point-to-point tangency)=== |
|||
<div class="mw-translate-fuzzy"> |
|||
===Tra due punti finali (tangenza punto con punto)=== |
|||
[[Image:Sketcher ConsraintTangent mode2.png|600px]] |
[[Image:Sketcher ConsraintTangent mode2.png|600px]] |
||
</div> |
|||
[[Image:Sketcher_ConsraintTangent_mode2.png|400px]] |
|||
In this mode, the endpoints are made coincident, and the joint is made tangent (C1-smooth, or "sharp", depending on the placement of curves before the constraint is applied). This mode is applied when two endpoints of two curves were selected. |
|||
The endpoints are made coincident, and the angle between the edges at that point is set to 180° (smooth joint) or 0° (sharp joint), depending on the placement of the edges before the constraint is applied. |
|||
'''Accepted selection:''' |
|||
* endpoint of line/arc/arc-of-ellipse + endpoint of line/arc/arc-of-ellipse (i.e., two endpoints of any two curves) |
|||
<span id="Between_edge_and_endpoint"></span> |
|||
===Between curve and endpoint (point-to-curve tangency)=== |
|||
<div class="mw-translate-fuzzy"> |
|||
===Tra una curva e un punto finale (tangenza punto con curva)=== |
|||
[[Image:Sketcher ConsraintTangent mode3.png|600px]] |
[[Image:Sketcher ConsraintTangent mode3.png|600px]] |
||
</div> |
|||
[[Image:Sketcher_ConsraintTangent_mode3.png|400px]] |
|||
In this mode, an endpoint of one curve is constrained to lie on the other curve, and the curves are forced tangent at the point. This mode is applied when a curve and an endpoint of another curve were selected. |
|||
<div class="mw-translate-fuzzy"> |
|||
'''Accepted selection:''' |
|||
In questo modo, il punto finale di una curva è vincolato a giacere sull'altra curva, e le curve sono forzate ad essere tangenti nel punto. Questa modalità viene applicata quando sono stati selezionati una curva e un punto finale di un'altra curva. |
|||
* line, circle, arc, ellipse, arc-of-ellipse + endpoint of line/arc/arc-of-ellipse (i.e., any curve + endpoint of any curve) |
|||
</div> |
|||
<span id="Between_two_edges_at_point"></span> |
|||
<div class="mw-translate-fuzzy"> |
|||
===Between two curves at point (tangent-via-point) (v0.15)=== |
|||
===Tra due curve nel punto (tangenza nel punto) (v0.15)=== |
|||
[[Image:Sketcher ConsraintTangent mode4.png|600px]] |
[[Image:Sketcher ConsraintTangent mode4.png|600px]] |
||
</div> |
|||
[[Image:Sketcher_ConsraintTangent_mode4.png|400px]] |
|||
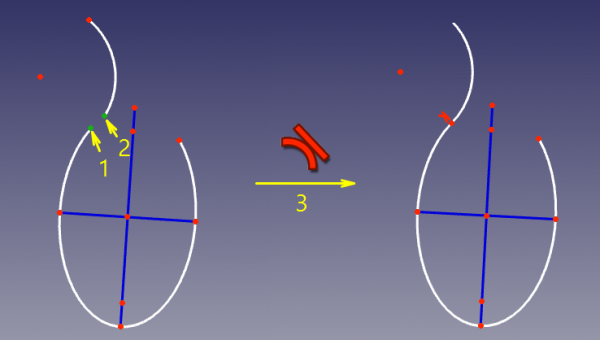
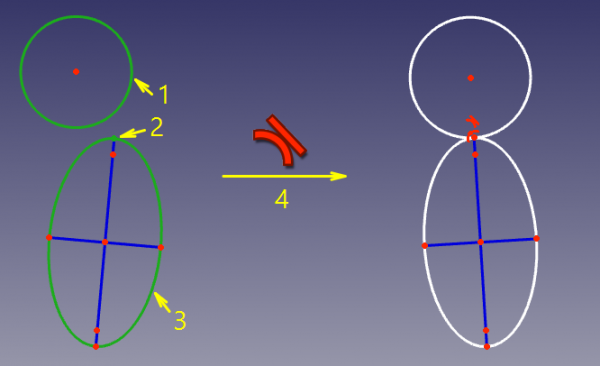
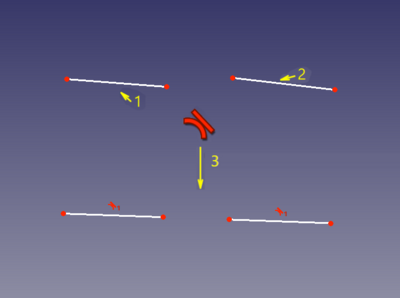
In this mode, two curves are made tangent, and the point of tangency is tracked. This mode is applied when two curves and a point were selected. |
|||
<div class="mw-translate-fuzzy"> |
|||
'''Accepted selection:''' |
|||
In questo modo, sono rese tangenti due curve, e il punto di tangenza è monitorato. Questa modalità viene applicata quando sono state selezionate due curve e un punto. |
|||
* any line/curve + any line/curve + any point |
|||
</div> |
|||
"Any point" can be a lone point, or a point of something, e.g. a center of a circle, an endpoint of an arc, or the origin. |
|||
<div class="mw-translate-fuzzy"> |
|||
For the constraint to work correctly, the point must be on both curves. So, as the constraint is invoked, the point will be automatically constrained onto both curves ([[Sketcher helper constraint|helper constraints]] will be added, if necessary), and the curves will be forced tangent at the point. These [[Sketcher helper constraint|helper constraints]] are plain regular constraints. They can be added manually, or deleted. |
|||
Rispetto alla tangenza diretta, questo vincolo è più lento, perché sono coinvolti i gradi di libertà, ma se il punto di tangenza è necessario, è la modalità consigliata perché offre una migliore convergenza rispetto alla tangenza diretta + punto su due curve. |
|||
</div> |
|||
<span id="Between_two_lines"></span> |
|||
Compared to direct tangency, this constraint is slower, because there are more degrees of freedom involved, but if the point of tangency is needed, it is the recommended mode because it offers better convergence compared to direct tangency + point on two curves. |
|||
<div class="mw-translate-fuzzy"> |
|||
===Tra due linee (collineari)=== |
|||
</div> |
|||
[[Image:Sketcher_ConstraintTangent_mode5.png|400px]] |
|||
The placement of the point before the constraint is applied is a hint for the solver for where the tangency should be. With this constraint, one can constrain two ellipses to touch each other in two places. |
|||
The two lines are made collinear. |
|||
==Scripting== |
|||
<span id="Scripting"></span> |
|||
Tangent Constraint can be created from [[macros]] and from the python console by using the following: |
|||
== Script == |
|||
<div class="mw-translate-fuzzy"> |
|||
I vincoli di tangenza possono essere creati con le [[macros/it|macro]] e dalla [[FreeCAD_Scripting_Basics/it|console di Python]] utilizzando la seguente funzione: |
|||
</div> |
|||
{{Code|code= |
{{Code|code= |
||
# direct tangency |
# direct tangency |
||
| Line 75: | Line 145: | ||
Sketch.addConstraint(Sketcher.Constraint('TangentViaPoint',icurve1,icurve2,geoidpoint,pointpos)) |
Sketch.addConstraint(Sketcher.Constraint('TangentViaPoint',icurve1,icurve2,geoidpoint,pointpos)) |
||
}} |
}} |
||
Dove: |
|||
where: |
|||
:* |
:* {{incode|Sketch}} è un oggetto sketch |
||
:* |
:* {{incode|icurve1}}, {{incode|icurve2}} sono due numeri interi che identificano le curve da rendere tangenti. I numeri interi sono gli indici nello schizzo (il valore, reso da {{incode|Sketch.addGeometry}}). |
||
:* |
:* {{incode|pointpos1}}, {{incode|pointpos2}} dovrebbe essere 1 per il punto iniziale e 2 per il punto finale. |
||
:* |
:* {{incode|geoidpoint}} e {{incode|pointpos}} in {{incode|TangentViaPoint}} sono gli indici che specificano il punto di tangenza. |
||
The [[Sketcher_scripting|Sketcher scripting]] page explains the values which can be used for {{incode|incurve1}}, {{incode|incurve2}}, {{incode|pointpos1}}, {{incode|pointpos2}}, {{incode|geoidpoint}} and {{incode|pointpos}} and contains further examples on how to create constraints from Python scripts. |
|||
{{clear}} |
|||
<languages/> |
|||
<div class="mw-translate-fuzzy"> |
|||
{{Docnav/it |
|||
|[[Sketcher_ConstrainPerpendicular/it|Perpendicolare]] |
|||
|[[Sketcher_ConstrainEqual/it|Uguale lunghezza]] |
|||
|[[Sketcher_Workbench/it|Sketcher]] |
|||
|IconL=Sketcher_ConstrainPerpendicular.svg |
|||
|IconR=Sketcher_ConstrainEqual.svg |
|||
|IconC=Workbench_Sketcher.svg |
|||
}} |
|||
</div> |
|||
{{Sketcher_Tools_navi{{#translation:}}}} |
|||
{{Userdocnavi{{#translation:}}}} |
|||
Latest revision as of 15:01, 23 April 2024
|
|
| Posizione nel menu |
|---|
| Sketch → Sketcher Vincoli → Vincolo Tangente |
| Ambiente |
| Sketcher |
| Avvio veloce |
| T |
| Introdotto nella versione |
| - |
| Vedere anche |
| Sketcher Vincolo Punto su oggetto |
Descrizione
Il vincolo Tangente costringe due curve ad essere tangenti. Le linee sono trattate come infinite, e gli archi sono trattati come cerchi o ellissi completi. Il vincolo è anche in grado di collegare due curve costringendole ad essere tangenti nella giunzione, e quindi rende levigata la loro congiunzione.
Utilizzo
See also: Drawing aids.
Continue mode
- Make sure there is no selection.
- There are several ways to invoke the tool:
- Press the
Constrain tangent or collinear button.
- Select the Sketch → Sketcher constraints →
Constrain tangent or collinear option from the menu.
- introduced in version 1.0: Right-click in the 3D view and select the Constrain →
Constrain tangent or collinear option from the context menu.
- Use the keyboard shortcut: T.
- Press the
- The cursor changes to a cross with the tool icon.
- Do one of the following:
- Select two edges. The edges can be any edge except a B-spline.
- Select a point and two edges (in that order).
- Select an edge, a point and another edge (idem).
- A Tangent constraint is added. If a point and two edges have been selected, up to two Point on object constraints can also be added. See Examples.
- Optionally keep creating constraints.
- To finish, right-click or press Esc, or start another geometry or constraint creation tool.
Run-once mode
- Do one of the following:
- Select two edges (see above).
- Select two endpoints belonging to different edges.
- Select an edge and the endpoint of another edge (in any order).
- Select a point and two edges (idem).
- Invoke the tool as explained above, or with the following additional option:
- introduced in version 1.0: Right-click in the 3D view and select the
Constrain tangent or collinear option from the context menu.
- introduced in version 1.0: Right-click in the 3D view and select the
- A Tangent constraint is added. If a point and two edges have been selected, up to two Point on object constraints can also be added. See Examples.
Examples
The two edges are made tangent. If one of the edges is a conic, a Point object that has a Point on object constraint with both (extended) edges is added.
Non è consigliabile ricostruire il punto di tangenza creando un punto e vincolandolo ad appartenere ad entrambe le curve. Questo metodo funziona, ma la convergenza è molto lenta, e richiede circa il doppio delle iterazioni di una convergenza normale. Se il punto di tangenza è proprio necessario conviene utilizzare gli altri modi di applicazione di questo vincolo.
The endpoints are made coincident, and the angle between the edges at that point is set to 180° (smooth joint) or 0° (sharp joint), depending on the placement of the edges before the constraint is applied.
In questo modo, il punto finale di una curva è vincolato a giacere sull'altra curva, e le curve sono forzate ad essere tangenti nel punto. Questa modalità viene applicata quando sono stati selezionati una curva e un punto finale di un'altra curva.
In questo modo, sono rese tangenti due curve, e il punto di tangenza è monitorato. Questa modalità viene applicata quando sono state selezionate due curve e un punto.
Rispetto alla tangenza diretta, questo vincolo è più lento, perché sono coinvolti i gradi di libertà, ma se il punto di tangenza è necessario, è la modalità consigliata perché offre una migliore convergenza rispetto alla tangenza diretta + punto su due curve.
Tra due linee (collineari)
The two lines are made collinear.
Script
I vincoli di tangenza possono essere creati con le macro e dalla console di Python utilizzando la seguente funzione:
# direct tangency
Sketch.addConstraint(Sketcher.Constraint('Tangent',icurve1,icurve2))

# point-to-point tangency
Sketch.addConstraint(Sketcher.Constraint('Tangent',icurve1,pointpos1,icurve2,pointpos2))

# point-to-curve tangency
Sketch.addConstraint(Sketcher.Constraint('Tangent',icurve1,pointpos1,icurve2))

# tangent-via-point (plain constraint, helpers are not added automatically)
Sketch.addConstraint(Sketcher.Constraint('TangentViaPoint',icurve1,icurve2,geoidpoint,pointpos))
Dove:
Sketchè un oggetto sketchicurve1,icurve2sono due numeri interi che identificano le curve da rendere tangenti. I numeri interi sono gli indici nello schizzo (il valore, reso daSketch.addGeometry).pointpos1,pointpos2dovrebbe essere 1 per il punto iniziale e 2 per il punto finale.geoidpointepointposinTangentViaPointsono gli indici che specificano il punto di tangenza.
The Sketcher scripting page explains the values which can be used for incurve1, incurve2, pointpos1, pointpos2, geoidpoint and pointpos and contains further examples on how to create constraints from Python scripts.
- General: Create sketch, Edit sketch, Map sketch to face, Reorient sketch, Validate sketch, Merge sketches, Mirror sketch, Leave sketch, View sketch, View section, Toggle grid, Toggle snap, Configure rendering order, Stop operation
- Sketcher geometries: Point, Line, Arc, Arc by 3 points, Circle, Circle by 3 points, Ellipse, Ellipse by 3 points, Arc of ellipse, Arc of hyperbola, Arc of parabola, B-spline by control points, Periodic B-spline by control points, B-spline by knots, Periodic B-spline by knots, Polyline, Rectangle, Centered rectangle, Rounded rectangle, Triangle, Square, Pentagon, Hexagon, Heptagon, Octagon, Regular polygon, Slot, Fillet, Corner-preserving fillet, Trim, Extend, Split, External geometry, Carbon copy, Toggle construction geometry
- Sketcher constraints:
- Geometric constraints: Coincident, Point on object, Vertical, Horizontal, Parallel, Perpendicular, Tangent, Equal, Symmetric, Block
- Dimensional constraints: Lock, Horizontal distance, Vertical distance, Distance, Radius or weight, Diameter, Auto radius/diameter, Angle, Refraction (Snell's law)
- Constraint tools: Toggle driving/reference constraint, Activate/deactivate constraint
- Sketcher tools: Select unconstrained DoF, Select associated constraints, Select associated geometry, Select redundant constraints, Select conflicting constraints, Show/hide internal geometry, Select origin, Select horizontal axis, Select vertical axis, Symmetry, Clone, Copy, Move, Rectangular array, Remove axes alignment, Delete all geometry, Delete all constraints
- Sketcher B-spline tools: Show/hide B-spline degree, Show/hide B-spline control polygon, Show/hide B-spline curvature comb, Show/hide B-spline knot multiplicity, Show/hide B-spline control point weight, Convert geometry to B-spline, Increase B-spline degree, Decrease B-spline degree, Increase knot multiplicity, Decrease knot multiplicity, Insert knot, Join curves
- Sketcher virtual space: Switch virtual space
- Additional: Sketcher Dialog, Preferences, Sketcher scripting
- Getting started
- Installation: Download, Windows, Linux, Mac, Additional components, Docker, AppImage, Ubuntu Snap
- Basics: About FreeCAD, Interface, Mouse navigation, Selection methods, Object name, Preferences, Workbenches, Document structure, Properties, Help FreeCAD, Donate
- Help: Tutorials, Video tutorials
- Workbenches: Std Base, Arch, Assembly, CAM, Draft, FEM, Inspection, Mesh, OpenSCAD, Part, PartDesign, Points, Reverse Engineering, Robot, Sketcher, Spreadsheet, Surface, TechDraw, Test Framework
- Hubs: User hub, Power users hub, Developer hub
