Sketcher ConstrainHorizontal/ro: Difference between revisions
No edit summary |
(Updating to match new version of source page) |
||
| (18 intermediate revisions by 2 users not shown) | |||
| Line 1: | Line 1: | ||
<languages/> |
<languages/> |
||
{{Docnav |
|||
|[[Sketcher_ConstrainHorVer|Horizontal/vertical]] |
|||
|[[Sketcher_ConstrainVertical|Vertical]] |
|||
|[[Sketcher_Workbench|Sketcher]] |
|||
|IconL=Sketcher_ConstrainHorVer.svg |
|||
|IconR=Sketcher_ConstrainVertical.svg |
|||
|IconC=Workbench_Sketcher.svg |
|||
}} |
|||
<div class="mw-translate-fuzzy"> |
|||
{{GuiCommand/ro |
{{GuiCommand/ro |
||
|Name=Constraint Horizontal |
|Name=Constraint Horizontal |
||
| Line 8: | Line 19: | ||
|SeeAlso=[[Sketcher ConstrainVertical/ro|Constraint Vertical]] |
|SeeAlso=[[Sketcher ConstrainVertical/ro|Constraint Vertical]] |
||
}} |
}} |
||
</div> |
|||
<span id="Description"></span> |
|||
==Descriere== |
==Descriere== |
||
<div class="mw-translate-fuzzy"> |
|||
The Horizontal Constraint forces a selected line or lines in the sketch to be parallel to the horizontal axis of the sketch. |
|||
'''Constrângerea orizontală''' forțează o linie din schiță să fie paralelă cu axa orizontală a schiței. |
|||
</div> |
|||
{{Version|1.0}}: In most cases it is advisable to use the combined [[Sketcher_ConstrainHorVer|Sketcher ConstrainHorVer]] tool instead. |
|||
<span id="Usage"></span> |
|||
<div class="mw-translate-fuzzy"> |
<div class="mw-translate-fuzzy"> |
||
==Cum se folosește== |
==Cum se folosește== |
||
</div> |
|||
See also: [[Sketcher_Workbench#Drawing_aids|Drawing aids]]. |
|||
===[[Sketcher_Workbench#Continue_modes|Continue mode]]=== |
|||
<div class="mw-translate-fuzzy"> |
|||
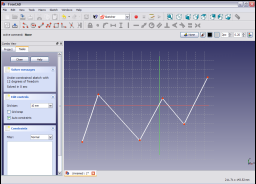
[[File:HorizontalConstraint1.png|left|256px]] |
[[File:HorizontalConstraint1.png|left|256px]] |
||
Selectați linia făcând click pe ea. |
Selectați linia făcând click pe ea. |
||
| Line 32: | Line 57: | ||
</div> |
</div> |
||
===Run-once mode=== |
|||
[[File:HorizontalConstraint1.png|left|256px]] |
|||
Select a line in the sketch by clicking on it. |
|||
# Do one of the following: |
|||
<br style="clear: both" /> |
|||
#* Select two or more points. |
|||
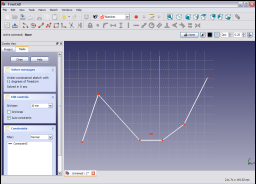
[[File:HorizontalConstraint2.png|left|256px]] |
|||
#* Select one or more lines. Points can be included in the selection, but will be ignored. |
|||
The line turns dark green. |
|||
# Invoke the tool as explained above, or with the following additional option: |
|||
<br style="clear: both" /> |
|||
#* {{Version|1.0}}: Right-click in the [[3D_view|3D view]] and select the {{MenuCommand|[[Image:Sketcher_ConstrainHorizontal.svg|16px]] Constrain horizontal}} option from the context menu. |
|||
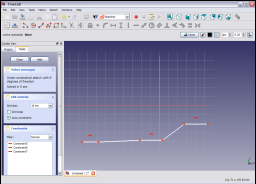
[[File:HorizontalConstraint3.png|left|256px]] |
|||
# Depending on the selection one or more constraints are added. |
|||
Apply the Horizontal Constraint by clicking on the Horizontal Constraint icon [[File:Constraint_Horizontal.png|16px]] in the Sketcher Constraints toolbar or by selecting the Constrain horizontally menu item in the Sketcher constraints sub menu of the Sketcher menu item in the Sketcher work bench (or the Part Design menu item of the Part Design work bench). The selected line is constrained to be parallel to the horizontal axis of the sketch. |
|||
<br style="clear: both" /> |
|||
== Scripting == |
|||
[[File:HorizontalConstraint4.png|left|256px]] |
|||
Multiple lines may be selected, |
|||
{{Code|code=Sketch.addConstraint(Sketcher.Constraint('Horizontal', Line))}} |
|||
<br style="clear: both" /> |
|||
[[File:HorizontalConstraint5.png|left|256px]] |
|||
The [[Sketcher_scripting|Sketcher scripting]] page explains the values which can be used for {{incode|Line}} and contains further examples on how to create constraints from Python scripts. |
|||
and then applying the constraint as described above, they are constrained to be parallel to the sketch horizontal axis. |
|||
<br style="clear: both" /> |
|||
<div class="mw-translate-fuzzy"> |
|||
| ⚫ | |||
</div> |
|||
{{Sketcher_Tools_navi{{#translation:}}}} |
|||
| ⚫ | |||
{{Userdocnavi{{#translation:}}}} |
|||
Latest revision as of 14:54, 23 April 2024
|
|
| poziția meniului |
|---|
| Sketch → Sketcher constraints → Constrain horizontally |
| Ateliere |
| Sketcher |
| scurtătură |
| H |
| Prezentat în versiune |
| - |
| A se vedea, de asemenea, |
| Constraint Vertical |
Descriere
Constrângerea orizontală forțează o linie din schiță să fie paralelă cu axa orizontală a schiței.
introduced in version 1.0: In most cases it is advisable to use the combined Sketcher ConstrainHorVer tool instead.
Cum se folosește
See also: Drawing aids.
Continue mode

Selectați linia făcând click pe ea.

Linia își schimbă culaorea în verde închis.

Apply the Horizontal Constraint by clicking on the Horizontal Constraint icon ![]() în bara de instrumente Sketcher Constructors sau selectând elementul de meniu Sketcher Constructors din Atelierul Sketcher (sau elementul de design al piesei de proiectare a bancului de lucru Part Design). Linia selectată este constrânsă să fie paralelă cu axa orizontală a schiței.
în bara de instrumente Sketcher Constructors sau selectând elementul de meniu Sketcher Constructors din Atelierul Sketcher (sau elementul de design al piesei de proiectare a bancului de lucru Part Design). Linia selectată este constrânsă să fie paralelă cu axa orizontală a schiței.

Multiple linii pot fi selectate,

și apoi aplicarea constrângerii așa cum este descrisă mai sus, ele sunt constrânse să fie paralele cu axa orizontală.
Run-once mode
- Do one of the following:
- Select two or more points.
- Select one or more lines. Points can be included in the selection, but will be ignored.
- Invoke the tool as explained above, or with the following additional option:
- introduced in version 1.0: Right-click in the 3D view and select the
Constrain horizontal option from the context menu.
- introduced in version 1.0: Right-click in the 3D view and select the
- Depending on the selection one or more constraints are added.
Scripting
Sketch.addConstraint(Sketcher.Constraint('Horizontal', Line))
The Sketcher scripting page explains the values which can be used for Line and contains further examples on how to create constraints from Python scripts.
- General: Create sketch, Edit sketch, Map sketch to face, Reorient sketch, Validate sketch, Merge sketches, Mirror sketch, Leave sketch, View sketch, View section, Toggle grid, Toggle snap, Configure rendering order, Stop operation
- Sketcher geometries: Point, Line, Arc, Arc by 3 points, Circle, Circle by 3 points, Ellipse, Ellipse by 3 points, Arc of ellipse, Arc of hyperbola, Arc of parabola, B-spline by control points, Periodic B-spline by control points, B-spline by knots, Periodic B-spline by knots, Polyline, Rectangle, Centered rectangle, Rounded rectangle, Triangle, Square, Pentagon, Hexagon, Heptagon, Octagon, Regular polygon, Slot, Fillet, Corner-preserving fillet, Trim, Extend, Split, External geometry, Carbon copy, Toggle construction geometry
- Sketcher constraints:
- Geometric constraints: Coincident, Point on object, Vertical, Horizontal, Parallel, Perpendicular, Tangent, Equal, Symmetric, Block
- Dimensional constraints: Lock, Horizontal distance, Vertical distance, Distance, Radius or weight, Diameter, Auto radius/diameter, Angle, Refraction (Snell's law)
- Constraint tools: Toggle driving/reference constraint, Activate/deactivate constraint
- Sketcher tools: Select unconstrained DoF, Select associated constraints, Select associated geometry, Select redundant constraints, Select conflicting constraints, Show/hide internal geometry, Select origin, Select horizontal axis, Select vertical axis, Symmetry, Clone, Copy, Move, Rectangular array, Remove axes alignment, Delete all geometry, Delete all constraints
- Sketcher B-spline tools: Show/hide B-spline degree, Show/hide B-spline control polygon, Show/hide B-spline curvature comb, Show/hide B-spline knot multiplicity, Show/hide B-spline control point weight, Convert geometry to B-spline, Increase B-spline degree, Decrease B-spline degree, Increase knot multiplicity, Decrease knot multiplicity, Insert knot, Join curves
- Sketcher virtual space: Switch virtual space
- Additional: Sketcher Dialog, Preferences, Sketcher scripting
- Getting started
- Installation: Download, Windows, Linux, Mac, Additional components, Docker, AppImage, Ubuntu Snap
- Basics: About FreeCAD, Interface, Mouse navigation, Selection methods, Object name, Preferences, Workbenches, Document structure, Properties, Help FreeCAD, Donate
- Help: Tutorials, Video tutorials
- Workbenches: Std Base, Arch, Assembly, CAM, Draft, FEM, Inspection, Mesh, OpenSCAD, Part, PartDesign, Points, Reverse Engineering, Robot, Sketcher, Spreadsheet, Surface, TechDraw, Test Framework
- Hubs: User hub, Power users hub, Developer hub