Tutoriel Draft
| Thème |
|---|
| Drafting |
| Niveau |
| Débutant |
| Temps d'exécution estimé |
| 30 minutes |
| Auteurs |
| Drei et vocx |
| Version de FreeCAD |
| 0.19 |
| Fichiers exemples |
| Draft tutorial updated |
| Voir aussi |
| None |
Introduction
Ce tutoriel a été écrit à l'origine par Drei et a été écrit et illustré par vocx.
Ce tutoriel est destiné à présenter au lecteur le flux de travail de base de l'Atelier Draft .
Le lecteur pratiquera:
- création de lignes, d'arcs et de polygones
- l'utilisation d'avions de travail
- la création de dimensions, de texte et de formes à partir de texte
- la création d'un dessin technique
Ce tutoriel utilise la notation (x, y, z) pour désigner les coordonnées nécessaires pour définir des points dans un objet. L'unité par défaut est le millimètre mm.
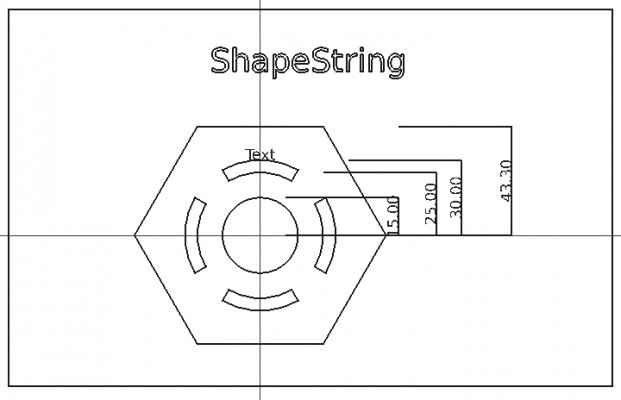
Dessin final comprenant divers objets Draft.
Installation
1. Ouvrez FreeCAD, créez un nouveau document vide avec Fichier → Nouveau.
- 1.1. Basculez vers l'atelier Draft depuis le sélecteur d'atelier ou le menu Affichage → Atelier →
Draft.
- 1.2. Assurez-vous de comprendre comment utiliser l'éditeur de propriétés, en particulier les onglets Données et Affichage pour modifier les propriétés.
- 1.3. Comme les objets Draft sont des formes planes, ils sont mieux vus du dessus. Utilisez
vue de dessus pour définir la Vue 3D.
- 1.4. Bien qu'elle ne soit pas utilisée dans ce tutoriel, la grille Draft est utile pour positionner des éléments géométriques. Utilisez
Plan de travail pour définir à la fois le plan de travail et la grille, puis affichez et masquez la grille avec
Visibilité de la grille.
Verrouillage de la barre d'outils
2. L'Draft Accrochage est normalement activée lorsque vous basculez vers atelier Draft.
- 2.1. Pour vous assurer qu'il est toujours là, allez dans Draft Préférences, Edition → Préférences → Draft → onglet: Grille et accrochage.
- 2.2. Vérifiez que la barre d'outils Montrer la barre d'outils d'accrochage est active.
Vous pouvez aussi changer la visibilité et les propriétés de la grille Draft dans cette même fenêtre.
Plans de travail
La plupart des objets Draft sont des formes planes, ils sont donc naturellement basés sur un plan de travail. Un plan de travail peut être l'un des plans de coordonnées globaux principaux XY, XZ et YZ, ou il peut s'agir d'un plan qui leur est parallèle avec un décalage positif ou négatif, ou il peut s'agir d'un plan défini par la face d'un objet solide.
- Sélectionnez
 Plan de Travail, soit dans la barre d'outils atelier Dessin, soit dans le menu Draft sous-menu Utilitaire.
 - Sélectionnez le plan XY.
Before pressing the button, you can also change the value of the offset in millimeters, as well as the grid spacing, the main lines and snapping radius.
Lignes et Arcs
- Sélectionnez
 Arc.
Arc. - Réglez le centre à (0, 0, 0)
- Définir le rayon à 30 mm
- L'angle de départ est de 60,0 °
- L'ouverture est de 60.0 °
Répétez la même procédure pour un deuxième arc avec un rayon de 25 mm, les autres propriétés restent inchangées.
- Sélectionnez
 Ligne.
 - Approchez la Terminaison de l'un ou l'autre des arcs. Un point blanc devrait apparaître, à côté de cette icône File:Snap Endpoint.png lorsque votre curseur s'approche du point de terminaison.
- Sélectionnez le point final de l'autre arc.
- Répétez pour l'autre côté des arcs
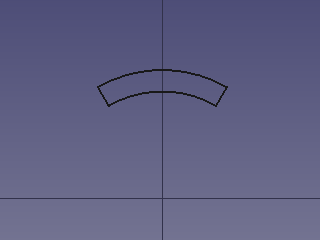
Closed profile created by two arcs and two lines.
Fusing or compounding
Nous avons maintenant plusieurs courbes qui détaillent un profil, mais celui-ci n'est toujours pas reconnu comme une entité unique. Il est possible de continuer à travailler avec des éléments entiers, mais dans ce cas, nous les fusionnerons dans un seul objet.
- Sélectionnez un arc et tout en appuyant sur la touche CTRL, sélectionnez les deux segments de ligne et l’autre arc.
- Avec ces quatre objets sélectionnés, cliquez sur
 Grouper.
6b. If you wish to maintain the parametric nature of the objects you can create a compound instead.
- 6b.1. Switch to the Part Workbench.
- 6b.2. With these objects selected, click on
Part Compound.
Plans, rectangles et cercles
- Cliquez sur
 Rectangle
 - Définir le premier point sur (-100, -60, 0)
- Définir le deuxième point sur (140, 90, 0)
7. We will draw a rectangular frame.
- 7.1. Press
Rectangle.
- 7.2. Enter the values of the first point
(-100, -60, 0), and press Enter. - 7.3. Make sure the Relative option is unchecked, as we will use absolute units. You may press R in the keyboard to quickly toggle this option on and off.
- 7.4. Enter the values for the second point
(140, 90, 0), and press Enter.
Le résultat est un Plan. Ses propriétés peuvent être modifiées pour supprimer le remplissage, en changeant son Style de Représentation en Filaire.
Polygones
- Sélectionnez
 Polygone
 - Le point central est situé à (0, 0, 0)
- Réglez le rayon à 50 mm
- Réglez le nombre de côtés à 6
Again, you may change the DonnéesMake Face and VueDisplay Mode properties in the property editor if you want.
The rectangle, the circle, the polygon, and most other objects created with the Draft Workbench share many data and view properties because they are derived from the same base class, Part Part2DObject.
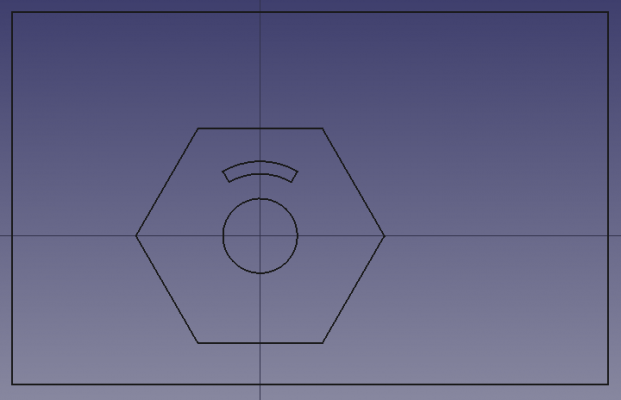
Rectangle, circle and polygon added.
Tableaux
Les tableaux sont utilisés pour reproduire un objet plusieurs fois dans une direction, un axe de révolution ou le long d'un chemin.
- Sélectionnez le Filaire qui a été précédemment créé
- Cliquez sur
 Tableau
 - Dans l'onglet Donnéesde l'objet, modifiez le type de matrice de ortho à polar
- Change Number Polar de 1 à 4
Arrays are used to replicate an object several times in an orthogonal direction (X, Y, Z), around a revolution axis, or along a path.
10. We will create a polar array.
- 10.1. Select the
Wireobject that was previously created with theUpgrade tool, or the
Compoundcreated with thePart Compound tool.
- 10.2. Press
PolarArray.
- 10.3. Adjust the polar angle to
360°. - 10.4. Set the number of elements to
4. - 10.5. Enter the values for the center of rotation
(0, 0, 0), and press Enter.
Old workflow
- 10.2. Press
Array.
- 10.3. Go to the tree view, select the
Arrayobject, and then go to the property editor, and change the DonnéesArray Type fromorthotopolar. - 10.4. Change DonnéesNumber Polar to
4, and DonnéesAngle to360°.
The array object shows copies of the object around the origin.
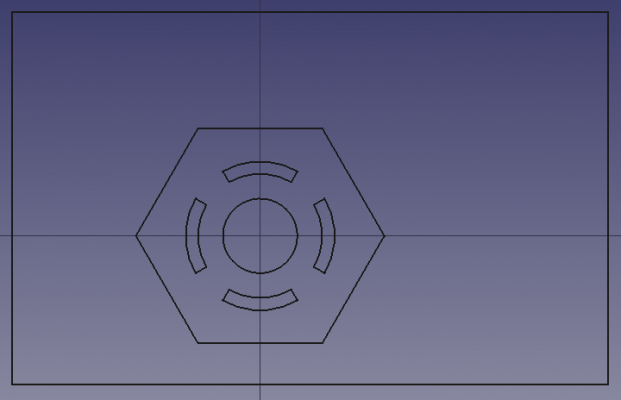
Polar array of the small profile centered around the origin.
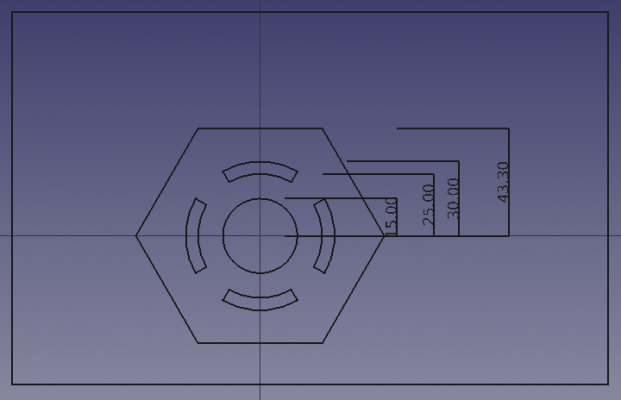
Ajout de dimensions
Les dimensions requièrent une utilisation constante de Restrictions d'Ancrage pour sélectionner correctement les points que l'on souhaite dimensionner. La barre d'outils Ancrage sert à modifier les points possibles qui peuvent être sélectionnés
Linear dimensions work best when using the appropriate Draft Snap methods to select points and edges to measure. However, they can also be created by specifying absolute coordinates.
- Sélectionnez
 Dimension
 - Sélectionnez le premier point. Cela peut être soit un élément existant, soit spécifié par des coordonnées. Pour ce tutoriel, le premier point sera toujours (0, 0, 0)
- Sélectionnez le deuxième point. Approchez le point médian de la ligne supérieure du polygone. Un point blanc devrait apparaître à côté de cette icône File:Snap Midpoint.png
- Déplacez le curseur sur l'emplacement souhaité de la dimension et cliquez dessus.
- Change la taille de la police sur l'onglet Vue à 6 mm
Répéter le processus pour les arcs et les cercles.
13. Repeat the process for the circle located in the center. The first point of the measurement will still be the origin. To select the second point make sure Toggle snap is active, and only
Angle as well. As you move the pointer to the top of the circle, the
Angle icon should appear; click to select this point. Then move the cursor to the right, and click to fix the dimension.
Remember to adjust the VueFont Size, and other properties to see the dimension correctly.
Dimensions that measure the vertical distance from the origin to the top of the circle, arcs, and polygon.
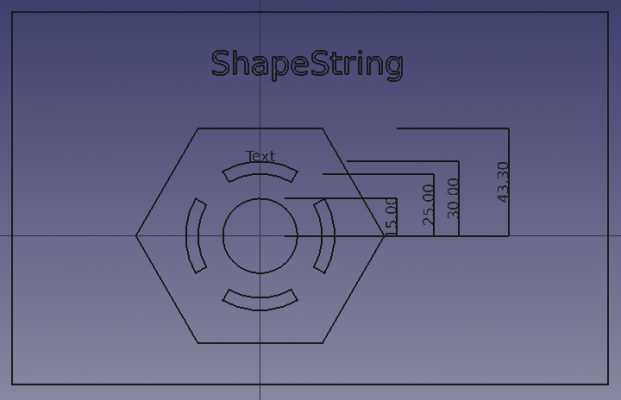
Annotations et texte
Il y a une légère différence entre les deux: il est seulement possible d'utiliser le second comme profil pour effectuer des opérations 3D
Annotations
- Sélectionnez
 Texte
Texte - Sélectionnez le point de référence dans la Vue 3D. Dans ce cas, le point milieu de l'arc supérieur.
- Entrez votre texte et appuyez sur Entrée. Répétez pour autant de lignes de texte que vous souhaitez saisir.
- Appuyez sur Entrée
Texte
- Sélectionnez
 ShapeString
 - Sélectionnez le point de référence dans la Vue 3D. Cela peut être un point existant ou l'emplacement actuel du curseur.
- Entrez votre texte et appuyez sur Entrée
- Définir la taille de police souhaitée
- Laisser le suivi à 0 mm
- Sélectionnez le chemin dans le fichier de police que vous souhaitez utilise
Text and ShapeString objects added.
To extrude letters and engrave them on to solids, see the Draft ShapeString tutorial.
Création de plans
Pour créer des plans, il est nécessaire de créer un Dessin avec les éléments que vous souhaitez utiliser. Veuillez lire le Tutoriel de Dessin pour une description détaillée.
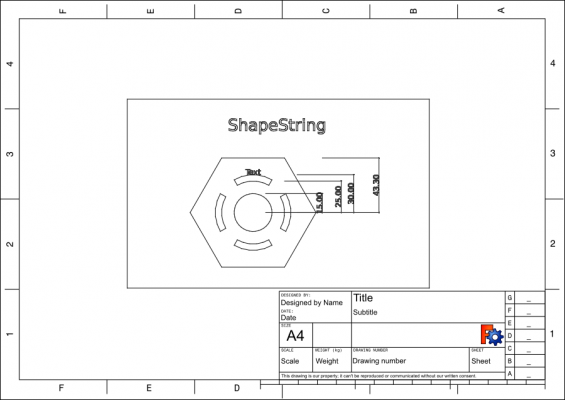
As it is now, the objects that we have created can be saved, exported to other formats like SVG or DXF, or printed.
If you wish, you may create a technical drawing to display these objects together with additional information like a frame.
Before doing anything, hide the Draft grid by pressing Toggle grid.
16. Switch to the TechDraw Workbench.
- 16.1. Create a standard page by pressing
TechDraw PageDefault.
- 16.2. In the tree view select all objects created, except for the Page, and then press
TechDraw ActiveView. Press OK with the default options; it may take a few seconds to create the view in the page.
- 16.3. Selecting the Page object in the tree view will automatically display the Page in the main window. With the Page selected, go to the property editor, and change DonnéesScale to
0.75. - 16.4. Expand the Page object in the tree view to select the ActiveView object. With this view selected, go to the property editor, and change DonnéesScale Type to
Page. - 16.5. Recompute the model by using
Refresh or pressing F5.
- 16.6. Hide the frames of the objects by pressing
TechDraw ToggleFrame.
Learn more about the TechDraw Workbench by reading the Basic TechDraw Tutorial.
TechDraw page with a projection of the shapes created with the Draft Workbench.
TechDraw works best with objects that have a Part TopoShape. Since some objects from Draft, like Draft Texts and Draft Dimensions, don't have such "shapes", some operations of TechDraw don't work with these elements.
Tools like TechDraw ActiveView,
TechDraw DraftView, and
TechDraw ArchView work by receiving an internal SVG image that is generated by internal Draft functions; therefore, TechDraw doesn't have much control about how these views are displayed. More integration of Draft and TechDraw is a work in progress.
Nous avons terminé le travail de base pour Module Table à Dessin.
The Draft Workbench in many ways is similar to the Sketcher Workbench, as both are intended to produce 2D shapes. The main difference is in the way each workbench handles coordinate systems, and how the objects are positioned. In Draft, objects are freely positioned in the global coordinates system, usually snapping their points to a grid, or to other objects. In Sketcher, a "sketch object" defines a local coordinate system which serves as the reference for all geometrical elements within that sketch. Moreover, the sketch relies on "constraints" to define the final position of its points.
- The Draft Workbench is intended for 2D drawings which are suitable to be drawn on a grid. The Arch Workbench mostly builds on top of the tools defined in the Draft Workbench.
- The Sketcher Workbench is intended for 2D drawings that require precise relationships between its points. It does not rely on a grid, but on rules of positioning (constraints) to determine where the points and edges will be placed. The Sketcher Workbench is mostly used together with the PartDesign Workbench for the creation of solid bodies.
- It is possible to transform a Draft object into a Sketch, and the other way around, using the
Draft Draft2Sketch tool.
- Drafting : Ligne, Polyligne, Congé, Arc, Arc par 3 points, Cercle, Ellipse, Rectangle, Polygone, B-spline, Courbe de Bézier cubique, Courbe de Bézier, Point, Surfaces liées, Formes à partir de texte, Hachure
- Annotation : Texte, Dimension, Étiquette, Éditeur de styles d'annotations, Widget d'échelle d'annotation.
- Modification : Déplacer,Pivoter,Échelle,Miroir, Décalage, Ajuster ou prolonger, Étirer, Cloner, Réseau orthogonal, Réseau polaire, Réseau circulaire, Réseau selon une courbe, Réseau lié selon une courbe, Réseau de points, Réseau lié selon des points, Éditer, Surligner les sous éléments, Joindre, Scinder, Agréger, Désagréger, Polyligne vers B-spline, Draft vers esquisse, Pente, Inverser le texte de la dimension, Vue 2D d'une forme
- Barre Draft : Plan de travail, Définir le style, Basculer en mode construction, Groupement automatique
- Aimantation : Verrouillage de l'aimantation, Aimantation terminaison, Aimantation milieu, Aimantation centre, Aimantation angle, Aimantation intersection, Aimantation perpendiculaire, Aimantation extension, Aimantation parallèle, Aimantation spéciale, Aimantation au plus proche, Aimantation orthogonal, Aimantation grille, Aimantation plan de travail, Aimantation dimensions, Basculer la grille
- Utilitaires : Appliquer le style, Calque, Gestionnaire de calques, Nommer un groupe, Déplacer vers un groupe, Sélection groupée, Ajouter au groupe de construction, Mode d'affichage, Proxy de plan de travail, Réparer, Barre d'aimantation
- Additionnels : Contrainte, Motif, Préférences, Préférences d'Import Export, DXF/DWG, SVG, OCA, DAT
- Menu contextuel :
- Conteneur du calque : Fusionner les calques en double, Ajouter un nouveau calque
- Calque : Groupement automatique, Sélection groupée
- Texte : Ouvir les hyperliens
- Filaire : Aplatir
- Proxy de plan de travail : Enregistrer la position de la caméra, Enregistrer l'état des objets
- Démarrer avec FreeCAD
- Installation : Téléchargements, Windows, Linux, Mac, Logiciels supplémentaires, Docker, AppImage, Ubuntu Snap
- Bases : À propos de FreeCAD, Interface, Navigation par la souris, Méthodes de sélection, Objet name, Préférences, Ateliers, Structure du document, Propriétés, Contribuer à FreeCAD, Faire un don
- Aide : Tutoriels, Tutoriels vidéo
- Ateliers : Std Base, Arch, Assembly, CAM, Draft, FEM, Inspection, Mesh, OpenSCAD, Part, PartDesign, Points, Reverse Engineering, Robot, Sketcher, Spreadsheet, Surface, TechDraw, Test
