Tutorium für geöffnete Fenster
| Topic |
|---|
| Architektur |
| Level |
| Anfänger |
| Time to complete |
| 60 Minuten |
| Authors |
| vocx |
| FreeCAD version |
| 0.18 or höher |
| Example files |
| none |
| See also |
| None |
Einleitung
Dieses Tutorial zeigt, wie man Fenster und Türen in einem Gebäudemodell platziert, wie man sie in der 3D Ansicht als offen anzeigt und wie man eine 2D Zeichnung (Grund- und Aufriss) für das Modell erstellt. Es verwendet die Arbeitsbereiche Entwurf (Draft), Architektur (Arch) und Technisches Zeichnen (TechDraw).
Häufig benutzte Werkzeuge sind: Draft:Raster (Draft Grid), Draft:Fang (Draft Snap), Draft:Drahtwerkzeug (Draft Wire), Arch:Wand (Arch Wall), Arch:Fenster (Arch Window), Arch:Schnittebene (Arch SectionPlane) und TechDraw:Neuer Zeichnungsausschnitt (TechDraw NewArch).
Einrichtung
1. Öffne FreeCAD, erstelle ein neues, leeres Dokument und wechsel zum Architektur-Arbeitsbereich.
2. Stelle sicher, dass Deine Einheiten im Menü Bearbeiten → Einstellungen → Allgemein → Einheiten korrekt eingestellt sind. Zum Beispiel ist MKS (m/kg/s/Grad) gut geeignet, um mit den Abständen in einem typischen Gebäude umzugehen; setze außerdem die Anzahl der Nachkommastellen auf 4, um auch die kleinsten Teile eines Meters zu berücksichtigen.
3. Benutze die Schaltfläche Entwurfsraster ein-/ausschalten, um ein Raster mit ausreichender Auflösung einzublenden. Das Erscheinungsbild des Rasters kannst Du im Menü Bearbeiten → Einstellungen → Draft → Raster und einrasten → Raster ändern. Setze "Hauptlinien alle" auf
20, "Rasterabstand" auf 50 mm und "Rastergröße" auf 1000 Linien (das Raster wird damit eine Fläche von 50m x 50m abdecken).
4. Zoome im 3D-Ansichtsfenster heraus, wenn Du zu nahe am Raster bist.
Jetzt sind wir bereit, ein einfaches Gebäude mit geschlossenen Wänden, 2 Türen und 2 Fenstern zu erstellen.
Wände erstellen
5. Benutze das Draft:Drahtwerkzeug, um einen geschlossenen Polygonzug zu erstellen. Gehe gegen den Uhrzeigersinn vor.
- 5.1. Erster Punkt bei (0, 0, 0); gib im Dialog ein: 0 m Enter, 0 m Enter, 0 m Enter.
- 5.2. Zweiter Punkt bei (3, 0, 0). Drücke X um die Bewegung auf die X-Achse einzuschränken; gib den Wert ein: 3 m Enter.
- 5.3. Dritter Punkt bei (3, 4, 0). Drücke Y um die Bewegung auf die Y-Achse einzuschränken; gib den Wert ein: 4 m Enter.
- 5.4. Vierter Punkt bei (0, 4, 0). Drücke X um die Bewegung auf die X-Achse einzuschränken; gib den Wert ein: - 3 m Enter.
- 5.5. Drücke O um den Polygonzug zu schließen und das Werkzeug zu beenden.
- 5.6. Drücke auf dem Nummernblock 0 um eine isometrische Projektion des Modells zu erhalten.
- Hinweis: Die Punkte können auch mit dem Mauscursor durch Anklicken der Rasterschnittpunkte unter Zuhilfenahme der Draft:Fang-Werkzeugleiste und der Raster-Methode definiert werden.
6. Wähle das Polygon DWire aus und verändere die Eigenschaft DatenMake Face auf false.
7. Wähle das Polygon DWire aus und klicke auf das Werkzeug Arch:Wand; die Wände werden unverzüglich erstellt mit einer voreingestellten Breite (Dicke) von 0.2 m und einer Höhe von 3 m.
- Note: Wenn die Eigenschaft DatenMake Face des Polygons
DWireauftrueeingestellt ist, wird dieser Schritt einen soliden Block erstellen anstatt nur die Kontur des PolygonsDWirezu nutzen.
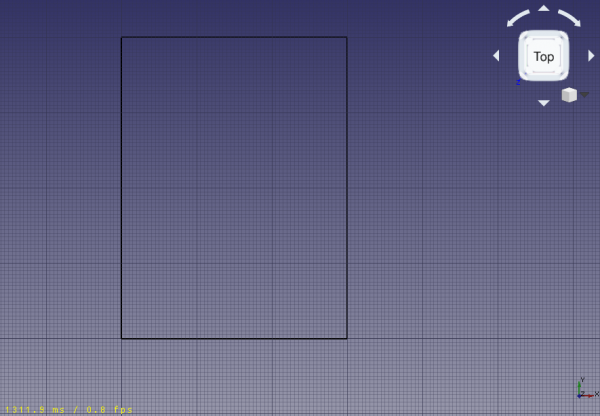
Basis-Polygon für die Wände; es ist ein geschlossener Linienzug, welcher nicht als Fläche definiert ist
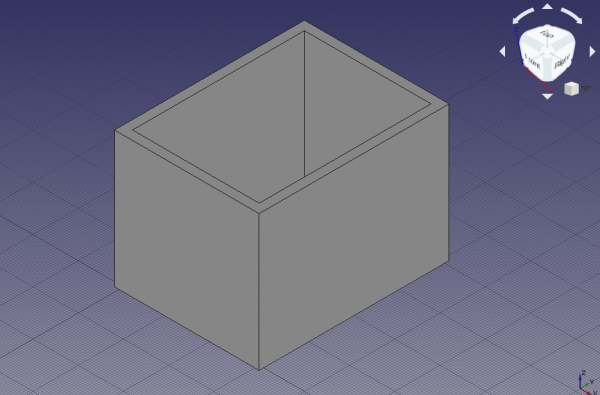
Wall constructed from the wire
Placing doors and windows
8. Click the Arch Window tool; as preset select Simple door, and change the height to 2 m.
- 8.1. Change the snapping to Draft Midpoint, and try selecting the bottom edge of the frontal wall; rotate the standard view as necessary to help you pick the edge and not the wall face; when the midpoint is active, click to place the door.
- 8.2. Click the Arch Window tool again, and place another door, but this time in the midpoint of the rear wall; rotate the standard view as necessary.
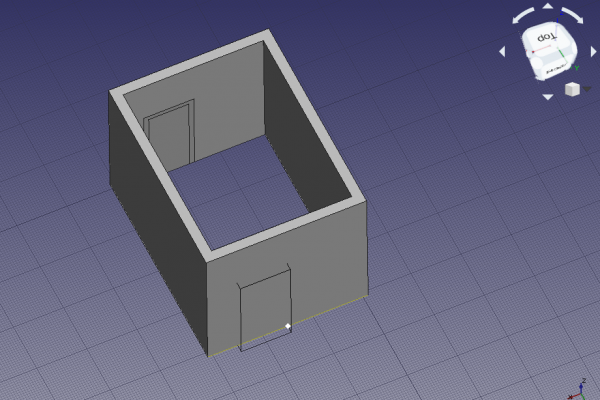
Snapping to the midpoint of the bottom edge of the wall to place the door
9. Click the Arch Window tool; as preset select Open 1-pane, and change the Sill height to 1 m.
- 9.1. Keep the snapping to Draft Midpoint, and try selecting the lower edge of the left side wall; rotate the standard view as necessary to help you pick the edge and not the wall face; when the midpoint is active, click to place the window.
- Note: the
Sill heightis the distance from the floor to the lower edge of the element. For doors theSill heightis usually 0 m as doors are normally touching the floor; on the other hand, windows have a usual separation of 0.5 m to 1.5 m from the floor.
- 9.2. Click the Arch Window tool again, and place another window, but this time in the midpoint of the right wall; rotate the standard view as necessary. This time make the window's width (length) 1.5 m, and again make the
Sill height1 m.
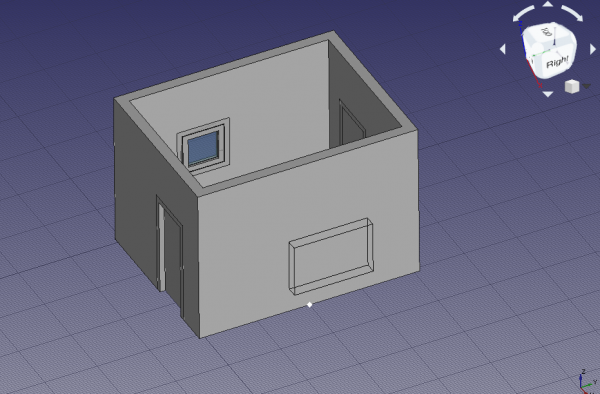
Snapping to the midpoint of the bottom edge of the wall to place the window
- Note: the
Sill heightparameter can only be set when initially creating the window with a preset. Once the window is inserted, modify its placement by editing the DatenPosition vector[x, y, z]of the underlying Sketcher Sketch.
- 9.3. Move the
Window001a bit higher. Select the underlyingSketch003, and change its DatenPosition from[3.1 m, 2.0 m, 1.0 m]to[3.1 m, 2.0 m, 1.6 m]. The entireWindow001should move up. The wall may still show an opening in the previous position; if this happens, right click theWallelement, selectMark to recompute, and then press Ctrl+R to recompute the model.
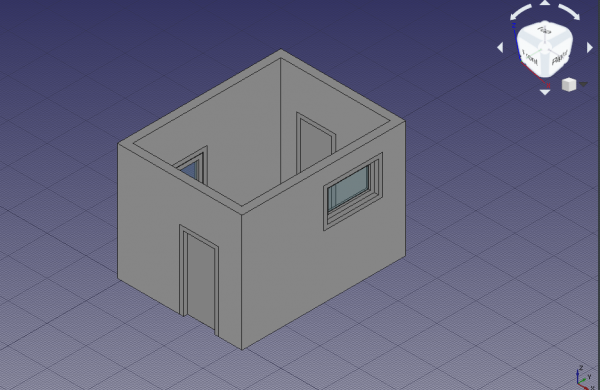
Wall built with doors and windows
Note: when placing a window or a door with a preset, hover the element over the Arch Wall, and wait for the element to rotate so that it is parallel to that wall. Aim for the bottom edge of the wall, and use the Sill height to adjust the distance from the floor. If this is difficult, use the Draft Near snapping mode of the Draft Snap toolbar to insert the element anywhere on the face of the wall, and then adjust its DatenPosition manually as described above. Having many Draft Snap modes active at the same time may cause issues with placing the element, so try with only one option at a time.
Note 2: occasionally the window may be placed outside the Arch Wall; as long as the element is parallel to that wall, you should be able to correct the position manually.
Opening the doors
10. In the tree view select Sketch underlying Door, and press Space, or change the property AnsichtVisibility to true
11. Double click Door in the tree view to start editing it.
- 11.1. Inside the
Window elementsframe there are two panes,WiresandComponents. - Note: with a simple door preset there are two wires,
Wire0andWire1, and two components,OuterFrameandDoor. A custom designed Arch Door may have more wires and components.
- 11.2. Click on
Door, and click the Edit button. This shows the properties of theDoorcomponent likeName,Type,Wires,Thickness,Offset,Hinge, andOpening mode. - 11.3. In the 3D view, select only one vertical edge in the visible sketch of the door, then click the Get selected edge button. The button should change to an edge name, for example, Edge8.
- 11.4. Change the
Opening modeto Arc 90, or any other option. - 11.5. Click the +Create/update component button, and then Close to finish editing the door. The sketch may become hidden again.
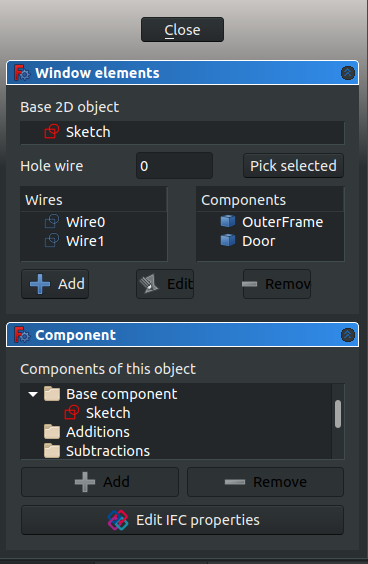
Dialog to edit a window or a door
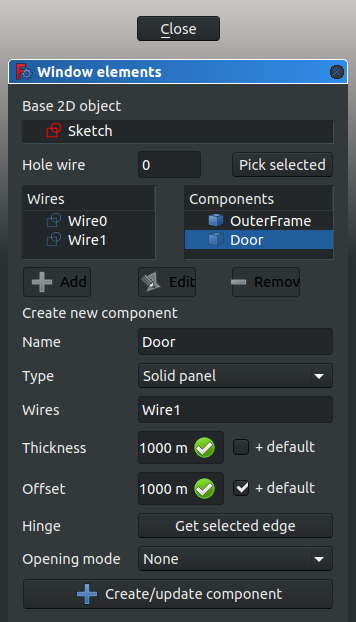
Dialog to edit the components that make a window or a door
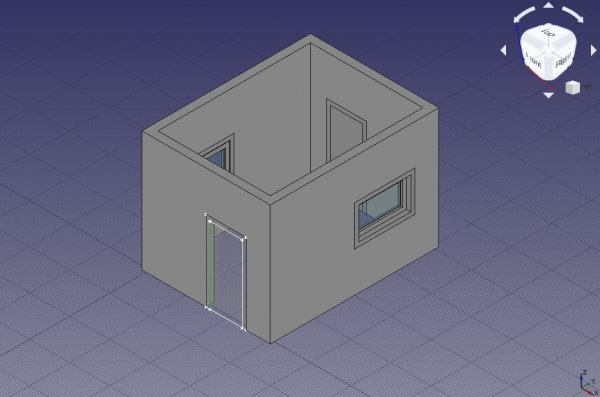
Vertical edge of sketch selected as hinge for a door
12. Select Door, and give the property DatenOpening a value of 45. The solid panel of the door should open to the inside of the building.
13. Select Door, and change the property DatenSymbol Elevation to true; the tip of the created wire indicates which side of the door opens; this is easier to see if the viewport changes to front view. Change the property DatenSymbol Plan to true; a circular arc should indicate the extent of the door's swing; this is easier to see if the viewport changes to top view.
14. Repeat the steps with Door001 and the underlying Sketch001 to make the door open 75 degrees to the inside of the building. Also enable the elevation and plan symbols.
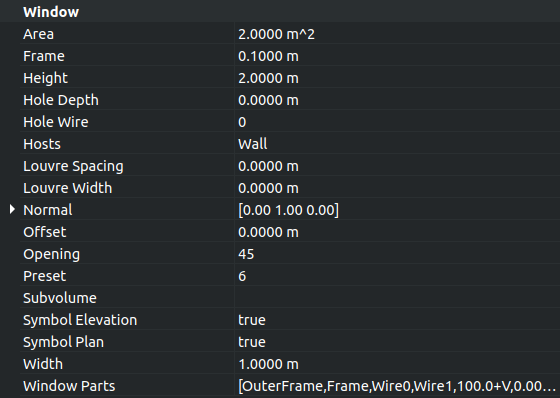
Property view of the door to change Opening value, Symbol elevation, Symbol plan, and other options
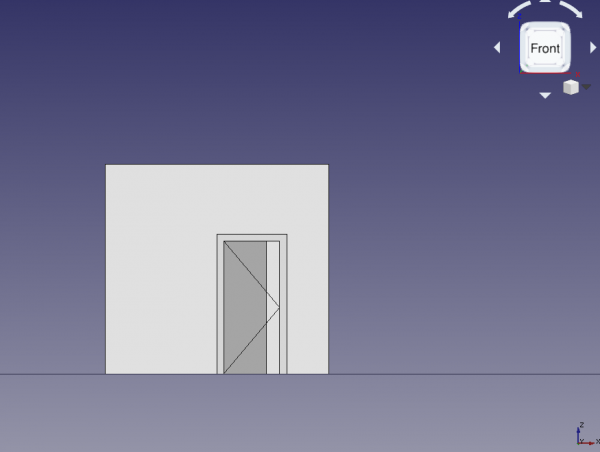
Door with opening elevation symbol, front view
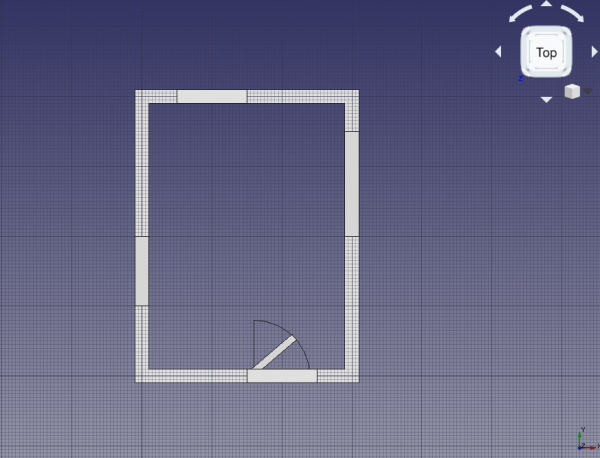
Door with plan symbol, top view
Opening the windows
15. In the tree view select Sketch002 underlying Window, and press Space, or change the property AnsichtVisibility to true.
16. Double click Window in the tree view to start editing it.
- 16.1. Click on the
InnerFramecomponent, and click the Edit button.
- 16.2. In the 3D view, select only one vertical edge of
Sketch002. The wires representingOuterFrameand theInnerFrameare very close to each other, so zoom in as close as possible to the sketch to select the appropriate wire. Then click the Get selected edge button. The button should change to an edge name, for example, Edge12. - Note: when there are many solids on the screen that it becomes difficult to select only one edge, switch to wireframe mode to remove the faces of those solid objects, and see only the wires, edges, and contours.
- 16.3. Change the
Opening modetoArc 90 inv, or any other option.
17. Select Window, and give the property DatenOpening a value of 45. The inner frame containing the transparent glass should open to the inside of the building.
18. Select Window, and change the property DatenSymbol Elevation to true; the tip of the created wire indicates which side of the window opens; this is easier to see if the viewport changes to left side view. Change the property DatenSymbol Plan to true; a circular arc should indicate the extent of the window's swing; this is easier to see if the viewport changes to top view.
19. Repeat the steps with Window001 and the underlying Sketch003 to make the window open 75 degrees. Also show the elevation and plan symbols. In this case, don't pick a vertical wire of the InnerFrame as hinge, but pick the top horizontal wire. This means that this window will open differently from the other window. The elevation symbol will be better seen from a right side view. The plan symbol will be better seen from the front view; however, since the wall is obstructing the view, you can change its AnsichtTransparency to a value such as 85 to see through it; alternatively you can also change its AnsichtDisplay Mode to Wireframe to show only its edges.
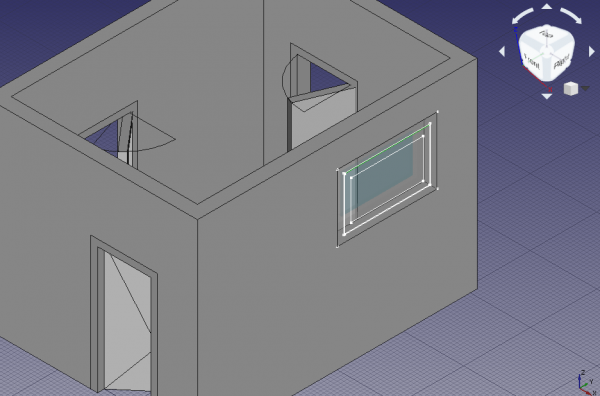
Horizontal edge of sketch selected as hinge for a window
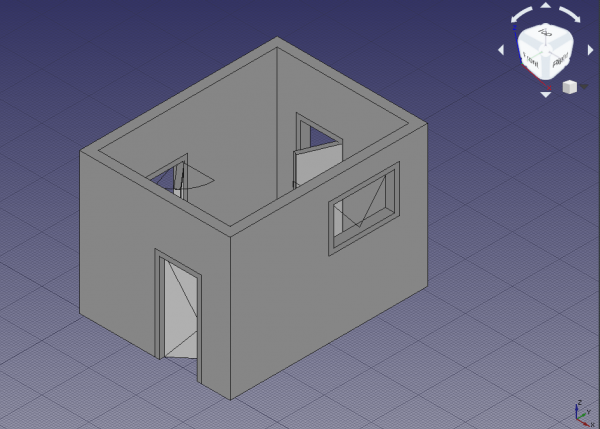
Elevation and plan symbols for all elements, axonometric view
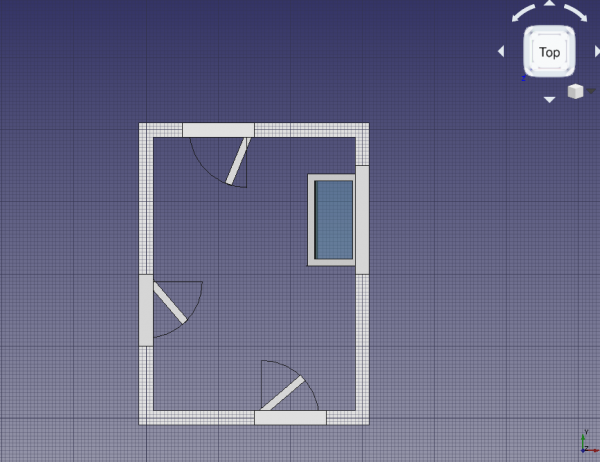
Elevation and plan symbols for all elements, top view
Making a floor plan of the building
20. Still in the Arch Workbench, select all components in the tree view, the Arch Wall, the two Arch Windows, and the two Arch Doors, then use the Arch SectionPlane tool to create a Section element.
Note: change the property DatenArrow size of the section plane to a larger value, for example, 200 mm, so that the direction of the section is clearly visible in the 3D viewport.
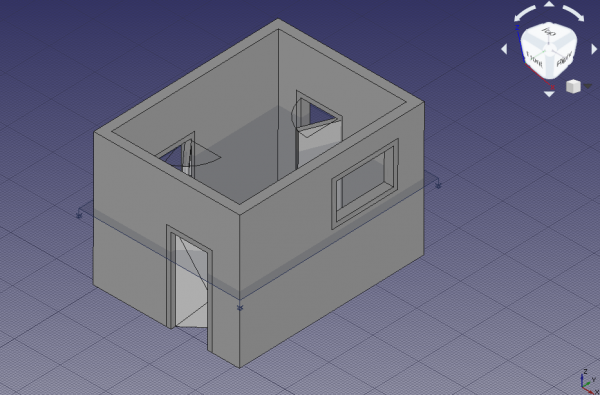
Section plane cutting through solid objects, including walls, doors, and windows
21. Change to the TechDraw Workbench and insert a new page with the TechDraw New Default tool; a new Page object is created, and the view switches to this page. The page inserted is a standard A4 sheet in landscape orientation, with a basic frame around it. Use the TechDraw New Pick tool if you need to create a new page using a particular SVG template.
22. Select Section, and use the TechDraw NewArch tool to create an ArchView object in the page. Most probably the new object won't be visible in the page because it has a very large scale of 1, that is, 1:1. This means that every meter in the 3D view is shown as a meter in the page view; since the page is only 0.297 m x 0.210 m in size, most features are too big to fit in this page at their natural scale.
23. Select this ArchView object, and change the property DatenScale to 0.02, which is equivalent to 1:50, a scale suitable for typical buildings. This means every meter in the 3D view will be shown as 20 mm in the page. The object should appear in the center of the page, and can be moved to a better position on the left side. The two doors should look like they are open, but only the left window should look open. The reason the right window doesn't appear in the projection is that the plane defined by Section does not cut through this right window.
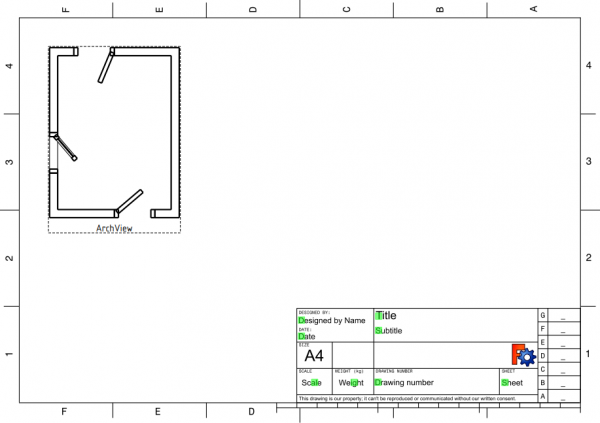
Section plane cutting through solid objects, including walls, doors, and windows
24. Switch back to the Arch Workbench. In the tree view select all components again, and use the Arch SectionPlane tool to create a second Section001 element.
- 24.1. Select
Section001and change the property DatenPosition to[1.5 m, 2.0 m, 1.8 m]. This second plane does cut through all Arch objects. - 24.2. Switch back to the TechDraw Workbench. Select
Section001, use the TechDraw NewArch tool to createArchView001, and set DatenScale to0.02. The new view in the TechDraw page now shows all openings in the Arch Wall produced by doors and windows.
Note: set DatenAll On to true for TechDraw ArchView objects so that all elements cut by the plane are visible in the page, regardless of their visibility state in the 3D viewport. The option DatenShow Fill can also be set to true to draw a shade on the solids that were cut by the section plane.
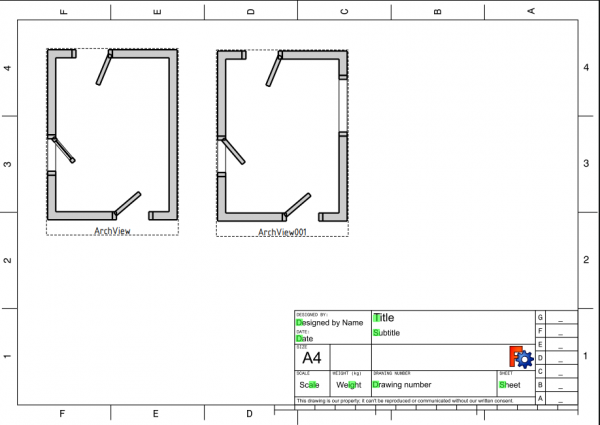
Section view of the building, with a second plane cut, A4 sheet, scale 1:50
Making an elevation projection of the building
25. Go back to the Arch Workbench. In the tree view, select all components, the Arch Wall, the two Arch Windows, and the two Arch Doors, then use the Arch SectionPlane tool to create a third Section002 element.
- 25.1. Rotate
Section002, so that it cuts vertically through the building. Change the properties DatenAxis to[1, 0, 0], and DatenAngle to90. - 25.2. Change the DatenPosition to
[1.5 m, -1 m, 1.5 m], so that the plane is in front of the building.
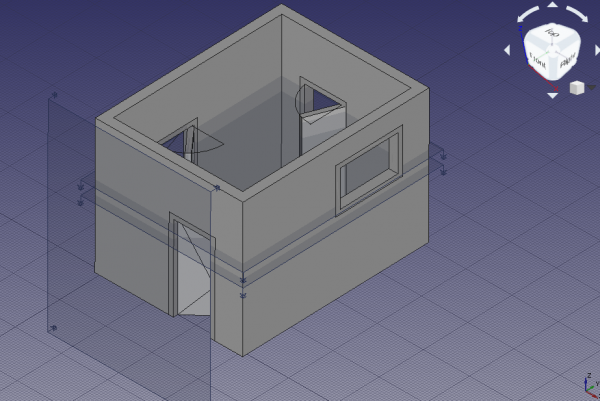
Section planes that cut or look at the building and the solid objects
26. Go back to the TechDraw Workbench, and use the TechDraw NewArch tool on Section002; remember to adjust the scale to 0.02 (1:50). Change DatenRotation to -90 to correct the appearance of the projections. Arrange ArchView002 next to the other views in the page. This third projection looks at the building from the front.
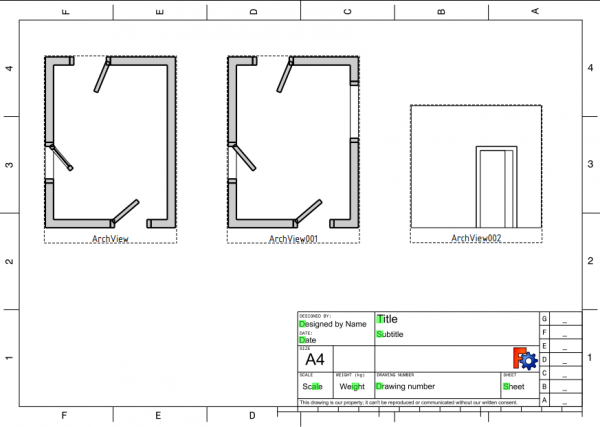
Section view of the building, two top views, and one elevation view, A4 sheet, scale 1:50
Arch and TechDraw interaction
As of the time of writing of this document (FreeCAD 0.18, November 2018), the TechDraw Workbench can only display in its pages what the Arch Workbench exports as SVG. This means that the appearance of the elements included within the Arch SectionPlane tool, and displayed by the TechDraw NewArch tool, is controlled by the Arch Workbench.
The TechDraw Workbench only has minimal control over how it displays those Arch SectionPlane (ArchView) objects. Therefore, bug reports and feature requests related to displaying Arch elements should be filed with both workbenches.
A closer interaction between the workbenches is planed for future versions of FreeCAD. In those versions it is expected that long-standing issues be resolved, such as controlling the characteristics of lines and faces (line width, line color, face color, hatch patterns, and others).
- Erste Schritte
- Installation: Herunterladen, Windows, Linux, Mac, Zusätzlicher Komponenten, Docker, AppImage, Ubuntu Snap
- Grundlagen: Über FreeCAD, Graphische Oberfläche, Mausbedienung, Auswahlmethoden, Objektname, Programmeinstellungen, Arbeitsbereiche, Dokumentstruktur, Objekteigenschaften, Hilf FreeCAD, Spende
- Hilfe: Tutorien, Video Tutorien
- Arbeitsbereiche: Std Base, Arch, Assembly, CAM, Draft, FEM, Inspection, Mesh, OpenSCAD, Part, PartDesign, Points, Reverse Engineering, Robot, Sketcher, Spreadsheet, Surface, TechDraw, Test Framework