Spreadsheet Workbench/ro: Difference between revisions
(Created page with "Uneori este de dorit să scapi de o unitate. Acest lucru se poate face numai prin înmulțirea cu 1 cu o unitate reciprocă.") |
(Updating to match new version of source page) |
||
| (42 intermediate revisions by 2 users not shown) | |||
| Line 1: | Line 1: | ||
<languages/> |
<languages/> |
||
{{Docnav |
|||
|[[Sketcher_Workbench|Sketcher Workbench]] |
|||
|[[Surface_Workbench|Surface Workbench]] |
|||
|IconL=Workbench_Sketcher.svg |
|||
|IconR=Workbench_Surface.svg |
|||
}} |
|||
[[Image:Workbench_Spreadsheet.svg|thumb|128px|Spreadsheet workbench icon]] |
|||
== Introduction == |
|||
<div class="mw-translate-fuzzy"> |
|||
{{Version|0.15}} Atelierul lucru pentru foi de calcul vă permite să creați și să editați foi de calcul, să efectuați calcule și să preluați date dintr-un model și să exportați datele sale în alte aplicații de calcul tabelar, cum ar fi LibreOffice sau Microsoft Excel. |
{{Version|0.15}} Atelierul lucru pentru foi de calcul vă permite să creați și să editați foi de calcul, să efectuați calcule și să preluați date dintr-un model și să exportați datele sale în alte aplicații de calcul tabelar, cum ar fi LibreOffice sau Microsoft Excel. |
||
</div> |
|||
<div class="mw-translate-fuzzy"> |
|||
[[File:Spreadsheet_screenshot.jpg]] |
[[File:Spreadsheet_screenshot.jpg]] |
||
</div> |
|||
[[File:Spreadsheet_screenshot.jpg|600px]] |
|||
== Funcții Suportate == |
|||
{{Caption|A spreadsheet with certain cells filled with text and quantities}} |
|||
== Tools == |
|||
Foaia de calcul oferă următoarele funcții, luând unul sau două argumente: abs, acos, asin, atan, atan2, cos, cosh, exp, log, log10, mod, pow, sin, sinh, sqrt, tan, tanh |
|||
* [[File:Spreadsheet_CreateSheet.svg|24px]] [[Spreadsheet_CreateSheet|Create sheet]]: create a new spreadsheet. |
|||
Funcțiile trigonometrice utilizează grade ca unitate implicită; furnizarea '''rad''' permite folosirea radiani. |
|||
* [[File:Spreadsheet_Import.svg|24px]] [[Spreadsheet_Import|Import]]: import a CSV file into a spreadsheet. |
|||
Funcțiile adiționale: ''ceil'', ''floor'', ''trunc'', and ''round'' sunt disponibile în FreeCAD începând cu {{Version|0.16}} |
|||
* [[File:Spreadsheet_Export.svg|24px]] [[Spreadsheet_Export|Export]]: export a CSV file from a spreadsheet. |
|||
Următoarele funcții agregate sunt suportate: ''average'', ''count'', ''max'', ''min'', ''stddev'', ''sum''. |
|||
* [[File:Spreadsheet_MergeCells.svg|24px]] [[Spreadsheet_MergeCells|Merge cells]]: merge selected cells. |
|||
Funcțiile agregate pot lua unul sau mai multe argumente, separate prin virgulă sau punct și virgulă. Argumentele pot include intervale (două celule separate prin două puncte), de ex''=average(B1:B8)'' |
|||
* [[File:Spreadsheet_SplitCell.svg|24px]] [[Spreadsheet_SplitCell|Split cell]]: split previously merged cells. |
|||
Constantele ''pi'' și ''e'' sunt predefinite. |
|||
* [[File:Spreadsheet_AlignLeft.svg|24px]] [[Spreadsheet_AlignLeft|Align left]]: align the contents of selected cells to the left. |
|||
Funcțiile if funcționează de maniera: ''= condition ? resultTrue : resultFalse'' |
|||
* [[File:Spreadsheet_AlignCenter.svg|24px]] [[Spreadsheet_AlignCenter|Align center]]: align the contents of selected cells to the center horizontally. |
|||
Funcția IF este definită ca o expresie care evaluaează fie 0 (for false) sau diferit de zero pentru true. Următorii operatori de compararea sunt definiți: ==, !=, >, <, >=, and <=. |
|||
* [[File:Spreadsheet_AlignRight.svg|24px]] [[Spreadsheet_AlignRight|Align right]]: align the contents of selected cells to the right. |
|||
Funcția IF are de fapt un bug cu privire la declarațiile condiționale imbricate. Numai rezultatul real poate avea o altă funcție IF. Parantezele se îndepărtează după confirmarea expresiei. Încercarea de a pune o afirmație condiționată imbricată în rezultatul false are ca rezultat paranteze stabilite greșite cu un rezultat diferit după salvarea și redeschiderea documentului. |
|||
* [[File:Spreadsheet_AlignTop.svg|24px]] [[Spreadsheet_AlignTop|Align top]]: align the contents of selected cells to the top. |
|||
Formulele sunt scrise după cum urmează: ''=A2+A3'' |
|||
* [[File:Spreadsheet_AlignVCenter.svg|24px]] [[Spreadsheet_AlignVCenter|Align vertical center]]: align the contents of selected cells to the center vertically. |
|||
Notăː Referințele de celule trebuie să fie scrise cu majuscule. |
|||
* [[File:Spreadsheet_AlignBottom.svg|24px]] [[Spreadsheet_AlignBottom|Align bottom]]: top align the contents of selected cells to the bottom. |
|||
* [[File:Spreadsheet_StyleBold.svg|24px]] [[Spreadsheet_StyleBold|Style bold]]: set the contents of selected cells to bold. |
|||
* [[File:Spreadsheet_StyleItalic.svg|24px]] [[Spreadsheet_StyleItalic|Style italic]]: set the contents of selected cells to italic. |
|||
* [[File:Spreadsheet_StyleUnderline.svg|24px]] [[Spreadsheet_StyleUnderline|Style underline]]: set the contents of selected cells to underlined. |
|||
* [[File:Spreadsheet_SetAlias.svg|24px]] [[Spreadsheet_SetAlias|Set alias]]: set the alias for a selected cell. |
|||
* {{Button|Black}} and {{Button|White}} set the foreground and the background colors of selected cells. |
|||
== Preferences == |
|||
* [[Image:Preferences-spreadsheet.svg|32px]] [[Spreadsheet_Preferences|Preferences]]: the preferences for the Spreadsheet Workbench. {{Version|0.20}} |
|||
== Removing cells can be dangerous == |
|||
Note that deleting or removing cells with data can break the spreadsheet and your model if it relies on the spreadheet. You are not prewarned if this happens. |
|||
== Insert and remove rows and columns == |
|||
Rows and columns can be inserted or removed by right-clicking a row or column header and selecting the appropriate option from the contex menu. It is possible to select multiple rows or columns first. Either by holding down the {{KEY|Ctrl}} key while selecting the headers, or by holding down the left mouse button and dragging. |
|||
== Edit cells == |
|||
The content of a cell can be edited by selecting the cell and entering a value in the {{MenuCommand|Content}} inputbox at the top of the window. To edit a cell in-place, select it and press {{KEY|F2}}, or double-click it. |
|||
== Delete cells == |
|||
To delete one or more cells select them and press {{KEY|Del}}. This will delete their contents, their properties and their aliases. To only delete the content of a cell it should be edited instead. |
|||
== Cut and copy-paste cells == |
|||
Cut and copy-paste operations can be used on spreadsheets cells. You can use the normal shortcuts for these operations: {{KEY|Ctrl}}+{{KEY|X}}, {{KEY|Ctrl}}+{{KEY|C}} and {{KEY|Ctrl}}+{{KEY|V}} respectively. To select multiple cells hold down the {{KEY|Ctrl}} key while selecting, or hold down the left mouse button and drag to select a rectangular cell range. |
|||
The cut and copy operations store the contents, properties and aliases of the cells on the Clipboard. The paste operation writes the data in such a way that the content of the top left cell of the stored data is dropped in the active cell. Other stored content is placed relative to that cell. Formulas are updated accordingly. Aliases are only pasted if they are unique. |
|||
<span id="Cell_properties"></span> |
|||
<div class="mw-translate-fuzzy"> |
|||
== Proprietățile celulei == |
|||
</div> |
|||
<div class="mw-translate-fuzzy"> |
|||
Proprietățile unei celule de calcul tabelar pot fi editate cu un clic dreapta pe o celulă. Următoarele |
|||
dialoguri apar: |
|||
</div> |
|||
[[File:SpreadsheetCellPropDialog.png]] |
|||
<div class="mw-translate-fuzzy"> |
|||
Are câteva tab-uri. Următoarele proprietăți pot fi modificate: |
|||
</div> |
|||
<div class="mw-translate-fuzzy"> |
|||
* Culoarea textului și culoarea de fundal |
|||
* Aliniere text orizontală și verticală |
|||
* Stil text: bold, italic, subliniat |
|||
* Unitate de afișare pentru această celulă. Citiți secțiunea de mai jos. |
|||
* Definiți un nume alias pentru această celulă. Acest alias-nume poate fi folosit în formulele de celule și, de asemenea, în FreeCADExpressions {{Version|0.16}} |
|||
</div> |
|||
== Cell expressions == |
|||
A spreadsheet cell may contain a number, a text or an expression. Expressions must start with an equal sign '='. |
|||
Cell expressions may contain numbers, functions, references to other cells, and references to properties of the model (But see [[#Current_limitations|Current limitations]] below). A cell can be referenced by its address (CAPITAL column letter + row number, e.g. B4) or by its [[Spreadsheet_SetAlias|alias]]. |
|||
'''Note:''' Cell expressions are treated by FreeCAD as programming code. Therefore, when you edit a cell the content you see may not follow your display settings: |
|||
* The decimal separator is always a dot. But commas can also be used when entering values. |
|||
* The number of displayed decimals can differ from your [[Preferences_Editor#Units|preferences settings]]. |
|||
References to objects in the model are explained under [[#References_to_CAD-data|References to CAD-data]] below. Using spreadsheet cell values to define model properties are explained under [[#Spreadsheet_data_in_expressions|Spreadsheet data in expressions]] below. For more information on expressions and the available functions, see [[Expressions|Expressions]]. |
|||
== Interaction between spreadsheets and the CAD model == |
|||
Data in the cells of a spreadsheet may be used in CAD model parameter expressions. Thus, a spreadsheet may be used as the source for parameter values used throughout a model, effectively gathering the values in one place. When values are changed in the spreadsheet, they are propagated throughout the model. |
|||
Similarly, properties from CAD model objects may be used in expressions in spreadsheet cells. This allows use of object properties like volume or area in the spreadsheet. If the name of an object in the CAD model is changed, the change will automatically be propagated to any references in spreadsheet expressions using the name which was changed. |
|||
More than one spreadsheet may be used in a document. A spreadsheet can be identified using either its name or its label. |
|||
FreeCAD will automatically assign a unique name to a spreadsheet when it is created. These names follow the pattern {{incode|Spreadsheet}}, {{incode|Spreadsheet001}}, {{incode|Spreadsheet002}} and so on. The name can not be changed, and it is not visible in the properties of the spreadsheet. It can be used to refer to the spreadsheet in an [[Expressions|Expression]] (see [[#Spreadsheet_data_in_expressions|Spreadsheet data in expressions]] below.) |
|||
The label of a spreadsheet is automatically set to the name of the spreadsheet upon creation. Unlike the name, the label can be changed, for example in the properties panel or using the context menu action Rename. By default FreeCAD does not accept duplicate labels, but there is a [[Preferences_Editor#Document|preference]] to override this. Spreadsheets with duplicate labels in the same document cannot be referenced by their label. |
|||
FreeCAD checks for cyclic dependencies. See [[Spreadsheet_Workbench#Current_limitations|Current limitations]]. |
|||
<span id="References_to_CAD-data"></span> |
|||
<div class="mw-translate-fuzzy"> |
|||
== Referință To CAD-Data == |
== Referință To CAD-Data == |
||
</div> |
|||
<div class="mw-translate-fuzzy"> |
|||
Este posibil să utilizați datele din construcție în foaia de calcul. |
Este posibil să utilizați datele din construcție în foaia de calcul. |
||
Următorul tabel prezintă câteva exemple, presupunând că modelul are o caracteristică numită "Cube" (rețineți că acesta este numele intern al caracteristicii, și nu numele utilizatorului atribuit etichetei): |
Următorul tabel prezintă câteva exemple, presupunând că modelul are o caracteristică numită "Cube" (rețineți că acesta este numele intern al caracteristicii, și nu numele utilizatorului atribuit etichetei): |
||
| Line 57: | Line 166: | ||
|x-coordinate in mm without units |
|x-coordinate in mm without units |
||
|} |
|} |
||
</div> |
|||
The following table shows some examples assuming the model has a feature named "MyCube": |
|||
== Proprietățile celulei == |
|||
{|{{Prettytable}} |
|||
!CAD-Data |
|||
!Cell in Spreadsheet |
|||
!Result |
|||
|- |
|||
|Parametric Length of a Part-Workbench Cube |
|||
|{{Incode|<nowiki>=MyCube.Length</nowiki>}} |
|||
|Length with units mm |
|||
|- |
|||
|Volume of the Cube |
|||
|{{Incode|<nowiki>=MyCube.Shape.Volume</nowiki>}} |
|||
|Volume in mm³ without units |
|||
|- |
|||
|Type of the Cube-shape |
|||
|{{Incode|<nowiki>=MyCube.Shape.ShapeType</nowiki>}} |
|||
|String: Solid |
|||
|- |
|||
|Label of the Cube |
|||
|{{Incode|<nowiki>=MyCube.Label</nowiki>}} |
|||
|String: MyCube |
|||
|- |
|||
|X coordinate of the center of mass of the Cube |
|||
|{{Incode|<nowiki>=MyCube.Shape.CenterOfMass.x</nowiki>}} |
|||
|Coordinate in mm without units |
|||
|} |
|||
<span id="Spreadsheet_data_in_expressions"></span> |
|||
Proprietățile unei celule de calcul tabelar pot fi editate cu un clic dreapta pe o celulă. Următoarele |
|||
<div class="mw-translate-fuzzy"> |
|||
dialoguri apar: |
|||
== Spreadsheet Data în Expresii == |
|||
</div> |
|||
In order to use spreadsheet data in other parts of FreeCAD, you will usually create an [[Expressions|Expression]] that refers to the spreadsheet and the cell that contains the data you want to use. You can identify spreadsheets by name or by label, and you can identify the cells by address or by alias. Autocompletion is available for all forms of referencing. |
|||
[[File:SpreadsheetCellPropDialog.png]] |
|||
{|{{Prettytable}} |
|||
Are câteva tab-uri. Următoarele proprietăți pot fi modificate: |
|||
! |
|||
!Spreadsheet by Name |
|||
!Spreadsheet by Label |
|||
|- |
|||
!Cell by Address |
|||
|{{incode|<nowiki>=Spreadsheet042.B5</nowiki>}} |
|||
|{{incode|<nowiki>=<<MySpreadsheet>>.B5</nowiki>}} |
|||
|- |
|||
!Cell by Alias |
|||
|{{incode|<nowiki>=Spreadsheet042.MyAlias</nowiki>}} |
|||
|{{incode|<nowiki>=<<MySpreadsheet>>.MyAlias</nowiki>}} |
|||
|} |
|||
<div class="mw-collapsible mw-collapsed"> |
|||
* Culoarea textului și culoarea de fundal |
|||
The recommended way to refer to spreadsheet data is to use the spreadsheet label and cell alias name. For a more in-depth explanation of the pros and cons of the referencing modes, see the expanded section below. |
|||
* Aliniere text orizontală și verticală |
|||
<div class="mw-collapsible-content"> |
|||
* Stil text: bold, italic, subliniat |
|||
* Unitate de afișare pentru această celulă. Citiți secțiunea de mai jos. |
|||
* Definiți un nume alias pentru această celulă. Acest alias-nume poate fi folosit în formulele de celule și, de asemenea, în FreeCADExpressions {{Version|0.16}} |
|||
Using the spreadsheet label has the advantage that it can be freely changed to describe the contents of the spreadsheet. It is also easier to identify the spreadsheet that is being used since the text in the expression matches the label shown in the model and property views. If you decide to change the label of a spreadsheet, existing references to the contents of the spreadsheet will be updated, so you won't break your expressions by renaming the spreadsheet. The internal name of the spreadsheet is not readily available anywhere except within the expression editor, so if you use the internal name and later decide to rename the spreadsheets, you might have a hard time tracing your expression data back to its source. |
|||
Expresiile sunt explicate aici:[[Expressions|Expressions]] |
|||
Be aware that when you create a new spreadsheet, the name and the label are the same, so it is easy to accidentally use the spreadsheet name instead of the label. A simple way to avoid this is to give the spreadsheet a meaningful name before starting to use it in expressions. |
|||
== Spreadsheet Data în Expresii == |
|||
While you may use the row and column number in an expression to reference a cell, best practice is to give the cell an alias name and use that. See [[#Cell_properties|Cell properties]] on how to set the alias. For example, if the data in cell B1 contained the length parameter for an object, an alias name of {{incode|MyObject_Length}} would allow the value to be referred to as {{incode|<<MyParams>>.MyObject_Length}} instead of {{incode|Spreadsheet.B1}}. Besides being much easier to read and understand, alias names are also much easier to change if you decide to adjust the structure of your spreadsheet. Using an alias also has the advantage that it is reasier to see which cells are used to control other parts of the document. Note that FreeCAD will automatically adjust the positional references in expressions if you insert or remove rows and columns in the spreadsheet, so even if you use row and column numbers in an expression, you can insert rows and columns without breaking the references to the surrounding cells. |
|||
Utilizarea datelor din foi de calcul în alte părți ale FreeCAD necesită un nume complet definit. Pentru că este posibil să existe mai mult de o foaie de calcul într-un document, este necesar un nume de foaie de calcul împreună cu numele celulei sau cu un alias. |
|||
Următoarele imagini ilustrează utilizarea unui nume "număr" dintr-o foaie de calcul "MySheet" într-o expresie |
|||
în Workbench-ul PartDesign. |
|||
[[File:Expression usage1.png]] |
|||
</div> |
|||
Tastarea unui "M" prezintă o listă cu numele disponibile. Tastele săgeți permit selectarea "MySheet". |
|||
</div> |
|||
=== Complex models and recomputes === |
|||
[[File:Expression usage2.png]] |
|||
Editing a spreadsheet will trigger a recompute of the 3D model, even if the changes do not affect the model. For a complex model a recompute can take a long time, and having to wait after every single edit is of course quite annoying. |
|||
Tastarea unui "n" arată acum lista de nume alias disponibile în MySheet, începând cu "n". |
|||
"Numărul" poate fi selectat cu butonul săgeată în jos. |
|||
Odată ce un nume valabil cu un conținut util este dat, câmpul rezultat va prezenta lungimea calculată. |
|||
There are three solutions to deal with this: |
|||
[[File:Expression usage3.png]] |
|||
# Temporarily skip recomputes: |
|||
#* In the [[Tree_view|Tree view]] right-click the [[Image:Document.svg|24px]] document that contains the spreadsheet. |
|||
#* Select the {{MenuCommand|Skip recomputes}} option from the context menu. |
|||
#* There is a big disadvantage to this solution. New values entered in the spreadsheet will not be displayed until the document is recomputed. Instead {{incode|#PENDING}} is shown. |
|||
#* You can either recompute manually, using the [[Std_Refresh|Std Refresh]] command, or disable {{MenuCommand|Skip recomputes}} when you are done editing. |
|||
# Use a macro to automatically skip recomputes while editing a spreadsheet: |
|||
#* Download and run [https://forum.freecadweb.org/viewtopic.php?f=8&t=48600#p419301 skipSheet.FCMacro]. |
|||
#* This solution saves a few steps compared to the first solution, but also has the mentioned disadvantage. |
|||
# Put the spreadsheet in a separate [[File_Format_FCStd|FreeCAD file]]: |
|||
#* You can reference spreadsheet data from an external {{FileName|.FCStd}} file with this syntax: {{incode|<nowiki>=NameOfFile#<<MySpreadsheet>>.MyAlias</nowiki>}}. |
|||
#* The advantage of having the spreadsheet in another file over switching off recomputes is that the spreadsheet itself does get recomputed. |
|||
#* The disadvantage is that the model won't automatically recompute after changes to the spreadsheet. |
|||
#* In the scenario where you first open the 'spreadsheet' file, change one or more values and then open the 'model' file, there won't be any indication that the model needs to be recomputed. But if both files are open the [[Std_Refresh|Std Refresh]] icon will update correctly for the 'model' file after changes to the 'spreadsheet' file. |
|||
<span id="Units"></span> |
|||
== Unități de măsură == |
== Unități de măsură == |
||
<div class="mw-translate-fuzzy"> |
|||
Foaia de calcul utilizează unități. Dacă un număr are o unitate, această unitate va fi utilizată în toate calculele. |
Foaia de calcul utilizează unități. Dacă un număr are o unitate, această unitate va fi utilizată în toate calculele. |
||
Înmulțirea a două lungimi cu unitatea în mm dă o suprafață cu unitatea mm pătrați-mm & sup2 ;. |
Înmulțirea a două lungimi cu unitatea în mm dă o suprafață cu unitatea mm pătrați-mm & sup2 ;. |
||
</div> |
|||
If a cell contains a value which represents a dimension, it should be entered with its associated unit. While in many simple cases one can get by with a dimensionless value, it is unwise to not enter the unit. If a value representing a dimension is entered without its associated unit, there are some sequences of operations which cause FreeCAD to complain of incompatible units in an expression when it appears the expression should be valid. (This may be better understood by viewing [https://forum.freecadweb.org/viewtopic.php?f=3&t=34713&p=292455#p292438 this thread] in the FreeCAD forums.) |
|||
<div class="mw-translate-fuzzy"> |
|||
Puteți schimba unitatea de lungime de la mm la inch prin dialog, veți obține cu un clic dreapta pe o celulă. |
Puteți schimba unitatea de lungime de la mm la inch prin dialog, veți obține cu un clic dreapta pe o celulă. |
||
Celula va arăta acum lungimea în centimetri. Valoarea utilizată pentru calcule nu se modifică. |
Celula va arăta acum lungimea în centimetri. Valoarea utilizată pentru calcule nu se modifică. |
||
Rezultatele unei formule care utilizează această valoare nu se modifică atunci când unitatea indicată a unei intrări a fost modificată. Rezultatul |
Rezultatele unei formule care utilizează această valoare nu se modifică atunci când unitatea indicată a unei intrări a fost modificată. Rezultatul |
||
se calculează încă din lungimea în mm. |
se calculează încă din lungimea în mm. |
||
</div> |
|||
<div class="mw-translate-fuzzy"> |
|||
Un număr fără o unitate de măsură nu poate fi modificat într-un număr cu unitate de măsură prin dialogul proprietăților celulare. |
Un număr fără o unitate de măsură nu poate fi modificat într-un număr cu unitate de măsură prin dialogul proprietăților celulare. |
||
Se poate introduce un șir de unități, care va fi afișat, dar celula conține încă un număr fără unitate de măsură. |
Se poate introduce un șir de unități, care va fi afișat, dar celula conține încă un număr fără unitate de măsură. |
||
</div> |
|||
<div class="mw-translate-fuzzy"> |
|||
Uneori este de dorit să scapi de o unitate. Acest lucru se poate face numai prin înmulțirea cu 1 cu o unitate reciprocă. |
Uneori este de dorit să scapi de o unitate. Acest lucru se poate face numai prin înmulțirea cu 1 cu o unitate reciprocă. |
||
</div> |
|||
<span id="Importing_and_exporting"></span> |
|||
== Import și export == |
== Import și export == |
||
=== CSV format === |
|||
Sheets can be imported and exported to the [https://en.wikipedia.org/wiki/Comma-separated_values csv] format which can also be read and written by most other spreadsheet applications such as Microsoft Excel or LibreOffice Calc. When importing files into FreeCAD, the delimiter (the character that is used to separate columns) must be the TAB character (this can be set when exporting from other applications). The import of a CSV-file is available over the menu Spreadsheet/ Import Spreadsheet or by clicking on the icon [[Image:SpreadsheetImport.svg|24px]]. This import function does not open Excel files or any other spreadsheet format. |
|||
<div class="mw-translate-fuzzy"> |
|||
Spreadsheets in Excel-format "xlsx" can be imported via the menu File/Import... into a FreeCAD document. Excel-spreadsheets can also be opened by FreeCAD by clicking in the menu File/Open... or by clicking on the icon [[Image:Document-open.svg|24px]]. In this case |
|||
Foiile de calcul pot fi importate și exportate în formatul [https://en.wikipedia.org/wiki/Comma-separated_values csv], care poate fi, de asemenea, citit și scris de majoritatea altor aplicații de calcul tabelar, cum ar fi Microsoft Excel sau LibreOffice Calc. Când importați fișiere în FreeCAD, separatorul/delimitatorul (caracterul care este utilizat pentru a separa coloanele) trebuie să fie caracterul TAB (acest lucru poate fi setat când exportați din alte aplicații). Importul unui fișier CSV este disponibil prin intermediul foii de calcul Spreadsheet / Import sau prin apăsarea pe pictograma [[Image: SpreadsheetImport.svg | 24px]]. Această funcție de import nu deschide fișiere Excel sau orice alt format de foaie de calcul. |
|||
a new document with a spreadsheet inside is created. Supported are the following features: |
|||
</div> |
|||
=== XLSX format === |
|||
* all functions that are also available in the FreeCAD spreadsheet. Other functions do give an error in the corresponding cell after the import. |
|||
* Alias names for cells |
|||
* More than one table in the Excel-sheet. In this case more FreeCAD spreadsheets are created. |
|||
<div class="mw-translate-fuzzy"> |
|||
Other functionality is not imported into the FreeCAD spreadsheet. The Excel-import is {{Version|0.17}}of FreeCAD. |
|||
Foile de calcul în format Excel "xlsx" pot fi importate prin meniul File / Import ... într-un document FreeCAD. Foile de calcul Excel pot fi deschise de FreeCAD făcând clic pe meniul File / Open ... sau făcând clic pe pictograma [[Image: Document-open.svg | 24px]]. În acest caz se creează un nou document cu o foaie de calcul în interior. Sunt acceptate următoarele caracteristici: |
|||
</div> |
|||
<div class="mw-translate-fuzzy"> |
|||
* toate funcțiile disponibile și în foaia de calcul FreeCAD. Alte funcții dau o eroare în celula corespunzătoare după import. |
|||
* Alias nume pentru celule |
|||
* Mai mult de un tabel din foaia Excel. În acest caz, sunt create mai multe foi de calcul FreeCAD. |
|||
</div> |
|||
<div class="mw-translate-fuzzy"> |
|||
Alte funcționalități nu sunt importate în foaia de calcul FreeCAD. Importul Excel este {{Version | 0.17}} al FreeCAD. |
|||
</div> |
|||
== Printing == |
|||
To handle the page setup necessary for printing, FreeCAD spreadsheets are printed by inserting them into a [[TechDraw_SpreadsheetView|TechDraw Spreadsheet View]]. |
|||
<span id="Current_limitations"></span> |
|||
<div class="mw-translate-fuzzy"> |
|||
== Limitări curente == |
== Limitări curente == |
||
</div> |
|||
<div class="mw-translate-fuzzy"> |
|||
Nu este posibilă furnizarea de date pentru o geometrie, de exemplu o lungime, într-o foaie de calcul și extragerea în aceeași foaie de calcul a volumului |
Nu este posibilă furnizarea de date pentru o geometrie, de exemplu o lungime, într-o foaie de calcul și extragerea în aceeași foaie de calcul a volumului |
||
forma rezultată. Aceasta va crea o referință circulară. Aceasta este o decizie de proiectare. Cu toate acestea, este posibil să utilizați două foi de calcul diferite: una ca sursă de date |
forma rezultată. Aceasta va crea o referință circulară. Aceasta este o decizie de proiectare. Cu toate acestea, este posibil să utilizați două foi de calcul diferite: una ca sursă de date |
||
pentru geometrie și altul pentru raportarea datelor geometrice. |
pentru geometrie și altul pentru raportarea datelor geometrice. |
||
</div> |
|||
== Cell binding == |
|||
Nu este posibilă selectarea și copierea mai multor celule. Numai conținutul unei celule din câmpul de introducere poate fi copiat și inserat în câmpul de intrare al unei alte celule. |
|||
{{Version|0.20}} |
|||
Pentru versiunile anterioare ale FreeCAD, a se vedea [[Spreadsheet_legacy|Spreadsheet legacy]] |
|||
It is possible to bind the content of cells to other spreadsheet cells. This can be useful when dealing with large tables or to get cell content from another spreadsheet. |
|||
=== Create binding === |
|||
To bind, for example, the cell range A3-C4 to the cell range B1-D2: |
|||
<ol> |
|||
<li> |
|||
Select the cell range A3-C4. |
|||
</li> |
|||
<li> |
|||
Right-click and select {{MenuCommand|Bind...}} from the context menu. |
|||
</li> |
|||
<li> |
|||
The {{MenuCommand|Bind Spreadsheet Cells}} dialog opens. |
|||
</li> |
|||
<li> |
|||
Set the range B1-D2 for the {{MenuCommand|To cells}}: |
|||
<br> |
|||
[[File:Spreadsheet_binding-dialog.png]] |
|||
</li> |
|||
<li> |
|||
Press {{Button|OK}}. |
|||
</li> |
|||
<li> |
|||
Bound cells have a blue border to highlight the binding. |
|||
</li> |
|||
<li> |
|||
If you now enter something in cell C1, the same will immediately appear in cell B3. |
|||
</li> |
|||
</ol> |
|||
[[File:Spreadsheet_binding-result.png]] |
|||
{{Caption|The spreadsheet may now look like this}} |
|||
=== Change binding === |
|||
# Right-click a bound cell (there is no need to highlight the whole bound range) and select {{MenuCommand|Bind...}} from the context menu. |
|||
# The {{MenuCommand|Bind Spreadsheet Cells}} dialog opens. |
|||
# Change one or more options. Note that the {{MenuCommand|Bind cells}}, the bound cell range, cannot be changed. |
|||
# Press {{Button|OK}}. |
|||
=== Remove binding === |
|||
# Right-click a bound cell (there is no need to highlight the whole bound range) and select {{MenuCommand|Bind...}} from the context menu. |
|||
# The {{MenuCommand|Bind Spreadsheet Cells}} dialog opens. |
|||
# Press {{Button|Unbind}}. |
|||
===Notes=== |
|||
* The {{MenuCommand|Hide dependency of binding}} option can be used to prevent problems with cyclic dependencies between spreadsheets. Selecting it is necessary when, for example, cells in ''Spreadsheet A'' are bound to ''Spreadsheet B'', while cells in ''Spreadsheet B'', in turn, are bound to some other cells in ''Spreadsheet A''. This option should be used with caution: |
|||
** Hiding dependencies can be dangerous because broken dependencies can damage your FreeCAD file. For example, when you delete a spreadsheet you will not be warned about hidden dependencies. |
|||
** When you open a document with a spreadsheet containing a hidden dependency, you will get the spreadsheet marked to be recomputed. This is because a cyclic dependency cannot be recomputed automatically. To recompute the [[Std_Refresh|Std Refresh]] tool must be used. |
|||
* The cell binding has a range check and warns you about mismatched ranges. For example binding 1x3 cells to 3x2 cells cannot work because it is unknown which 3 cells of the original 6 cells should be used. |
|||
* You cannot change the cell range of an existing binding. You must first unbind the cells and then create a new binding. |
|||
* The frame color indicating the binding cannot be changed yet. |
|||
== Configuration tables == |
|||
{{Version|0.20}} |
|||
You can use Spreadsheets to create configuration tables with sets of predefined parameters for your model, and then dynamically change which configuration to use. See [https://forum.freecadweb.org/viewtopic.php?f=17&t=42183 this Forum post] if you want to know more about the inner workings of this feature. |
|||
<div class="mw-collapsible mw-collapsed toccolours"> |
|||
Expand this section for a brief tutorial on creating a configuration table. |
|||
<div class="mw-collapsible-content"> |
|||
<ol> |
|||
<li> |
|||
In a new document, first create a [[Std_Part|Std Part]], then create a [[Part_Box|Part Box]], a [[Part_Cylinder|Part Cylinder]] and a Spreadsheet. |
|||
</li> |
|||
<li> |
|||
The Box and the Cylinder are automatically placed in the [[Std_Part|Std Part]] container. Manually put the Spreadsheet in the container as well. |
|||
</li> |
|||
<li> |
|||
In the Spreadsheet enter the content as shown below. Set the alias for B2 as {{Value|width}}, C2 as {{Value|length}} and D2 as {{Value|radius}}: |
|||
<br> |
|||
[[File:Spreadsheet_configuration_table_screenshot_4.png]] |
|||
</li> |
|||
<li> |
|||
Bind the [[Expressions|expressions]] {{Value|Spreadsheet.width}} and {{Value|Spreadsheet.length}} to the Box's properties {{PropertyData|Width}} and {{PropertyData|Length}}, respectively: |
|||
<br> |
|||
[[File:Spreadsheet_configuration_table_screenshot_2.png]] |
|||
</li> |
|||
<li> |
|||
Bind the expression {{Value|Spreadsheet.radius}} to the Cylinder's property {{PropertyData|Radius}}. Also change the {{PropertyData|Height}} of the Cylinder to {{Value|5 mm}} so that it is lower than the Box. |
|||
</li> |
|||
<li> |
|||
Right-click the cell A2 in the Spreadsheet and select {{MenuCommand|Configuration table...}} from the context menu. |
|||
</li> |
|||
<li> |
|||
The {{MenuCommand|Setup Configuration Table}} dialog opens. |
|||
</li> |
|||
<li> |
|||
Enter the following: |
|||
<br> |
|||
[[File:Spreadsheet_configuration_table_screenshot_5.png]] |
|||
</li> |
|||
<li> |
|||
Press {{Button|OK}}. |
|||
</li> |
|||
<li> |
|||
A new property called {{PropertyData|Configuration}} is be added to the [[Std_Part|Std Part]] container to choose the configuration as shown below: |
|||
<br> |
|||
[[File:Spreadsheet_configuration_table_screenshot_6.png]] |
|||
</li> |
|||
</ol> |
|||
You can use either a [[Std_LinkMake|Std Link]] or a [[PartDesign_SubShapeBinder|PartDesign SubShapeBinder]] to instantiate a [https://forum.freecadweb.org/viewtopic.php?f=17&t=42183&p=532130#p532130 Variant Instance] of a configurable object with the following steps: |
|||
# Create a [[Std_LinkMake|Std Link]] to the [[Std_Part|Std Part]] container and set its {{PropertyData|Link Copy On Change}} property to {{Value|Enabled}}. |
|||
# Move the Link to a new place by changing its {{PropertyData|Placement}} so that it is easier to distinguish from the original object. |
|||
# Select a different {{PropertyData|Configuration}} for the Link to create a variant instance. |
|||
Similar steps apply to a [[PartDesign_SubShapeBinder|PartDesign SubShapeBinder]], except that its property for activating a variant instance is called {{PropertyData|Bind Copy On Change}}. |
|||
</div> |
|||
</div> |
|||
<span id="Scripting_basics"></span> |
|||
<div class="mw-translate-fuzzy"> |
|||
== Bazele script programări== |
|||
</div> |
|||
== Bazele script programări== |
|||
{{Code|code= |
{{Code|code= |
||
import Spreadsheet |
import Spreadsheet |
||
sheet = App.ActiveDocument.addObject("Spreadsheet::Sheet") |
sheet = App.ActiveDocument.addObject("Spreadsheet::Sheet","MySpreadsheet") |
||
sheet.Label = "Dimensions" |
sheet.Label = "Dimensions" |
||
sheet.set('A1','10mm') |
|||
sheet.recompute() |
|||
sheet.get('A1') |
|||
sheet.setAlias('B1','Diameter') |
|||
sheet.set('Diameter','20mm') |
|||
sheet.recompute() |
|||
sheet.get('Diameter') |
|||
}} |
}} |
||
{{Docnav| | }} |
|||
[[Category:User Documentation]] |
|||
<div class="mw-translate-fuzzy"> |
|||
{{Docnav| | }} |
|||
</div> |
|||
{{Spreadsheet_Tools_navi{{#translation:}}}} |
|||
{{clear}} |
|||
{{Userdocnavi{{#translation:}}}} |
|||
[[Category:Workbenches{{#translation:}}]] |
|||
Latest revision as of 18:48, 25 April 2024

Introduction
introduced in version 0.15 Atelierul lucru pentru foi de calcul vă permite să creați și să editați foi de calcul, să efectuați calcule și să preluați date dintr-un model și să exportați datele sale în alte aplicații de calcul tabelar, cum ar fi LibreOffice sau Microsoft Excel.
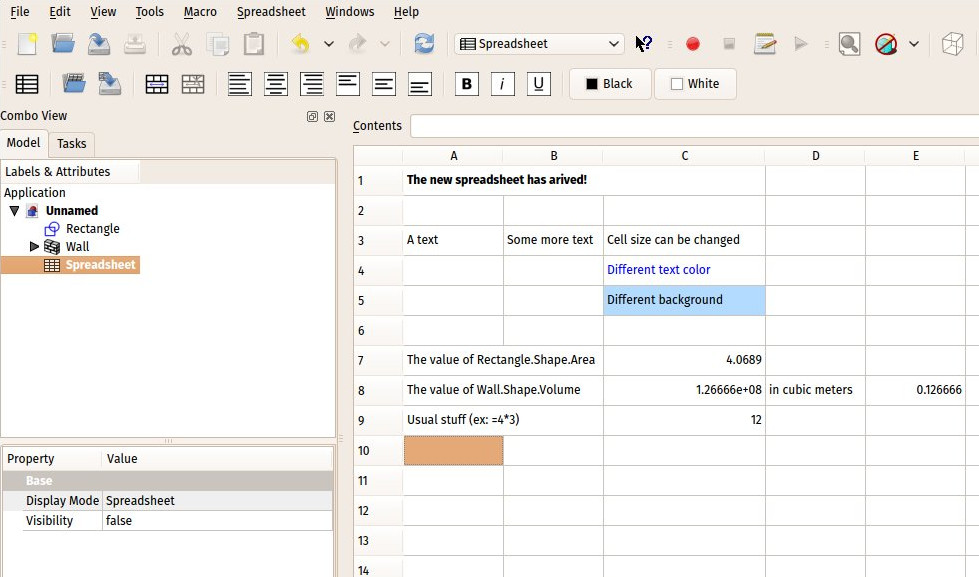
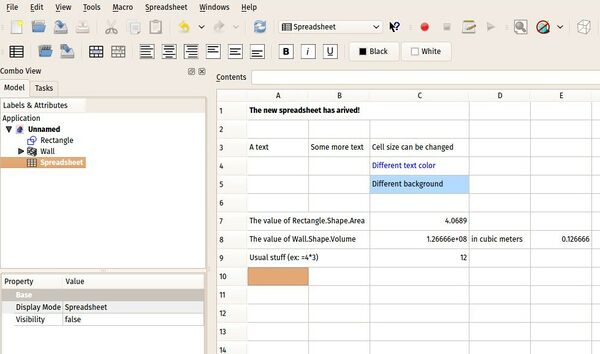
A spreadsheet with certain cells filled with text and quantities
Tools
Create sheet: create a new spreadsheet.
Import: import a CSV file into a spreadsheet.
Export: export a CSV file from a spreadsheet.
Merge cells: merge selected cells.
Split cell: split previously merged cells.
Align left: align the contents of selected cells to the left.
Align center: align the contents of selected cells to the center horizontally.
Align right: align the contents of selected cells to the right.
Align top: align the contents of selected cells to the top.
Align vertical center: align the contents of selected cells to the center vertically.
Align bottom: top align the contents of selected cells to the bottom.
Style bold: set the contents of selected cells to bold.
Style italic: set the contents of selected cells to italic.
Style underline: set the contents of selected cells to underlined.
Set alias: set the alias for a selected cell.
- Black and White set the foreground and the background colors of selected cells.
Preferences
Preferences: the preferences for the Spreadsheet Workbench. introduced in version 0.20
Removing cells can be dangerous
Note that deleting or removing cells with data can break the spreadsheet and your model if it relies on the spreadheet. You are not prewarned if this happens.
Insert and remove rows and columns
Rows and columns can be inserted or removed by right-clicking a row or column header and selecting the appropriate option from the contex menu. It is possible to select multiple rows or columns first. Either by holding down the Ctrl key while selecting the headers, or by holding down the left mouse button and dragging.
Edit cells
The content of a cell can be edited by selecting the cell and entering a value in the Content inputbox at the top of the window. To edit a cell in-place, select it and press F2, or double-click it.
Delete cells
To delete one or more cells select them and press Del. This will delete their contents, their properties and their aliases. To only delete the content of a cell it should be edited instead.
Cut and copy-paste cells
Cut and copy-paste operations can be used on spreadsheets cells. You can use the normal shortcuts for these operations: Ctrl+X, Ctrl+C and Ctrl+V respectively. To select multiple cells hold down the Ctrl key while selecting, or hold down the left mouse button and drag to select a rectangular cell range.
The cut and copy operations store the contents, properties and aliases of the cells on the Clipboard. The paste operation writes the data in such a way that the content of the top left cell of the stored data is dropped in the active cell. Other stored content is placed relative to that cell. Formulas are updated accordingly. Aliases are only pasted if they are unique.
Proprietățile celulei
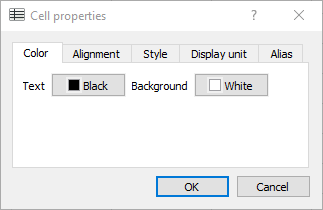
Proprietățile unei celule de calcul tabelar pot fi editate cu un clic dreapta pe o celulă. Următoarele dialoguri apar:
Are câteva tab-uri. Următoarele proprietăți pot fi modificate:
- Culoarea textului și culoarea de fundal
- Aliniere text orizontală și verticală
- Stil text: bold, italic, subliniat
- Unitate de afișare pentru această celulă. Citiți secțiunea de mai jos.
- Definiți un nume alias pentru această celulă. Acest alias-nume poate fi folosit în formulele de celule și, de asemenea, în FreeCADExpressions introduced in version 0.16
Cell expressions
A spreadsheet cell may contain a number, a text or an expression. Expressions must start with an equal sign '='.
Cell expressions may contain numbers, functions, references to other cells, and references to properties of the model (But see Current limitations below). A cell can be referenced by its address (CAPITAL column letter + row number, e.g. B4) or by its alias.
Note: Cell expressions are treated by FreeCAD as programming code. Therefore, when you edit a cell the content you see may not follow your display settings:
- The decimal separator is always a dot. But commas can also be used when entering values.
- The number of displayed decimals can differ from your preferences settings.
References to objects in the model are explained under References to CAD-data below. Using spreadsheet cell values to define model properties are explained under Spreadsheet data in expressions below. For more information on expressions and the available functions, see Expressions.
Interaction between spreadsheets and the CAD model
Data in the cells of a spreadsheet may be used in CAD model parameter expressions. Thus, a spreadsheet may be used as the source for parameter values used throughout a model, effectively gathering the values in one place. When values are changed in the spreadsheet, they are propagated throughout the model.
Similarly, properties from CAD model objects may be used in expressions in spreadsheet cells. This allows use of object properties like volume or area in the spreadsheet. If the name of an object in the CAD model is changed, the change will automatically be propagated to any references in spreadsheet expressions using the name which was changed.
More than one spreadsheet may be used in a document. A spreadsheet can be identified using either its name or its label.
FreeCAD will automatically assign a unique name to a spreadsheet when it is created. These names follow the pattern Spreadsheet, Spreadsheet001, Spreadsheet002 and so on. The name can not be changed, and it is not visible in the properties of the spreadsheet. It can be used to refer to the spreadsheet in an Expression (see Spreadsheet data in expressions below.)
The label of a spreadsheet is automatically set to the name of the spreadsheet upon creation. Unlike the name, the label can be changed, for example in the properties panel or using the context menu action Rename. By default FreeCAD does not accept duplicate labels, but there is a preference to override this. Spreadsheets with duplicate labels in the same document cannot be referenced by their label.
FreeCAD checks for cyclic dependencies. See Current limitations.
Referință To CAD-Data
Este posibil să utilizați datele din construcție în foaia de calcul. Următorul tabel prezintă câteva exemple, presupunând că modelul are o caracteristică numită "Cube" (rețineți că acesta este numele intern al caracteristicii, și nu numele utilizatorului atribuit etichetei):
| CAD-Data | Call in Spreadsheet | Result |
|---|---|---|
| Parametric Length of a Part-Workbench Cube | =Cube.Length | Length with units mm |
| Volume of the Cube | =Cube.Shape.Volume | Volume in mm³ without units |
| Type of the Cube-shape | =Cube.Shape.ShapeType | String: Solid |
| Label of the Cube | =Cube.Label | String: Cube |
| x-coordinate of center of mass of the Cube | =Cube.Shape.CenterOfMass.x | x-coordinate in mm without units |
The following table shows some examples assuming the model has a feature named "MyCube":
| CAD-Data | Cell in Spreadsheet | Result |
|---|---|---|
| Parametric Length of a Part-Workbench Cube | =MyCube.Length
|
Length with units mm |
| Volume of the Cube | =MyCube.Shape.Volume
|
Volume in mm³ without units |
| Type of the Cube-shape | =MyCube.Shape.ShapeType
|
String: Solid |
| Label of the Cube | =MyCube.Label
|
String: MyCube |
| X coordinate of the center of mass of the Cube | =MyCube.Shape.CenterOfMass.x
|
Coordinate in mm without units |
Spreadsheet Data în Expresii
In order to use spreadsheet data in other parts of FreeCAD, you will usually create an Expression that refers to the spreadsheet and the cell that contains the data you want to use. You can identify spreadsheets by name or by label, and you can identify the cells by address or by alias. Autocompletion is available for all forms of referencing.
| Spreadsheet by Name | Spreadsheet by Label | |
|---|---|---|
| Cell by Address | =Spreadsheet042.B5
|
=<<MySpreadsheet>>.B5
|
| Cell by Alias | =Spreadsheet042.MyAlias
|
=<<MySpreadsheet>>.MyAlias
|
The recommended way to refer to spreadsheet data is to use the spreadsheet label and cell alias name. For a more in-depth explanation of the pros and cons of the referencing modes, see the expanded section below.
Using the spreadsheet label has the advantage that it can be freely changed to describe the contents of the spreadsheet. It is also easier to identify the spreadsheet that is being used since the text in the expression matches the label shown in the model and property views. If you decide to change the label of a spreadsheet, existing references to the contents of the spreadsheet will be updated, so you won't break your expressions by renaming the spreadsheet. The internal name of the spreadsheet is not readily available anywhere except within the expression editor, so if you use the internal name and later decide to rename the spreadsheets, you might have a hard time tracing your expression data back to its source.
Be aware that when you create a new spreadsheet, the name and the label are the same, so it is easy to accidentally use the spreadsheet name instead of the label. A simple way to avoid this is to give the spreadsheet a meaningful name before starting to use it in expressions.
While you may use the row and column number in an expression to reference a cell, best practice is to give the cell an alias name and use that. See Cell properties on how to set the alias. For example, if the data in cell B1 contained the length parameter for an object, an alias name of MyObject_Length would allow the value to be referred to as <<MyParams>>.MyObject_Length instead of Spreadsheet.B1. Besides being much easier to read and understand, alias names are also much easier to change if you decide to adjust the structure of your spreadsheet. Using an alias also has the advantage that it is reasier to see which cells are used to control other parts of the document. Note that FreeCAD will automatically adjust the positional references in expressions if you insert or remove rows and columns in the spreadsheet, so even if you use row and column numbers in an expression, you can insert rows and columns without breaking the references to the surrounding cells.
Complex models and recomputes
Editing a spreadsheet will trigger a recompute of the 3D model, even if the changes do not affect the model. For a complex model a recompute can take a long time, and having to wait after every single edit is of course quite annoying.
There are three solutions to deal with this:
- Temporarily skip recomputes:
- In the Tree view right-click the
document that contains the spreadsheet.
- Select the Skip recomputes option from the context menu.
- There is a big disadvantage to this solution. New values entered in the spreadsheet will not be displayed until the document is recomputed. Instead
#PENDINGis shown. - You can either recompute manually, using the Std Refresh command, or disable Skip recomputes when you are done editing.
- In the Tree view right-click the
- Use a macro to automatically skip recomputes while editing a spreadsheet:
- Download and run skipSheet.FCMacro.
- This solution saves a few steps compared to the first solution, but also has the mentioned disadvantage.
- Put the spreadsheet in a separate FreeCAD file:
- You can reference spreadsheet data from an external .FCStd file with this syntax:
=NameOfFile#<<MySpreadsheet>>.MyAlias. - The advantage of having the spreadsheet in another file over switching off recomputes is that the spreadsheet itself does get recomputed.
- The disadvantage is that the model won't automatically recompute after changes to the spreadsheet.
- In the scenario where you first open the 'spreadsheet' file, change one or more values and then open the 'model' file, there won't be any indication that the model needs to be recomputed. But if both files are open the Std Refresh icon will update correctly for the 'model' file after changes to the 'spreadsheet' file.
- You can reference spreadsheet data from an external .FCStd file with this syntax:
Unități de măsură
Foaia de calcul utilizează unități. Dacă un număr are o unitate, această unitate va fi utilizată în toate calculele. Înmulțirea a două lungimi cu unitatea în mm dă o suprafață cu unitatea mm pătrați-mm & sup2 ;.
If a cell contains a value which represents a dimension, it should be entered with its associated unit. While in many simple cases one can get by with a dimensionless value, it is unwise to not enter the unit. If a value representing a dimension is entered without its associated unit, there are some sequences of operations which cause FreeCAD to complain of incompatible units in an expression when it appears the expression should be valid. (This may be better understood by viewing this thread in the FreeCAD forums.)
Puteți schimba unitatea de lungime de la mm la inch prin dialog, veți obține cu un clic dreapta pe o celulă. Celula va arăta acum lungimea în centimetri. Valoarea utilizată pentru calcule nu se modifică. Rezultatele unei formule care utilizează această valoare nu se modifică atunci când unitatea indicată a unei intrări a fost modificată. Rezultatul se calculează încă din lungimea în mm.
Un număr fără o unitate de măsură nu poate fi modificat într-un număr cu unitate de măsură prin dialogul proprietăților celulare. Se poate introduce un șir de unități, care va fi afișat, dar celula conține încă un număr fără unitate de măsură.
Uneori este de dorit să scapi de o unitate. Acest lucru se poate face numai prin înmulțirea cu 1 cu o unitate reciprocă.
Import și export
CSV format
Foiile de calcul pot fi importate și exportate în formatul csv, care poate fi, de asemenea, citit și scris de majoritatea altor aplicații de calcul tabelar, cum ar fi Microsoft Excel sau LibreOffice Calc. Când importați fișiere în FreeCAD, separatorul/delimitatorul (caracterul care este utilizat pentru a separa coloanele) trebuie să fie caracterul TAB (acest lucru poate fi setat când exportați din alte aplicații). Importul unui fișier CSV este disponibil prin intermediul foii de calcul Spreadsheet / Import sau prin apăsarea pe pictograma . Această funcție de import nu deschide fișiere Excel sau orice alt format de foaie de calcul.
XLSX format
Foile de calcul în format Excel "xlsx" pot fi importate prin meniul File / Import ... într-un document FreeCAD. Foile de calcul Excel pot fi deschise de FreeCAD făcând clic pe meniul File / Open ... sau făcând clic pe pictograma . În acest caz se creează un nou document cu o foaie de calcul în interior. Sunt acceptate următoarele caracteristici:
- toate funcțiile disponibile și în foaia de calcul FreeCAD. Alte funcții dau o eroare în celula corespunzătoare după import.
- Alias nume pentru celule
- Mai mult de un tabel din foaia Excel. În acest caz, sunt create mai multe foi de calcul FreeCAD.
Alte funcționalități nu sunt importate în foaia de calcul FreeCAD. Importul Excel este introduced in version 0.17 al FreeCAD.
Printing
To handle the page setup necessary for printing, FreeCAD spreadsheets are printed by inserting them into a TechDraw Spreadsheet View.
Limitări curente
Nu este posibilă furnizarea de date pentru o geometrie, de exemplu o lungime, într-o foaie de calcul și extragerea în aceeași foaie de calcul a volumului forma rezultată. Aceasta va crea o referință circulară. Aceasta este o decizie de proiectare. Cu toate acestea, este posibil să utilizați două foi de calcul diferite: una ca sursă de date pentru geometrie și altul pentru raportarea datelor geometrice.
Cell binding
It is possible to bind the content of cells to other spreadsheet cells. This can be useful when dealing with large tables or to get cell content from another spreadsheet.
Create binding
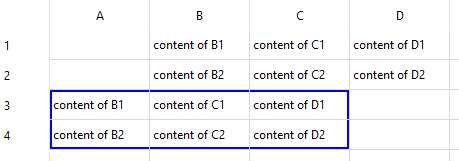
To bind, for example, the cell range A3-C4 to the cell range B1-D2:
- Select the cell range A3-C4.
- Right-click and select Bind... from the context menu.
- The Bind Spreadsheet Cells dialog opens.
-
Set the range B1-D2 for the To cells:
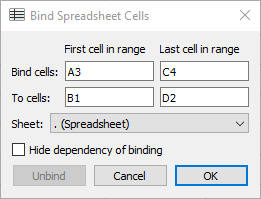
- Press OK.
- Bound cells have a blue border to highlight the binding.
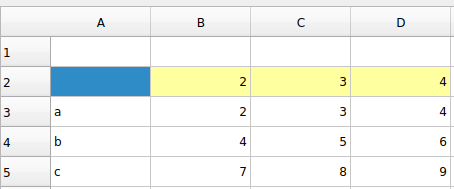
- If you now enter something in cell C1, the same will immediately appear in cell B3.
The spreadsheet may now look like this
Change binding
- Right-click a bound cell (there is no need to highlight the whole bound range) and select Bind... from the context menu.
- The Bind Spreadsheet Cells dialog opens.
- Change one or more options. Note that the Bind cells, the bound cell range, cannot be changed.
- Press OK.
Remove binding
- Right-click a bound cell (there is no need to highlight the whole bound range) and select Bind... from the context menu.
- The Bind Spreadsheet Cells dialog opens.
- Press Unbind.
Notes
- The Hide dependency of binding option can be used to prevent problems with cyclic dependencies between spreadsheets. Selecting it is necessary when, for example, cells in Spreadsheet A are bound to Spreadsheet B, while cells in Spreadsheet B, in turn, are bound to some other cells in Spreadsheet A. This option should be used with caution:
- Hiding dependencies can be dangerous because broken dependencies can damage your FreeCAD file. For example, when you delete a spreadsheet you will not be warned about hidden dependencies.
- When you open a document with a spreadsheet containing a hidden dependency, you will get the spreadsheet marked to be recomputed. This is because a cyclic dependency cannot be recomputed automatically. To recompute the Std Refresh tool must be used.
- The cell binding has a range check and warns you about mismatched ranges. For example binding 1x3 cells to 3x2 cells cannot work because it is unknown which 3 cells of the original 6 cells should be used.
- You cannot change the cell range of an existing binding. You must first unbind the cells and then create a new binding.
- The frame color indicating the binding cannot be changed yet.
Configuration tables
You can use Spreadsheets to create configuration tables with sets of predefined parameters for your model, and then dynamically change which configuration to use. See this Forum post if you want to know more about the inner workings of this feature.
Expand this section for a brief tutorial on creating a configuration table.
- In a new document, first create a Std Part, then create a Part Box, a Part Cylinder and a Spreadsheet.
- The Box and the Cylinder are automatically placed in the Std Part container. Manually put the Spreadsheet in the container as well.
-
In the Spreadsheet enter the content as shown below. Set the alias for B2 as
width, C2 aslengthand D2 asradius:
-
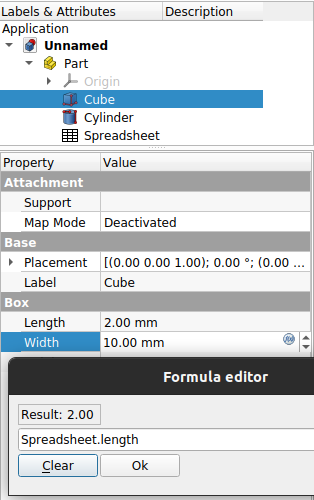
Bind the expressions
Spreadsheet.widthandSpreadsheet.lengthto the Box's properties DateWidth and DateLength, respectively:
-
Bind the expression
Spreadsheet.radiusto the Cylinder's property DateRadius. Also change the DateHeight of the Cylinder to5 mmso that it is lower than the Box. - Right-click the cell A2 in the Spreadsheet and select Configuration table... from the context menu.
- The Setup Configuration Table dialog opens.
-
Enter the following:
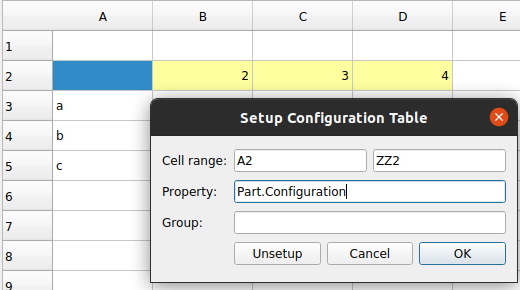
- Press OK.
-
A new property called DateConfiguration is be added to the Std Part container to choose the configuration as shown below:
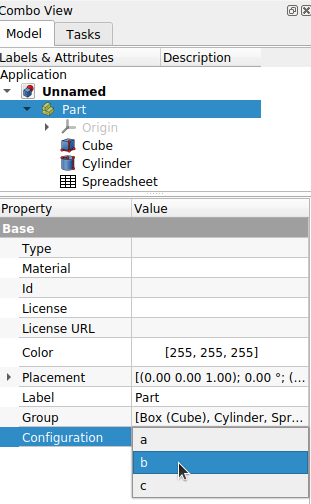
You can use either a Std Link or a PartDesign SubShapeBinder to instantiate a Variant Instance of a configurable object with the following steps:
- Create a Std Link to the Std Part container and set its DateLink Copy On Change property to
Enabled. - Move the Link to a new place by changing its DatePlacement so that it is easier to distinguish from the original object.
- Select a different DateConfiguration for the Link to create a variant instance.
Similar steps apply to a PartDesign SubShapeBinder, except that its property for activating a variant instance is called DateBind Copy On Change.
Bazele script programări
import Spreadsheet
sheet = App.ActiveDocument.addObject("Spreadsheet::Sheet","MySpreadsheet")
sheet.Label = "Dimensions"

sheet.set('A1','10mm')
sheet.recompute()
sheet.get('A1')

sheet.setAlias('B1','Diameter')
sheet.set('Diameter','20mm')
sheet.recompute()
sheet.get('Diameter')
- Creation: Create sheet, Import, Export, Merge cells, Split cell, Set alias
- Aligment: Align left, Align center, Align right, Align top, Align vertical center, Align bottom
- Style: Style bold, Style italic, Style underline
- Additional: Preferences
- Getting started
- Installation: Download, Windows, Linux, Mac, Additional components, Docker, AppImage, Ubuntu Snap
- Basics: About FreeCAD, Interface, Mouse navigation, Selection methods, Object name, Preferences, Workbenches, Document structure, Properties, Help FreeCAD, Donate
- Help: Tutorials, Video tutorials
- Workbenches: Std Base, Arch, Assembly, CAM, Draft, FEM, Inspection, Mesh, OpenSCAD, Part, PartDesign, Points, Reverse Engineering, Robot, Sketcher, Spreadsheet, Surface, TechDraw, Test Framework
- Hubs: User hub, Power users hub, Developer hub
