Part Scale: Difference between revisions
Wandererfan (talk | contribs) (Created page with "<languages/> {{Docnav |Extrude |Revolve |Part |IconL=Part_Extrude.svg |IconR=Part_Revolve.svg |IconC=Workbench_Part.svg }} {{GuiCommand |Name=Part Scale |MenuLocation=Part → Scale |Workbenches=Part |Version=0.22 |SeeAlso=Draft Clone, Draft Scale }} == Description == '''Part Scale''' extends a shape by a specified factor in all directions or by distinct factors in...") |
(No difference)
|
Revision as of 23:31, 9 September 2023
|
|
| Menu location |
|---|
| Part → Scale |
| Workbenches |
| Part |
| Default shortcut |
| None |
| Introduced in version |
| 0.22 |
| See also |
| Draft Clone, Draft Scale |
Description
Part Scale extends a shape by a specified factor in all directions or by distinct factors in each cardinal direction. In the case of distinct factors, the shape may be distorted.
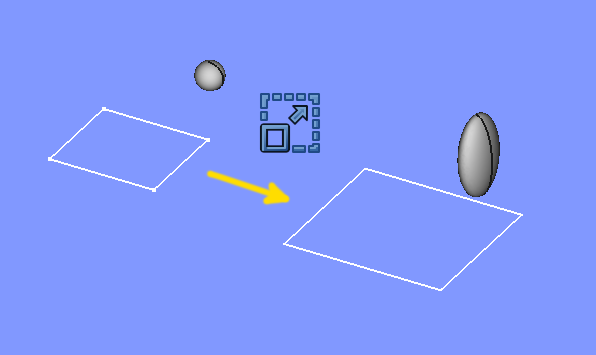
Examples of scaling
Usage
- Select the shape(s) in the 3D view or in the Model tree view
- Click on the
Part Scale button in the toolbar, or go to the Part → Scale menu
- Choose uniform scale and set a scaling factor. -or-
- Choose non-uniform scale and set a scaling factor for each cardinal direction.
- Click OK.
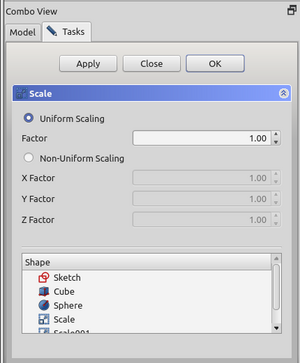
Alternatively, the selection can be done after launching the tool, by selecting one or more shape from the list in the Tasks panel.
The Model tree will list as many Scale objects as there were selected shapes. Each input shape is placed underneath its Scale object.
Parameters
The Scale shape is defined by the following parameters, which can be edited after its creation in the Property editor.
- Base: the input shape (the shape upon which the Part Scale was applied).
- Uniform: controls uniform vs non-uniform scaling
- Uniform Scale: the scale factor to use for uniform scaling
- XScale, YScale, ZScale: the scale factors to use for non-uniform scaling
- Placement: the standard placement parameters.
- Label: label to be shown in the Model tree view (not available on Scale creation).
Task dialog

- OK button creates the scaled object, and closes the dialog.
- Close button closes dialog, without doing anything.
- Apply button creates the scaled objects, but does not close the dialog. You can then select another shape in the list on the bottom, and create more scaled objects. Clicking Apply many times creates many many scaled objects.
- Shape list: here you select, what shapes to scale. If multiple objects are selected, multiple Scale objects are created.
Notes
- Points/Vertices can not be scaled as they are dimensionless.
- App Link objects linked to the appropriate object types and App Part containers with the appropriate visible objects inside can also be scaled.
- The task dialog does not offer a preview, yet. Apply will create an scaled object every time you click it, which can be useful as preview; however, they will remain and yet another one will be created as you click OK. Undo can be useful to clean them up before clicking OK.
- Primitives: Box, Cylinder, Sphere, Cone, Torus, Tube, Create primitives, Shape builder
- Creation and modification: Extrude, Revolve, Mirror, Fillet, Chamfer, Make face from wires, Ruled Surface, Loft, Sweep, Section, Cross sections, 3D Offset, 2D Offset, Thickness, Projection on surface, Attachment
- Boolean: Make compound, Explode Compound, Compound Filter, Boolean, Cut, Fuse, Common, Connect, Embed, Cutout, Boolean fragments, Slice apart, Slice, XOR
- Measure: Measure Linear, Measure Angular, Measure Refresh, Clear All, Toggle All, Toggle 3D, Toggle Delta
- Getting started
- Installation: Download, Windows, Linux, Mac, Additional components, Docker, AppImage, Ubuntu Snap
- Basics: About FreeCAD, Interface, Mouse navigation, Selection methods, Object name, Preferences, Workbenches, Document structure, Properties, Help FreeCAD, Donate
- Help: Tutorials, Video tutorials
- Workbenches: Std Base, Arch, Assembly, CAM, Draft, FEM, Inspection, Mesh, OpenSCAD, Part, PartDesign, Points, Reverse Engineering, Robot, Sketcher, Spreadsheet, Surface, TechDraw, Test Framework
- Hubs: User hub, Power users hub, Developer hub
