Part Helix
This documentation is not finished. Please help and contribute documentation.
GuiCommand model explains how commands should be documented. Browse Category:UnfinishedDocu to see more incomplete pages like this one. See Category:Command Reference for all commands.
See WikiPages to learn about editing the wiki pages, and go to Help FreeCAD to learn about other ways in which you can contribute.
|
|
| Menu location |
|---|
| Part → Create primitives → Helix |
| Workbenches |
| Part, OpenSCAD |
| Default shortcut |
| None |
| Introduced in version |
| - |
| See also |
| Part Primitives |
Description
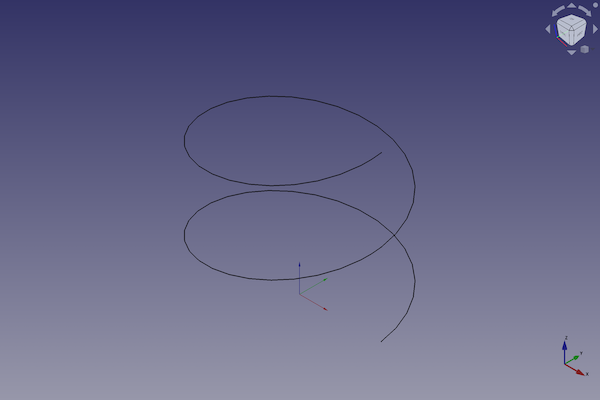
The Part Helix geometric primitive creates a helix shape, defined by a radius, a pitch, and a total height.
A common usage for the helix primitive is for creating screw threads in conjunction with a closed profile, and the Sweep operation. This process works essentially the same in the PartDesign Workbench by using the
PartDesign Additive pipe tool.
Usage
- There are several ways to invoke the command:
- Press the
Create Primitives... button.
- Select the Part → Create Primitives →
Create Primitives... option from the menu.
- Select the
Helix option from the menu.
- Press the
- Set options and press Create.
- To close the dialog press Close.
Example

A Part Box object with the values of the bottom scripting example are shown here.
Parameter
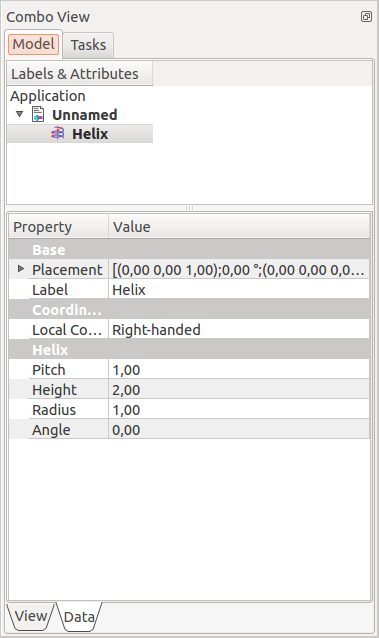
- Pitch:The pitch corresponds to the space between two consecutive "turns" of the helix measured along the main axis of the helix.
- Height: The height corresponds to the overall height of the helix measured along the main axis of the helix.
- Radius: The radius corresponds to the radius of the circle built by the helix by viewing the helix from the top or bottom.
- Angle: Per default the helix is built on a imaginary cylinder. With this option it is possible to build the helix on a imaginary cone. This angle corresponds to the angle of the cone. The value must be comprised between 0 and +90 deg.
- Right-handed or Left-handed: This parameter specifies the handedness of the helix.
Location
- X: The main axis of the helix will be translated along the x axis of the value you indicate in this field.
- Y: The main axis of the helix will be translated along the y axis of the value you indicate in this field.
- Z: The main axis of the helix will be translated along the z axis of the value you indicate in this field.
- Direction: Per default the main axis of the helix is the z axis. Here you have the possibility to edit the main axis of the helix. If you select the parameter "user defined..." , you will be invited to indicate the main axis of the helix by entering the coordinates of its vector.
- 3D View: allows you select center in the 3D view
Options
Properties
Once you have created the helix you have the possibility to edit its parameters.

|
The parameters in this menu are similar to those described above.
|
Properties
See also: Property editor.
A Part Box object is derived from a Part Feature object and inherits all its properties. It also has the following additional properties:
Data
Coordinate System
- DataLocal Coord: The handedness of the helix.
Helix
- DataPitch (
Length): The pitch corresponds to the space between two consecutive "turns" of the helix measured along the main axis of the helix. - DataHeight (
Length): The height corresponds to the overall height of the helix measured along the main axis of the helix. - DataRadius (
Length): The radius corresponds to the radius of the circle built by the helix by viewing the helix from the top or bottom. - DataSegment Length (
Length): - DataAngle (
Angle): Per default the helix is built on a imaginary cylinder. With this option it is possible to build the helix on a imaginary cone. This angle corresponds to the angle of the cone. The value must be comprised between 0 and +90 deg.
Scripting
A Part Helix is created with the addObject() method of the document.
helix = FreeCAD.ActiveDocument.addObject("Part::Helix", "myHelix")
- Where
myHelixis the name for the object. The name must be unique for the entire document. - The function returns the newly created object.
The Label is the user editable name for the object. It can be easily changed by
helix.Label = "new myHelixName"
You can access and modify attributes of the helix object. For example, you may wish to modify the pitch, height and radius parameters.
helix.Pitch = 2
helix.Height = 3
helix.Radius = 4
helix.SegmentLength = 21
helix.Angle = 45
You can change its placement and orientation with:
helix.Placement = FreeCAD.Placement(FreeCAD.Vector(1, 2, 3), FreeCAD.Rotation(75, 60, 30))
- Primitives: Box, Cylinder, Sphere, Cone, Torus, Tube, Create primitives, Shape builder
- Creation and modification: Extrude, Revolve, Mirror, Fillet, Chamfer, Make face from wires, Ruled Surface, Loft, Sweep, Section, Cross sections, 3D Offset, 2D Offset, Thickness, Projection on surface, Attachment
- Boolean: Make compound, Explode Compound, Compound Filter, Boolean, Cut, Fuse, Common, Connect, Embed, Cutout, Boolean fragments, Slice apart, Slice, XOR
- Measure: Measure Linear, Measure Angular, Measure Refresh, Clear All, Toggle All, Toggle 3D, Toggle Delta
- Getting started
- Installation: Download, Windows, Linux, Mac, Additional components, Docker, AppImage, Ubuntu Snap
- Basics: About FreeCAD, Interface, Mouse navigation, Selection methods, Object name, Preferences, Workbenches, Document structure, Properties, Help FreeCAD, Donate
- Help: Tutorials, Video tutorials
- Workbenches: Std Base, Arch, Assembly, CAM, Draft, FEM, Inspection, Mesh, OpenSCAD, Part, PartDesign, Points, Reverse Engineering, Robot, Sketcher, Spreadsheet, Surface, TechDraw, Test Framework
- Hubs: User hub, Power users hub, Developer hub
