PartDesign MoveFeatureInTree/ro: Difference between revisions
(Created page with "PartDesign: Move Feature In Tree") |
(Updating to match new version of source page) |
||
| (17 intermediate revisions by 3 users not shown) | |||
| Line 1: | Line 1: | ||
<languages/> |
<languages/> |
||
{{GuiCommandNoIcon|Name=PartDesign MoveFeatureInTree|MenuLocation=Contextual menu → Move object after other object|Workbenches=[[PartDesign Workbench|PartDesign]]|Shortcut=None|SeeAlso=[[PartDesign MoveTip|Set tip]], [[PartDesign MoveFeature|Move object to other body]]}} |
|||
{{Docnav |
|||
==Description== |
|||
|[[PartDesign_MoveFeature|Move object to other body]] |
|||
| |
|||
|[[PartDesign_Workbench|PartDesign]] |
|||
|IconL=PartDesign_MoveFeature.svg |
|||
|IconR= |
|||
|IconC=Workbench_PartDesign.svg |
|||
}} |
|||
<div class="mw-translate-fuzzy"> |
|||
'''Move object after other object''', as this command is labeled in the contextual menu, allows reordering of objects under a Body. Sketches, datum geometry and features are supported. |
|||
{{GuiCommand/ro |
|||
|Name=PartDesign MoveFeatureInTree |
|||
|Name/ro=PartDesign MoveFeatureInTree |
|||
|Empty=1 |
|||
| ⚫ | |||
|Workbenches=[[PartDesign Workbench/ro|PartDesign]] |
|||
|SeeAlso=[[PartDesign MoveTip/ro|Set tip]], [[PartDesign MoveFeature/ro|Move object to other body]] |
|||
| ⚫ | |||
}} |
|||
</div> |
|||
==Descriere== |
|||
| ⚫ | |||
<div class="mw-translate-fuzzy"> |
|||
==How to use== |
|||
'''Move object after other object''', deoarece această comandă este nominalizată/etichetată în meniul contextual, permite reordonarea obiectelor sub un corp. Se acceptă schițe, geometria de origine și caracteristicile. |
|||
</div> |
|||
<div class="mw-translate-fuzzy"> |
|||
# In the Model tree, select the object(s) to be moved then right-click to open the contextual menu. |
|||
== Cum se folosește == |
|||
| ⚫ | |||
</div> |
|||
# In the '''Select feature''' dialog, select the object under which to move the object(s). |
|||
| ⚫ | |||
<div class="mw-translate-fuzzy"> |
|||
# În arborescența Model, selectați obiectul (obiectele) care urmează să fie mutat, apoi faceți clic dreapta pentru a deschide meniul contextual. |
|||
# Selectați '' 'Mutare obiect după alt obiect' ''. |
|||
# În fereastra de selecție '' 'Selectați caracteristica' '' ', selectați obiectul în care doriți să mutați obiectele. |
|||
| ⚫ | |||
</div> |
|||
==Example== |
==Example== |
||
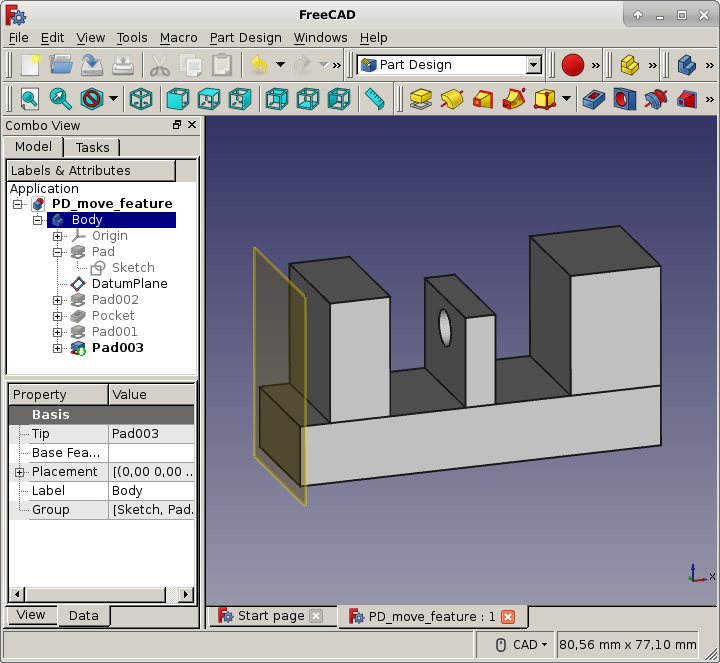
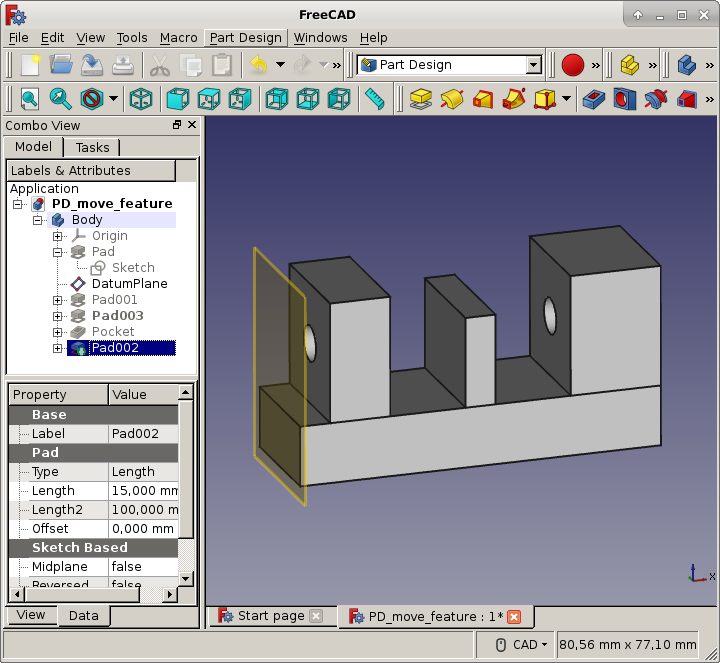
Următoarele trei imagini prezintă același model cu un buzunar definit pe o schiță atașată la planul de referință. Caracteristicile sunt reordonate de la o imagine la cealaltă. Acest lucru are ca efect faptul că buzunarul face fie fără gaură, fie să facă găuri în diferite bosaje, în funcție de ordinea caracteristicilor din arborele modelului. |
|||
The following three pictures show the same model with a pocket defined on a sketch attached to the datum plane. The features are reordered from one picture to the other. This has the effect that the pocket makes either no hole or make holes in different pads, depending on the order of the features in the model tree. |
|||
[[File:PD_move_feature0.png|none]] |
[[File:PD_move_feature0.png|none]] |
||
[[File:Hole_Pad002.png|none]] |
[[File:Hole_Pad002.png|none]] |
||
[[File:PD_move_feature2.png|none]] |
[[File:PD_move_feature2.png|none]] |
||
{{Docnav |
|||
|[[PartDesign_MoveFeature|Move object to other body]] |
|||
| |
|||
|[[PartDesign_Workbench|PartDesign]] |
|||
|IconL=PartDesign_MoveFeature.svg |
|||
|IconR= |
|||
|IconC=Workbench_PartDesign.svg |
|||
}} |
|||
{{PartDesign Tools navi{{#translation:}}}} |
|||
{{Userdocnavi{{#translation:}}}} |
|||
Latest revision as of 14:49, 11 April 2022
|
PartDesign MoveFeatureInTree |
| poziția meniului |
|---|
| Contextual menu → Move object after other object |
| Ateliere |
| PartDesign |
| scurtătură |
| nici unul |
| Prezentat în versiune |
| 0.17 |
| A se vedea, de asemenea, |
| Set tip, Move object to other body |
Descriere
Move object after other object, deoarece această comandă este nominalizată/etichetată în meniul contextual, permite reordonarea obiectelor sub un corp. Se acceptă schițe, geometria de origine și caracteristicile.
Cum se folosește
- În arborescența Model, selectați obiectul (obiectele) care urmează să fie mutat, apoi faceți clic dreapta pentru a deschide meniul contextual.
- Selectați 'Mutare obiect după alt obiect' .
- În fereastra de selecție 'Selectați caracteristica' ', selectați obiectul în care doriți să mutați obiectele.
- Apăsați tasta OK.
Example
Următoarele trei imagini prezintă același model cu un buzunar definit pe o schiță atașată la planul de referință. Caracteristicile sunt reordonate de la o imagine la cealaltă. Acest lucru are ca efect faptul că buzunarul face fie fără gaură, fie să facă găuri în diferite bosaje, în funcție de ordinea caracteristicilor din arborele modelului.


- Structure tools: Part, Group
- Helper tools: Create body, Create sketch, Edit sketch, Map sketch to face
- Modeling tools
- Datum tools: Create a datum point, Create a datum line, Create a datum plane, Create a local coordinate system, Create a shape binder, Create a sub-object(s) shape binder, Create a clone
- Additive tools: Pad, Revolution, Additive loft, Additive pipe, Additive helix, Additive box, Additive cylinder, Additive sphere, Additive cone, Additive ellipsoid, Additive torus, Additive prism, Additive wedge
- Subtractive tools: Pocket, Hole, Groove, Subtractive loft, Subtractive pipe, Subtractive helix, Subtractive box, Subtractive cylinder, Subtractive sphere, Subtractive cone, Subtractive ellipsoid, Subtractive torus, Subtractive prism, Subtractive wedge
- Transformation tools: Mirrored, Linear Pattern, Polar Pattern, Create MultiTransform, Scaled
- Dress-up tools: Fillet, Chamfer, Draft, Thickness
- Boolean: Boolean operation
- Extras: Migrate, Sprocket, Involute gear, Shaft design wizard
- Context menu: Set tip, Move object to other body, Move object after other object, Appearance, Color per face
- Getting started
- Installation: Download, Windows, Linux, Mac, Additional components, Docker, AppImage, Ubuntu Snap
- Basics: About FreeCAD, Interface, Mouse navigation, Selection methods, Object name, Preferences, Workbenches, Document structure, Properties, Help FreeCAD, Donate
- Help: Tutorials, Video tutorials
- Workbenches: Std Base, Arch, Assembly, CAM, Draft, FEM, Inspection, Mesh, OpenSCAD, Part, PartDesign, Points, Reverse Engineering, Robot, Sketcher, Spreadsheet, Surface, TechDraw, Test Framework
- Hubs: User hub, Power users hub, Developer hub