Part Slice/ro: Difference between revisions
(Updating to match new version of source page) |
(Updating to match new version of source page) |
||
| (15 intermediate revisions by 2 users not shown) | |||
| Line 1: | Line 1: | ||
<languages/> |
<languages/> |
||
{{Docnav |
|||
{{Docnav|[[Part_BooleanFragments|Boolean fragments]]|[[Part_XOR|XOR]]|[[Part_Module|Part]]|IconL=Part BooleanFragments.png|IconC=Workbench_Part.svg|IconR=Part XOR.png}} |
|||
|[[Part_SliceApart|SliceApart]] |
|||
|[[Part_XOR|XOR]] |
|||
|[[Part_Workbench|Part]] |
|||
|IconL=Part_SliceApart.svg |
|||
|IconR=Part_XOR.svg |
|||
|IconC=Workbench_Part.svg |
|||
}} |
|||
<div class="mw-translate-fuzzy"> |
|||
{{GuiCommand|Name=Part Slice|MenuLocation=Part → Split → Slice|Workbenches=[[Part Module|Part]]|SeeAlso=[[Part_BooleanFragments|Part Boolean Fragments]], [[Part_XOR|Part XOR]], [[Part_CompJoinFeatures|Join features]], [[Part Booleans|Part Booleans]]}} |
|||
{{GuiCommand |
|||
|Name=Part Slice |
|||
|MenuLocation=Part → Split → Slice to compound |
|||
|Workbenches=[[Part_Workbench|Part]] |
|||
|Version=0.17 |
|||
|SeeAlso=[[Part_BooleanFragments|Part Boolean Fragments]], [[Part_XOR|Part XOR]], [[Part_CompJoinFeatures|Part Join features]], [[Part_Boolean|Part Boolean]] |
|||
}} |
|||
</div> |
|||
==Description== |
|||
<div class="mw-translate-fuzzy"> |
|||
==Descriere== |
==Descriere== |
||
Este un instrument pentru a împărți forme prin intersecția cu alte forme. De exemplu, pentru o cutie și un plan, este creat un compus de două solide. |
Este un instrument pentru a împărți forme prin intersecția cu alte forme. De exemplu, pentru o cutie și un plan, este creat un compus de două solide. |
||
</div> |
|||
[[image:Part_Slice_Demo.png|600px]] |
[[image:Part_Slice_Demo.png|600px]] |
||
<div class="mw-translate-fuzzy"> |
|||
(on the picture above, the pieces were moved apart manually afterwards, to reveal the slicing) |
(on the picture above, the pieces were moved apart manually afterwards, to reveal the slicing) |
||
</div> |
|||
There are two commands to slice a shape: [[ |
There are two commands to slice a shape: [[Image:Part_SliceApart.svg|24px]] [[Part_SliceApart|Part Slice apart]] and [[Image:Part_Slice.svg|24px]] [[Part_Slice|Part Slice to compound]]. They both create a 'Slice' parametric feature, that puts the sliced pieces into a compound. However, [[Image:Part_SliceApart.svg|24px]] [[Part_SliceApart|Part Slice Apart]] explodes the resulting compound into separate objects. "Slice to compound" is fully-parametric, and causes no trouble as the number of pieces changes. "Slice apart" will not update the number of objects as the number of pieces changes. |
||
<div class="mw-translate-fuzzy"> |
|||
The output shape occupies the same space as the original. But it is split where it intersects with other shapes. The split pieces are put into a compound (or compsolid), so the object appears to remain in one piece. You need to explode the compound to get the individual pieces. If you want to access the individual pieces in a parametric way you can use [[Part CompoundFilter]] for the purpose. For quick non parametric access use [[Draft Downgrade]]. |
The output shape occupies the same space as the original. But it is split where it intersects with other shapes. The split pieces are put into a compound (or compsolid), so the object appears to remain in one piece. You need to explode the compound to get the individual pieces. If you want to access the individual pieces in a parametric way you can use [[Part CompoundFilter]] for the purpose. For quick non parametric access use [[Draft Downgrade]]. |
||
</div> |
|||
<div class="mw-translate-fuzzy"> |
|||
The tool has three modes: "Standard", "Split", and "CompSolid". |
The tool has three modes: "Standard", "Split", and "CompSolid". |
||
</div> |
|||
"Standard" and "Split" differ by the action of the tool on wires, shells and compsolids: if "Split", those are separated; if "Standard", they are kept together (get extra segments). |
"Standard" and "Split" differ by the action of the tool on wires, shells and compsolids: if "Split", those are separated; if "Standard", they are kept together (get extra segments). |
||
| Line 23: | Line 48: | ||
In "CompSolid" mode, the output is a compsolid (or a compound of compsolids, if the resulting solids form more than one island of connectedness). Compsolid is a set of solids connected by faces; they are related to solids like wires are related to edges, and shells are related to faces; the name is probably a shortened phrase "composite solid". |
In "CompSolid" mode, the output is a compsolid (or a compound of compsolids, if the resulting solids form more than one island of connectedness). Compsolid is a set of solids connected by faces; they are related to solids like wires are related to edges, and shells are related to faces; the name is probably a shortened phrase "composite solid". |
||
<div class="mw-translate-fuzzy"> |
|||
The overall action of the tool is very similar to [[Part BooleanFragments|Boolean Fragments]], except only the pieces from the first shape are in the result. |
The overall action of the tool is very similar to [[Part BooleanFragments|Boolean Fragments]], except only the pieces from the first shape are in the result. |
||
</div> |
|||
==Usage== |
|||
<div class="mw-translate-fuzzy"> |
|||
==Cu se folosește== |
==Cu se folosește== |
||
# Select the object to be sliced, first, and then some objects to slice with. <br /> The order of selection is important. Compounds with self-intersections are not allowed (self-intersections sometimes can be accounted for by passing the compound through [[Part_BooleanFragments|BooleanFragments]]) |
# Select the object to be sliced, first, and then some objects to slice with. <br /> The order of selection is important. Compounds with self-intersections are not allowed (self-intersections sometimes can be accounted for by passing the compound through [[Part_BooleanFragments|BooleanFragments]]) |
||
# Invoke the Part Slice command. |
# Invoke the Part Slice command. |
||
</div> |
|||
# Noteː The Objects to slice with must completely separate the object to be sliced. Thus a cube cannot be sliced by a wire |
# Noteː The Objects to slice with must completely separate the object to be sliced. Thus a cube cannot be sliced by a wire, but by a plane derived from an extruded wire for instance. |
||
<div class="mw-translate-fuzzy"> |
|||
A Slice parametric object is created. Original objects are hidden, and the result of intersection is shown in 3D view. |
A Slice parametric object is created. Original objects are hidden, and the result of intersection is shown in 3D view. |
||
</div> |
|||
===Tree structure of Slice === |
|||
The Slice command creates a sliced object. In the following example a cube is sliced by a face. |
|||
The slice is created and each piece of it is united in a Compound. |
|||
[[Image:Part_SliceTree.png]] |
|||
==Properties== |
|||
<div class="mw-translate-fuzzy"> |
|||
==Proprietăți== |
==Proprietăți== |
||
{{TitleProperty|Slice}} |
{{TitleProperty|Slice}} |
||
| Line 39: | Line 82: | ||
* {{PropertyData|Mode}}: "Standard", "Split", or "CompSolid". "Split" is default. Standard and Split differ by the action of the tool on aggregation type shapes: if Split, those are separated; otherwise they are kept together (get extra segments). |
* {{PropertyData|Mode}}: "Standard", "Split", or "CompSolid". "Split" is default. Standard and Split differ by the action of the tool on aggregation type shapes: if Split, those are separated; otherwise they are kept together (get extra segments). |
||
* {{PropertyData|Tolerance}}: "fuzziness" value. This is an extra tolerance to apply when searching for intersections, in addition to tolerances stored in the input shapes. |
* {{PropertyData|Tolerance}}: "fuzziness" value. This is an extra tolerance to apply when searching for intersections, in addition to tolerances stored in the input shapes. |
||
</div> |
|||
̈Noteː Properties are accessible on the slices inner object, not on the result level. |
|||
<span id="Example"></span> |
|||
<div class="mw-translate-fuzzy"> |
<div class="mw-translate-fuzzy"> |
||
==Exemple: making puzzle== |
==Exemple: making puzzle== |
||
# Switch to [[Sketcher Workbench]], create an new sketch. Draw a rectangle that will outline the overall shape of the puzzle. Close the sketch.<br />[[image:slice_example_step1.png|320px]] |
# Switch to [[Sketcher Workbench]], create an new sketch. Draw a rectangle that will outline the overall shape of the puzzle. Close the sketch.<br />[[image:slice_example_step1.png|320px]] |
||
# Switch to [[ |
# Switch to [[Part_Workbench|Part workbench]]. Select the sketch, and pick Part->Create face from sketch (in menu).<br />[[image:slice_example_step2.png|320px]] |
||
# Switch to Sketcher workbench, and create another sketch on the same plane. Using polyline tool, draw the lines that will split the puzzle into pieces.<br />[[image:slice_example_step3.png|320px]] |
# Switch to Sketcher workbench, and create another sketch on the same plane. Using polyline tool, draw the lines that will split the puzzle into pieces.<br />[[image:slice_example_step3.png|320px]] |
||
# Switch to Part workbench. Select the splitter sketch, and apply [[Part BooleanFragments|Part Boolean Fragments]]. This will insert vertices where lines of splitter sketch intersect. Having them is essential for the next step to work.<br />[[image:slice_example_step4.png|320px]] |
# Switch to Part workbench. Select the splitter sketch, and apply [[Part BooleanFragments|Part Boolean Fragments]]. This will insert vertices where lines of splitter sketch intersect. Having them is essential for the next step to work.<br />[[image:slice_example_step4.png|320px]] |
||
| Line 50: | Line 97: | ||
</div> |
</div> |
||
===Creating a Puzzle=== |
|||
Steps 5 and 6 can be done in single click using [[Part SliceApart]] |
|||
# Switch to [[Image:Workbench_Sketcher.svg|24px]] [[Sketcher_Workbench|Sketcher Workbench]] |
|||
#* Create a new sketch. |
|||
#* Draw a rectangle that will outline the overall shape of the puzzle. |
|||
#* Close the sketch.<br />[[image:slice_example_step1.png|320px]] |
|||
# Switch to [[Image:Workbench_Part.svg|24px]] [[Part_Workbench|Part workbench]]. |
|||
#* Select the sketch, and pick {{MenuCommand|Part → [[Image:Part_MakeFace.svg|24px]] [[Part_MakeFace|Make face from wires]]}}.<br />[[image:slice_example_step2.png|320px]] |
|||
# Switch back to [[Image:Workbench_Sketcher.svg|24px]] [[Sketcher_Workbench|Sketcher Workbench]] |
|||
#* Create another sketch on the same plane. |
|||
#* Using polyline tool, draw the lines that will split the puzzle into pieces.<br />[[image:slice_example_step3.png|320px]] |
|||
# Switch back to [[Image:Workbench_Part.svg|24px]] [[Part_Workbench|Part Workbench]]. |
|||
#* Select the splitter sketch, and apply [[Image:Part_BooleanFragments.svg|24px]] [[Part_BooleanFragments|Part Boolean Fragments]]. This will insert vertices where lines of splitter sketch intersect. Having them is essential for the next step to work.<br />[[image:slice_example_step4.png|320px]] |
|||
# Select the rectangular face, and the BooleanFragments of splitter sketch, and apply [[Image:Part_Slice.svg|24px]] Part Slice.<br />[[image:slice_example_step5.png|320px]] |
|||
# Use [[Image:Part_ExplodeCompound.svg|24px]] [[Part_ExplodeCompound|Part ExplodeCompound]] on the sliced face, to break apart the compound made by Part Slice into individual pieces. |
|||
'''Note:''' Steps 5 and 6 can be done in single click using [[Image:Part_SliceApart.svg|24px]] [[Part_SliceApart|Part SliceApart]] |
|||
==Notes== |
|||
<div class="mw-translate-fuzzy"> |
|||
==Versiune== |
|||
Acest instrument a fost introdus în FreeCAD v0.17.8053. FreeCAD și necesită compilarea cu OCC 6.9.0 sau mai recent; altfel instrumentul este inutilizabil. |
|||
</div> |
|||
<span id="Scripting"></span> |
|||
== Scrip-Programare == |
== Scrip-Programare == |
||
<div class="mw-translate-fuzzy"> |
|||
Instrumentul poate fi utilizat în [[macros]] și din consola python utilizând următoarea funcție: |
Instrumentul poate fi utilizat în [[macros]] și din consola python utilizând următoarea funcție: |
||
</div> |
|||
'''BOPTools.SplitFeatures.makeSlice(name)''' |
|||
{{Code|code=BOPTools.SplitFeatures.makeSlice(name)}} |
|||
* Creates an empty Slice feature. The 'Base' and 'Tools' properties must be assigned explicitly, afterwards. |
* Creates an empty Slice feature. The 'Base' and 'Tools' properties must be assigned explicitly, afterwards. |
||
| Line 61: | Line 134: | ||
Slice poate fi, de asemenea, aplicat la forme simple, fără a fi nevoie să aibă un obiect de document, prin: |
Slice poate fi, de asemenea, aplicat la forme simple, fără a fi nevoie să aibă un obiect de document, prin: |
||
{{Code|code=BOPTools.SplitAPI.slice(base_shape, tool_shapes, mode, tolerance = 0.0)}} |
|||
This can be useful for making custom Python scripted features. |
This can be useful for making custom Python scripted features. |
||
Acest lucru poate fi util pentru crearea de funcții(onalități) script-Programare personalizate Python. |
Acest lucru poate fi util pentru crearea de funcții(onalități) script-Programare personalizate Python. |
||
| Line 74: | Line 147: | ||
}} |
}} |
||
<div class="mw-translate-fuzzy"> |
|||
Instrumentul propriu-zis este implementat în Python, vezi /Mod/Part/BOPTools/SplitFeatures.py unde este instalat FreeCAD. |
Instrumentul propriu-zis este implementat în Python, vezi /Mod/Part/BOPTools/SplitFeatures.py unde este instalat FreeCAD. |
||
</div> |
|||
==Versiune== |
|||
Acest instrument a fost introdus în FreeCAD v0.17.8053. FreeCAD și necesită compilarea cu OCC 6.9.0 sau mai recent; altfel instrumentul este inutilizabil. |
|||
==Tutorials== |
|||
{{Docnav|[[Part_BooleanFragments|Boolean fragments]]|[[Part_XOR|XOR]]|[[Part_Module|Part]]|IconL=Part BooleanFragments.png|IconC=Workbench_Part.svg|IconR=Part XOR.png}} |
|||
* [https://www.youtube.com/watch?v=tzHkQaHgrfQ FreeCad 0.18 Part WB using Slice and Slice Apart] (English language), author: Ha Gei |
|||
{{Part Tools navi}} |
|||
* [https://www.youtube.com/watch?v=JJAL5JmqqKQ FreeCAD Slice und Slice Apart und andere Tricks] (German language), author: Ha Gei |
|||
{{Userdocnavi}} |
|||
{{Docnav |
|||
|[[Part_SliceApart|SliceApart]] |
|||
|[[Part_XOR|XOR]] |
|||
|[[Part_Workbench|Part]] |
|||
|IconL=Part_SliceApart.svg |
|||
|IconR=Part_XOR.svg |
|||
|IconC=Workbench_Part.svg |
|||
}} |
|||
{{Part Tools navi{{#translation:}}}} |
|||
{{clear}} |
|||
{{Userdocnavi{{#translation:}}}} |
|||
Latest revision as of 09:26, 14 April 2023
|
|
| Menu location |
|---|
| Part → Split → Slice to compound |
| Workbenches |
| Part |
| Default shortcut |
| None |
| Introduced in version |
| 0.17 |
| See also |
| Part Boolean Fragments, Part XOR, Part Join features, Part Boolean |
Description
Descriere
Este un instrument pentru a împărți forme prin intersecția cu alte forme. De exemplu, pentru o cutie și un plan, este creat un compus de două solide.
(on the picture above, the pieces were moved apart manually afterwards, to reveal the slicing)
There are two commands to slice a shape: Part Slice apart and
Part Slice to compound. They both create a 'Slice' parametric feature, that puts the sliced pieces into a compound. However,
Part Slice Apart explodes the resulting compound into separate objects. "Slice to compound" is fully-parametric, and causes no trouble as the number of pieces changes. "Slice apart" will not update the number of objects as the number of pieces changes.
The output shape occupies the same space as the original. But it is split where it intersects with other shapes. The split pieces are put into a compound (or compsolid), so the object appears to remain in one piece. You need to explode the compound to get the individual pieces. If you want to access the individual pieces in a parametric way you can use Part CompoundFilter for the purpose. For quick non parametric access use Draft Downgrade.
The tool has three modes: "Standard", "Split", and "CompSolid".
"Standard" and "Split" differ by the action of the tool on wires, shells and compsolids: if "Split", those are separated; if "Standard", they are kept together (get extra segments).
Compounding structure in "Standard" and "Split" modes follows the compounding structure of shape being sliced.
In "CompSolid" mode, the output is a compsolid (or a compound of compsolids, if the resulting solids form more than one island of connectedness). Compsolid is a set of solids connected by faces; they are related to solids like wires are related to edges, and shells are related to faces; the name is probably a shortened phrase "composite solid".
The overall action of the tool is very similar to Boolean Fragments, except only the pieces from the first shape are in the result.
Usage
Cu se folosește
- Select the object to be sliced, first, and then some objects to slice with.
The order of selection is important. Compounds with self-intersections are not allowed (self-intersections sometimes can be accounted for by passing the compound through BooleanFragments) - Invoke the Part Slice command.
- Noteː The Objects to slice with must completely separate the object to be sliced. Thus a cube cannot be sliced by a wire, but by a plane derived from an extruded wire for instance.
A Slice parametric object is created. Original objects are hidden, and the result of intersection is shown in 3D view.
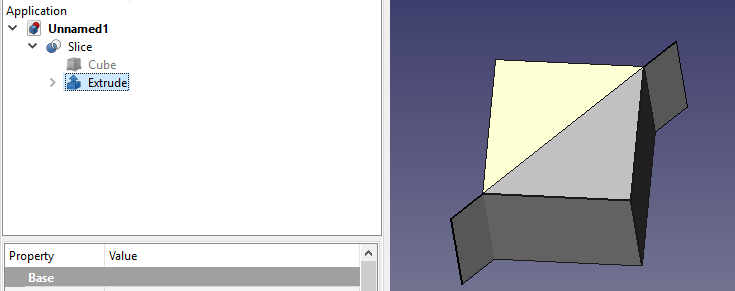
Tree structure of Slice
The Slice command creates a sliced object. In the following example a cube is sliced by a face.
The slice is created and each piece of it is united in a Compound.
Properties
Proprietăți
Slice
- DateBase: Object to be sliced.
- DateTools: List of objects to slice with. (as of FreeCAD v0.17.8053, this property is not displayed in property editor, and can only be accessed via Python).
- DateMode: "Standard", "Split", or "CompSolid". "Split" is default. Standard and Split differ by the action of the tool on aggregation type shapes: if Split, those are separated; otherwise they are kept together (get extra segments).
- DateTolerance: "fuzziness" value. This is an extra tolerance to apply when searching for intersections, in addition to tolerances stored in the input shapes.
̈Noteː Properties are accessible on the slices inner object, not on the result level.
Exemple: making puzzle
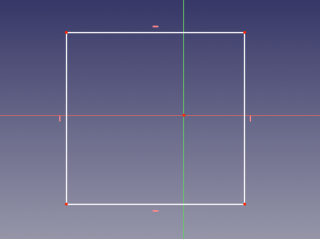
- Switch to Sketcher Workbench, create an new sketch. Draw a rectangle that will outline the overall shape of the puzzle. Close the sketch.
- Switch to Part workbench. Select the sketch, and pick Part->Create face from sketch (in menu).

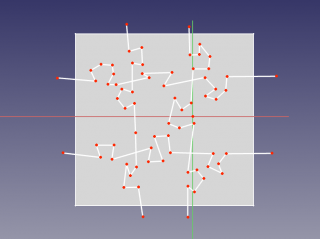
- Switch to Sketcher workbench, and create another sketch on the same plane. Using polyline tool, draw the lines that will split the puzzle into pieces.
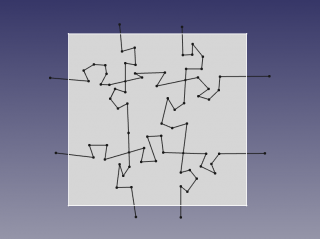
- Switch to Part workbench. Select the splitter sketch, and apply Part Boolean Fragments. This will insert vertices where lines of splitter sketch intersect. Having them is essential for the next step to work.
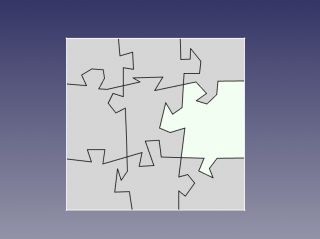
- Select the rectangular face, and the BooleanFragments of splitter sketch, and apply Part Split.
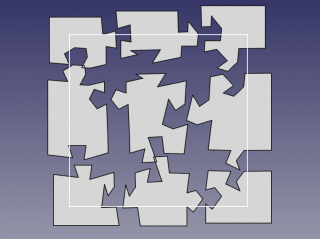
- Switch to Draft workbench, and apply Draft Downgrade to the result. You should get all the pieces as "Face00X" in document tree, that can be moved independently. Done!
Creating a Puzzle
- Switch to
Sketcher Workbench
- Switch to
Part workbench.
- Select the sketch, and pick Part →
Make face from wires.

- Select the sketch, and pick Part →
- Switch back to
Sketcher Workbench
- Switch back to
Part Workbench.
- Select the splitter sketch, and apply
Part Boolean Fragments. This will insert vertices where lines of splitter sketch intersect. Having them is essential for the next step to work.

- Select the splitter sketch, and apply
- Select the rectangular face, and the BooleanFragments of splitter sketch, and apply
Part Slice.

- Use
Part ExplodeCompound on the sliced face, to break apart the compound made by Part Slice into individual pieces.
Note: Steps 5 and 6 can be done in single click using Part SliceApart
Notes
Versiune
Acest instrument a fost introdus în FreeCAD v0.17.8053. FreeCAD și necesită compilarea cu OCC 6.9.0 sau mai recent; altfel instrumentul este inutilizabil.
Scrip-Programare
Instrumentul poate fi utilizat în macros și din consola python utilizând următoarea funcție:
BOPTools.SplitFeatures.makeSlice(name)
- Creates an empty Slice feature. The 'Base' and 'Tools' properties must be assigned explicitly, afterwards.
- Returns the newly created object.
Slice poate fi, de asemenea, aplicat la forme simple, fără a fi nevoie să aibă un obiect de document, prin:
BOPTools.SplitAPI.slice(base_shape, tool_shapes, mode, tolerance = 0.0)
This can be useful for making custom Python scripted features. Acest lucru poate fi util pentru crearea de funcții(onalități) script-Programare personalizate Python.
Example:
import BOPTools.SplitFeatures
j = BOPTools.SplitFeatures.makeSlice(name= 'Slice')
j.Base = FreeCADGui.Selection.getSelection()[0]
j.Tools = FreeCADGui.Selection.getSelection()[1:]
Instrumentul propriu-zis este implementat în Python, vezi /Mod/Part/BOPTools/SplitFeatures.py unde este instalat FreeCAD.
Tutorials
- FreeCad 0.18 Part WB using Slice and Slice Apart (English language), author: Ha Gei
- FreeCAD Slice und Slice Apart und andere Tricks (German language), author: Ha Gei
- Primitives: Box, Cylinder, Sphere, Cone, Torus, Tube, Create primitives, Shape builder
- Creation and modification: Extrude, Revolve, Mirror, Fillet, Chamfer, Make face from wires, Ruled Surface, Loft, Sweep, Section, Cross sections, 3D Offset, 2D Offset, Thickness, Projection on surface, Attachment
- Boolean: Make compound, Explode Compound, Compound Filter, Boolean, Cut, Fuse, Common, Connect, Embed, Cutout, Boolean fragments, Slice apart, Slice, XOR
- Measure: Measure Linear, Measure Angular, Measure Refresh, Clear All, Toggle All, Toggle 3D, Toggle Delta
- Getting started
- Installation: Download, Windows, Linux, Mac, Additional components, Docker, AppImage, Ubuntu Snap
- Basics: About FreeCAD, Interface, Mouse navigation, Selection methods, Object name, Preferences, Workbenches, Document structure, Properties, Help FreeCAD, Donate
- Help: Tutorials, Video tutorials
- Workbenches: Std Base, Arch, Assembly, CAM, Draft, FEM, Inspection, Mesh, OpenSCAD, Part, PartDesign, Points, Reverse Engineering, Robot, Sketcher, Spreadsheet, Surface, TechDraw, Test Framework
- Hubs: User hub, Power users hub, Developer hub

