FEM CalculiX Cantilever 3D/de: Difference between revisions
(Updating to match new version of source page) |
(Updating to match new version of source page) |
||
| (18 intermediate revisions by 2 users not shown) | |||
| Line 1: | Line 1: | ||
<languages/> |
<languages/> |
||
<div class="mw-translate-fuzzy"> |
|||
{{TutorialInfo/de |
{{TutorialInfo/de |
||
|Topic=Finite |
|Topic=Finite-Elemente-Analyse |
||
|Level=Beginner |
|Level=Beginner |
||
|Time=10 minutes |
|Time=10 minutes |
||
|Author=[http://www.freecadweb.org/wiki/index.php?title=User:Berndhahnebach Bernd] |
|Author=[http://www.freecadweb.org/wiki/index.php?title=User:Berndhahnebach Bernd] |
||
|FCVersion=0.16.6377 or above |
|FCVersion=0.16.6377 or above |
||
|Files= |
|||
}} |
}} |
||
</div> |
|||
= |
<span id="Introduction"></span> |
||
==Einleitung== |
|||
This example is meant to show how a simple Finite Element Analysis ('''FEA''') in FreeCAD's [[FEM_Workbench|FEM Workbench]] looks like in the FreeCAD interface and how the results can be visualized. It illustrates how to trigger a FEA and how to change the load value and load direction. Furthermore, since the example file is provided with any FreeCAD installation, it a useful and easy check to run for the purpose of ascertaining if the the FEM Workbench is set up properly. |
This example is meant to show how a simple Finite Element Analysis ('''FEA''') in FreeCAD's [[FEM_Workbench|FEM Workbench]] looks like in the FreeCAD interface and how the results can be visualized. It illustrates how to trigger a FEA and how to change the load value and load direction. Furthermore, since the example file is provided with any FreeCAD installation, it a useful and easy check to run for the purpose of ascertaining if the the FEM Workbench is set up properly. |
||
[[Image: |
[[Image:FEM_example01_pic10.png|700px]] |
||
= |
<span id="Requirements"></span> |
||
==Voraussetzungen== |
|||
* A compatible version of FreeCAD designated in the tutorial overview. |
* A compatible version of FreeCAD designated in the tutorial overview. |
||
*: Use the {{MenuCommand|Help → About FreeCAD}} to see the version of FreeCAD installed |
*: Use the {{MenuCommand|Help → About FreeCAD}} to see the version of FreeCAD installed |
||
* No external software is needed for loading the example file, viewing the mesh and geometry as well as for visualizing the results. |
* No external software is needed for loading the example file, viewing the mesh and geometry as well as for visualizing the results. |
||
* For rerunning the FEA the solver software CalculiX has to be installed on your computer. Probably the solver has been installed together with FreeCAD already. If the solver CalculiX is not installed see [[FEM_Install|FEM Install]]. |
* For rerunning the FEA the solver software CalculiX has to be installed on your computer. Probably the solver has been installed together with FreeCAD already. If the solver CalculiX is not installed see [[FEM_Install|FEM Install]]. |
||
<span id="Set_up_the_example_file"></span> |
|||
== Set up the example file == |
|||
==Beispieldatei vorbereiten== |
|||
<span id="Load_the_example_file"></span> |
|||
=== Load Start Workbench === |
|||
===Beispieldatei laden=== |
|||
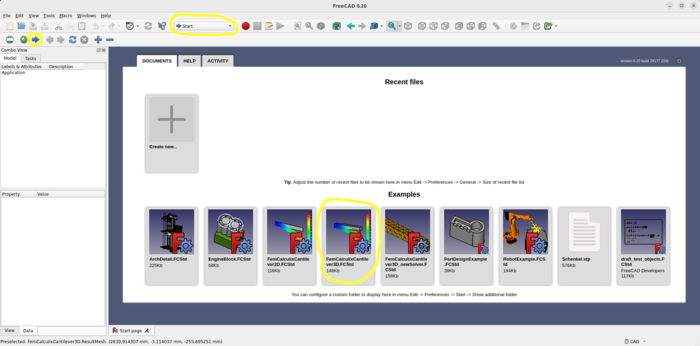
* |
* FreeCAD starten. |
||
* Ist der Arbeitsbereich Start nicht aktiviert, sollte er geladen und die Startseite geöffnet werden. |
|||
* The Start Workbench should be loaded |
|||
* Das Beispiel "FemCalculixCantilever3D.FcStd" öffnen. |
|||
| ⚫ | |||
=== Load the example file === |
|||
<span id="Activate_the_analysis_container"></span> |
|||
* Go to the example projects and click on "Load an FEM analysis example" |
|||
=== Analyse-Container aktivieren=== |
|||
* If due to further operations some geometry, constraints or the results are broken or deleted just repeat the steps above. |
|||
| ⚫ | |||
=== Activate the analysis container === |
|||
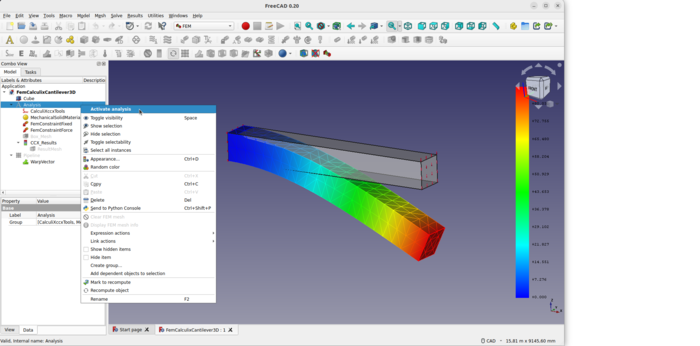
* To work with an analysis the analysis has to be activated. |
* To work with an analysis the analysis has to be activated. |
||
* In the [[Tree_view|tree view]], |
* In the [[Tree_view|tree view]], double click on the [[Image:FEM_Analysis.svg|24px]] {{Button|Analysis}}, |
||
* |
* or right click on the [[Image:FEM_Analysis.svg|24px]] {{Button|Analysis}} and choose {{Button|Activate analysis}}. |
||
[[Image: |
[[Image:FEM_example01_pic12.png|700px]] |
||
<span id="Analysis_container_and_its_objects"></span> |
|||
=== Analysis container and its objects === |
|||
===Der Analyse-Container und seine Objekte=== |
|||
* If the analysis is activated FreeCAD itself will change the current workbench to FEM. |
* If the analysis is activated, FreeCAD itself will change the current workbench to FEM. |
||
* There are at least |
* There are at least 5 objects needed to make a static mechanical analysis. |
||
* [[Image:FEM_Analysis.svg|24px]] analysis container |
* [[Image:FEM_Analysis.svg|24px]] analysis container |
||
# [[Image:FEM_SolverCalculixCxxtools.svg|24px]] a solver |
# [[Image:FEM_SolverCalculixCxxtools.svg|24px]] a solver |
||
# [[Image:FEM_MaterialSolid.svg|24px]] a material |
# [[Image:FEM_MaterialSolid.svg|24px]] a material |
||
# [[Image:FEM_ConstraintFixed.svg|24px]] a fixed |
# [[Image:FEM_ConstraintFixed.svg|24px]] a fixed boundary condition |
||
# [[Image:FEM_ConstraintForce.svg|24px]] a force |
# [[Image:FEM_ConstraintForce.svg|24px]] a force load |
||
# [[Image:FEM_FEMMesh.svg|24px]] a FEM mesh |
# [[Image:FEM_FEMMesh.svg|24px]] a FEM mesh |
||
* |
* In this example, results [[Image:FEM_ResultShow.svg|24px|link=FEM_ResultShow]] are already included as well. |
||
<span id="Visualizing_Results"></span> |
|||
=== Visualizing Results === |
|||
===Ergebnisse darstellen=== |
|||
# Be sure the analysis is activated. |
# Be sure the analysis is activated. |
||
# Be sure the analysis still contains the result object, if not just reload the example file. |
# Be sure the analysis still contains the result object, if not just reload the example file. |
||
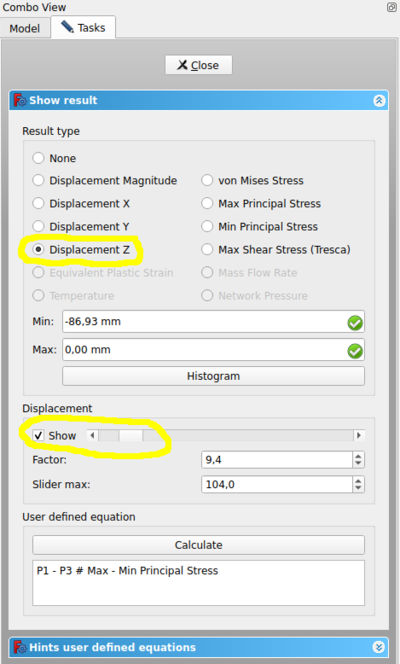
# |
# Double click the result object [[Image:FEM_ResultShow.svg|24px]], or select it and click the [[Image:FEM_ResultShow.svg|24px]] [[FEM_ResultShow|Show result]] button in the FEM toolbar. |
||
# In task window choose {{incode|z-Displacement}}. It shows {{incode|- |
# In the task window, choose {{incode|z-Displacement}}. It shows {{incode|-86.93 mm}} in negative z-direction. This makes sense since the force is in negative z-direction as well. |
||
# Activate the check box besides the bottom slider of displacement show. |
# Activate the check box besides the bottom slider of displacement show. |
||
# The slider can be used to alter the mesh to view the deformation in a simplified manner. |
# The slider can be used to alter the mesh to view the deformation in a simplified manner. |
||
# Choose among the different Result types to view all in the GUI available result types. |
# Choose among the different Result types to view all in the GUI available result types. |
||
[[Image: |
[[Image:FEM_example01_pic13.png|400px]] |
||
<span id="Purging_Results"></span> |
|||
=== Purging Results === |
|||
===Ergebnisse entfernen=== |
|||
# Be sure the analysis is activated. |
# Be sure the analysis is activated. |
||
# To remove the results: select in the icon toolbar the [[Image:FEM_ResultsPurge.svg|24px]] [[FEM_ResultsPurge|Purge results]] button. |
# To remove the results: select in the icon toolbar the [[Image:FEM_ResultsPurge.svg|24px]] [[FEM_ResultsPurge|Purge results]] button. |
||
<span id="Running_the_FEA"></span> |
|||
=== Running the FEA === |
|||
===Die FEA durchführen=== |
|||
* In the [[Tree_view|tree view]] double click on the solver object [[Image:FEM_SolverCalculixCxxtools.svg|24px]]. |
* In the [[Tree_view|tree view]] double click on the solver object [[Image:FEM_SolverCalculixCxxtools.svg|24px]]. |
||
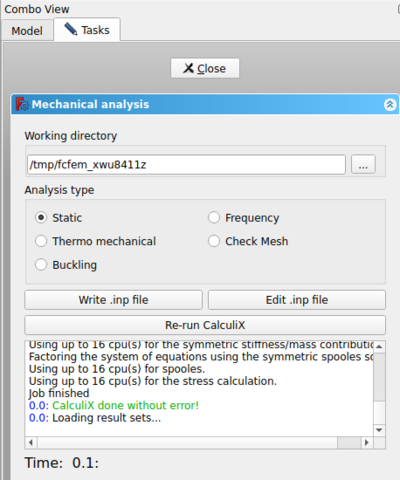
* In the [[Task_panel|task panel]] of the solver object make sure static analysis is selected. |
* In the [[Task_panel|task panel]] of the solver object make sure static analysis is selected. |
||
* Click on |
* Click on {{Button|Write .inp file}} in the same task window. Watch the log window until it prints "write completed." |
||
* Click on {{Button|Run CalculiX}}. Since this is a very small analysis it should take less than a second to run. |
* Click on {{Button|Run CalculiX}}. Since this is a very small analysis it should take less than a second to run. |
||
* In the text window it should print in green letters "CalculiX done!" and in the next line "loading result sets ..." |
* In the text window it should print in green letters "CalculiX done without error!" and in the next line "loading result sets ..." |
||
* You just have finished your first FEA in FreeCAD if there has not been any error message. |
* You just have finished your first FEA in FreeCAD if there has not been any error message. |
||
* Click on {{Button|Close}} in the task window. |
* Click on {{Button|Close}} in the task window. |
||
| Line 88: | Line 90: | ||
* If you get an error message no solver binary or similar when triggering the analysis check [[FEM_Install|FEM Install]]. |
* If you get an error message no solver binary or similar when triggering the analysis check [[FEM_Install|FEM Install]]. |
||
[[Image: |
[[Image:FEM_example01_pic14.png|400px]] |
||
=== Running the FEA the fast Way === |
=== Running the FEA the fast Way === |
||
* In tree view select the solver object [[Image:FEM_SolverCalculixCxxtools.svg|24px]] of the analysis [[Image:FEM_Analysis.svg|24px]]. |
* In tree view select the solver object [[Image:FEM_SolverCalculixCxxtools.svg|24px]] of the analysis [[Image:FEM_Analysis.svg|24px]]. |
||
* In the icon toolbar click on [[Image:FEM_SolverRun.svg|24px]] [[FEM_SolverRun| |
* In the icon toolbar click on [[Image:FEM_SolverRun.svg|24px]] [[FEM_SolverRun|Run solver calculations]]. |
||
* The Calculix input file will be written, CalculiX will be triggered and the result object should be created. |
* The Calculix input file will be written, CalculiX will be triggered and the result object should be created. |
||
<span id="Changing_Load_Direction_and_Load_Value"></span> |
|||
=== Changing Load Direction and Load Value === |
|||
===Lastrichtung und Lastwert ändern=== |
|||
* In the [[Tree_view|tree view]] |
* In the [[Tree_view|tree view]] expand [[Image:FEM_ResultShow.svg|24px]] CCX_Results and select the [[Image:FEM_MeshResult.svg|24px]] ResultMesh object and press the {{KEY|Space}} key. |
||
** '''Result:''' The visibility of the FEM mesh will be turned off. The geometrical model is still visible. |
** '''Result:''' The visibility of the FEM mesh will be turned off. The geometrical model is still visible. |
||
* In the [[Tree_view|tree view]] double click on the |
* In the [[Tree_view|tree view]] double click on the [[Image:FEM_ConstraintForce.svg|24px]] FEMConstraintForce object to open its [[Task_panel|task panel]] |
||
* In the task window change the load value to '''500000000 N = 500 MN''' ('''Note:''' force unit in task window has to be in N) |
* In the task window change the load value to '''500000000 N = 500 MN''' ('''Note:''' force unit in task window has to be in N) |
||
| ⚫ | |||
* On the geometrical model click on one of the long edges in x-direction. |
* On the geometrical model click on one of the long edges in x-direction. |
||
| ⚫ | |||
** '''Result:''' The red arrows that illustrate force will change their direction in x-direction. They indicate the |
** '''Result:''' The red arrows that illustrate force will change their direction in x-direction. They indicate the force direction. |
||
* Since tension should be applied to the box the Reverse Direction needs to be triggered by clicking on it. |
* Since tension should be applied to the box the Reverse Direction needs to be triggered by clicking on it. |
||
* The red arrows of the force will change their direction. |
* The red arrows of the force will change their direction. |
||
* Click on {{Button|OK}} in task window. |
* Click on {{Button|OK}} in task window. |
||
[[Image: |
[[Image:FEM_example01_pic15.png|700px]] |
||
| ⚫ | |||
* Toggle the [[Std_ToggleVisibility|visibility]] of the FEM mesh [[Image:FEM_FEMMesh.svg|24px]] 'On' by selecting it in tree view and pressing the {{Button|Space}} key. |
|||
| ⚫ | |||
| ⚫ | |||
| ⚫ | |||
[[Image: |
[[Image:FEM_example01_pic16.png|400px]] |
||
<span id="What_next?"></span> |
|||
== What next? == |
|||
==Wie geht es weiter?== |
|||
* We are now finished with the basic workflow for the [[FEM_Workbench|FEM Workbench]]. |
* We are now finished with the basic workflow for the [[FEM_Workbench|FEM Workbench]]. |
||
* You are now prepared to do the second [[FEM_tutorial|FEM tutorial]]. |
* You are now prepared to do the second [[FEM_tutorial|FEM tutorial]]. |
||
* We will create the CalculiX cantilever by ourselves and compare the results with the beam theory. |
* We will create the CalculiX cantilever by ourselves and compare the results with the beam theory. |
||
{{Tutorials navi{{#translation:}}}} |
|||
{{FEM Tools navi{{#translation:}}}} |
{{FEM Tools navi{{#translation:}}}} |
||
{{Userdocnavi{{#translation:}}}} |
{{Userdocnavi{{#translation:}}}} |
||
Latest revision as of 09:18, 30 November 2023
| Thema |
|---|
| Finite-Elemente-Analyse |
| Niveau |
| Beginner |
| Zeit zum Abschluss |
| 10 minutes |
| Autoren |
| Bernd |
| FreeCAD-Version |
| 0.16.6377 or above |
| Beispieldateien |
| None |
| Siehe auch |
| None |
Einleitung
This example is meant to show how a simple Finite Element Analysis (FEA) in FreeCAD's FEM Workbench looks like in the FreeCAD interface and how the results can be visualized. It illustrates how to trigger a FEA and how to change the load value and load direction. Furthermore, since the example file is provided with any FreeCAD installation, it a useful and easy check to run for the purpose of ascertaining if the the FEM Workbench is set up properly.
Voraussetzungen
- A compatible version of FreeCAD designated in the tutorial overview.
- Use the Help → About FreeCAD to see the version of FreeCAD installed
- No external software is needed for loading the example file, viewing the mesh and geometry as well as for visualizing the results.
- For rerunning the FEA the solver software CalculiX has to be installed on your computer. Probably the solver has been installed together with FreeCAD already. If the solver CalculiX is not installed see FEM Install.
Beispieldatei vorbereiten
Beispieldatei laden
- FreeCAD starten.
- Ist der Arbeitsbereich Start nicht aktiviert, sollte er geladen und die Startseite geöffnet werden.
- Das Beispiel "FemCalculixCantilever3D.FcStd" öffnen.
Analyse-Container aktivieren
- To work with an analysis the analysis has to be activated.
- In the tree view, double click on the
Analysis,
- or right click on the
Analysis and choose Activate analysis.
Der Analyse-Container und seine Objekte
- If the analysis is activated, FreeCAD itself will change the current workbench to FEM.
- There are at least 5 objects needed to make a static mechanical analysis.
analysis container
Ergebnisse darstellen
- Be sure the analysis is activated.
- Be sure the analysis still contains the result object, if not just reload the example file.
- Double click the result object
, or select it and click the
Show result button in the FEM toolbar.
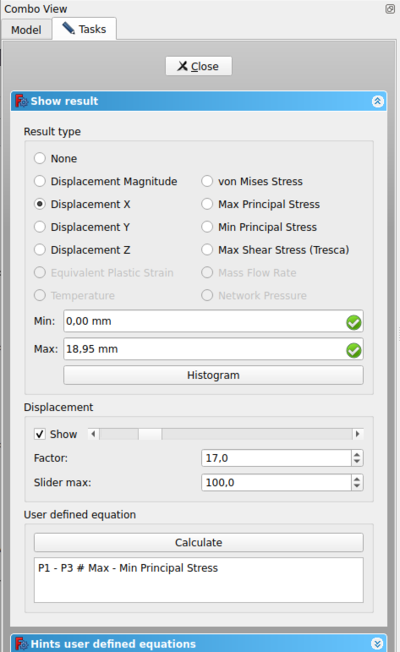
- In the task window, choose
z-Displacement. It shows-86.93 mmin negative z-direction. This makes sense since the force is in negative z-direction as well. - Activate the check box besides the bottom slider of displacement show.
- The slider can be used to alter the mesh to view the deformation in a simplified manner.
- Choose among the different Result types to view all in the GUI available result types.
Ergebnisse entfernen
- Be sure the analysis is activated.
- To remove the results: select in the icon toolbar the
Purge results button.
Die FEA durchführen
- In the tree view double click on the solver object
.
- In the task panel of the solver object make sure static analysis is selected.
- Click on Write .inp file in the same task window. Watch the log window until it prints "write completed."
- Click on Run CalculiX. Since this is a very small analysis it should take less than a second to run.
- In the text window it should print in green letters "CalculiX done without error!" and in the next line "loading result sets ..."
- You just have finished your first FEA in FreeCAD if there has not been any error message.
- Click on Close in the task window.
- A new result object should be created. You know how to visualize the results already.
- If you get an error message no solver binary or similar when triggering the analysis check FEM Install.
Running the FEA the fast Way
- In tree view select the solver object
of the analysis
.
- In the icon toolbar click on
Run solver calculations.
- The Calculix input file will be written, CalculiX will be triggered and the result object should be created.
Lastrichtung und Lastwert ändern
- In the tree view expand
CCX_Results and select the
ResultMesh object and press the Space key.
- Result: The visibility of the FEM mesh will be turned off. The geometrical model is still visible.
- In the tree view double click on the
FEMConstraintForce object to open its task panel
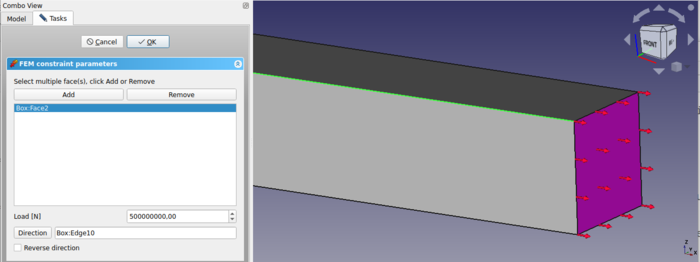
- In the task window change the load value to 500000000 N = 500 MN (Note: force unit in task window has to be in N)
- On the geometrical model click on one of the long edges in x-direction.
- Click on the Direction button.
- Result: The red arrows that illustrate force will change their direction in x-direction. They indicate the force direction.
- Since tension should be applied to the box the Reverse Direction needs to be triggered by clicking on it.
- The red arrows of the force will change their direction.
- Click on OK in task window.
- You know how to trigger an analysis and how to visualize results already.
- The deformation in x-direction should be 18.95 mm.
Wie geht es weiter?
- We are now finished with the basic workflow for the FEM Workbench.
- You are now prepared to do the second FEM tutorial.
- We will create the CalculiX cantilever by ourselves and compare the results with the beam theory.
- Materials: Solid, Fluid, Nonlinear mechanical, Reinforced (concrete); Material editor
- Element geometry: Beam (1D), Beam rotation (1D), Shell (2D), Fluid flow (1D)
Constraints
- Electromagnetic: Electrostatic potential, Current density, Magnetization
- Geometrical: Plane rotation, Section print, Transform
- Mechanical: Fixed, Displacement, Contact, Tie, Spring, Force, Pressure, Centrif, Self weight
- Thermal: Initial temperature, Heat flux, Temperature, Body heat source
- Overwrite Constants: Constant vacuum permittivity
- Solve: CalculiX Standard, Elmer, Mystran, Z88; Equations: Deformation, Elasticity, Electrostatic, Electricforce, Magnetodynamic, Magnetodynamic 2D, Flow, Flux, Heat; Solver: Solver control, Solver run
- Results: Purge, Show; Postprocessing: Apply changes, Pipeline from result, Warp filter, Scalar clip filter, Function cut filter, Region clip filter, Contours filter, Line clip filter, Stress linearization plot, Data at point clip filter, Filter function plane, Filter function sphere, Filter function cylinder, Filter function box
- Additional: Preferences; FEM Install, FEM Mesh, FEM Solver, FEM CalculiX, FEM Concrete; FEM Element Types
- Erste Schritte
- Installation: Herunterladen, Windows, Linux, Mac, Zusätzlicher Komponenten, Docker, AppImage, Ubuntu Snap
- Grundlagen: Über FreeCAD, Graphische Oberfläche, Mausbedienung, Auswahlmethoden, Objektname, Programmeinstellungen, Arbeitsbereiche, Dokumentstruktur, Objekteigenschaften, Hilf FreeCAD, Spende
- Hilfe: Tutorien, Video Tutorien
- Arbeitsbereiche: Std Base, Arch, Assembly, CAM, Draft, FEM, Inspection, Mesh, OpenSCAD, Part, PartDesign, Points, Reverse Engineering, Robot, Sketcher, Spreadsheet, Surface, TechDraw, Test Framework

