Arch Truss/it: Difference between revisions
Renatorivo (talk | contribs) (Created page with "# Utilizzare un ambiente di lavoro a scelta per creare un'unica linea # Selezionare quella linea # Premere il pulsante {{Button|16px Arch Truss/it|T...") |
Renatorivo (talk | contribs) |
||
| Line 36: | Line 36: | ||
=== Creare dall'inizio === |
=== Creare dall'inizio === |
||
# Assicurarsi che non sia selezionato nulla |
|||
# Make sure nothing is selected |
|||
# |
# Premere il pulsante {{Button|[[Image:Arch Truss.svg|16px]] [[Arch Truss/it|Travatura]]}} |
||
# Fare clic nella vista 3D per definire un primo punto o immettere manualmente le coordinate X, Y e Z. |
|||
# Click in the 3D view to define a first point, or manually enter X, Y and Z coordinates |
|||
# Fare clic nella vista 3D per definire il secondo punto o immettere manualmente le coordinate X, Y e Z. |
|||
# Click in the 3D view to define a second point, or manually enter X, Y and Z coordinates |
|||
# Regolare le proprietà della capriata a proprio piacimento |
|||
# Adjust the truss properties to your liking |
|||
==Proprietà== |
==Proprietà== |
||
Revision as of 19:08, 18 May 2020
|
|
| Posizione nel menu |
|---|
| Arch → Travatura |
| Ambiente |
| Arch |
| Avvio veloce |
| Nessuno |
| Introdotto nella versione |
| 0.19 |
| Vedere anche |
| Nessuno |
Descrizione
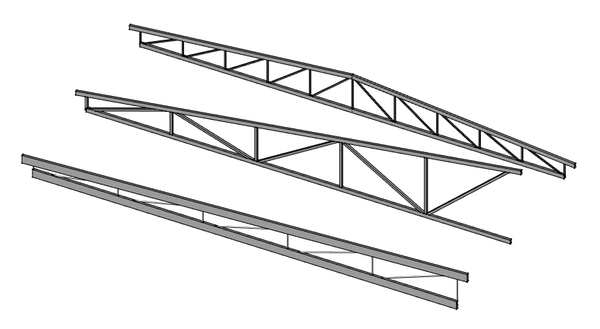
Lo strumento Travatura crea un oggetto travatura, sia da un oggetto lineare selezionato (posta su una Linea di Draft o uno [[Sketcher_NewSketch/it|Schizzo] ]), o da zero se non viene selezionato alcun oggetto all'avvio del comando.
Utilizzo
Creare da un oggetto selezionato
- Utilizzare un ambiente di lavoro a scelta per creare un'unica linea
- Selezionare quella linea
- Premere il pulsante
Travatura
- Regolare le proprietà della capriata a proprio piacimento
Creare dall'inizio
- Assicurarsi che non sia selezionato nulla
- Premere il pulsante
Travatura
- Fare clic nella vista 3D per definire un primo punto o immettere manualmente le coordinate X, Y e Z.
- Fare clic nella vista 3D per definire il secondo punto o immettere manualmente le coordinate X, Y e Z.
- Regolare le proprietà della capriata a proprio piacimento
Proprietà
Dati
- DatiTrussAngle: The angle of the truss
- DatiSlantType: The slant type of this truss
- DatiNormal: The normal direction of this truss
- DatiHeightStart: The height of the truss at the start position
- DatiHeightEnd: The height of the truss at the end position
- DatiStrutStartOffset: An optional start offset for the top strut
- DatiStrutEndOffset: An optional end offset for the top strut
- DatiStrutHeight: The height of the main top and bottom elements of the truss
- DatiStrutWidth: The width of the main top and bottom elements of the truss
- DatiRodType: The type of the middle element of the truss
- DatiRodDirection: The direction of the rods
- DatiRodSize: The diameter or side of the rods
- DatiRodSections: The number of rod sections
- DatiRodEnd: If the truss has a rod at its endpoint or not
- DatiRodMode: How to draw the rods
Script
Lo strumentoTravatura può essere utilizzato nelle macro e dalla console Python tramite la seguente funzione:
Truss = makeFence([baseobj])
Esempio:
import FreeCAD
import Draft
import Arch

p1 = FreeCAD.Vector(0,0,0)
p2 = FreeCAD.Vector(2000,0,0)
baseline = Draft.makeLine(p1,p2)
truss = Arch.makeTruss(baseline)
truss.HeightStart = 200
truss.HeightEnd = 400
# adjust other needed properties
- Elements: Wall, Structure, Curtain Wall, Window, Roof, Space, Stairs, Equipment, Frame, Fence, Truss, Profile, Pipe, Pipe Connector
- Reinforcements: Straight Rebar, U-Shape Rebar, L-Shape Rebar, Stirrup, Bent-Shape Rebar, Helical Rebar, Column Reinforcement, Beam Reinforcement, Slab Reinforcement, Footing Reinforcement, Custom Rebar
- Panels: Panel, Panel Cut, Panel Sheet, Nest
- Materials: Material, Multi-Material
- Organization: Building Part, Project, Site, Building, Level, External reference, Section Plane, Schedule
- Axes: Axis, Axes system, Grid
- Modification: Cut with plane, Add component, Remove component, Survey
- Utilities: Component, Clone component, Split Mesh, Mesh to Shape, Select non-manifold meshes, Remove Shape from Arch, Close Holes, Merge Walls, Check, Toggle IFC Brep flag, 3 Views from mesh, Create IFC spreadsheet, Toggle Subcomponents
- Additional: Preferences, Import Export Preferences (IFC, DAE, OBJ, JSON, 3DS, SHP), IfcOpenShell, IfcPlusPlus, Arch API
- Getting started
- Installation: Download, Windows, Linux, Mac, Additional components, Docker, AppImage, Ubuntu Snap
- Basics: About FreeCAD, Interface, Mouse navigation, Selection methods, Object name, Preferences, Workbenches, Document structure, Properties, Help FreeCAD, Donate
- Help: Tutorials, Video tutorials
- Workbenches: Std Base, Arch, Assembly, CAM, Draft, FEM, Inspection, Mesh, OpenSCAD, Part, PartDesign, Points, Reverse Engineering, Robot, Sketcher, Spreadsheet, Surface, TechDraw, Test Framework
- Hubs: User hub, Power users hub, Developer hub
