Part Design: Multitrasformazione
|
|
| Posizione nel menu |
|---|
| PartDesign → MultiTrasformazione |
| Ambiente |
| PartDesign |
| Avvio veloce |
| Nessuno |
| Introdotto nella versione |
| - |
| Vedere anche |
| Nessuno |
Introduzione
Crea una combinazioni di trasformazioni - Lo strumento ![]() Multitrasformazione utilizza una (o una serie di) funzioni come input e consente all'utente di applicare progressivamente più trasformazioni a tale funzione (o set di funzioni), in sequenza, creando una trasformazione combinata o composta.
Multitrasformazione utilizza una (o una serie di) funzioni come input e consente all'utente di applicare progressivamente più trasformazioni a tale funzione (o set di funzioni), in sequenza, creando una trasformazione combinata o composta.
For example, to produce the flange with a double row of holes as pictured below, the user:
- selected the hole as the 'feature' (base) in the Model tree
- clicked on the
 MultiTransform icon
 - added a linear pattern with two occurrences in the X direction
- added a polar pattern with eight occurrences around the Y axis.
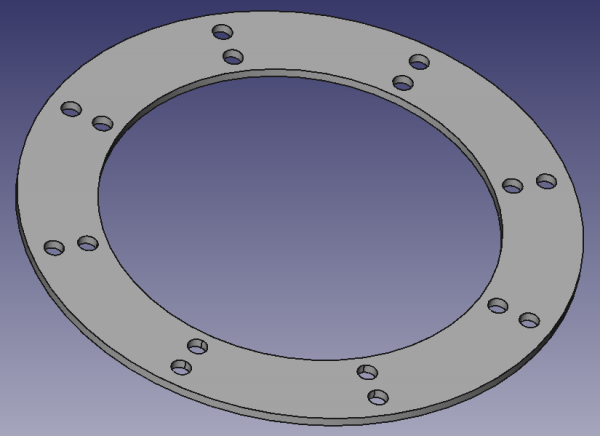
Flangia con doppia fila di fori. Serie di fori creati con lo strumento 'Multitrasformazione'.
Usage
Prima di iniziare uno dei metodi seguenti, assicurarsi che l'oggetto ![]() Corpo necessario sia attivo; in caso contrario, riceve un messaggio pop-up di errore che indica che è necessario un oggetto
Corpo necessario sia attivo; in caso contrario, riceve un messaggio pop-up di errore che indica che è necessario un oggetto ![]() Corpo attivo prima di usare lo strumento
Corpo attivo prima di usare lo strumento ![]() Multitrasformazione.
Multitrasformazione.
Metodo standard
Questo metodo inizia senza funzioni di trasformazione esistenti e senza selezioni nella finestra o nella struttura del modello.
Quando questo metodo è completato l'oggetto ![]() Multitrasformazione dovrebbe diventare correttamente la "Punta" dell'oggetto Body.
Multitrasformazione dovrebbe diventare correttamente la "Punta" dell'oggetto Body.
- Click on the
 MultiTransform icon to initiate the operation.
 - You will be prompted with the Select feature window.
From the list, select one initial feature to be used for the transformations and click OK to proceed.
You may add additional features in the next step.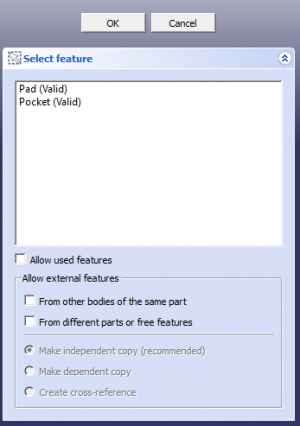
- The Transformed features messages and MultiTransform parameters window will appear.
You will see the label of the feature you selected in the feature list view, below the Add feature and Remove feature buttons.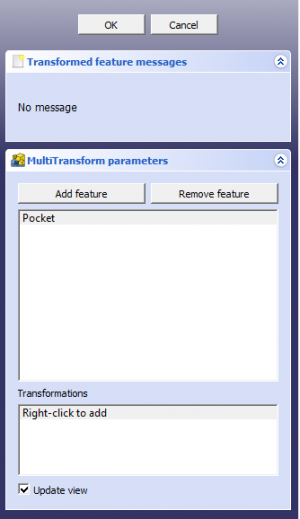
If you want to include additional features for the transformations, follow these instructions:- Click the Add feature button in the transform tool
- Switch to the Model tree view (Click on Model tab)
- Select the feature you want to add, and make it visible(spacebar, or right-click and toggle visibility).
Note: This will hide the previously visible feature. - Click on anything in 3D view (viewport).
- Click on Tasks tab in Combo View to return to MultiTransform parameters window.
- You should see the label of the recently selected feature appear in the feature list view.
- Below the feature list view is the Transformations list view. Within you should see the text, " Right-click to add ".
- Add a transformation by right-clicking in the Transformations list view to display the options list.
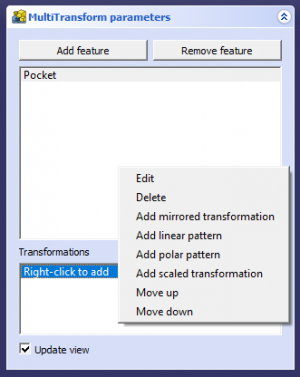
- Add the desired transformation by selecting it in the options list.
- The new transformation entry will appear in the Transformations list with corresponding settings appearing below the list.

- Adjust the settings for the new transformation. (You will see the preview in the viewport.)
- Click the OK button underneath these settings to save the new transformation.
- Continue to add transformations in the order you wish to apply them using Step 5 above.
- You may also edit, delete, and move (change the order of) the transformations as needed by right-clicking on a transformation in the Transformations list and selecting the corresponding option.
- When you are finished adding and editing the transformations, click the OK button at the very top to save the
 MultiTransform and exit.
Metodo alternativo 1
Questo metodo inizia con una funzione di trasformazione esistente in oggetto ![]() Corpo.
Corpo.
- In the Model tree, within the active Body object, select the existing transformation to be included.
- Click on the
 MultiTransform icon to initiate the operation.
 - In the feature list view, you will see the label(s) of the feature(s) from the existing transformation you included.
To add additional features, see Step 3 in the Standard Method above. - Below the feature list view is the Transformations list view. Within you should see the label for the existing transformation you included.
- Finish using Steps 5-8 in the Standard Method above.
When initiated and completed in this way, the ![]() MultiTransform usually fails to become the "Tip" of the Body object. To correct this:
MultiTransform usually fails to become the "Tip" of the Body object. To correct this:
- Right click on the newly created
 MultiTransform.
 - Choose "Set tip".
Metodo alternativo 2
Questo metodo inizia con più funzioni di trasformazioni indipendenti esistenti nell'oggetto ![]() Corpo - con l'idea di combinarli. NOTA: per combinare delle trasformazioni esistenti, esse devono trovarsi all'interno dello stesso oggetto Corpo e dovrebbero usare tutte la stessa funzione o set di funzioni.
Corpo - con l'idea di combinarli. NOTA: per combinare delle trasformazioni esistenti, esse devono trovarsi all'interno dello stesso oggetto Corpo e dovrebbero usare tutte la stessa funzione o set di funzioni.
- In the Model tree, within the active Body object, select one of existing transformation of those you wish to include.
- Click on the
 MultiTransform icon to initiate the operation.
 - Click the OK button at top to save and exit.
- In the object tree, select the newly created
 MultiTransform.
 - In the Property View window, locate the Transformations property in the Data tab.
- Edit the Transformations property by clicking on its value, then click on the ellipse box that appeared to open the Links window for this property.
- Select all existing feature transformations that should be included. Multiple selections are permitted using CTRL-click.
- Click OK to save and close the Links window.
- Click the
 Refresh button if activated.
When initiated and completed in this way, the ![]() MultiTransform might fail to become the "Tip" of the Body object. If you need it to be the "Tip":
MultiTransform might fail to become the "Tip" of the Body object. If you need it to be the "Tip":
- Right click on the newly created
 MultiTransform.
 - If available, choose "Set tip".
Usage Notes
- Supported feature transformations are:
 Mirrored,
  Linear Pattern,
  Polar Pattern, and SCALED transformation.
 - Each transformation linked to the
 MultiTransform should use the same feature, or set of features, in each.
Limitazioni
- Una trasformazione di scala non dovrebbe essere la prima della lista
- La trasformazione di scala deve avere lo stesso numero di occorrenze della trasformazione immediatamente precedente nella lista
- Vedere la funzione
 Schiera lineare per altre limitazioni
Opzioni
|
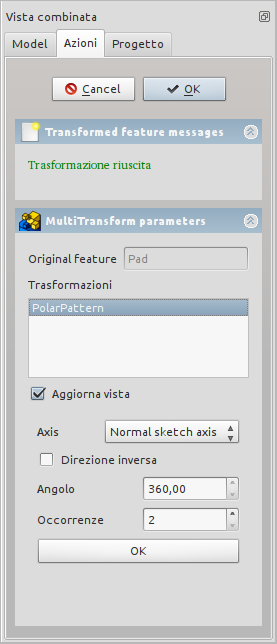
Quando si crea una operazione di MultiTrasformazione, la finestra di dialogo Parametri MultiTrasformazione mostra due elenchi in campi diversi (Originali e Trasformazioni). Selezionare gli originaliLa finestra Vista combinata mostra la lista delle operazioni (oggetti) originali che devono essere trasformati. Fare clic su una operazione per aggiungerla alla lista. Selezionare le trasformazioniIn questo elenco si possono inserire delle combinazioni di trasformazioni semplici quali simmetria, schiera lineare, schiera polare e scalatura. Le trasformazioni saranno applicate nell'ordine una dopo l'altra. Il menu di scelta rapida offre le seguenti voci: ModificaPermette di modificare i parametri di una trasformazione nella lista (un doppio clic produce lo stesso effetto) EliminaRimuove una trasformazione dalla lista Aggiungi trasformazioneAggiunge una trasformazione alla lista Sposta su o giùPermette di cambiare l'ordine delle trasformazioni nella lista |
Esempi
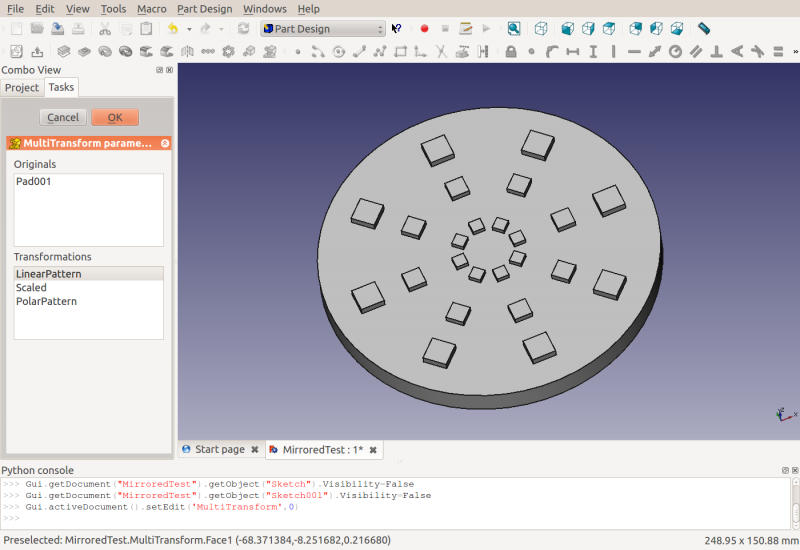
Il blocco più piccolo viene prima modellato tre volte in direzione X e poi scalato per un fattore due (in modo che alle tre occorrenze venga applicato il fattore di scala 1.0, 1.5 e 2.0). In seguito viene eseguita una schiera polare con 8 occorrenze.
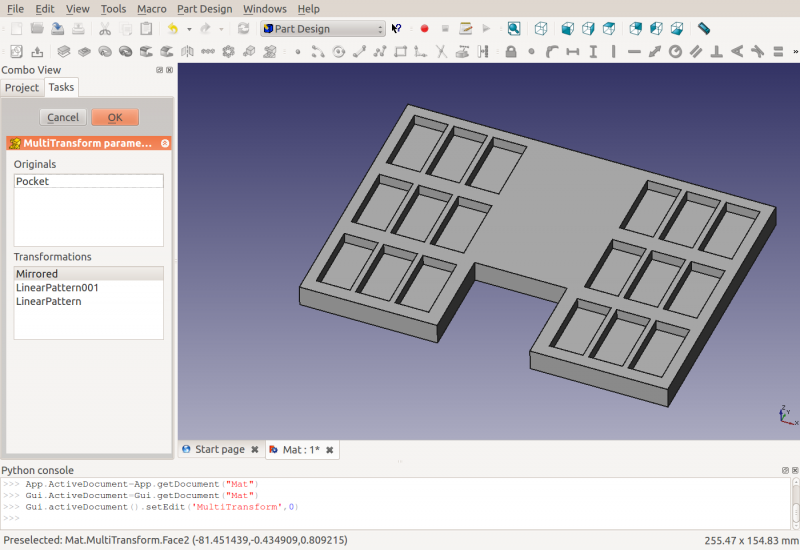
Lo scavo viene prima riflesso sul piano YZ e poi si applicano due trasformazioni di schiera lineare per produrre una schiera rettangolare.
- Structure tools: Part, Group
- Helper tools: Create body, Create sketch, Edit sketch, Map sketch to face
- Modeling tools
- Datum tools: Create a datum point, Create a datum line, Create a datum plane, Create a local coordinate system, Create a shape binder, Create a sub-object(s) shape binder, Create a clone
- Additive tools: Pad, Revolution, Additive loft, Additive pipe, Additive helix, Additive box, Additive cylinder, Additive sphere, Additive cone, Additive ellipsoid, Additive torus, Additive prism, Additive wedge
- Subtractive tools: Pocket, Hole, Groove, Subtractive loft, Subtractive pipe, Subtractive helix, Subtractive box, Subtractive cylinder, Subtractive sphere, Subtractive cone, Subtractive ellipsoid, Subtractive torus, Subtractive prism, Subtractive wedge
- Transformation tools: Mirrored, Linear Pattern, Polar Pattern, Create MultiTransform, Scaled
- Dress-up tools: Fillet, Chamfer, Draft, Thickness
- Boolean: Boolean operation
- Extras: Migrate, Sprocket, Involute gear, Shaft design wizard
- Context menu: Set tip, Move object to other body, Move object after other object, Appearance, Color per face
- Getting started
- Installation: Download, Windows, Linux, Mac, Additional components, Docker, AppImage, Ubuntu Snap
- Basics: About FreeCAD, Interface, Mouse navigation, Selection methods, Object name, Preferences, Workbenches, Document structure, Properties, Help FreeCAD, Donate
- Help: Tutorials, Video tutorials
- Workbenches: Std Base, Assembly, BIM, CAM, Draft, FEM, Inspection, Mesh, OpenSCAD, Part, PartDesign, Points, Reverse Engineering, Robot, Sketcher, Spreadsheet, Surface, TechDraw, Test Framework
- Hubs: User hub, Power users hub, Developer hub