PartDesign Chamfer/it: Difference between revisions
Renatorivo (talk | contribs) (Created page with "{{PartDesign Tools navi/it}}") |
Renatorivo (talk | contribs) (Created page with "{{Userdocnavi/it}}") |
||
| Line 66: | Line 66: | ||
{{PartDesign Tools navi/it}} |
{{PartDesign Tools navi/it}} |
||
{{Userdocnavi}} |
{{Userdocnavi/it}} |
||
Revision as of 21:17, 17 April 2019
|
|
| Posizione nel menu |
|---|
| PartDesign → Smusso |
| Ambiente |
| PartDesign, Completo |
| Avvio veloce |
| Nessuno |
| Introdotto nella versione |
| - |
| Vedere anche |
| PartDesign → Raccordo, Part → Smusso di Part |
Questo strumento applica degli smussi ai bordi di un oggetto selezionato. All'albero del Progetto viene aggiunto un nuovo elemento Chamfer (Smusso) (seguito da un numero sequenziale se non è il primo smusso creato nel documento).
This tool creates chamfers (flat face at 45 degrees to both adjoining faces) on the selected edges of an object. A new separate Chamfer entry (followed by a consecutive number if there are already existing chamfers in the document) is created in the Project tree.
   |
Utilizzo
Lo smusso di PartDesign e smusso di ParteLo smusso di PartDesign non deve essere confuso con lo smusso di Part.
|
- Select a single or multiple edges or a face on an object, then start the tool either by clicking the
 PartDesign Chamfer button or PartDesign → Chamfer from the top menu. In case you selected a face all its edges are respected for chamfering.
 - In Chamfer parameters in the TaskPanel, set the chamfer size either by entering the value, or by clicking on the up/down arrows. The applied chamfer is shown in real time.
- If you want to add more edges or faces click first the Add ref button and then select the edge or the face.
- If you want to remove edges or faces click the Remove ref button. All edges and faces being previously selected are highlighted in purple. Select the edge or the face to be removed.
- Click OK to validate.
- For a chain of edges tangential to one another, one single edge can be selected; the chamfer will propagate along the chain.
- To edit the chamfer after the function has been validated, either double-click on the Chamfer label in the Project tree, or right-click on it and select Edit Chamfer.
PartDesign Chamfer vs. Part Chamfer
The PartDesign Chamfer is not to be confused with its Part workbench counterpart. Although they share the same icon, they are not the same, and are not used the same way. Here is how they differ from each other:
- Edges must be selected on an object before activating the PartDesign Chamfer. With the Part Chamfer, the tool can be started, then a solid is selected, then edges.
- The PartDesign Chamfer creates a separate Fillet entry (followed by a sequential number if there are already existing fillets) in the Project tree for the current body. The Part Chamfer becomes the parent of the object it was applied to.
- The PartDesign Chamfer offers a live preview of the fillet applied to the object before validating the function.
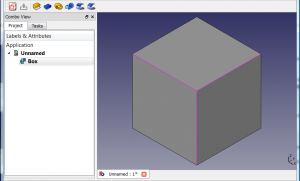
-
Selection of the edges before command execution.
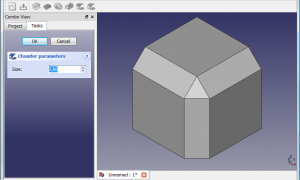
-
Setting of the size of the chamfer in the 'Chamfer parameters' panel.
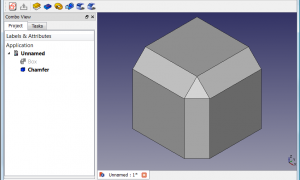
-
A Chamfer element is added to the Project tree.
- Structure tools: Part, Group
- Helper tools: Create body, Create sketch, Edit sketch, Map sketch to face
- Modeling tools
- Datum tools: Create a datum point, Create a datum line, Create a datum plane, Create a local coordinate system, Create a shape binder, Create a sub-object(s) shape binder, Create a clone
- Additive tools: Pad, Revolution, Additive loft, Additive pipe, Additive helix, Additive box, Additive cylinder, Additive sphere, Additive cone, Additive ellipsoid, Additive torus, Additive prism, Additive wedge
- Subtractive tools: Pocket, Hole, Groove, Subtractive loft, Subtractive pipe, Subtractive helix, Subtractive box, Subtractive cylinder, Subtractive sphere, Subtractive cone, Subtractive ellipsoid, Subtractive torus, Subtractive prism, Subtractive wedge
- Transformation tools: Mirrored, Linear Pattern, Polar Pattern, Create MultiTransform, Scaled
- Dress-up tools: Fillet, Chamfer, Draft, Thickness
- Boolean: Boolean operation
- Extras: Migrate, Sprocket, Involute gear, Shaft design wizard
- Context menu: Set tip, Move object to other body, Move object after other object, Appearance, Color per face
- Getting started
- Installation: Download, Windows, Linux, Mac, Additional components, Docker, AppImage, Ubuntu Snap
- Basics: About FreeCAD, Interface, Mouse navigation, Selection methods, Object name, Preferences, Workbenches, Document structure, Properties, Help FreeCAD, Donate
- Help: Tutorials, Video tutorials
- Workbenches: Std Base, Arch, Assembly, CAM, Draft, FEM, Inspection, Mesh, OpenSCAD, Part, PartDesign, Points, Reverse Engineering, Robot, Sketcher, Spreadsheet, Surface, TechDraw, Test Framework
- Hubs: User hub, Power users hub, Developer hub