Manual:Using spreadsheets/pl: Difference between revisions
(Created page with "* Wyodrębnijmy teraz kilka informacji o tych obiektach. Przejdź do środowiska Arkusz Kalkulacyjny * Naciśnij przycisk 16px '''Utwórz arkusz'''. * Kliknij dwukrotnie nowy obiekt AkruszKalkulacyjny w widoku drzewa. Otworzy się edytor arkusza kalkulacyjnego:") |
(Created page with "Edytor arkuszy kalkulacyjnych FreeCAD, choć nie jest tak kompletny i potężny jak bardziej kompletne aplikacje arkuszy kalkulacyjnych, które wymieniliśmy powyżej, ma jednak większość podstawowych narzędzi i funkcji, które są powszechnie używane, takich jak możliwość zmiany właściwości komórek (rozmiar, kolor, wyrównanie), łączenia i dzielenia komórek, używania formuł takich jak {{Incode|=2+2}} lub odwoływania się do innych komórek za pomocą {...") |
||
| Line 30: | Line 30: | ||
[[Image:Exercise_spreadsheet_02.jpg]] |
[[Image:Exercise_spreadsheet_02.jpg]] |
||
Edytor arkuszy kalkulacyjnych FreeCAD, choć nie jest tak kompletny i potężny jak bardziej kompletne aplikacje arkuszy kalkulacyjnych, które wymieniliśmy powyżej, ma jednak większość podstawowych narzędzi i funkcji, które są powszechnie używane, takich jak możliwość zmiany właściwości komórek (rozmiar, kolor, wyrównanie), łączenia i dzielenia komórek, używania formuł takich jak {{Incode|=2+2}} lub odwoływania się do innych komórek za pomocą {{Incode|=B1}}. |
|||
The spreadsheet editor of FreeCAD, although it is not as complete and powerful as the more complete spreadsheet applications we listed above, has nevertheless most of the basic tools and functions that are commonly used, such as the possibility to change the aspect of the cells (size, color, alignment), join and split cells, use formulas such as '''=2+2''', or reference other cells with '''=B1'''. |
|||
In FreeCAD, on top of these common features, there is a new interesting one: The possibility to reference not only other cells, but other objects from the document, and retrieve values from their properties. For example, let's retrieve a couple of properties from the 3 objects we created above. Properties are what we can see in the properties editor window, under the '''Data''' tab, when an object is selected. |
In FreeCAD, on top of these common features, there is a new interesting one: The possibility to reference not only other cells, but other objects from the document, and retrieve values from their properties. For example, let's retrieve a couple of properties from the 3 objects we created above. Properties are what we can see in the properties editor window, under the '''Data''' tab, when an object is selected. |
||
Revision as of 15:19, 3 March 2024
- Słowo wstępne
- Odkrywamy FreeCAD
- Praca z FreeCAD
- Skrypty środowiska Python
- Społeczność
FreeCAD posiada kolejne interesujące środowisko robocze, które warto zbadać: Arkusz kalkulacyjny. To środowisko umożliwia tworzenie arkuszy kalkulacyjnych takich jak te tworzone w Excelu lub Calc z LibreOffice bezpośrednio w programie FreeCAD. Te arkusze kalkulacyjne mogą być wypełniane danymi pobieranymi z modelu oraz mogą wykonywać różne obliczenia na wartościach. Arkusze kalkulacyjne można eksportować jako pliki CSV, które można zaimportować do dowolnej innej aplikacji arkuszy kalkulacyjnych.
W programie FreeCAD arkusze kalkulacyjne mają dodatkową użyteczność: Ich komórki mogą otrzymać nazwę i mogą być następnie wywoływane przez dowolne pole obsługiwane przez silnik wyrażeń. Sprawia to, że arkusze kalkulacyjne stają się potężnymi strukturami sterowania, gdzie wartości wprowadzone w określonych komórkach mogą sterować wymiarami modelu. Istnieje tylko jedna rzecz, o której trzeba pamiętać, ponieważ FreeCAD zabrania cyklicznych zależności między obiektami, ten sam arkusz kalkulacyjny nie może być używany do ustawiania właściwości obiektu i jednocześnie pobierania wartości właściwości z tego samego obiektu. Oznacza to, że arkusz kalkulacyjny i obiekt zależą od siebie nawzajem.
W poniższym przykładzie stworzymy kilka obiektów, pobierzemy niektóre z ich właściwości do arkusza kalkulacyjnego, a następnie użyjemy arkusza kalkulacyjnego do bezpośredniego sterowania właściwościami innych obiektów.
Odczyt właściwości
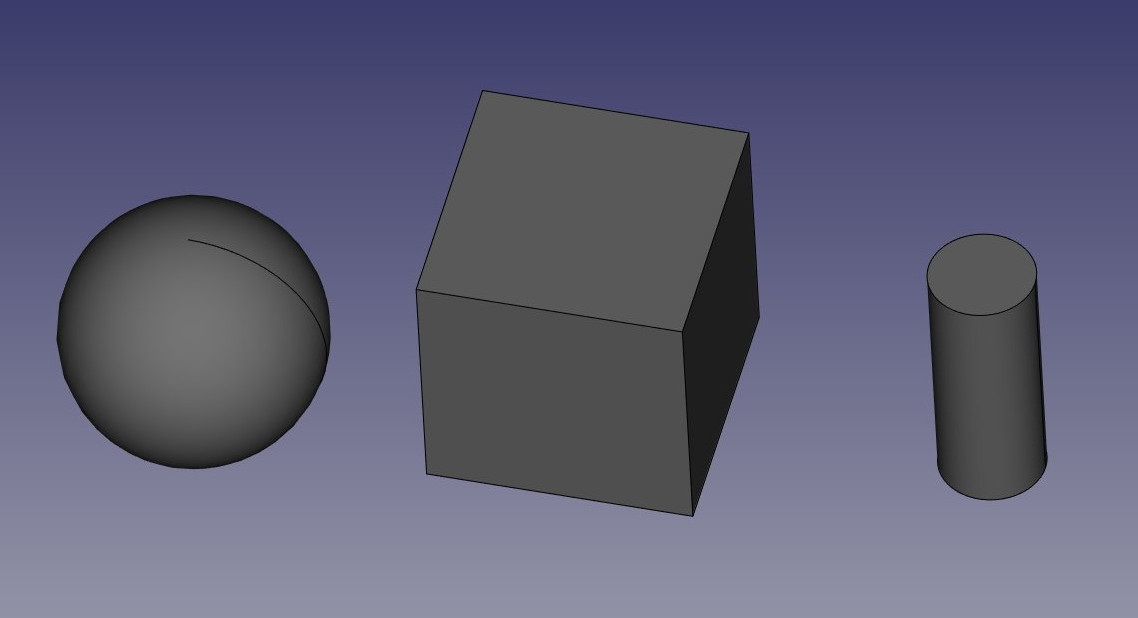
- Zacznij od przejścia do środowiska Part Workbench i stwórz kilka obiektów:
sześcian i
walec i
sfera.
- Edytuj ich właściwość Umiejscowienie (lub użyj narzędzia
Przesuń), aby umieścić je nieco od siebie, abyśmy mogli lepiej zobaczyć efekty tego, co zrobimy:
- Wyodrębnijmy teraz kilka informacji o tych obiektach. Przejdź do środowiska Arkusz Kalkulacyjny
- Naciśnij przycisk
 Utwórz arkusz.
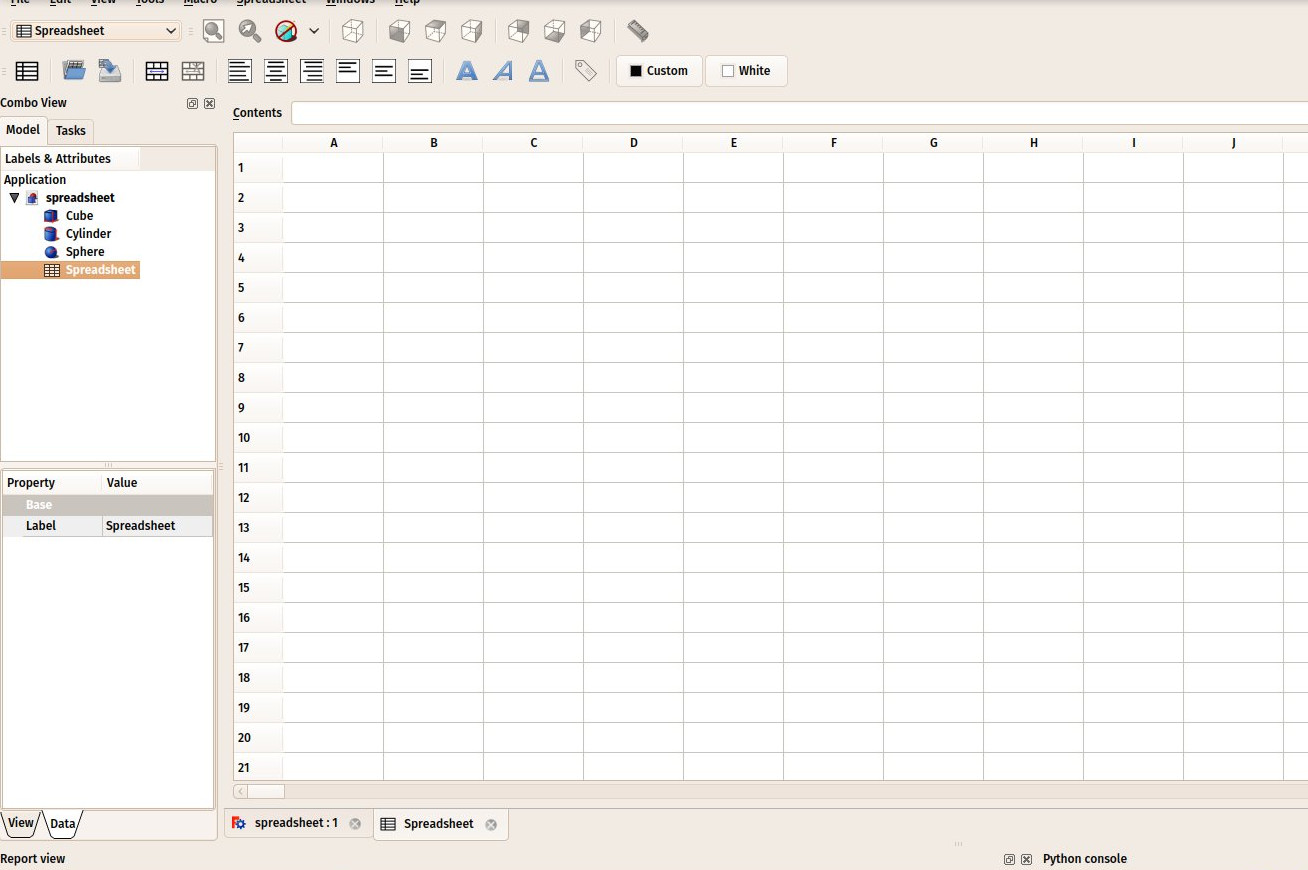
 - Kliknij dwukrotnie nowy obiekt AkruszKalkulacyjny w widoku drzewa. Otworzy się edytor arkusza kalkulacyjnego:
Edytor arkuszy kalkulacyjnych FreeCAD, choć nie jest tak kompletny i potężny jak bardziej kompletne aplikacje arkuszy kalkulacyjnych, które wymieniliśmy powyżej, ma jednak większość podstawowych narzędzi i funkcji, które są powszechnie używane, takich jak możliwość zmiany właściwości komórek (rozmiar, kolor, wyrównanie), łączenia i dzielenia komórek, używania formuł takich jak {{{1}}} lub odwoływania się do innych komórek za pomocą {{{1}}}.
In FreeCAD, on top of these common features, there is a new interesting one: The possibility to reference not only other cells, but other objects from the document, and retrieve values from their properties. For example, let's retrieve a couple of properties from the 3 objects we created above. Properties are what we can see in the properties editor window, under the Data tab, when an object is selected.
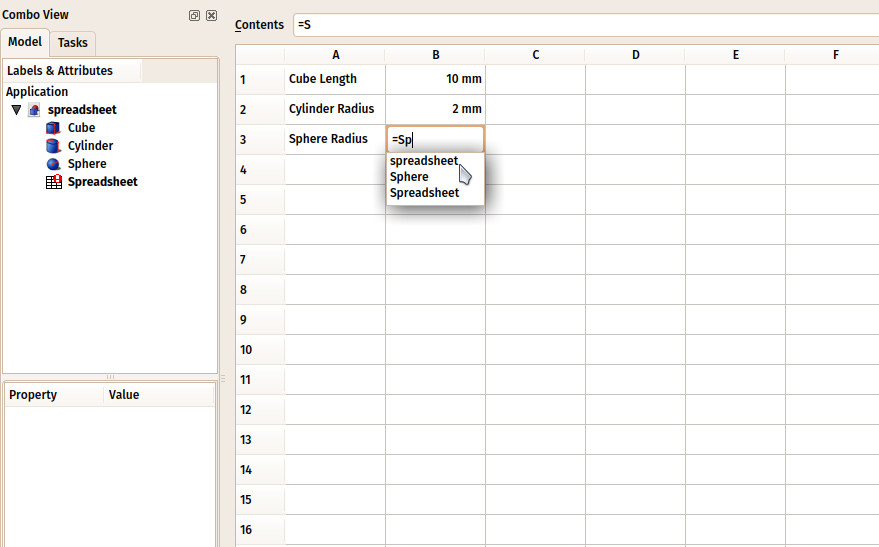
- Let's start by entering a couple of texts in the cells A1, A2 and A3, so we remember what is what later on, for example Cube Length, Cylinder Radius and Sphere Radius. To enter text, just write in the "Contents" field above the spreadsheet, or double-click a cell.
- Now let's retrieve the actual length of our cube. In cell B1, type =Cube.Length. You will notice that the spreadsheet has an autocompletion mechanism, which is actually the same as the expression editor we used in the previous chapter.
- Do the same for cell B2 (=Cylinder.Radius) and B3 (=Sphere.Radius).
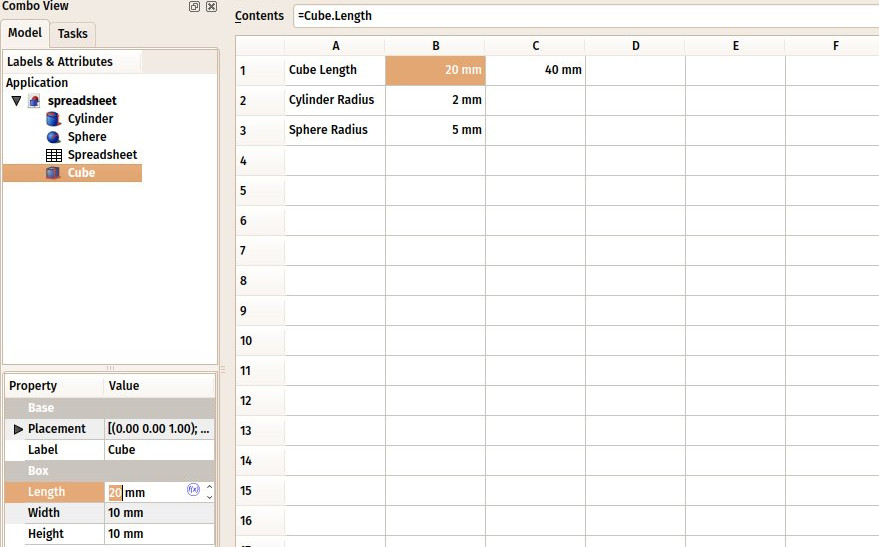
- Although these results are expressed with their units, the values can be manipulated as any number, try for example entering in cell C1: =B1*2.
- We can now change one of these values in the properties editor, and the change will be immediately reflected in the spreadsheet. For example, let's change the length of our cube to 20mm:
The Spreadsheet Workbench page will describe in more detail all the possible operations and functions available in spreadsheets.
Writing properties
Another very interesting use of the Spreadsheet Workbench in FreeCAD is to do the contrary of what we have been doing until now: Instead of reading the values of properties of 3D objects, we can also assign values to these objects. Remember, however, one of the fundamental rules of FreeCAD: Circular dependencies are forbidden. We can therefore not use the same spreadsheet to read and write values to a 3D object. That would make the object depend on the spreadsheet, which would also depend on the object. Instead, we will create another spreadsheet.
- We can now close the spreadsheet tab (under the 3D view). This is not mandatory, there is no problem in keeping several spreadsheet windows open.
- Press the
 New Spreadsheet button again
 - Change the name of the new spreadsheet to something more meaningful, such as Input (do this by right-clicking the new spreadsheet object, and choosing Rename).
- Double-click the Input spreadsheet to open the spreadsheet editor.
- In cell A1, let's put a descriptive text, for example: "Cube dimensions"
- In cell B1, write =5mm (using the = sign makes sure the value is interpreted as a unit value, not a text).
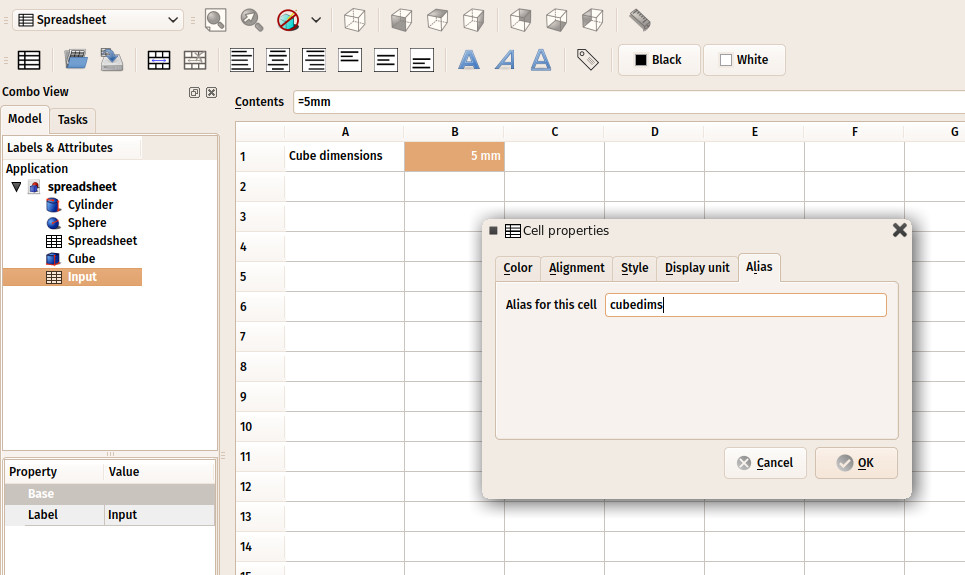
- Now to be able to use this value outside the spreadsheet, we need to give a name, or alias, to the B1 cell. Right-click the cell, click Properties and select the Alias tab. Give it a name, such as cubedims:
- Press OK, then close the spreadsheet tab
- Select the cube object
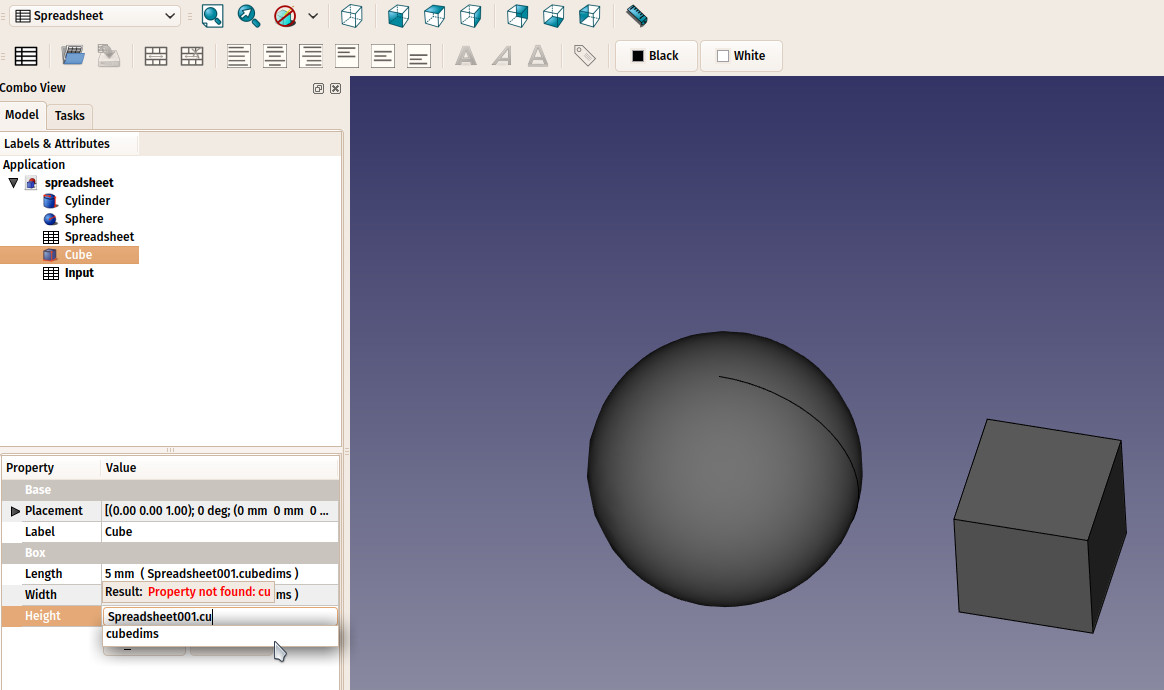
- In the properties editor, click the little
 expression icon at the right side of the Length field. This will open the expressions editor, where you can write Spreadsheet001.cubedims. Repeat this for Height and Width:
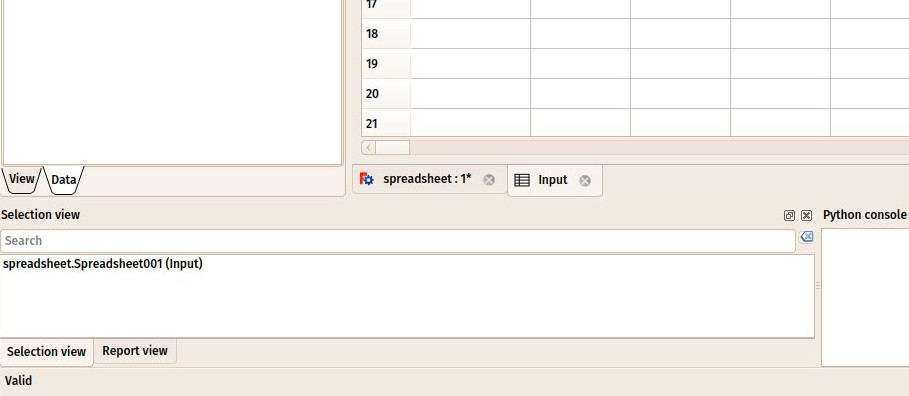
You might wonder why we had to use "Spreadsheet001" instead of "Input" in the expression above. This is because each object, in a FreeCAD document, has an internal name, which is unique in the document, and a label, which is what appears in the tree view. If you uncheck the relevant option in the preferences window, FreeCAD will allow you to give the same label to more than one object. This is why all operations that must identify an object uniquely, will use the internal name instead of the label, which could designate more than one object. The easiest way to know the internal name of an object is by keeping the selection panel (menu bar View → Panels) open, it will always indicate the internal name of a selected object:
By using cell aliases in spreadsheets, we are able to use a spreadsheet to store "master values" in a FreeCAD document. This can be used, for example, to have a model of a piece of certain dimensions, and to store these dimensions in a spreadsheet. It then becomes very easy to produce another model with different dimensions, it is just a matter of opening the file and changing a couple of dimensions in the spreadsheet.
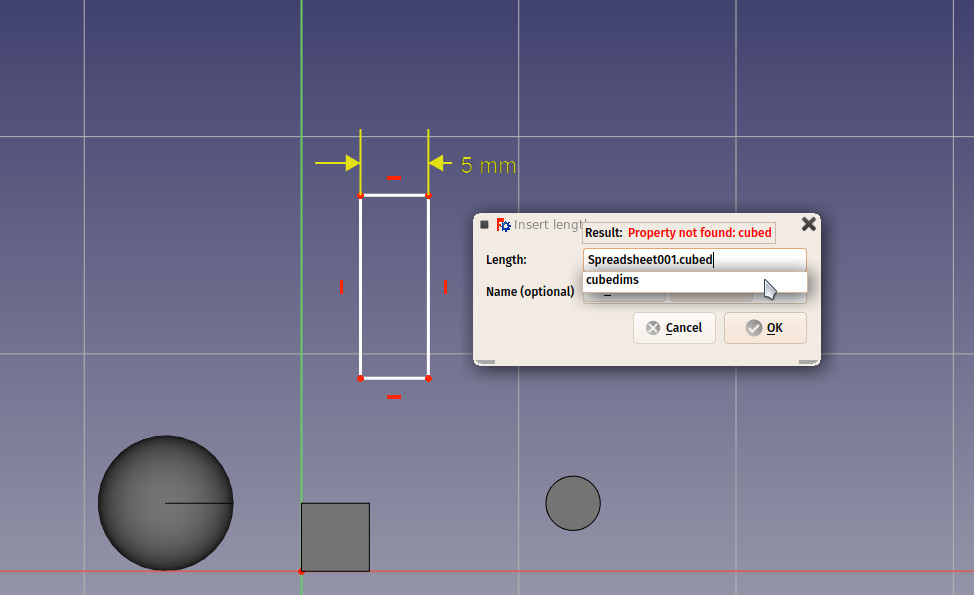
Finally, note that the constraints inside a sketch can also receive the value of a spreadsheet cell:
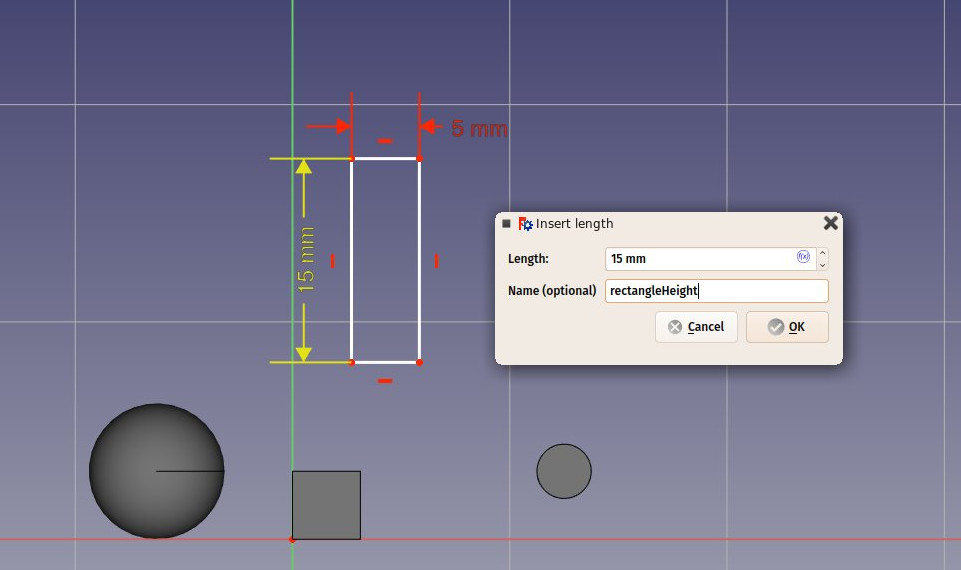
You can also give aliases to dimensional constraints (horizontal, vertical or distance) in a sketch (you can then use that value from outside the sketch as well):
Do pobrania
- Plik utworzony w tym ćwiczeniu: https://github.com/yorikvanhavre/FreeCAD-manual/blob/master/files/spreadsheet.FCStd
Więcej informacji:
