Arch Roof/ru: Difference between revisions
No edit summary |
(Updating to match new version of source page) |
||
| (29 intermediate revisions by 3 users not shown) | |||
| Line 1: | Line 1: | ||
<languages/> |
<languages/> |
||
{{Docnav |
|||
{{Docnav/ru |
|||
|[[Arch_Grid|Grid]] |
|||
|[[ |
|[[Arch_Window/ru|Окно]] |
||
|[[Arch_CompAxis/ru|CompAxis]] |
|||
|[[Arch_Module|Arch]] |
|||
|[[Arch_Workbench/ru|Архитектурный верстак "Arch"]] |
|||
|IconL=Arch_Grid.svg |
|||
|IconL=Arch_Window.svg |
|||
|IconR=Arch_CompAxis.png |
|||
|IconC=Workbench_Arch.svg |
|IconC=Workbench_Arch.svg |
||
|IconR=Arch_Space.svg |
|||
}} |
}} |
||
<div class="mw-translate-fuzzy"> |
|||
{{GuiCommand/ru |
{{GuiCommand/ru |
||
|Name= |
|Name=Arch_Roof |
||
|Name/ru= |
|Name/ru=Крыша |
||
|Workbenches=[[Arch Module/ru|Arch]] |
|||
|MenuLocation=Архитектура → Крыша |
|MenuLocation=Архитектура → Крыша |
||
|Workbenches=[[Arch_Workbench/ru|Arch]] |
|||
|Shortcut=R F |
|||
|Shortcut={{KEY|R}} {{KEY|F}} |
|||
|SeeAlso=[[Arch_Structure/ru|Структура]], [[Arch_Wall/ru|Стена]] |
|||
}} |
}} |
||
</div> |
|||
= |
<span id="Description"></span> |
||
==Описание== |
|||
The {{Button|[[Image:Arch Roof.svg|16px]] [[ |
The {{Button|[[Image:Arch Roof.svg|16px]] [[Arch_Roof|Arch Roof]]}} tool allows for the creation of a sloped roof from a selected wire. The created roof object is parametric, keeping its relationship with the base object. The principle is that each edge is seen allotting a profile of roof (slope, width, overhang, thickness). |
||
'''Note:''' This tool is still in development, and might fail with very complex shapes. |
'''Note:''' This tool is still in development, and might fail with very complex shapes. |
||
| Line 28: | Line 29: | ||
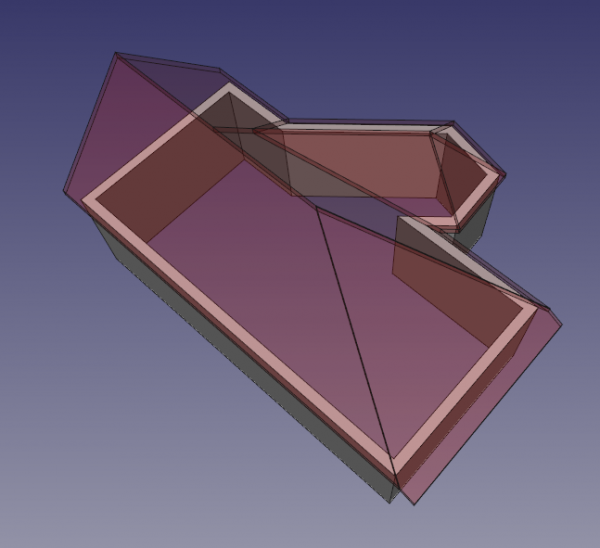
{{Caption|View from above a building model showing the roof with certain transparency}} |
{{Caption|View from above a building model showing the roof with certain transparency}} |
||
<span id="Usage_(wire_base)"></span> |
|||
==Usage== |
|||
<div class="mw-translate-fuzzy"> |
|||
==Применение== |
|||
</div> |
|||
<div class="mw-translate-fuzzy"> |
|||
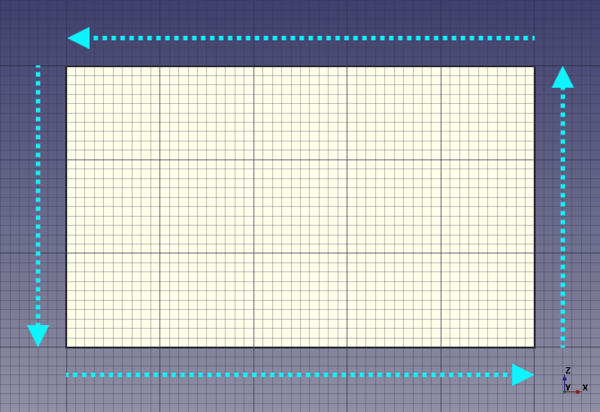
# Create a wire with following the counter-clockwise direction and select it. |
|||
# Создайте замкнутый контур с помощью инструмента '''Wire''' с направлением построения против часовой стрелки и выберите его. |
|||
#:[[Image:CounterclockwiseWire.png|600px]] |
#:[[Image:CounterclockwiseWire.png|600px]] |
||
# |
# Нажмите кнопку {{Button|[[Image:Arch Roof.svg|16px]] [[Arch Roof/ru|Крыша]]}}, или клавишу клавиатуры {{KEY|R}} затем {{KEY|F}} |
||
# Крыша созданная изначально может иметь странную форму, это связанно с тем, что параметры граней созданной крыши, пока что ещё не настроены. |
|||
# The default roof object could have a strange shape, it's because the tool is missing some necessary information. |
|||
# После создания крыши по умолчанию дважды щелкните по объекту в [[tree_view/ru|древе проекта]] для доступа к редактированию свойств. Угол крыши должен быть между 0 и 90. |
|||
# After creating the default roof, double click on the object in the [[tree view]] to access and edit all the properties. Angle must be between 0 and 90. |
|||
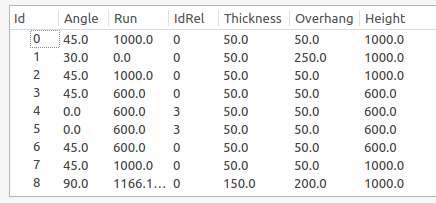
#:[[File:RoofTable.png]] |
#:[[File:RoofTable.png]] |
||
# Каждая строка соответствует одной из панелей крыши. Таким образом, вы можете установить нужные свойства для каждой панели крыши. |
|||
# Each line corresponds to a roof pane. So you can set the properties you want for each roof pane. |
|||
# |
# Чтобы помочь себе, вы можете установить {{incode|Angle (Угол)}} или {{incode|Run}} в {{incode|0}} и определить {{incode|Relative Id}}, что приведет к автоматическому расчету, чтобы найти данные относительно {{incode|Relative Id}}. |
||
# Это работает следующим образом: |
|||
# It works like this: |
|||
## |
## Если {{incode|Angle (Угол) = 0}} и {{incode|Run = 0}} тогда профиль идентичен относительному профилю. |
||
## |
## Если {{incode|Angle (Угол) = 0}} тогда {{incode|Angle (Угол)}} рассчитывается таким образом, чтобы высота была такой же, как и относительный профиль. |
||
## |
## Если {{incode|Run = 0}} тогда {{incode|Run}} рассчитывается таким образом, чтобы высота была такой же, как и относительный профиль. |
||
# Наконец, установите Angle (Угол) на 90°, чтобы сделать фронтон. |
|||
# Finally, set an Angle to 90° to make a gable. |
|||
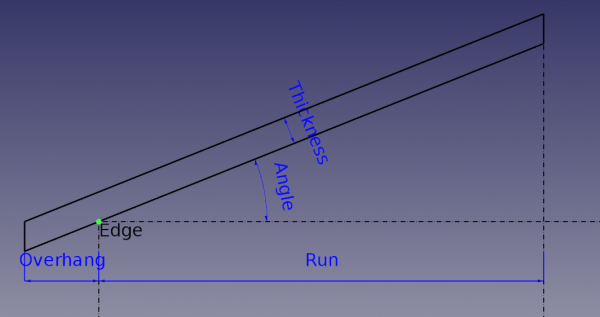
#:[[Image:RoofProfil.png|600px]] |
#:[[Image:RoofProfil.png|600px]] |
||
# {{Emphasis| |
# {{Emphasis|Примечание}}: для лучшего понимания, пожалуйста, посмотрите это [https://www.youtube.com/watch?v=4Urwru71dVk youtube видеоролик]. |
||
</div> |
|||
==Usage (solid base)== |
|||
==Options== |
|||
If your roof has a complex shape (e.g. contains pitched windows or other non-standard features) you can create a custom solid object using various other FreeCAD workbenches ([[Part_Workbench|Part]], [[Sketcher_Workbench|Sketcher]] etc.). And then use this solid as the {{PropertyData|Base}} object of your roof: |
|||
* Roofs share the common properties and behaviors of all [[Arch Component|Arch Components]] |
|||
# Select the solid base object. |
|||
==Properties== |
|||
# Press the {{Button|[[Image:Arch_Roof.svg|16px]] [[Arch Roof|Arch Roof]]}} button, or press {{KEY|R}} then {{KEY|F}} keys. |
|||
==Subtracting a roof== |
|||
* {{PropertyData|Angles}}: List of the slope angle of the roof pane (an angle for each edge in the wire). |
|||
* {{PropertyData|Runs}}: List of the width of the roof pane (a run for each edge in the wire). |
|||
Roofs have an automatically generated subtraction volume ({{Version|1.0}} for roofs with a solid base). When a roof is [[Arch_Remove|removed]] from the walls of a building, both the roof itself as well as everything above it is subtracted from the walls. |
|||
* {{PropertyData|IdRel}}: List of relation Id of the slope angle of the roof. |
|||
* {{PropertyData|Thickness}}: List of thickness of the roof pane. (a thickness for each edge in the wire). |
|||
{{Version|1.0}}: It is possible to override the automatic subtraction volume by setting the {{PropertyData|Subvolume}} property of the roof to a custom solid object. |
|||
* {{PropertyData|Overhang}}: List of the overhang of the roof pane (an overhang for each edge in the wire). |
|||
* {{PropertyData|Face}}: The face index of the base object to be used (not really used). |
|||
[[File:Arch_Roof_Subtract_Default.png|x150px]] [[File:Arch_Roof_Subtract_Subvolume.png|x150px]] [[File:Arch_Roof_Subvolume_Example.png|x150px]] |
|||
{{Caption|Solid-based roof before (1st image) and after (2nd image) [[Arch_Remove|removing]] it from walls.<br> |
|||
The 3rd image shows the generated subtraction volume.}} |
|||
<span id="Options"></span> |
|||
==Опции== |
|||
<div class="mw-translate-fuzzy"> |
|||
* Крыши обладают таким же свойствами и моделью поведения, как и все остальные [[Arch_Component/ru|компоненты верстака Arch]] |
|||
</div> |
|||
<span id="Properties"></span> |
|||
==Свойства== |
|||
===Data=== |
|||
{{TitleProperty|Roof}} |
|||
<div class="mw-translate-fuzzy"> |
|||
* {{PropertyData|Angles (Углы)}}: Список содержащий углы наклона крыши, для каждой её грани. |
|||
* {{PropertyData|Runs ()}}: Список содержащий расстояние от центра крыши до свеса, для каждой грани крыши. |
|||
* {{PropertyData|IdRel}}: Список содержащий идентификаторы, для каждой грани крыши. |
|||
* {{PropertyData|Thickness (Толщины)}}: Список содержащий толщины крыши, для каждой её грани. |
|||
* {{PropertyData|Overhang (Свесы)}}: Список содержащий длины свесов крыши, для каждой её грани. |
|||
* {{PropertyData|Face (Грань)}}: Индекс грани базового объекта (не используется). |
|||
</div> |
|||
==Scripting== |
==Scripting== |
||
{{Emphasis|See also:}} [[Arch API|Arch API]] and [[FreeCAD Scripting Basics|FreeCAD Scripting Basics]]. |
|||
<div class="mw-translate-fuzzy"> |
|||
The Roof tool can be used in [[macros|macros]] and from the [[Python|Python]] console by using the following function: |
|||
==Программирование== |
|||
{{Emphasis|См. так же:}} [[Arch API/ru|Arch API]] и [[FreeCAD Scripting Basics/ru|Основы составления скриптов FreeCAD]]. |
|||
</div> |
|||
The Roof tool can be used in [[Macros|macros]] and from the [[Python|Python]] console by using the following function: |
|||
{{Code|code= |
{{Code|code= |
||
Roof = makeRoof(baseobj=None, facenr=0, angles=[45.,], run=[], idrel=[0,], thickness=[50.,], overhang=[100.,], name="Roof") |
Roof = makeRoof(baseobj=None, facenr=0, angles=[45.,], run=[], idrel=[0,], thickness=[50.,], overhang=[100.,], name="Roof") |
||
| Line 71: | Line 109: | ||
** The lists are automatically completed to match the number of edges in the wire. |
** The lists are automatically completed to match the number of edges in the wire. |
||
Пример: |
|||
Example: |
|||
{{Code|code= |
{{Code|code= |
||
import FreeCAD |
import FreeCAD as App |
||
import Arch, Draft |
|||
doc = App.newDocument() |
|||
Rect = Draft.makeRectangle(3000, 4000) |
|||
Roof = Arch.makeRoof(Rect, angles=[30.,]) |
|||
FreeCAD.ActiveDocument.recompute() |
|||
rect = Draft.makeRectangle(3000, 4000) |
|||
p1 = FreeCAD.Vector(0, 0, 0) |
|||
doc.recompute() |
|||
p2 = FreeCAD.Vector(1000, 1000, 0) |
|||
p3 = FreeCAD.Vector(0, 2000, 0) |
|||
roof = Arch.makeRoof(rect, angles=[30.,]) |
|||
Wire = Draft.makeWire([p1, p2, p3], closed=True) |
|||
Roof2 = Arch.makeRoof(Wire) |
|||
p1 = App.Vector(0, 0, 0) |
|||
FreeCAD.ActiveDocument.recompute() |
|||
p2 = App.Vector(1000, 1000, 0) |
|||
p3 = App.Vector(0, 2000, 0) |
|||
wire = Draft.make_wire([p1, p2, p3], closed=True) |
|||
doc.recompute() |
|||
roof1 = Arch.makeRoof(wire) |
|||
doc.recompute() |
|||
}} |
}} |
||
{{Docnav/ru |
{{Docnav/ru |
||
|[[ |
|[[Arch_Window/ru|Окно]] |
||
|[[ |
|[[Arch_CompAxis/ru|CompAxis]] |
||
|[[Arch_Workbench/ru|Архитектурный верстак "Arch"]] |
|||
|[[Arch_Module/ru|Arch]] |
|||
|IconL= |
|IconL=Arch_Window.svg |
||
|IconR=Arch_CompAxis.png |
|||
|IconC=Workbench_Arch.svg |
|IconC=Workbench_Arch.svg |
||
|IconR=Arch_Space.svg |
|||
}} |
}} |
||
Latest revision as of 09:47, 21 April 2024
|
|
| Системное название |
|---|
| Arch_Roof |
| Расположение в меню |
| Архитектура → Крыша |
| Верстаки |
| Arch |
| Быстрые клавиши |
| R F |
| Представлено в версии |
| - |
| См. также |
| Структура, Стена |
Описание
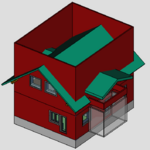
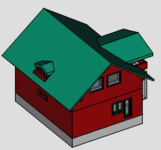
The Arch Roof tool allows for the creation of a sloped roof from a selected wire. The created roof object is parametric, keeping its relationship with the base object. The principle is that each edge is seen allotting a profile of roof (slope, width, overhang, thickness).
Note: This tool is still in development, and might fail with very complex shapes.
View from above a building model showing the roof with certain transparency
Применение
- Создайте замкнутый контур с помощью инструмента Wire с направлением построения против часовой стрелки и выберите его.
- Нажмите кнопку
Крыша, или клавишу клавиатуры R затем F
- Крыша созданная изначально может иметь странную форму, это связанно с тем, что параметры граней созданной крыши, пока что ещё не настроены.
- После создания крыши по умолчанию дважды щелкните по объекту в древе проекта для доступа к редактированию свойств. Угол крыши должен быть между 0 и 90.
- Каждая строка соответствует одной из панелей крыши. Таким образом, вы можете установить нужные свойства для каждой панели крыши.
- Чтобы помочь себе, вы можете установить
Angle (Угол)илиRunв0и определитьRelative Id, что приведет к автоматическому расчету, чтобы найти данные относительноRelative Id. - Это работает следующим образом:
- Если
Angle (Угол) = 0иRun = 0тогда профиль идентичен относительному профилю. - Если
Angle (Угол) = 0тогдаAngle (Угол)рассчитывается таким образом, чтобы высота была такой же, как и относительный профиль. - Если
Run = 0тогдаRunрассчитывается таким образом, чтобы высота была такой же, как и относительный профиль.
- Если
- Наконец, установите Angle (Угол) на 90°, чтобы сделать фронтон.
- Примечание: для лучшего понимания, пожалуйста, посмотрите это youtube видеоролик.
Usage (solid base)
If your roof has a complex shape (e.g. contains pitched windows or other non-standard features) you can create a custom solid object using various other FreeCAD workbenches (Part, Sketcher etc.). And then use this solid as the ДанныеBase object of your roof:
- Select the solid base object.
- Press the
Arch Roof button, or press R then F keys.
Subtracting a roof
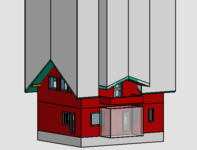
Roofs have an automatically generated subtraction volume (introduced in version 1.0 for roofs with a solid base). When a roof is removed from the walls of a building, both the roof itself as well as everything above it is subtracted from the walls.
introduced in version 1.0: It is possible to override the automatic subtraction volume by setting the ДанныеSubvolume property of the roof to a custom solid object.
Solid-based roof before (1st image) and after (2nd image) removing it from walls.
The 3rd image shows the generated subtraction volume.
Опции
- Крыши обладают таким же свойствами и моделью поведения, как и все остальные компоненты верстака Arch
Свойства
Data
Roof
- ДанныеAngles (Углы): Список содержащий углы наклона крыши, для каждой её грани.
- ДанныеRuns (): Список содержащий расстояние от центра крыши до свеса, для каждой грани крыши.
- ДанныеIdRel: Список содержащий идентификаторы, для каждой грани крыши.
- ДанныеThickness (Толщины): Список содержащий толщины крыши, для каждой её грани.
- ДанныеOverhang (Свесы): Список содержащий длины свесов крыши, для каждой её грани.
- ДанныеFace (Грань): Индекс грани базового объекта (не используется).
Scripting
Программирование
См. так же: Arch API и Основы составления скриптов FreeCAD.
The Roof tool can be used in macros and from the Python console by using the following function:
Roof = makeRoof(baseobj=None, facenr=0, angles=[45.,], run=[], idrel=[0,], thickness=[50.,], overhang=[100.,], name="Roof")
- Creates a
Roofobject from the givenbaseobj, which can be a closed wire or a solid object.- If
baseobjis a wire, you can provide lists forangles,run,idrel,thickness, andoverhang, for each edge in the wire to define the shape of the roof. - The lists are automatically completed to match the number of edges in the wire.
- If
Пример:
import FreeCAD as App
import Arch, Draft

doc = App.newDocument()

rect = Draft.makeRectangle(3000, 4000)
doc.recompute()

roof = Arch.makeRoof(rect, angles=[30.,])

p1 = App.Vector(0, 0, 0)
p2 = App.Vector(1000, 1000, 0)
p3 = App.Vector(0, 2000, 0)

wire = Draft.make_wire([p1, p2, p3], closed=True)
doc.recompute()

roof1 = Arch.makeRoof(wire)

doc.recompute()
- Elements: Wall, Structure, Curtain Wall, Window, Roof, Space, Stairs, Equipment, Frame, Fence, Truss, Profile, Pipe, Pipe Connector
- Reinforcements: Straight Rebar, U-Shape Rebar, L-Shape Rebar, Stirrup, Bent-Shape Rebar, Helical Rebar, Column Reinforcement, Beam Reinforcement, Slab Reinforcement, Footing Reinforcement, Custom Rebar
- Panels: Panel, Panel Cut, Panel Sheet, Nest
- Materials: Material, Multi-Material
- Organization: Building Part, Project, Site, Building, Level, External reference, Section Plane, Schedule
- Axes: Axis, Axes system, Grid
- Modification: Cut with plane, Add component, Remove component, Survey
- Utilities: Component, Clone component, Split Mesh, Mesh to Shape, Select non-manifold meshes, Remove Shape from Arch, Close Holes, Merge Walls, Check, Toggle IFC Brep flag, 3 Views from mesh, Create IFC spreadsheet, Toggle Subcomponents
- Additional: Preferences, Import Export Preferences (IFC, DAE, OBJ, JSON, 3DS, SHP), IfcOpenShell, IfcPlusPlus, Arch API
- Начинающим
- Установка: Загрузка, Windows, Linux, Mac, Дополнительных компонентов, Docker, AppImage, Ubuntu Snap
- Базовая: О FreeCAD, Интерфейс, Навигация мыши, Методы выделения, Имя объекта, Настройки, Верстаки, Структура документа, Свойства, Помоги FreeCAD, Пожертвования
- Помощь: Учебники, Видео учебники
- Верстаки: Std Base, Arch, Assembly, CAM, Draft, FEM, Inspection, Mesh, OpenSCAD, Part, PartDesign, Points, Reverse Engineering, Robot, Sketcher, Spreadsheet, Surface, TechDraw, Test Framework
