TechDraw DiameterDimension/ro: Difference between revisions
m (FuzzyBot moved page TechDraw Dimension Diameter/ro to TechDraw DiameterDimension/ro without leaving a redirect: Part of translatable page "TechDraw Dimension Diameter") |
(Updating to match new version of source page) |
||
| Line 9: | Line 9: | ||
}} |
}} |
||
| ⚫ | |||
<div class="mw-translate-fuzzy"> |
|||
| ⚫ | |||
</div> |
|||
<div class="mw-translate-fuzzy"> |
|||
==Descriere== |
==Descriere== |
||
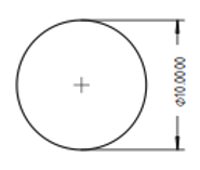
Instrumentul pentru cote tip diametrue adaugă o cotă diametru unei imagini. Cota poate fi aplicată la orice cerc din desen. Distanța va fi inițial distanța proiectată(adică așa cum este reprezentată în desen), dar această distanță poate fi înlocuită prin distanța 3D reală utilizând instrumentul Link Dimension [[Image:LinkDimension.png|24px]]. |
Instrumentul pentru cote tip diametrue adaugă o cotă diametru unei imagini. Cota poate fi aplicată la orice cerc din desen. Distanța va fi inițial distanța proiectată(adică așa cum este reprezentată în desen), dar această distanță poate fi înlocuită prin distanța 3D reală utilizând instrumentul Link Dimension [[Image:LinkDimension.png|24px]]. |
||
[[File:DiameterSample.png|200px|center]] |
[[File:DiameterSample.png|200px|center]] |
||
</div> |
|||
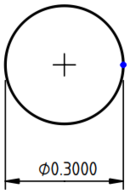
The Dimension Diameter tool adds a diameter dimension to a View. The dimension may be applied to any circular in the drawing. The distance will initially be the projected distance (ie as shown on the drawing), but this may be changed to the actual 3D distance using the {{Button|[[Image:TechDraw_Dimension_Link.svg|16px]] [[TechDraw_Dimension_Link|Link Dimension]]}} tool. |
The Dimension Diameter tool adds a diameter dimension to a View. The dimension may be applied to any circular in the drawing. The distance will initially be the projected distance (ie as shown on the drawing), but this may be changed to the actual 3D distance using the {{Button|[[Image:TechDraw_Dimension_Link.svg|16px]] [[TechDraw_Dimension_Link|Link Dimension]]}} tool. |
||
| Line 24: | Line 20: | ||
{{Caption|Measuring a circle, indicating the diameter}} |
{{Caption|Measuring a circle, indicating the diameter}} |
||
<div class="mw-translate-fuzzy"> |
|||
==Cum se folosește== |
==Cum se folosește== |
||
# Selectați un cerc sau un arc de cerc în desen. (Notați că anumite arce de cerc apar ca fiind circulare dar de fapt sunt elipse sau curbe BSplines. Nu puteți realiza diametru dimension în aceste cazuri) |
# Selectați un cerc sau un arc de cerc în desen. (Notați că anumite arce de cerc apar ca fiind circulare dar de fapt sunt elipse sau curbe BSplines. Nu puteți realiza diametru dimension în aceste cazuri) |
||
# Apăsați butonul {{KEY|[[Image:Dimension_Diameter.png|24px]] [[TechDraw Dimension Diameter|Dimension Diameter]]}} |
# Apăsați butonul {{KEY|[[Image:Dimension_Diameter.png|24px]] [[TechDraw Dimension Diameter|Dimension Diameter]]}} |
||
# O cotă/distanță va fi adăugată în View. Cota poate fi glisată până în poziția dorită. |
# O cotă/distanță va fi adăugată în View. Cota poate fi glisată până în poziția dorită. |
||
</div> |
|||
# Select a circular edge in the drawing. (Note some arcs which appear to be circular are actually ellipses or BSplines. You cannot make a diameter dimension in these cases) |
# Select a circular edge in the drawing. (Note some arcs which appear to be circular are actually ellipses or BSplines. You cannot make a diameter dimension in these cases) |
||
| Line 42: | Line 36: | ||
Dimension objects are vulnerable to "topological naming" issues. See the information in the [[TechDraw_Dimension_Length|TechDraw Dimension Length]] tool for more information. |
Dimension objects are vulnerable to "topological naming" issues. See the information in the [[TechDraw_Dimension_Length|TechDraw Dimension Length]] tool for more information. |
||
<div class="mw-translate-fuzzy"> |
|||
==Proprietăți== |
==Proprietăți== |
||
This object has the same properties as the [[TechDraw Dimension Length/ro|TechDraw Dimension Length]] tool. See that tool for details. |
This object has the same properties as the [[TechDraw Dimension Length/ro|TechDraw Dimension Length]] tool. See that tool for details. |
||
</div> |
|||
This object has the same properties as the [[TechDraw_Dimension_Length|TechDraw Dimension Length]] tool. See that tool for details. |
This object has the same properties as the [[TechDraw_Dimension_Length|TechDraw Dimension Length]] tool. See that tool for details. |
||
<div class="mw-translate-fuzzy"> |
|||
==Script== |
==Script== |
||
Cotele tip diametru pot fi adăugate la Pages utilizând Python. |
Cotele tip diametru pot fi adăugate la Pages utilizând Python. |
||
</div> |
|||
{{Emphasis|See also:}} [[TechDraw_API|TechDraw API]] and [[FreeCAD_Scripting_Basics|FreeCAD Scripting Basics]]. |
{{Emphasis|See also:}} [[TechDraw_API|TechDraw API]] and [[FreeCAD_Scripting_Basics|FreeCAD Scripting Basics]]. |
||
Revision as of 13:06, 15 September 2021
!!FUZZY!!
|
|
| Menu location |
|---|
| TechDraw → Dimension Diameter |
| Workbenches |
| TechDraw |
| Default shortcut |
| None |
| Introduced in version |
| - |
| See also |
| None |
Descriere
Instrumentul pentru cote tip diametrue adaugă o cotă diametru unei imagini. Cota poate fi aplicată la orice cerc din desen. Distanța va fi inițial distanța proiectată(adică așa cum este reprezentată în desen), dar această distanță poate fi înlocuită prin distanța 3D reală utilizând instrumentul Link Dimension ![]() .
.

The Dimension Diameter tool adds a diameter dimension to a View. The dimension may be applied to any circular in the drawing. The distance will initially be the projected distance (ie as shown on the drawing), but this may be changed to the actual 3D distance using the Link Dimension tool.
Measuring a circle, indicating the diameter
Cum se folosește
- Selectați un cerc sau un arc de cerc în desen. (Notați că anumite arce de cerc apar ca fiind circulare dar de fapt sunt elipse sau curbe BSplines. Nu puteți realiza diametru dimension în aceste cazuri)
- Apăsați butonul File:Dimension Diameter.png Dimension Diameter
- O cotă/distanță va fi adăugată în View. Cota poate fi glisată până în poziția dorită.
- Select a circular edge in the drawing. (Note some arcs which appear to be circular are actually ellipses or BSplines. You cannot make a diameter dimension in these cases)
- Press the
Dimension Diameter button
- A dimension will be added to the View. The dimension may be dragged to the desired position.
- If needed, add tolerances as described in this page.
To change the properties of a dimension object either double-clicking it in the drawing or in the Tree view. This will open the dimension dialog.
Limitations
Dimension objects are vulnerable to "topological naming" issues. See the information in the TechDraw Dimension Length tool for more information.
Proprietăți
This object has the same properties as the TechDraw Dimension Length tool. See that tool for details.
This object has the same properties as the TechDraw Dimension Length tool. See that tool for details.
Script
Cotele tip diametru pot fi adăugate la Pages utilizând Python.
See also: TechDraw API and FreeCAD Scripting Basics.
The Dimension Diameter tool can be used in macros and from the Python console by using the following functions:
dim1 = FreeCAD.ActiveDocument.addObject('TechDraw::DrawViewDimension','Dimension')
dim1.Type = "Diameter"
dim1.References2D=[(view1, 'Edge1')]
rc = page.addView(dim1)
- Pages: Insert Default Page, Insert Page using Template, Redraw Page, Print All Pages
- Views: Insert View, Insert Active View, Insert Projection Group, Insert Section View, Insert Complex Section View, Insert Detail View, Insert Draft Workbench Object, Insert Arch Workbench Object, Insert Spreadsheet View, Insert Clip Group, Share View, Project Shape
- Stacking: Move view to top of stack, Move view to bottom of stack, Move view up one level, Move view down one level
- Decorations: Hatch Face using Image File, Apply Geometric Hatch to Face, Insert SVG Symbol, Insert Bitmap Image, Turn View Frames On/Off
- Dimensions: Insert Length Dimension, Insert Horizontal Dimension, Insert Vertical Dimension, Insert Radius Dimension, Insert Diameter Dimension, Insert Angle Dimension, Insert 3-Point Angle Dimension, Insert Horizontal Extent Dimension, Insert Vertical Extent Dimension, Link Dimension to 3D Geometry, Insert Balloon Annotation, Insert Axonometric Length Dimension, Insert Landmark Dimension, Adjust Geometric References of Dimension
- Annotations: Insert Annotation, Add Leaderline to View, Insert Rich Text Annotation, Add Cosmetic Vertex, Add Midpoint Vertices, Add Quadrant Vertices, Add Centerline to Faces, Add Centerline between 2 Lines, Add Centerline between 2 Points, Add Cosmetic Line Through 2 points, Add Cosmetic Circle, Change Appearance of Lines, Show/Hide Invisible Edges, Add Welding Information to Leader, Add Surface Finish Symbol, Add Hole or Shaft Tolerances
- Extensions:
- Attributes and modifications: Select Line Attributes, Cascade Spacing and Delta Distance, Change Line Attributes, Extend Line, Shorten Line, Lock/Unlock View, Position Section View, Position Horizontal Chain Dimensions, Position Vertical Chain Dimensions, Position Oblique Chain Dimensions, Cascade Horizontal Dimensions, Cascade Vertical Dimensions, Cascade Oblique Dimensions, Calculate the area of selected faces, Calculate the arc length of selected edges, Customize format label
- Centerlines and threading: Add Circle Centerlines, Add Bolt Circle Centerlines, Add Cosmetic Thread Hole Side View, Add Cosmetic Thread Hole Bottom View, Add Cosmetic Thread Bolt Side View, Add Cosmetic Thread Bolt Bottom View, Add Cosmetic Intersection Vertex(es), Add an offset vertex, Add Cosmetic Circle, Add Cosmetic Arc, Add Cosmetic Circle 3 Points, Add Cosmetic Parallel Line, Add Cosmetic Perpendicular Line
- Dimensions: Create Horizontal Chain Dimensions, Create Vertical Chain Dimensions, Create Oblique Chain Dimensions, Create Horizontal Coordinate Dimensions, Create Vertical Coordinate Dimensions, Create Oblique Coordinate Dimensions, Create Horizontal Chamfer Dimension, Create Vertical Chamfer Dimension, Create Arc Length Dimension, Insert '⌀' Prefix, Insert '〼' Prefix, Remove Prefix, Increase Decimal Places, Decrease Decimal Places
- Export: Export Page as SVG, Export Page as DXF
- Additional: Line Groups, Templates, Hatching, Geometric dimensioning and tolerancing, Preferences
- Getting started
- Installation: Download, Windows, Linux, Mac, Additional components, Docker, AppImage, Ubuntu Snap
- Basics: About FreeCAD, Interface, Mouse navigation, Selection methods, Object name, Preferences, Workbenches, Document structure, Properties, Help FreeCAD, Donate
- Help: Tutorials, Video tutorials
- Workbenches: Std Base, Arch, Assembly, CAM, Draft, FEM, Inspection, Mesh, OpenSCAD, Part, PartDesign, Points, Reverse Engineering, Robot, Sketcher, Spreadsheet, Surface, TechDraw, Test Framework
- Hubs: User hub, Power users hub, Developer hub
