Std ToggleClipPlane/sv: Difference between revisions
(Updating to match new version of source page) |
(Updating to match new version of source page) |
||
| Line 5: | Line 5: | ||
|[[Std_TextureMapping|TextureMapping]] |
|[[Std_TextureMapping|TextureMapping]] |
||
|[[Std_View_Menu|Std View Menu]] |
|[[Std_View_Menu|Std View Menu]] |
||
|IconL= |
|IconL=Std_AxisCross.svg |
||
|IconR= |
|IconR=Std_TextureMapping.svg |
||
|IconC=Freecad.svg |
|IconC=Freecad.svg |
||
}} |
}} |
||
| Line 26: | Line 26: | ||
==Usage== |
==Usage== |
||
# Select the {{MenuCommand|View → Clipping plane}} option from the menu. |
# Select the {{MenuCommand|View → [[Image:Std_ToggleClipPlane.svg|16px]] Clipping plane}} option from the menu. |
||
# In the Clipping task panel do one of the following: |
# In the Clipping task panel do one of the following: |
||
#* Check one or more of the {{CheckBox|TRUE|Clipping X}} to {{CheckBox|TRUE|Clipping Z}} checkboxes. |
#* Check one or more of the {{CheckBox|TRUE|Clipping X}} to {{CheckBox|TRUE|Clipping Z}} checkboxes. |
||
| Line 43: | Line 43: | ||
* To clearly distinguish the interior of partially clipped objects change their {{PropertyView|Lighting}} property to 'One side'. The color of the interior side of their faces will then depend on the backlight settings: {{MenuCommand|Edit → Preferences... → Display → 3D View → Backlight color - Intensity}}. See [[Preferences_Editor#3D_View|Preferences Editor]]. |
* To clearly distinguish the interior of partially clipped objects change their {{PropertyView|Lighting}} property to 'One side'. The color of the interior side of their faces will then depend on the backlight settings: {{MenuCommand|Edit → Preferences... → Display → 3D View → Backlight color - Intensity}}. See [[Preferences_Editor#3D_View|Preferences Editor]]. |
||
{{Docnav |
{{Docnav |
||
| Line 48: | Line 49: | ||
|[[Std_TextureMapping|TextureMapping]] |
|[[Std_TextureMapping|TextureMapping]] |
||
|[[Std_View_Menu|Std View Menu]] |
|[[Std_View_Menu|Std View Menu]] |
||
|IconL= |
|IconL=Std_AxisCross.svg |
||
|IconR= |
|IconR=Std_TextureMapping.svg |
||
|IconC=Freecad.svg |
|IconC=Freecad.svg |
||
}} |
}} |
||
Revision as of 15:02, 6 January 2021
|
Std ClippingPlane |
| Menyplacering |
|---|
| View → Clipping plane |
| Arbetsbänkar |
| All |
| Standard genväg |
| Ingen |
| Introducerad i version |
| - |
| Se även |
| Ingen |
Description
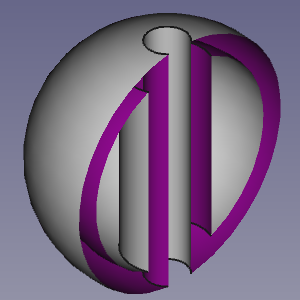
The Std ToggleClipPlane command temporarily hides objects and parts of objects on one side of up to three virtual planes in the active 3D view.
A clipped hollow object
File:Std ToggleClipPlane taskpanel.png
The Clipping task panel
Usage
- Select the View →
Clipping plane option from the menu.
- In the Clipping task panel do one of the following:
- Check one or more of the
Clipping X to
Clipping Z checkboxes.
- Optionally change the offset distance(s).
- Optionally press the Flip button(s) to change the side of the clipping plane objects are hidden on.
- Check the
Clipping custom direction checkbox.
- Optionally change the offset distance.
- Do one of the following:
- Check one or more of the
- Optionally change the view to inspect the model.
- Press the Close button to close the task panel and finish the command.
Notes
- To clearly distinguish the interior of partially clipped objects change their VyLighting property to 'One side'. The color of the interior side of their faces will then depend on the backlight settings: Edit → Preferences... → Display → 3D View → Backlight color - Intensity. See Preferences Editor.
- File: New, Open, Close, Close All, Save, Save As, Save a Copy, Save All, Revert, Import, Export,Merge project, Project information, Print, Print preview, Export PDF, Recent files, Exit
- Edit: Undo, Redo, Cut, Copy, Paste, Duplicate selection, Refresh, Box selection, Box element selection, Select All, Delete, Send to Python Console, Placement, Transform, Alignment, Toggle Edit mode, Edit mode, Preferences
- View:
- Miscellaneous: Create new view, Orthographic view, Perspective view, Fullscreen, Bounding box, Toggle axis cross, Clipping plane, Texture mapping, Toggle navigation/Edit mode, Appearance, Random color, Workbench, Status bar
- Standard views: Fit all, Fit selection, Isometric, Dimetric, Trimetric, Home, Front, Top, Right, Rear, Bottom, Left, Rotate Left, Rotate Right
- Freeze display: Save views, Load views, Freeze view, Clear views
- Draw style: As is, Points, Wireframe, Hidden line, No shading, Shaded, Flat lines
- Stereo: Stereo red/cyan, Stereo quad buffer, Stereo Interleaved Rows, Stereo Interleaved Columns, Stereo Off, Issue camera position
- Zoom: Zoom In, Zoom Out, Box zoom
- Document window: Docked, Undocked, Fullscreen
- Visibility: Toggle visibility, Show selection, Hide selection, Select visible objects, Toggle all objects, Show all objects, Hide all objects, Toggle selectability, Toggle measurement, Clear measurement
- Toolbars: File, Edit, Clipboard, Workbench, Macro, View, Structure, Help
- Panels: Tree view, Property view, Selection view, Tasks, Python console, DAG view, Model, Report view
- Link navigation: Go to linked object, Go to the deepest linked object, Select all links
- Tree view actions: Sync view, Sync selection, Sync placement, Pre-selection, Record selection, Single document, Multi document, Collapse/Expand, Initiate dragging, Go to selection, Selection Back, Selection Forward
- Tools: Edit parameters, Save image, Load image, Scene inspector, Dependency graph, Project utility, Measure distance, Add text document, View turntable, Units calculator, Customize, Addon manager
- Macro: Macro recording, Macros, Recent macros, Execute macro, Attach to remote debugger, Debug macro, Stop debugging, Step over, Step into, Toggle breakpoint
- Help: Help, FreeCAD Website, Donate, Users documentation, Python scripting documentation, Automatic Python modules documentation, FreeCAD Forum, FreeCAD FAQ, Report a bug, About FreeCAD, What's This
- Getting started
- Installation: Download, Windows, Linux, Mac, Additional components, Docker, AppImage, Ubuntu Snap
- Basics: About FreeCAD, Interface, Mouse navigation, Selection methods, Object name, Preferences, Workbenches, Document structure, Properties, Help FreeCAD, Donate
- Help: Tutorials, Video tutorials
- Workbenches: Std Base, Arch, Assembly, CAM, Draft, FEM, Inspection, Mesh, OpenSCAD, Part, PartDesign, Points, Reverse Engineering, Robot, Sketcher, Spreadsheet, Surface, TechDraw, Test Framework
- Hubs: User hub, Power users hub, Developer hub
