Cubo de Navegação
Introduction
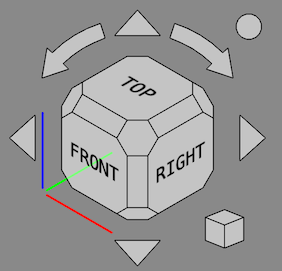
O controle do cubo de navegação, ou 'cubo de navegação, é uma ajuda gráfica de interface com o usuário para reorientar a visualização 3D. Por padrão, ele é visível e reside no canto superior direito da tela 3D. Se você estiver olhando para a vista 3D padrão, ela se parece com o seguinte:
O cubo de navegação é composto de várias partes:
- Setas direcionais
- Cubo de navegação principal
- Menu mini-cubo
All parts, except the axis indicators, can be clicked.
Usage
Main cube
The main cube has 26 faces: 6 main faces, 12 rectangular edge faces (introduced in version 0.20), and 8 corner faces. Clicking any of them will reorient the camera so that its direction is perpendicular to the selected face.
Setas direcionais
Há seis setas direcionais: quatro setas triangulares, na parte superior, inferior, esquerda e direita; e duas setas curvas, uma de cada lado da seta superior.
Reverse view button
Clicking the round button in the top right corner of the Navigation Cube will rotate the 3D view 180 degrees around the vertical axis of the view.
Menu mini-cubo
No canto inferior direito do cubo de navegação está um pequeno cubo. Clicando neste cubo, aparecerá um menu que você pode usar para mudar o tipo de vista (Ortográfica, Perspectiva, Isométrica) e para "Zoom to Fit".
Customization
Você pode mover toda a estrutura de controle do cubo de navegação para outro local na tela 3D, pressionando o mouse em qualquer lugar no cubo de navegação principal e arrastando. A estrutura não começará a se mover até que o ponteiro do mouse tenha passado a borda do cubo de navegação principal.
Preferences
O cubo de navegação é configurável, incluindo o ajuste de seu tamanho: Editar → Preferências... → Tela → Navegação → Cubo de Navegação introduced in version 0.19.
Advanced parameters
Some advanced Navigation Cube parameters cannot be changed in the Preferences Editor. These parameters can be set manually in the Parameter editor or via the CubeMenu external workbench. Changes will become visible when a new 3D view is created (with Std New, Std Open or Std ViewCreate).
To manually set colors:
- Start the
Parameter editor.
- In the panel on the left browse to BaseApp → Preferences → NaviCube.
- Right-click the panel on the right and select New unsigned item from the context menu.
- Enter the name of one of these colors:
- BorderColor: the lines separating the cube faces, default is
842150655(hex:323232ff). - ButtonColor: all elements around the cube, default is
3806916480(hex:e2e9ef80). - FrontColor: all cube faces, default is
3806916544(hex:e2e9efc0). - HiliteColor: the cube or arrow face that is currently highlighted, default is
2867003391(hex:aae2ffff). - TextColor: the text on the cube faces, default is
255(hex:000000ff).
- BorderColor: the lines separating the cube faces, default is
- The color value must be entered as a 32-bit unsigned integer. Translated to the hexadecimal format this integer has the form
RRGGBBAA. WhereAAstands for the alpha channel (a measure for the transparency), and the other three digit pairs stand for red, green and blue. To convert a hexadecimal value to an unsigned integer you can use the Python console, enter for exampleint("323232ff", 16), or an online service such as this one. - Optionally set more colors.
- Press the Close button.
To manually set the border width:
- Start the
Parameter editor.
- In the panel on the left browse to BaseApp → Preferences → NaviCube.
- Right-click the panel on the right and select New float item from the context menu.
- Enter the name BorderWidth,
default is 1.1. - Enter the width.
- Press the Close button.
- Getting started
- Installation: Download, Windows, Linux, Mac, Additional components, Docker, AppImage, Ubuntu Snap
- Basics: About FreeCAD, Interface, Mouse navigation, Selection methods, Object name, Preferences, Workbenches, Document structure, Properties, Help FreeCAD, Donate
- Help: Tutorials, Video tutorials
- Workbenches: Std Base, Arch, Assembly, CAM, Draft, FEM, Inspection, Mesh, OpenSCAD, Part, PartDesign, Points, Reverse Engineering, Robot, Sketcher, Spreadsheet, Surface, TechDraw, Test Framework
- Hubs: User hub, Power users hub, Developer hub
