Robot Edge2Trac/es: Difference between revisions
(Updating to match new version of source page) |
(Updating to match new version of source page) |
||
| (4 intermediate revisions by the same user not shown) | |||
| Line 1: | Line 1: | ||
<languages/> |
<languages/> |
||
{{Docnav|[[Robot_InsertWaypointPre|Insert a waypoint Pre]]|[[Robot_TrajectoryDressUp|Dress-up a trajectory]]|[[Robot_Workbench|Robot]]|IconL=Robot_InsertWaypointPre.png|IconC=Workbench_Robot.svg|IconR=Robot_TrajectoryDressUp.png}} |
|||
{{Docnav |
|||
|[[Robot_InsertWaypointPre|Insert a waypoint preselected]] |
|||
|[[Robot_TrajectoryDressUp|Dress-up a trajectory]] |
|||
|[[Robot_Workbench|Robot]] |
|||
|IconL=Robot_InsertWaypointPre.svg |
|||
|IconR=Robot_TrajectoryDressUp.svg |
|||
|IconC=Workbench_Robot.svg |
|||
}} |
|||
<div class="mw-translate-fuzzy"> |
|||
{{GuiCommand/es|Name=Robot Edge2Trac|Name/es=Robot Edge2Trac|Workbenches=[[Robot_Workbench/es|Robot]]|MenuLocation=Robot → Edge to trajectory}} |
{{GuiCommand/es|Name=Robot Edge2Trac|Name/es=Robot Edge2Trac|Workbenches=[[Robot_Workbench/es|Robot]]|MenuLocation=Robot → Edge to trajectory}} |
||
</div> |
|||
| ⚫ | |||
| ⚫ | |||
Insert a new object which decompose edges to a trajectory. |
Insert a new object which decompose edges to a trajectory. |
||
| ⚫ | |||
| ⚫ | |||
| ⚫ | |||
| ⚫ | |||
| ⚫ | |||
| ⚫ | |||
| ⚫ | |||
| ⚫ | |||
| ⚫ | |||
| ⚫ | |||
| ⚫ | |||
| ⚫ | |||
| ⚫ | |||
| ⚫ | |||
| ⚫ | |||
<br /> |
|||
| ⚫ | |||
<br /> |
|||
| ⚫ | |||
<br /> |
|||
| ⚫ | |||
| ⚫ | |||
| ⚫ | |||
| ⚫ | |||
| ⚫ | |||
{{Docnav|[[Robot_InsertWaypointPre|Insert a waypoint Pre]]|[[Robot_TrajectoryDressUp|Dress-up a trajectory]]|[[Robot_Workbench|Robot]]|IconL=Robot_InsertWaypointPre.png|IconC=Workbench_Robot.svg|IconR=Robot_TrajectoryDressUp.png}} |
|||
| ⚫ | |||
{{Docnav |
|||
| ⚫ | |||
|[[Robot_InsertWaypointPre|Insert a waypoint preselected]] |
|||
|[[Robot_TrajectoryDressUp|Dress-up a trajectory]] |
|||
|[[Robot_Workbench|Robot]] |
|||
|IconL=Robot_InsertWaypointPre.svg |
|||
|IconR=Robot_TrajectoryDressUp.svg |
|||
|IconC=Workbench_Robot.svg |
|||
}} |
|||
| ⚫ | |||
{{clear}} |
|||
| ⚫ | |||
Latest revision as of 13:38, 3 August 2022
|
|
| Ubicación en el Menú |
|---|
| Robot → Edge to trajectory |
| Entornos de trabajo |
| Robot |
| Atajo de teclado por defecto |
| Ninguno |
| Introducido en versión |
| - |
| Ver también |
| Ninguno |
Description
Insert a new object which decompose edges to a trajectory.
Usage
- Select edges of shapes/solids
- Click on
or choose Robot →
Edge to Trajectory... from the top menu.
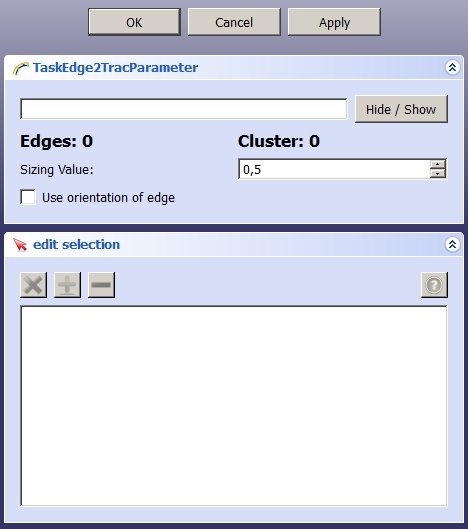
- A menu will pop up in the Task panel
- In the top white box there will be displayed the name of the shape/solid present in the scene.
- By selecting edges they will appear with their name in the lowest white box.
- By clicking on Apply the entries "Edges" and "Cluster" will turn green and the numbers beside them will show how many elements were recognized.
- By clicking on OK you will close this dialog.
Notes
You are able to change values for this trajectory by defining a Trajectory Dress-up.
- Trajectories, non parametric: Create a trajectory, Set default orientation, Set default values, Insert waypoint, Insert waypoint (mouse)
- Trajectories, parametric: Create a trajectory from edges, Dress-up trajectory, Trajectory compound
- Getting started
- Installation: Download, Windows, Linux, Mac, Additional components, Docker, AppImage, Ubuntu Snap
- Basics: About FreeCAD, Interface, Mouse navigation, Selection methods, Object name, Preferences, Workbenches, Document structure, Properties, Help FreeCAD, Donate
- Help: Tutorials, Video tutorials
- Workbenches: Std Base, Arch, Assembly, CAM, Draft, FEM, Inspection, Mesh, OpenSCAD, Part, PartDesign, Points, Reverse Engineering, Robot, Sketcher, Spreadsheet, Surface, TechDraw, Test Framework
- Hubs: User hub, Power users hub, Developer hub
