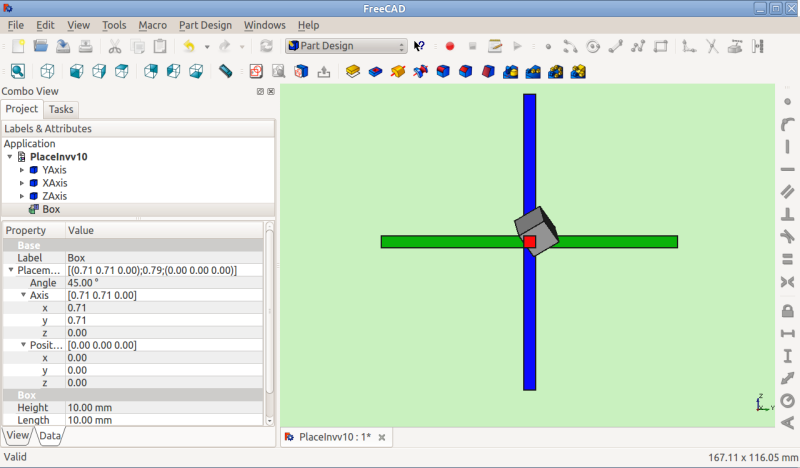
Placement/zh-cn: Difference between revisions
No edit summary |
(Updating to match new version of source page) |
||
| (30 intermediate revisions by 2 users not shown) | |||
| Line 1: | Line 1: | ||
<languages/> |
<languages/> |
||
==Overview== |
|||
<div class="mw-translate-fuzzy"> |
|||
==概述== |
==概述== |
||
'''Placement'''是用户在FreeCAD中指定目标对象在空间中位置与姿态(朝向)的手段。指定方位属性的方式多种多样,例如通过 [[Python_scripting_tutorial#Vectors_and_Placements|脚本]]、属性面板或'''Placement'''对话框(位于'''Edit'''菜单中)。 |
'''Placement'''是用户在FreeCAD中指定目标对象在空间中位置与姿态(朝向)的手段。指定方位属性的方式多种多样,例如通过 [[Python_scripting_tutorial#Vectors_and_Placements|脚本]]、属性面板或'''Placement'''对话框(位于'''Edit'''菜单中)。 |
||
| Line 5: | Line 9: | ||
===访问定位属性=== |
===访问定位属性=== |
||
可通过下列3种方式来调整目标对象的方位Placement属性: |
可通过下列3种方式来调整目标对象的方位Placement属性: |
||
</div> |
|||
===Accessing the Placement Attribute=== |
|||
An object's Placement attributes can be accessed and modified in 3 ways: |
|||
<div class="mw-translate-fuzzy"> |
|||
[[Image:PlacementPropertiesv10-800x800.png|frame|left|位于属性面板中的方位属性]] |
[[Image:PlacementPropertiesv10-800x800.png|frame|left|位于属性面板中的方位属性]] |
||
{{clear}} |
{{clear}} |
||
</div> |
|||
<div class="mw-translate-fuzzy"> |
|||
[[Image:PlacePyConv10.png|frame|left|以脚本的方式利用y/p/r参数、矩阵与[[Placement_API|定位API]]来调整方位属性。]] |
[[Image:PlacePyConv10.png|frame|left|以脚本的方式利用y/p/r参数、矩阵与[[Placement_API|定位API]]来调整方位属性。]] |
||
{{clear}} |
{{clear}} |
||
</div> |
|||
[[Image:PlacementDialogv10.png|frame|left|Placement task panel]] |
|||
{{clear}} |
|||
==Forms of Placement== |
|||
<div class="mw-translate-fuzzy"> |
|||
[[Image:PlacementDialogv10.png|frame|left|采用Rotation axis with angle选项的方位对话框]] |
[[Image:PlacementDialogv10.png|frame|left|采用Rotation axis with angle选项的方位对话框]] |
||
{{clear}} |
{{clear}} |
||
| Line 17: | Line 36: | ||
==指定方位的方式== |
==指定方位的方式== |
||
方位属性在内部实现会存作位置、旋转(旋转轴与旋转角度会被转换为对应的四元数[https://en.wikipedia.org/wiki/Quaternions_and_spatial_rotation])两种属性。指定旋转有若干种方式,例如,若指定了一个旋转中心,这将仅会对旋转计算造成影响,而并不会为后续计算而存储此值。类似地,如果指定了旋转轴(1,1,1),可能会在把它保存于一个四元数中的时候将其进行归一化处理,从而在后续浏览此对象时,其值将表现为(0.58, 0.58, 0.58)。 |
方位属性在内部实现会存作位置、旋转(旋转轴与旋转角度会被转换为对应的四元数[https://en.wikipedia.org/wiki/Quaternions_and_spatial_rotation])两种属性。指定旋转有若干种方式,例如,若指定了一个旋转中心,这将仅会对旋转计算造成影响,而并不会为后续计算而存储此值。类似地,如果指定了旋转轴(1,1,1),可能会在把它保存于一个四元数中的时候将其进行归一化处理,从而在后续浏览此对象时,其值将表现为(0.58, 0.58, 0.58)。 |
||
</div> |
|||
===Angle, Axis and Position=== |
|||
<div class="mw-translate-fuzzy"> |
|||
===Angle,Axis与Position属性=== |
===Angle,Axis与Position属性=== |
||
'''Placement = [Angle, Axis, Position]''' |
'''Placement = [Angle, Axis, Position]''' |
||
</div> |
|||
<div class="mw-translate-fuzzy"> |
|||
这种指定'''Placement'''的第一种形式,将以Position来修改对象的空间位置,再以绕Axis的单个旋转操作来描述其朝向。 |
这种指定'''Placement'''的第一种形式,将以Position来修改对象的空间位置,再以绕Axis的单个旋转操作来描述其朝向。 |
||
'''Angle = r'''为一标量,表示目标对象绕Axis所旋转的角度。用户输入的是角度,而实际内部存储用的是弧度制。 |
'''Angle = r'''为一标量,表示目标对象绕Axis所旋转的角度。用户输入的是角度,而实际内部存储用的是弧度制。 |
||
</div> |
|||
'''Angle = r''' is a scalar indicating the amount of rotation of the object about '''Axis'''. Entered as degrees, but stored internally as radians. |
|||
<div class="mw-translate-fuzzy"> |
|||
'''Axis = (ax,ay,az)'''是一个向量,描述的是旋转轴(参见关于旋转轴的备注)。以下为示例: |
'''Axis = (ax,ay,az)'''是一个向量,描述的是旋转轴(参见关于旋转轴的备注)。以下为示例: |
||
(1,0,0) ==> |
(1,0,0) ==> 绕'''X'''轴旋转 |
||
(0,1,0) ==> |
(0,1,0) ==> 绕'''Y'''轴旋转 |
||
(0,0,1) ==> |
(0,0,1) ==> 绕'''Z'''轴旋转 |
||
(0.71,0.71,0) ==> |
(0.71,0.71,0) ==> 绕直线'''y=x'''旋转 |
||
</div> |
|||
(1,0,0) ==> about '''X''' axis |
|||
Note that it is also possible to translate (move) an object along this axis of rotation (axial motion) by entering the distance to move in the Axial spinbox and clicking the Apply axial button. (One way to envision axial motion is to think of an airplane with a propeller spinning on its nose -- the propeller spins '''about''' an axis of rotation while the plane moves '''along''' that same axis.) The values in the vector can be thought of as the relative amount of motion that will be applied in that direction. For example, in the y=x case (0.71,0.71,0) the value contained in the Axial spinbox gets applied in equal measure to the X and Y directions, but no movement happens in the Z direction. |
|||
(0,1,0) ==> about '''Y''' axis |
|||
(0,0,1) ==> about '''Z''' axis |
|||
(0.71,0.71,0) ==> about the line '''y=x''' |
|||
<div class="mw-translate-fuzzy"> |
|||
请注意,也可以令对象沿此旋转轴进行平移(移动,轴向移动),方法是:在Axial框中输入移动距离,再点击Apply axial按钮。(可以这样来想象此轴向移动操作:假设有一附有前置螺旋桨的飞机——飞行时,螺旋桨“绕”旋转轴转动,而飞机整体则“沿”此轴飞行。)可将此向量中的值看作是应用于对应方向的移动量。例如,在(0.71,0.71,0)这种y=x的情况下,对象将按Axial框中的值在X与Y方向上进行相同量的移动,且不会在Z方向上移动。 |
|||
'''Position = (x,y,z)'''是一个向量,描述目标对象几何体的位置(事实上,对于对象而言,此为其“局部原点(local origin)”)。请注意,在脚本里用Placement.Base来表示方位属性中的Position分量。属性编辑器称此值为"Position",Placement对话框中则称之为"Translation"。 |
|||
'''Position = (x,y,z)''' is a Vector describing the point from which the object's geometry will be calculated (in effect, a "local origin" for the object). Note that in scripts, Placement.Base is used to denote the Position component of a placement. The Property Editor calls this value "Position" and the Placement dialog calls it "Translation". |
|||
</div> |
|||
'''Position = (x,y,z)''' is a Vector describing the point from which the object's geometry will be calculated (in effect, a "local origin" for the object). Note that in scripts, Placement.Base is used to denote the Position component of a placement. The property editor calls this value '''Position''' and the Placement task panel calls it '''Translation'''. |
|||
===Position and Yaw, Pitch and Roll=== |
===Position and Yaw, Pitch and Roll=== |
||
[[Image:PlacementDialogv10b.png|frame|left|Placement Dialog Euler angles]] |
|||
<div class="mw-translate-fuzzy"> |
|||
===Position与Yaw,Pitch与Roll=== |
|||
[[Image:PlacementDialogv10b.png|frame|left|采用Euler angles选项的方位对话框]] |
|||
{{clear}} |
{{clear}} |
||
'''Placement = [Position, Yaw-Pitch-Roll]''' |
|||
</div> |
|||
'''Placement = [Position, Yaw-Pitch-Roll]''' |
'''Placement = [Position, Yaw-Pitch-Roll]''' |
||
<div class="mw-translate-fuzzy"> |
|||
The second form of '''Placement''' fixes an object's location in space with a Position (as in the first form), but describes it's orientation using Yaw, Pitch and Roll angles ([http://en.wikipedia.org/wiki/Yaw,_pitch,_and_roll Yaw, Pitch, Roll]). These angles are sometimes referred to as Euler angles or Tait-Bryan angles ([http://en.wikipedia.org/wiki/Euler_angles Euler angles]). Yaw, Pitch and Roll are common aviation terms for a body's orientation (or attitude). |
|||
这种指定'''Placement'''的第二种形式,除了用Position属性(与第一种形式中的意义相同)来修改目标对象的空间位置之外,还将以Yaw(偏转)、Pitch(俯仰)与Roll(滚动)3种角度([http://en.wikipedia.org/wiki/Yaw,_pitch,_and_roll Yaw, Pitch, Roll])来描述其朝向。这些角度有时被称为欧拉角(Euler angles)或Tait-Bryan角([http://en.wikipedia.org/wiki/Euler_angles 欧拉角])。Yaw、Pitch与Roll为航空学中描述物体朝向(姿态)的常用术语。 |
|||
</div> |
|||
'''Position = (x,y,z)'''为一个向量,描述目标对象几何体的位置(事实上,对于对象而言,此为其“局部原点(local origin)”)。 |
|||
'''Position = (x,y,z)''' is a Vector describing the point from which the object's geometry will be calculated (in effect, a "local origin" for the object). |
|||
<div class="mw-translate-fuzzy"> |
|||
'''Yaw-Pitch-Roll = (y,p,r)''' is a tuple that specifies the attitude of the object. Values for y,p,r specify degrees of rotation about each of the z,y,x axis (see note). |
|||
'''Yaw-Pitch-Roll = (y,p,r)'''是一个指定目标对象姿态的三元组。y、p、r三值分别用于指定对象绕z、y、x三轴旋转的角度(参考备注)。 |
|||
{{clear}} |
{{clear}} |
||
{{Code|code= |
{{Code|code= |
||
>>> App.getDocument("Sans_nom").Cylinder.Placement=App.Placement(App.Vector(0,0,0), App.Rotation(10,20,30), App.Vector(0,0,0)) |
>>> App.getDocument("Sans_nom").Cylinder.Placement=App.Placement(App.Vector(0,0,0), App.Rotation(10,20,30), App.Vector(0,0,0)) |
||
}} |
}} |
||
</div> |
|||
{{Code|code= |
|||
App.Rotation(10,20,30) = Euler Angle |
|||
>>> App.ActiveDocument.Cylinder.Placement = App.Placement(App.Vector(0,0,0), App.Rotation(10,20,30), App.Vector(0,0,0)) |
|||
}} |
|||
App.Rotation(10,20,30) = 欧拉角 |
|||
'''Yaw''' = 10 degrees ('''Z''') |
|||
''' |
'''Yaw''' = 10度 ('''Z''') |
||
''' |
'''Pitch''' = 20度 ('''Y''') |
||
'''Roll''' = 30度 ('''X''') |
|||
[[Image:Tache_Placement_Lacet_fr_Mini.gif|left]]'''Yaw''' is the rotation about the '''Z axis''', that is to say a rotation from left to right. <br />(The yaw angle is the '''Psi ψ'''). |
|||
{{clear}} |
|||
[[Image: |
[[Image:Tache_Placement_Lacet_fr_Mini.gif|left]]'''Yaw'''为绕'''Z轴'''进行旋转,可以说是从左至右的旋转操作。<br />(Yaw角为'''Psi ψ''')。 |
||
{{clear}} |
{{clear}} |
||
[[Image: |
[[Image:Tache_Placement_Tangage_fr_Mini.gif|left]]'''Pitch'''为绕'''Y轴'''进行旋转,可以说是上仰与下俯。<br />(Pitch角为'''Phi φ''')。 |
||
{{clear}} |
|||
[[Image:Tache_Placement_Roulis_fr_Mini.gif|left]]'''Roll'''为绕'''X轴'''进行旋转,可以说是机翼上下翻转。<br />(Roll角为'''Thêta θ''')。 |
|||
{{clear}} |
{{clear}} |
||
===Matrix=== |
===Matrix=== |
||
<div class="mw-translate-fuzzy"> |
|||
===矩阵=== |
|||
'''Placement = Matrix''' |
'''Placement = Matrix''' |
||
</div> |
|||
第三种指定'''Placement'''的方式是利用一个4x4仿射变换矩阵进行描述([http://en.wikipedia.org/wiki/Affine_transformation 仿射变换])。 |
|||
'''Matrix''' = |
'''Matrix''' = |
||
((r11,r12,r13,t1), |
((r11,r12,r13,t1), |
||
(r21,r22,r23,t2), |
(r21,r22,r23,t2), |
||
(r31,r32,r33,t3), |
(r31,r32,r33,t3), |
||
(0,0,0,1)) , with rij specifying rotation and ti specifying translation. |
(0,0,0,1)) , with rij specifying rotation and ti specifying translation. |
||
{{clear}} |
{{clear}} |
||
==The Placement Dialog== |
==The Placement Dialog== |
||
The Placement Dialog is invoked from the '''Edit''' menu. It is used to precisely rotate/translate objects. It is also used when we need to create a sketch on a "non standard" plane or change a sketch's orientation to a new plane. |
|||
The '''Translation''' section adjusts the object's location in space. |
|||
The '''Center''' section adjusts the rotational axis to one that does not pass through the object's reference point. |
|||
The '''Rotation''' section adjusts the rotational angle(s) and the method of specifying those angles. |
|||
<div class="mw-translate-fuzzy"> |
|||
But while the elements within each section generally apply to the purpose of that section there are also some elements in one section that can affect elements in another section. For example, clicking the Selected points button in the '''Center''' section with 2 points selected in the 3d view results in not only populating the '''Center''' coordinate spinboxes with the coordinates of the midpoint between those 2 selected points, but it also creates a custom axis along the line defined by those 2 selected points in the '''Rotation''' section. In another example, placing a value in the Axial spinbox and clicking the Apply axial button in the '''Translation''' section translates (moves) the object along the axis defined in the '''Rotation''' section. |
|||
==Placement对话框== |
|||
利用'''Edit'''菜单就可以调出Placement对话框。通常用此对话框来精确地旋转/平移对象。另外,它还可用于:在一个“非标准”平面上创建草图,或将一个草图的朝向调整至一个新平面的情况。 |
|||
'''Translation'''部分用于调整对象的空间位置。 |
|||
The '''Apply incremental changes to object placement''' tick box is useful when translations/rotations are to be made relative the object's current position/attitude, rather than to the original position/attitude. Ticking this box resets the dialogue input fields to zero, but does not change the object's orientation or location. Subsequent entries do change the orientation/location, but are applied from the object's current position. Enabling this checkbox is also useful when using the Selected points button as it can sometimes prevent undesired placement changes. |
|||
'''Center'''部分用于将旋转轴调整为并非穿过目标对象参考点(reference point)的旋转轴。 |
|||
'''Rotation'''部分用于调整旋转角以及指定旋转角的具体方式。 |
|||
</div> |
|||
* The '''Translation''' section adjusts the object's location in space. |
|||
* The '''Center''' section adjusts the rotational axis to one that does not pass through the object's reference point. |
|||
* The '''Rotation''' section adjusts the rotational angle(s) and the method of specifying those angles. |
|||
But while the elements within each section generally apply to the purpose of that section there are also some elements in one section that can affect elements in another section. For example, clicking the Selected points button in the '''Center''' section with 2 points selected in the 3d view results in not only populating the '''Center''' coordinate spinboxes with the coordinates of the midpoint between those 2 selected points, but it also creates a custom axis along the line defined by those 2 selected points in the '''Rotation''' section. In another example, placing a value in the Axial spinbox and clicking the Apply axial button in the '''Translation''' section translates (moves) the object along the axis defined in the '''Rotation''' section. |
|||
The '''Apply incremental changes to object placement''' tick box is useful when translations/rotations are to be made relative the object's current position/attitude, rather than to the original position/attitude. Ticking this box resets the dialogue input fields to zero, but does not change the object's orientation or location. Subsequent entries do change the orientation/location, but are applied from the object's current position. Enabling this checkbox is also useful when using the Selected points button as it can sometimes prevent undesired placement changes. |
|||
PS: since version 0.17 introduce new object Part, this object have his placement, and the Placement object created in the Part object is incremented with the Part Placement. {{Version|0.17}} |
PS: since version 0.17 introduce new object Part, this object have his placement, and the Placement object created in the Part object is incremented with the Part Placement. {{Version|0.17}} |
||
For obtain the Part Placement use this code |
|||
To obtain the Part Placement use this code: |
|||
{{Code|code= |
{{Code|code= |
||
import Draft, Part |
import Draft, Part |
||
sel = FreeCADGui.Selection.getSelection() |
sel = FreeCADGui.Selection.getSelection() |
||
print |
print(sel[0].Placement) |
||
print |
print(sel[0].getGlobalPlacement()) # return the GlobalPlacement |
||
print |
print(sel[0].getParentGeoFeatureGroup()) # return the GeoFeatureGroup, ex: Body or a Part. |
||
print |
print("____________________") |
||
}} |
}} |
||
'''Selected points''' button is used to populate the coordinates in the '''Center''' coordinates spinboxes and (when 2 or 3 points are selected) additionally to create a custom (user-defined) axis of rotation in the '''Rotation''' section. |
'''Selected points''' button is used to populate the coordinates in the '''Center''' coordinates spinboxes and (when 2 or 3 points are selected) additionally to create a custom (user-defined) axis of rotation in the '''Rotation''' section. A point can be a vertex, but it can also be any point along an edge or on a face. When you select an edge or face the entire edge or face is selected, but FreeCAD also remembers which point on that face or edge the mouse pointer was hovering over when that edge or face was selected. It is this point's coordinates that get used in the Placement dialog when the '''Selected points''' button is clicked. You might be thinking this isn't a very precise way of selecting a point, and you are correct, but in many cases it is sufficient that the point selected is guaranteed to be on that edge or face. In cases where you need to precisely designate a point to be used you should select a vertex. When there is no vertex in the desired location consider creating one, perhaps in a temporary sketch attached to that face or edge, perhaps using a Draft workbench object, such as a line or point, etc. |
||
Let us first consider the simple case of selecting 1 point. |
Let us first consider the simple case of selecting 1 point. The workflow is to first select the desired point, then click the '''Selected points''' button. The coordinates of the selected point will be used to populate the X, Y, and Z spinboxes within the '''Center''' section. Now any rotation done on the object will about this center of rotation. |
||
Now consider the case of selecting 2 points. |
Now consider the case of selecting 2 points. You would select the 2 desired points, and then click the '''Selected points''' button. The coordinates of the midpoint between the 2 selected points get placed into the X, Y, and Z spinboxes within the '''Center''' section. Now any rotation done on the object will be about this center of rotation. But in addition to setting up the '''Center''' section coordinates a custom (user-defined) axis is also added to the '''Axis''' element within the '''Rotation''' section. (Note: if you were in Euler rotation mode, the mode gets switched to Rotation with an axis mode and the new custom axis is selected as the current axis of rotation.) Now any rotation done using the new custom axis will be about this axis of rotation. As an added bonus, the distance is measured between the 2 selected points, and this information is given in the Report View. (Note: Hold down the Shift key while clicking the '''Selected points''' button to copy the distance measurement to the clipboard.) By entering this distance into the Axial spinbox in the '''Translation''' section and clicking the '''Apply axial''' button you can translate (move) the object so that the first selected point now occupies the coordinates occupied by the second selected point (at the time the '''Selected points''' button was clicked). |
||
Now consider the case of selecting 3 points. |
Now consider the case of selecting 3 points. You would select the 3 desired points, and then click the '''Selected points''' button. The coordinates of the first selected point (order of selection is very important here) get placed into the X, Y, and Z spinboxes within the '''Center''' section. Since 3 points define a plane FreeCAD is able to take advantage of that and use those 3 points to create a new custom (user-defined) axis of rotation that is normal (perpendicular) to that defined plane. As with 2 selected points, the distance between points is also shown in the Report View, but this time it is the distance between the 2nd and 3rd selected points. (Note: Hold down the Shift key while clicking '''Selected points''' button -- Shift + Click -- to copy the angle measurement to the clipboard.) Additionally, the angle between the 2nd and 3rd points is also measured and displayed in the Report View. By entering this angle into the '''Angle''' spinbox within the '''Rotation''' section we can very precisely rotate the object such that now the 2nd selected point is in alignment with the coordinates occupied by the 3rd selected point. (Note: you might want to increase the number of digits used within the Edit menu -> Preferences -> General -> Units -> Number of decimals spinbox if you desire more precision.) |
||
==Examples== |
==Examples== |
||
Rotations about a single axis: |
Rotations about a single axis: |
||
[[Image:RotationAboutZBefore.png|600px|left|Before Rotation]] Before Rotation (top view) |
[[Image:RotationAboutZBefore.png|600px|left|Before Rotation]] Before Rotation (top view) |
||
{{clear}} |
|||
[[Image:RotationAboutZAfter.png|600px|right|After Rotation about Z]] After Rotation about Z (top view) {{clear}} |
|||
[[Image:RotationAboutZAfter.png|600px|right|After Rotation about Z]] After Rotation about Z (top view) |
|||
{{clear}} |
|||
[[Image:RotationAboutYXAfter.png|600px|right|After Rotation about y=x]] After Rotation about y=x (right view) {{clear}} |
|||
[[Image:RotationAboutYXAfter.png|600px|right|After Rotation about y=x]] After Rotation about y=x (right view) |
|||
{{clear}} |
|||
Rotation with offset centre point: |
Rotation with offset centre point: |
||
[[Image:RotationOffsetBefore.png|600px|left|Before Rotation]] Before Rotation (top view) |
[[Image:RotationOffsetBefore.png|600px|left|Before Rotation]] Before Rotation (top view) |
||
{{clear}} |
|||
[[Image:RotationOffsetAfter.png|600px|right|After Rotation about Z]] After Rotation about Z (top view) {{clear}} |
|||
[[Image:RotationOffsetAfter.png|600px|right|After Rotation about Z]] After Rotation about Z (top view) |
|||
{{clear}} |
|||
Rotation using Euler angles: |
Rotation using Euler angles: |
||
[[Image:RotationEulerBefore.png|600px|left|Before Rotation]] |
[[Image:RotationEulerBefore.png|600px|left|Before Rotation]] Before Rotation |
||
{{clear}} |
|||
[[Image:RotationEulerAfter.png|600px|right|After Rotation]] After Rotation {{clear}} |
|||
[[Image:RotationEulerAfter.png|600px|right|After Rotation]] After Rotation |
|||
{{clear}} |
|||
==Placement.Base vs Shape Definition== |
==Placement.Base vs Shape Definition== |
||
Placement is not the only way to position a shape in space. Note the Python console |
|||
in this image: |
|||
Placement is not the only way to position a shape in space. Note the Python console in this image: |
|||
[[Image:2Placements800.png|frame|left|2 Shapes with Same Placement]]{{clear}} |
|||
[[Image:2Placements800.png|frame|left|2 Shapes with Same Placement]] |
|||
{{clear}} |
|||
Both cubes have the same value for Placement, but are in different locations! |
Both cubes have the same value for Placement, but are in different locations! This is because the 2 shapes are defined by different vertices (curves in more complex shapes). For the 2 shapes in the above illustration: |
||
because the 2 shapes are defined by different vertices (curves in more complex shapes). For the 2 shapes in the above illustration: |
|||
>>> ev = App.ActiveDocument.Extrude.Shape.Vertexes |
>>> ev = App.ActiveDocument.Extrude.Shape.Vertexes |
||
>>> for v in ev: print |
>>> for v in ev: print(v.X,",",v.Y,",",v.Z) |
||
... |
... |
||
30.0,30.0,0.0 |
30.0,30.0,0.0 |
||
30.0,30.0,10.0 |
30.0,30.0,10.0 |
||
| Line 154: | Line 229: | ||
30.0,40.0,10.0 |
30.0,40.0,10.0 |
||
>>> e1v = App.ActiveDocument.Extrude001.Shape.Vertexes |
>>> e1v = App.ActiveDocument.Extrude001.Shape.Vertexes |
||
>>> for v in e1v: print |
>>> for v in e1v: print(v.X,",",v.Y,",",v.Z) |
||
... |
... |
||
0.0,10.0,0.0 |
0.0,10.0,0.0 |
||
0.0,10.0,10.0 |
0.0,10.0,10.0 |
||
| Line 164: | Line 239: | ||
0.0,0.0,0.0 |
0.0,0.0,0.0 |
||
0.0,0.0,10.0 |
0.0,0.0,10.0 |
||
>>> |
>>> |
||
The Vertices (or Vectors) that define the shape use the Placement.Base attribute as |
The Vertices (or Vectors) that define the shape use the Placement.Base attribute as their origin. So if you want to move a shape 10 units along the '''X''' axis, you could add 10 to the '''X''' coordinates of all the Vertices or you could set Placement.Base to (10,0,0). |
||
their origin. So if you want to move a shape 10 units along the '''X''' axis, you could |
|||
add 10 to the '''X''' coordinates of all the Vertices or you could set Placement.Base |
|||
to (10,0,0). |
|||
==Using "Center" to Control Axis of Rotation== |
==Using "Center" to Control Axis of Rotation== |
||
By default, the axis of rotation isn't really the x/y/z axis. It is a line parallel to the selected axis, but passing through the reference point (Placement.Base) of the object to be rotated. This can be changed by using the Center fields in the Placement dialog or, in scripts, by using the Center parameter of the FreeCAD.Placement constructor. |
By default, the axis of rotation isn't really the x/y/z axis. It is a line parallel to the selected axis, but passing through the reference point (Placement.Base) of the object to be rotated. This can be changed by using the Center fields in the Placement dialog or, in scripts, by using the Center parameter of the FreeCAD.Placement constructor. |
||
For example, suppose we have a box (below) positioned at (20,20,10). |
For example, suppose we have a box (below) positioned at (20,20,10). |
||
[[Image:LocalZBefore2.png|frame|center|Before Rotation]]{{clear}} |
|||
[[Image:LocalZBefore2.png|frame|center|Before Rotation]] |
|||
We wish to spin the box around it's own vertical centre line (ie local Z), while keeping it the same position. We can easily achieve this by specifying a Center value equal to the coordinates of the box's central point (25,25,15). |
|||
{{clear}} |
|||
[[Image:LocalZAfter2.png|frame|center|After Rotation]]{{clear}} |
|||
We wish to spin the box around it's own vertical centre line (ie local Z), while keeping it the same position. We can easily achieve this by specifying a Center value equal to the coordinates of the box's central point (25,25,15). |
|||
In a script, we would do: |
|||
[[Image:LocalZAfter2.png|frame|center|After Rotation]] |
|||
{{clear}} |
|||
In a script, we would do: |
|||
{{Code|code= |
{{Code|code= |
||
import FreeCAD |
import FreeCAD |
||
| Line 185: | Line 264: | ||
rot = FreeCAD.Rotation(FreeCAD.Vector(0,0,1),45) # 45° about Z |
rot = FreeCAD.Rotation(FreeCAD.Vector(0,0,1),45) # 45° about Z |
||
#rot = FreeCAD.Rotation(FreeCAD.Vector(1,0,1),45) # 45° about X and 45° about Z |
#rot = FreeCAD.Rotation(FreeCAD.Vector(1,0,1),45) # 45° about X and 45° about Z |
||
#rot = FreeCAD.Rotation(10,20,30) # here example with Euler angle Yaw = 10 degrees (Z), Pitch = 20 degrees (Y), Roll = 30 degrees (X) |
#rot = FreeCAD.Rotation(10,20,30) # here example with Euler angle Yaw = 10 degrees (Z), Pitch = 20 degrees (Y), Roll = 30 degrees (X) |
||
centre = FreeCAD.Vector(25,25,15) # central point of box |
centre = FreeCAD.Vector(25,25,15) # central point of box |
||
pos = obj.Placement.Base # position point of box |
pos = obj.Placement.Base # position point of box |
||
newplace = FreeCAD.Placement(pos,rot,centre) # make a new Placement object |
newplace = FreeCAD.Placement(pos,rot,centre) # make a new Placement object |
||
obj.Placement = newplace # spin the box |
obj.Placement = newplace # spin the box |
||
}} |
}} |
||
Same script with the file example [http://forum.freecadweb.org/download/file.php?id=1651 RotateCoG2.fcstd] (discussion on the [http://forum.freecadweb.org/viewtopic.php?f=3&t=3950#p31052 forum]) |
Same script with the file example [http://forum.freecadweb.org/download/file.php?id=1651 RotateCoG2.fcstd] (discussion on the [http://forum.freecadweb.org/viewtopic.php?f=3&t=3950#p31052 forum]) |
||
{{Code|code= |
{{Code|code= |
||
import FreeCAD |
import FreeCAD |
||
| Line 197: | Line 278: | ||
rot = FreeCAD.Rotation(FreeCAD.Vector(0,0,1),45) # 45 about Z |
rot = FreeCAD.Rotation(FreeCAD.Vector(0,0,1),45) # 45 about Z |
||
#rot = FreeCAD.Rotation(FreeCAD.Vector(1,0,1),45) # 45° about X and 45° about Z |
#rot = FreeCAD.Rotation(FreeCAD.Vector(1,0,1),45) # 45° about X and 45° about Z |
||
#rot = FreeCAD.Rotation(10,20,30) # here example with Euler angle Yaw = 10 degrees (Z), Pitch = 20 degrees (Y), Roll = 30 degrees (X) |
#rot = FreeCAD.Rotation(10,20,30) # here example with Euler angle Yaw = 10 degrees (Z), Pitch = 20 degrees (Y), Roll = 30 degrees (X) |
||
centre = FreeCAD.Vector(25,25,0) # "centre" of rotation (where local Z cuts XY) |
centre = FreeCAD.Vector(25,25,0) # "centre" of rotation (where local Z cuts XY) |
||
pos = obj.Placement.Base # original placement of obj |
pos = obj.Placement.Base # original placement of obj |
||
| Line 203: | Line 284: | ||
obj.Placement = newplace # spin the box |
obj.Placement = newplace # spin the box |
||
}} |
}} |
||
==Using Placement in expressions== |
|||
In expressions it is possible to use the components of the placement for example to access the x-component of the object labeled "Cube": |
|||
{{Code|code= |
|||
<<Cube>>.Placement.Base.x |
|||
}} |
|||
You can access the angle of the rotation by |
|||
{{Code|code= |
|||
<<Cube>>.Placement.Rotation.Angle |
|||
}} |
|||
The axis of rotation can be accessed with |
|||
{{Code|code= |
|||
<<Cube>>.Placement.Rotation.Axis.x |
|||
<<Cube>>.Placement.Rotation.Axis.y |
|||
<<Cube>>.Placement.Rotation.Axis.z |
|||
}} |
|||
where often one of these values is 1 while the others are 0. |
|||
You can also use the whole Placement in a single expression: |
|||
Right click on Placement property in the property editor, select "show all" then extra properties will show. If you then right click on Placement again the context menu will include Expression, select Expression then the Expression dialogue will open and whatever you type will go into the Placement property rather than its child properties. |
|||
To make the placement of "Sketch" equal to that of "Cylinder", you would enter in that way for Sketch the expression |
|||
{{Code|code= |
|||
<<Cube>>.Placement |
|||
}} |
|||
[[Image:PlacementInExpression.png|frame|left|Setting the whole Placement in one expression]] |
|||
{{clear}} |
|||
'''NOTE:''' It's also possible to ''create'' Placement objects in expressions. See the [[Expressions#Placement|Expressions]] page for details. |
|||
==Notes== |
==Notes== |
||
* The Placement properties in the Data tab are disabled for objects which are attached to some other object. The Attachment Offset has to be edited instead. |
|||
* Axis and Angle can also be expressed as a [http://en.wikipedia.org/wiki/Quaternions_and_spatial_rotation quaternion]. |
* Axis and Angle can also be expressed as a [http://en.wikipedia.org/wiki/Quaternions_and_spatial_rotation quaternion]. |
||
* The reference point of an object varies depending on the object. |
* The reference point of an object varies depending on the object. Some examples for common objects: |
||
{| class="wikitable" border="1" |
{| class="wikitable" border="1" |
||
!Object!!Reference Point |
!Object!!Reference Point |
||
|- align="left" |
|- align="left" |
||
|Part.Box ||left (minx), front (miny), bottom (minz) vertex |
|Part.Box ||left (minx), front (miny), bottom (minz) vertex |
||
|- align="left" |
|- align="left" |
||
| Line 221: | Line 343: | ||
|Part.Torus||center of the torus |
|Part.Torus||center of the torus |
||
|- align="left" |
|- align="left" |
||
|Features derived from Sketches||the Feature inherits the Position of the underlying Sketch. |
|Features derived from Sketches||the Feature inherits the Position of the underlying Sketch. Sketches always start with Position = (0,0,0). This position corresponds to the origin in the sketch. |
||
|} |
|} |
||
==Issues== |
|||
* As of version 0.13, update of Placement properties in the Data tab has been disabled for objects created with PartDesign, except for the initial sketch from which the solid will be created. Therefore the Placement of a solid created in PartDesign from a sketch can only be altered by adjusting Placement parameters of the initial construction sketch (the first sketch) from which the solid was created. |
|||
* Placement functionality will eventually be handled in the Assembly workbench. |
|||
==More== |
==More== |
||
*This tutorial: [[Aeroplane|Aeroplane]] covers the mechanics of changing an object's Placement extensively. |
*This tutorial: [[Aeroplane|Aeroplane]] covers the mechanics of changing an object's Placement extensively. |
||
*This [https://blog.freecad.org/2023/01/16/the-rotation-api-in-freecad/?preview_id=343 FreeCAD News article] discusses the Rotation API. |
|||
*A step-by-step explanation of the Placement Dialog can be found here [[Tasks_Placement|Tasks_Placement]]. |
|||
{{Userdocnavi{{#translation:}}}} |
|||
[[Category:User Documentation]] |
|||
Latest revision as of 13:57, 27 May 2023
Overview
概述
Placement是用户在FreeCAD中指定目标对象在空间中位置与姿态(朝向)的手段。指定方位属性的方式多种多样,例如通过 脚本、属性面板或Placement对话框(位于Edit菜单中)。
访问定位属性
可通过下列3种方式来调整目标对象的方位Placement属性:
Accessing the Placement Attribute
An object's Placement attributes can be accessed and modified in 3 ways:

Forms of Placement

指定方位的方式
方位属性在内部实现会存作位置、旋转(旋转轴与旋转角度会被转换为对应的四元数[1])两种属性。指定旋转有若干种方式,例如,若指定了一个旋转中心,这将仅会对旋转计算造成影响,而并不会为后续计算而存储此值。类似地,如果指定了旋转轴(1,1,1),可能会在把它保存于一个四元数中的时候将其进行归一化处理,从而在后续浏览此对象时,其值将表现为(0.58, 0.58, 0.58)。
Angle, Axis and Position
Angle,Axis与Position属性
Placement = [Angle, Axis, Position]
这种指定Placement的第一种形式,将以Position来修改对象的空间位置,再以绕Axis的单个旋转操作来描述其朝向。
Angle = r为一标量,表示目标对象绕Axis所旋转的角度。用户输入的是角度,而实际内部存储用的是弧度制。
Angle = r is a scalar indicating the amount of rotation of the object about Axis. Entered as degrees, but stored internally as radians.
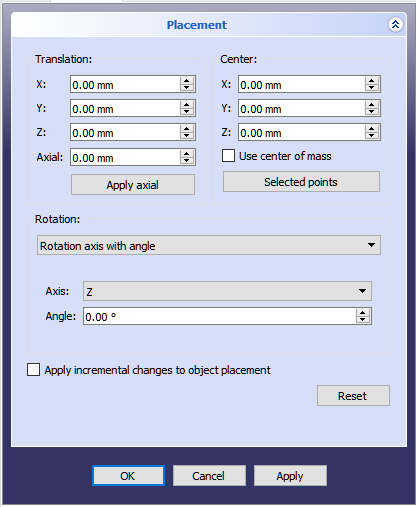
Axis = (ax,ay,az)是一个向量,描述的是旋转轴(参见关于旋转轴的备注)。以下为示例:
   (1,0,0)       ==> 绕X轴旋转
   (0,1,0)       ==> 绕Y轴旋转
   (0,0,1)       ==> 绕Z轴旋转
   (0.71,0.71,0) ==> 绕直线y=x旋转
   (1,0,0)       ==> about X axis
   (0,1,0)       ==> about Y axis
   (0,0,1)       ==> about Z axis
   (0.71,0.71,0) ==> about the line y=x
请注意,也可以令对象沿此旋转轴进行平移(移动,轴向移动),方法是:在Axial框中输入移动距离,再点击Apply axial按钮。(可以这样来想象此轴向移动操作:假设有一附有前置螺旋桨的飞机——飞行时,螺旋桨“绕”旋转轴转动,而飞机整体则“沿”此轴飞行。)可将此向量中的值看作是应用于对应方向的移动量。例如,在(0.71,0.71,0)这种y=x的情况下,对象将按Axial框中的值在X与Y方向上进行相同量的移动,且不会在Z方向上移动。
Position = (x,y,z)是一个向量,描述目标对象几何体的位置(事实上,对于对象而言,此为其“局部原点(local origin)”)。请注意,在脚本里用Placement.Base来表示方位属性中的Position分量。属性编辑器称此值为"Position",Placement对话框中则称之为"Translation"。
Position = (x,y,z) is a Vector describing the point from which the object's geometry will be calculated (in effect, a "local origin" for the object). Note that in scripts, Placement.Base is used to denote the Position component of a placement. The property editor calls this value Position and the Placement task panel calls it Translation.
Position and Yaw, Pitch and Roll
Placement = [Position, Yaw-Pitch-Roll]
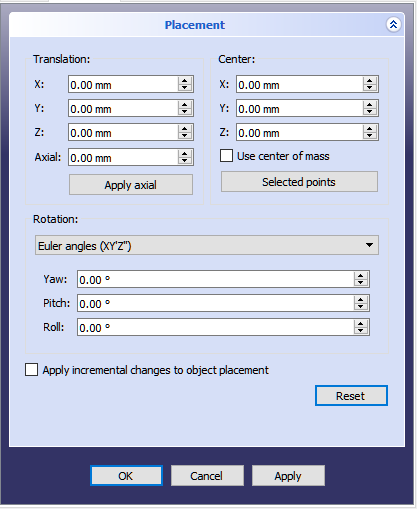
这种指定Placement的第二种形式,除了用Position属性(与第一种形式中的意义相同)来修改目标对象的空间位置之外,还将以Yaw(偏转)、Pitch(俯仰)与Roll(滚动)3种角度(Yaw, Pitch, Roll)来描述其朝向。这些角度有时被称为欧拉角(Euler angles)或Tait-Bryan角(欧拉角)。Yaw、Pitch与Roll为航空学中描述物体朝向(姿态)的常用术语。
Position = (x,y,z)为一个向量,描述目标对象几何体的位置(事实上,对于对象而言,此为其“局部原点(local origin)”)。
Yaw-Pitch-Roll = (y,p,r)是一个指定目标对象姿态的三元组。y、p、r三值分别用于指定对象绕z、y、x三轴旋转的角度(参考备注)。
>>> App.getDocument("Sans_nom").Cylinder.Placement=App.Placement(App.Vector(0,0,0), App.Rotation(10,20,30), App.Vector(0,0,0))
>>> App.ActiveDocument.Cylinder.Placement = App.Placement(App.Vector(0,0,0), App.Rotation(10,20,30), App.Vector(0,0,0))
App.Rotation(10,20,30) = 欧拉角
Yaw = 10度 (Z)
Pitch = 20度 (Y)
Roll = 30度 (X)
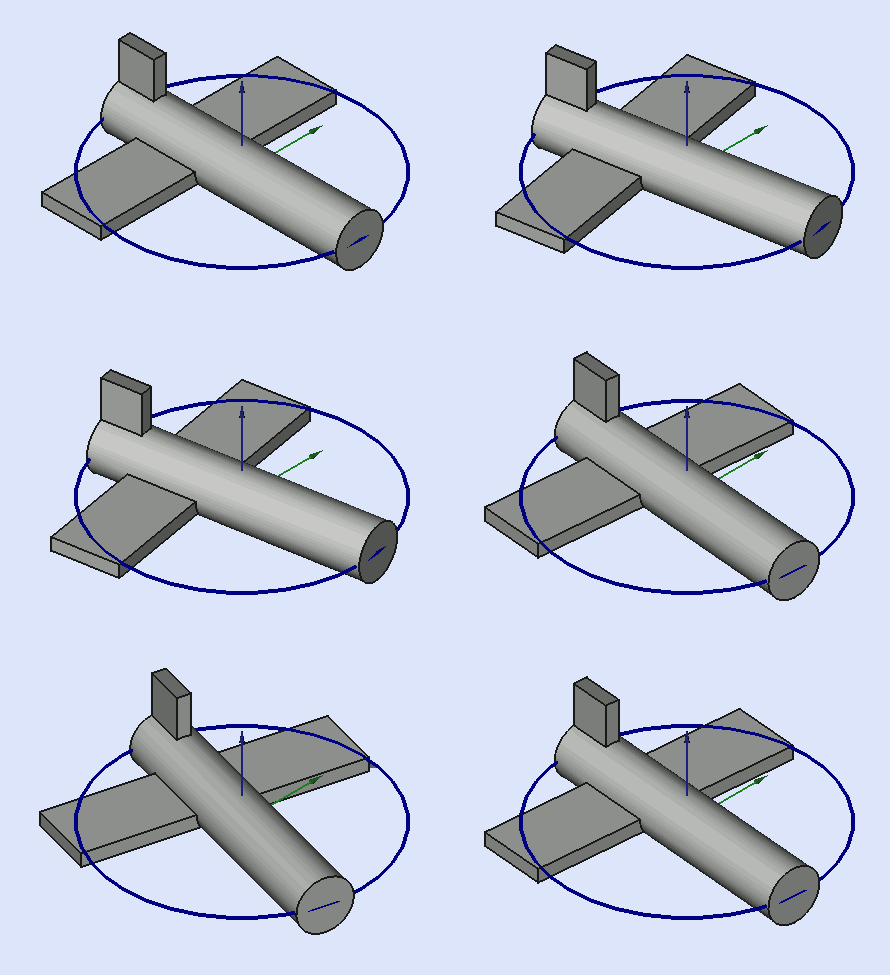
Yaw为绕Z轴进行旋转,可以说是从左至右的旋转操作。
(Yaw角为Psi ψ)。
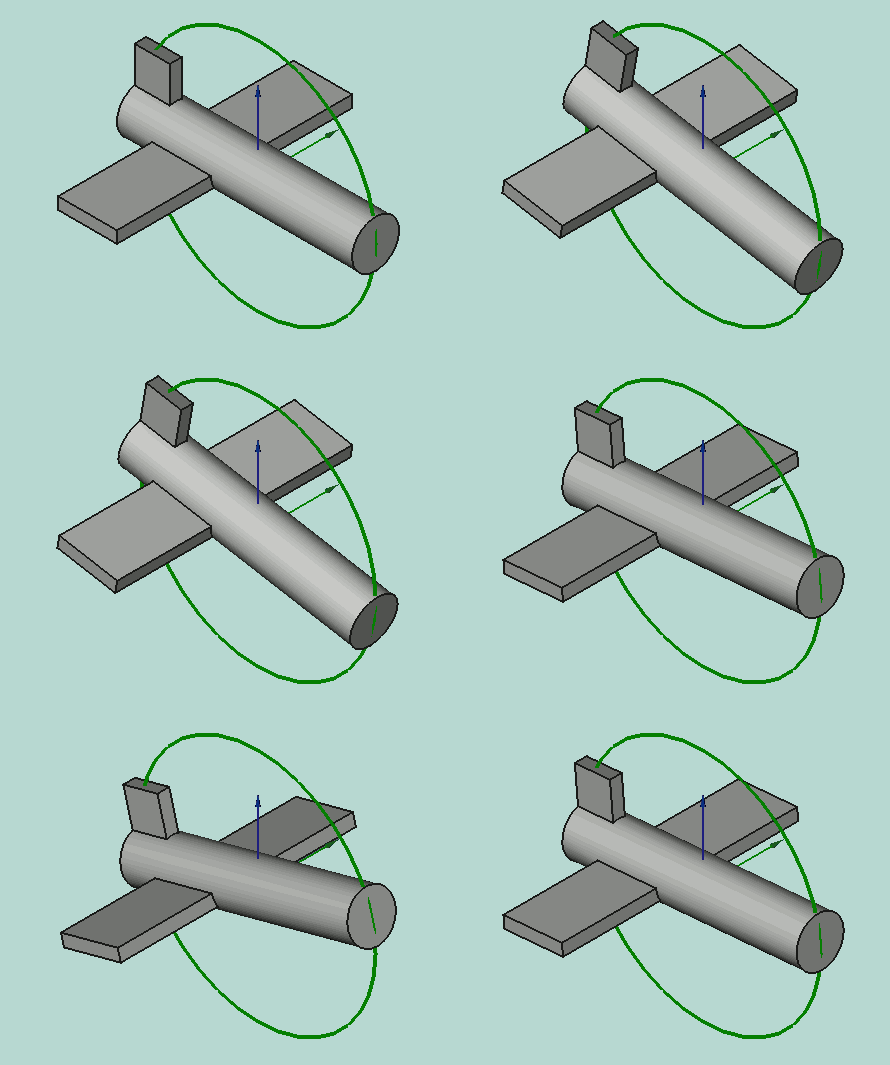
Pitch为绕Y轴进行旋转,可以说是上仰与下俯。
(Pitch角为Phi φ)。
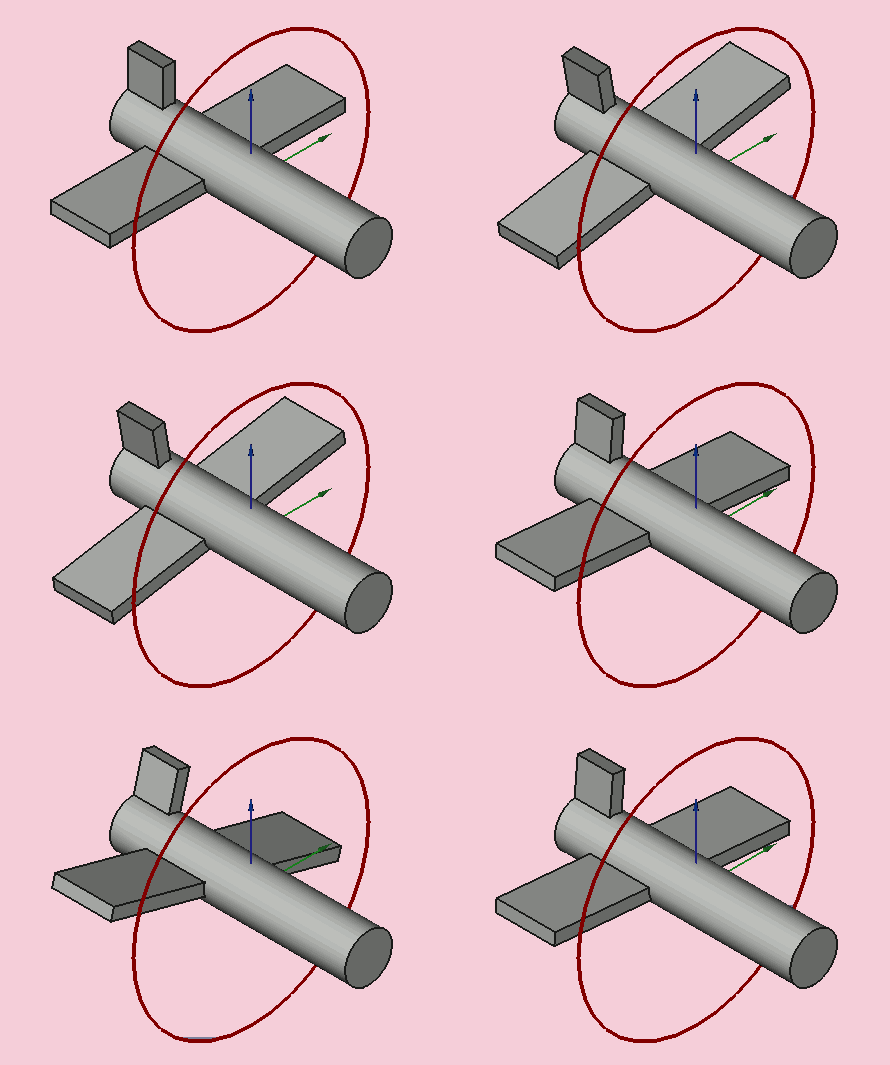
Roll为绕X轴进行旋转,可以说是机翼上下翻转。
(Roll角为Thêta θ)。
Matrix
矩阵
Placement = Matrix
第三种指定Placement的方式是利用一个4x4仿射变换矩阵进行描述(仿射变换)。
Matrix =
  ((r11,r12,r13,t1),
   (r21,r22,r23,t2),
   (r31,r32,r33,t3),
   (0,0,0,1)) , with rij specifying rotation and ti specifying translation.
The Placement Dialog
Placement对话框
利用Edit菜单就可以调出Placement对话框。通常用此对话框来精确地旋转/平移对象。另外,它还可用于:在一个“非标准”平面上创建草图,或将一个草图的朝向调整至一个新平面的情况。
Translation部分用于调整对象的空间位置。 Center部分用于将旋转轴调整为并非穿过目标对象参考点(reference point)的旋转轴。 Rotation部分用于调整旋转角以及指定旋转角的具体方式。
- The Translation section adjusts the object's location in space.
- The Center section adjusts the rotational axis to one that does not pass through the object's reference point.
- The Rotation section adjusts the rotational angle(s) and the method of specifying those angles.
But while the elements within each section generally apply to the purpose of that section there are also some elements in one section that can affect elements in another section. For example, clicking the Selected points button in the Center section with 2 points selected in the 3d view results in not only populating the Center coordinate spinboxes with the coordinates of the midpoint between those 2 selected points, but it also creates a custom axis along the line defined by those 2 selected points in the Rotation section. In another example, placing a value in the Axial spinbox and clicking the Apply axial button in the Translation section translates (moves) the object along the axis defined in the Rotation section.
The Apply incremental changes to object placement tick box is useful when translations/rotations are to be made relative the object's current position/attitude, rather than to the original position/attitude. Ticking this box resets the dialogue input fields to zero, but does not change the object's orientation or location. Subsequent entries do change the orientation/location, but are applied from the object's current position. Enabling this checkbox is also useful when using the Selected points button as it can sometimes prevent undesired placement changes.
PS: since version 0.17 introduce new object Part, this object have his placement, and the Placement object created in the Part object is incremented with the Part Placement. introduced in version 0.17
To obtain the Part Placement use this code:
import Draft, Part
sel = FreeCADGui.Selection.getSelection()
print(sel[0].Placement)
print(sel[0].getGlobalPlacement())   # return the GlobalPlacement
print(sel[0].getParentGeoFeatureGroup()) # return the GeoFeatureGroup, ex:  Body or a Part.
print("____________________")
Selected points button is used to populate the coordinates in the Center coordinates spinboxes and (when 2 or 3 points are selected) additionally to create a custom (user-defined) axis of rotation in the Rotation section. A point can be a vertex, but it can also be any point along an edge or on a face. When you select an edge or face the entire edge or face is selected, but FreeCAD also remembers which point on that face or edge the mouse pointer was hovering over when that edge or face was selected. It is this point's coordinates that get used in the Placement dialog when the Selected points button is clicked. You might be thinking this isn't a very precise way of selecting a point, and you are correct, but in many cases it is sufficient that the point selected is guaranteed to be on that edge or face. In cases where you need to precisely designate a point to be used you should select a vertex. When there is no vertex in the desired location consider creating one, perhaps in a temporary sketch attached to that face or edge, perhaps using a Draft workbench object, such as a line or point, etc.
Let us first consider the simple case of selecting 1 point. The workflow is to first select the desired point, then click the Selected points button. The coordinates of the selected point will be used to populate the X, Y, and Z spinboxes within the Center section. Now any rotation done on the object will about this center of rotation.
Now consider the case of selecting 2 points. You would select the 2 desired points, and then click the Selected points button. The coordinates of the midpoint between the 2 selected points get placed into the X, Y, and Z spinboxes within the Center section. Now any rotation done on the object will be about this center of rotation. But in addition to setting up the Center section coordinates a custom (user-defined) axis is also added to the Axis element within the Rotation section. (Note: if you were in Euler rotation mode, the mode gets switched to Rotation with an axis mode and the new custom axis is selected as the current axis of rotation.) Now any rotation done using the new custom axis will be about this axis of rotation. As an added bonus, the distance is measured between the 2 selected points, and this information is given in the Report View. (Note: Hold down the Shift key while clicking the Selected points button to copy the distance measurement to the clipboard.) By entering this distance into the Axial spinbox in the Translation section and clicking the Apply axial button you can translate (move) the object so that the first selected point now occupies the coordinates occupied by the second selected point (at the time the Selected points button was clicked).
Now consider the case of selecting 3 points. You would select the 3 desired points, and then click the Selected points button. The coordinates of the first selected point (order of selection is very important here) get placed into the X, Y, and Z spinboxes within the Center section. Since 3 points define a plane FreeCAD is able to take advantage of that and use those 3 points to create a new custom (user-defined) axis of rotation that is normal (perpendicular) to that defined plane. As with 2 selected points, the distance between points is also shown in the Report View, but this time it is the distance between the 2nd and 3rd selected points. (Note: Hold down the Shift key while clicking Selected points button -- Shift + Click -- to copy the angle measurement to the clipboard.) Additionally, the angle between the 2nd and 3rd points is also measured and displayed in the Report View. By entering this angle into the Angle spinbox within the Rotation section we can very precisely rotate the object such that now the 2nd selected point is in alignment with the coordinates occupied by the 3rd selected point. (Note: you might want to increase the number of digits used within the Edit menu -> Preferences -> General -> Units -> Number of decimals spinbox if you desire more precision.)
Examples
Rotations about a single axis:
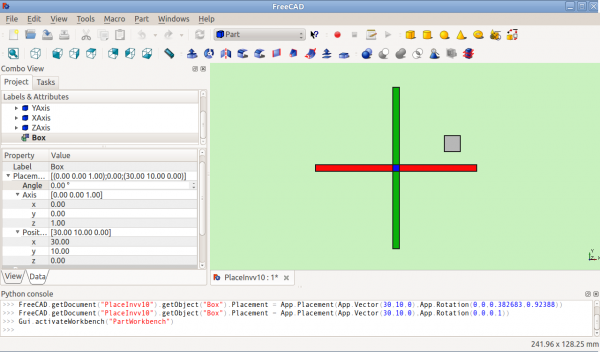
Before Rotation (top view)
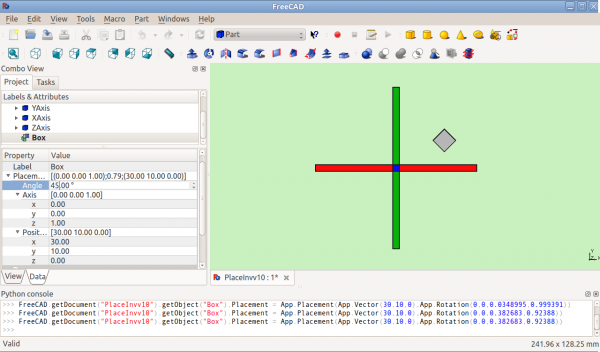
After Rotation about Z (top view)
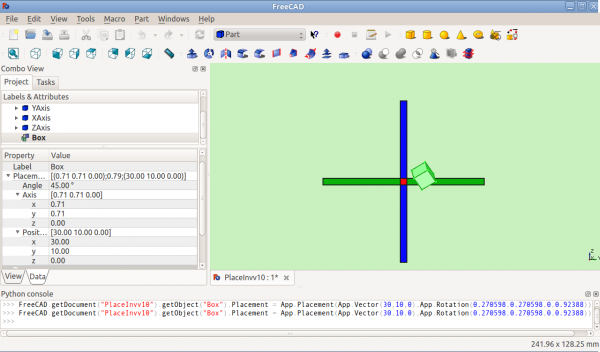
After Rotation about y=x (right view)
Rotation with offset centre point:
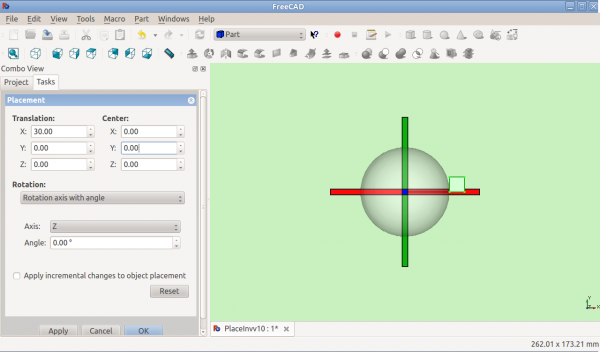
Before Rotation (top view)
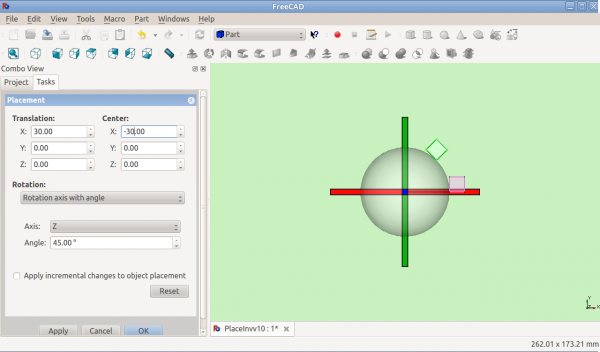
After Rotation about Z (top view)
Rotation using Euler angles:
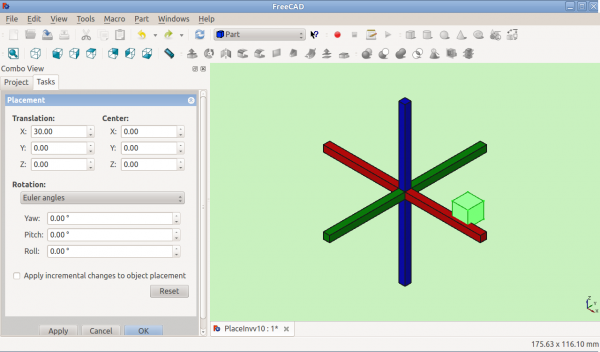
Before Rotation
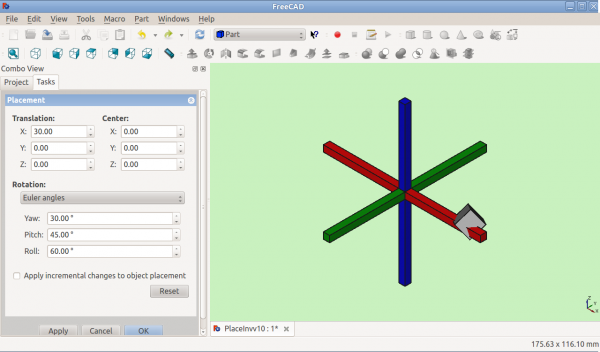
After Rotation
Placement.Base vs Shape Definition
Placement is not the only way to position a shape in space. Note the Python console in this image:

Both cubes have the same value for Placement, but are in different locations! This is because the 2 shapes are defined by different vertices (curves in more complex shapes). For the 2 shapes in the above illustration:
 >>> ev = App.ActiveDocument.Extrude.Shape.Vertexes
 >>> for v in ev: print(v.X,",",v.Y,",",v.Z)
 ...
 30.0,30.0,0.0
 30.0,30.0,10.0
 40.0,30.0,0.0
 40.0,30.0,10.0
 40.0,40.0,0.0
 40.0,40.0,10.0
 30.0,40.0,0.0
 30.0,40.0,10.0
 >>> e1v = App.ActiveDocument.Extrude001.Shape.Vertexes
 >>> for v in e1v: print(v.X,",",v.Y,",",v.Z)
 ...
 0.0,10.0,0.0
 0.0,10.0,10.0
 10.0,10.0,0.0
 10.0,10.0,10.0
 10.0,0.0,0.0
 10.0,0.0,10.0
 0.0,0.0,0.0
 0.0,0.0,10.0
 >>>
The Vertices (or Vectors) that define the shape use the Placement.Base attribute as their origin. So if you want to move a shape 10 units along the X axis, you could add 10 to the X coordinates of all the Vertices or you could set Placement.Base to (10,0,0).
Using "Center" to Control Axis of Rotation
By default, the axis of rotation isn't really the x/y/z axis. It is a line parallel to the selected axis, but passing through the reference point (Placement.Base) of the object to be rotated. This can be changed by using the Center fields in the Placement dialog or, in scripts, by using the Center parameter of the FreeCAD.Placement constructor.
For example, suppose we have a box (below) positioned at (20,20,10).
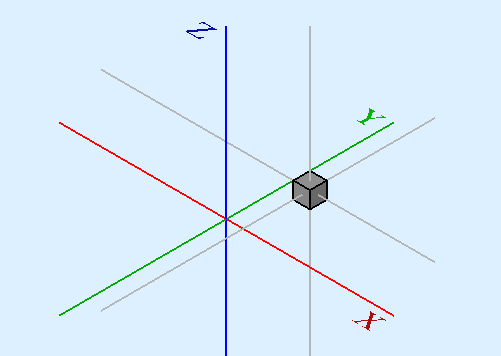
We wish to spin the box around it's own vertical centre line (ie local Z), while keeping it the same position. We can easily achieve this by specifying a Center value equal to the coordinates of the box's central point (25,25,15).

In a script, we would do:
import FreeCAD
obj = App.ActiveDocument.Box                       # our box
rot = FreeCAD.Rotation(FreeCAD.Vector(0,0,1),45)   # 45° about Z
#rot = FreeCAD.Rotation(FreeCAD.Vector(1,0,1),45)   # 45° about X and 45° about Z
#rot = FreeCAD.Rotation(10,20,30)                   # here example with Euler angle Yaw = 10 degrees (Z), Pitch = 20 degrees (Y), Roll = 30 degrees (X)
centre = FreeCAD.Vector(25,25,15)                  # central point of box
pos = obj.Placement.Base                           # position point of box
newplace = FreeCAD.Placement(pos,rot,centre)       # make a new Placement object
obj.Placement = newplace                           # spin the box
Same script with the file example RotateCoG2.fcstd (discussion on the forum)
import FreeCAD
obj = App.ActiveDocument.Extrude                    # our box
rot = FreeCAD.Rotation(FreeCAD.Vector(0,0,1),45)    # 45 about Z
#rot = FreeCAD.Rotation(FreeCAD.Vector(1,0,1),45)    # 45° about X and 45° about Z
#rot = FreeCAD.Rotation(10,20,30)                    # here example with Euler angle Yaw = 10 degrees (Z), Pitch = 20 degrees (Y), Roll = 30 degrees (X)
centre = FreeCAD.Vector(25,25,0)                    # "centre" of rotation (where local Z cuts XY)
pos = obj.Placement.Base                            # original placement of obj
newplace = FreeCAD.Placement(pos,rot,centre)        # make a new Placement object
obj.Placement = newplace                            # spin the box
Using Placement in expressions
In expressions it is possible to use the components of the placement for example to access the x-component of the object labeled "Cube":
<<Cube>>.Placement.Base.x
You can access the angle of the rotation by
<<Cube>>.Placement.Rotation.Angle
The axis of rotation can be accessed with
<<Cube>>.Placement.Rotation.Axis.x
<<Cube>>.Placement.Rotation.Axis.y
<<Cube>>.Placement.Rotation.Axis.z
where often one of these values is 1 while the others are 0.
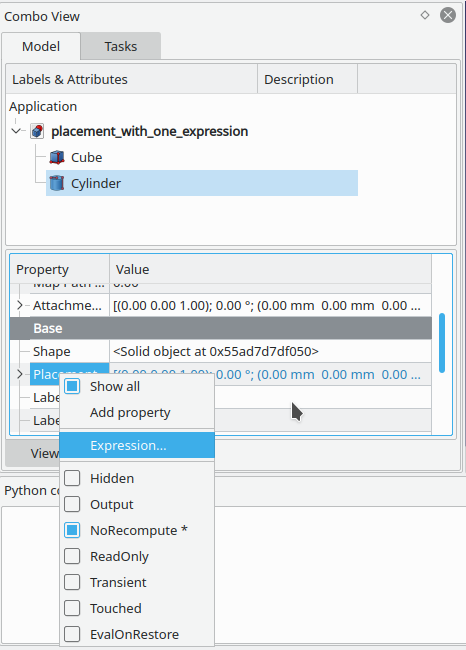
You can also use the whole Placement in a single expression:
Right click on Placement property in the property editor, select "show all" then extra properties will show. If you then right click on Placement again the context menu will include Expression, select Expression then the Expression dialogue will open and whatever you type will go into the Placement property rather than its child properties.
To make the placement of "Sketch" equal to that of "Cylinder", you would enter in that way for Sketch the expression
<<Cube>>.Placement
NOTE: It's also possible to create Placement objects in expressions. See the Expressions page for details.
Notes
- The Placement properties in the Data tab are disabled for objects which are attached to some other object. The Attachment Offset has to be edited instead.
- Axis and Angle can also be expressed as a quaternion.
- The reference point of an object varies depending on the object. Some examples for common objects:
| Object | Reference Point |
|---|---|
| Part.Box | left (minx), front (miny), bottom (minz) vertex |
| Part.Sphere | center of the sphere (ie centre of bounding box) |
| Part.Cylinder | center of the bottom face |
| Part.Cone | center of bottom face (or apex if bottom radius is 0) |
| Part.Torus | center of the torus |
| Features derived from Sketches | the Feature inherits the Position of the underlying Sketch. Sketches always start with Position = (0,0,0). This position corresponds to the origin in the sketch. |
More
- This tutorial: Aeroplane covers the mechanics of changing an object's Placement extensively.
- This FreeCAD News article discusses the Rotation API.
- Getting started
- Installation: Download, Windows, Linux, Mac, Additional components, Docker, AppImage, Ubuntu Snap
- Basics: About FreeCAD, Interface, Mouse navigation, Selection methods, Object name, Preferences, Workbenches, Document structure, Properties, Help FreeCAD, Donate
- Help: Tutorials, Video tutorials
- Workbenches: Std Base, Arch, Assembly, CAM, Draft, FEM, Inspection, Mesh, OpenSCAD, Part, PartDesign, Points, Reverse Engineering, Robot, Sketcher, Spreadsheet, Surface, TechDraw, Test Framework
- Hubs: User hub, Power users hub, Developer hub
