Whiffle Ball tutorial: Difference between revisions
(Press the View isometric button or press 0 in the numerical pad of your keyboard to change the view to isometric to visualize the 3D solids better.) |
(→Fuse and cut: Note: the order in which you select the objects is important for the cut operation. The base object is selected first, and the subtracting object comes at the end.) |
||
| Line 121: | Line 121: | ||
== Fuse and cut == |
== Fuse and cut == |
||
10. In the [[tree view|tree view]], select {{incode|Cube001}}, {{incode|Cylinder}}, {{incode|Cylinder001}}, and {{incode|Cylinder002}}, and fuse them together by clicking on {{Button|[[File:Part_Fuse.svg|24px]] [[Part_Union|Fuse]]}}. |
10. In the [[tree view|tree view]], select {{incode|Cube001}} (the inner, smaller cube), {{incode|Cylinder}}, {{incode|Cylinder001}}, and {{incode|Cylinder002}}, and fuse them together by clicking on {{Button|[[File:Part_Fuse.svg|24px]] [[Part_Union|Fuse]]}}. |
||
{{Emphasis|Note:}} Hold {{KEY|Ctrl}} while you click to select multiple items. |
{{Emphasis|Note:}} Hold {{KEY|Ctrl}} while you click to select multiple items. |
||
| Line 128: | Line 128: | ||
:11.1. In the [[tree view|tree view]] select {{incode|Cube}} first, and then {{incode|Fusion}}. |
:11.1. In the [[tree view|tree view]] select {{incode|Cube}} first, and then {{incode|Fusion}}. |
||
:11.2. Then press {{Button|[[File:Part_Cut.svg|24px]] [[Part_Cut|Cut]]}}. |
:11.2. Then press {{Button|[[File:Part_Cut.svg|24px]] [[Part_Cut|Cut]]}}. |
||
:{{Emphasis|Note:}} the order in which you select the objects is important for the cut operation. The base object is selected first, and the subtracting object comes at the end. |
|||
:11.3. If the colors |
:11.3. If the colors look strange, select the new {{incode|Cut}} object, go to the {{incode|View}} tab, click on the {{incode|Shape Color}} value to open the "Select color" dialog, then choose a gray color. |
||
</translate> |
</translate> |
||
| Line 134: | Line 135: | ||
<translate> |
<translate> |
||
<!--T:11--> |
<!--T:11--> |
||
{{Caption| |
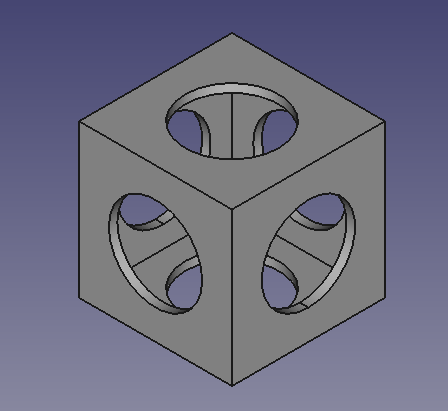
{{Caption|Hollow shape produced from cutting a cube and three cylinders from a bigger cube.}} |
||
== Insert primitive cubes to cut shapes == |
== Insert primitive cubes to cut shapes == |
||
Revision as of 04:37, 21 November 2019
| Topic |
|---|
| Product design |
| Level |
| Beginner |
| Time to complete |
| 30 minutes |
| Authors |
| r-frank |
| FreeCAD version |
| 0.16 and above |
| Example files |
| WhiffleBall_Tutorial_FCWiki.FCStd |
| See also |
| None |
Introduction
This tutorial is here to teach you how to use the Part Workbench.
The Part Workbench was the first workbench developed. It provides the basic geometrical elements that can be used as building blocks for other workbenches. The Part Workbench is meant to be used in a traditional constructive solid geometry (CSG) workflow. For a more modern workflow using sketches, pads, and features, use the PartDesign Workbench.
You will practice:
- inserting primitives
- changing values of primitives
- modifying the placement
- doing boolean operations
If you selected something wrong or want to de-select everything, just click on empty space in the 3D view.
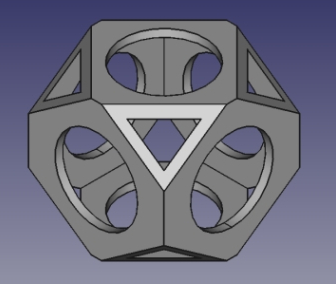
Final model of the wiffle ball
Setup
1. Open FreeCAD, create a new empty document with File → New, and switch to the Part Workbench.
Press the View isometric button or press 0 in the numerical pad of your keyboard to change the view to isometric to visualize the 3D solids better.
Insert primitive cubes
2. Insert a primitive cube by clicking on Box.
- 2.1. Select
Cubein the tree view. - 2.2. Change the dimensions in the
Datatab of the property editor. - 2.3. Change
Lengthto90 mm. - 2.4. Change
Widthto90 mm. - 2.5. Change
Heightto90 mm.
3. In the Data tab of the property editor, click on the Placement value so the ellipsis button ... appears on right.
- 3.1. Press on the ellipsis to launch the Placement dialog.
- 3.2. Change the translation values.
- 3.3. Change
Xto-45 mm. - 3.4. Change
Yto-45 mm. - 3.5. Change
Zto-45 mm. - 3.6. Press the OK button to close the dialog.
4. Repeat the process, inserting a second, smaller cube by clicking on Box.
- 4.1. The second cube will be created with the same name, but with an additional number to distinguish the object.
- 4.2. Select
Cube001in the tree view, and change the dimensions and placement like with the previous object. - 4.3. Change
Lengthto80 mm. - 4.4. Change
Widthto80 mm. - 4.5. Change
Heightto80 mm. - 4.6. Open the Placement dialog.
- 4.7. Change
Xto-40 mm. - 4.8. Change
Yto-40 mm. - 4.9. Change
Zto-40 mm. - 4.10. Press the OK button to close the dialog.
Change visual properties
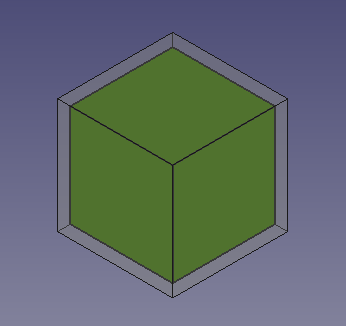
5. The previous operations create a smaller cube inside a bigger cube. To visualize this, we can modify the View properties in the property editor.
- 5.1. Select
Cube001, the smaller cube, in the tree view, and change the color. In theViewtab, click on theShape Colorvalue to open the "Select color" dialog, then choose a green color. - 5.2. Select
Cube, the larger cube, in the tree view, and change the transparency. In theViewtab, change the value ofTransparencyto70.
Solid cube inside another solid cube
Insert primitive cylinders
6. Insert a primitive cylinder by clicking on Cylinder.
- 6.1. Select
Cylinderin the tree view. - 6.2. Change the dimensions in the
Datatab of the property editor. - 6.3. Change
Radiusto27.5 mm. - 6.4. Change
Heightto90 mm. - 6.5. Open the Placement dialog.
- 6.6. Change
Zto-60 mm. - 6.7. Press the OK button to close the dialog.
7. Repeat the process, inserting a second cylinder by clicking on Cylinder.
- 7.1. The second cylinder will be created with the same name, but with an additional number to distinguish the object.
- 7.2. Select
Cylinder001in the tree view, and change the dimensions and placement like with the previous object. - 7.3. Change
Radiusto27.5 mm. - 7.4. Change
Heightto120 mm. - 7.5. Open the Placement dialog.
- 7.6. Change
Yto60 mm. - 7.7. Change the rotation,
Rotation axis with angle;AxistoX, andAngleto90 deg. - 7.8. Press the OK button to close the dialog.
8. Insert another cylinder. This time create a duplicate, so that the radius and height doesn't have to be changed, only its placement.
- 8.1. Select
Cylinder001in the tree view, and go to the menu Edit → Duplicate selection. This will createCylinder002. - 8.2. Open the Placement dialog.
- 8.3. Change
Xto-60 mm. - 8.4. Change the rotation,
Rotation axis with angle;AxistoY, andAngleto90 deg. - 8.5. Press the OK button to close the dialog.
Change visual properties
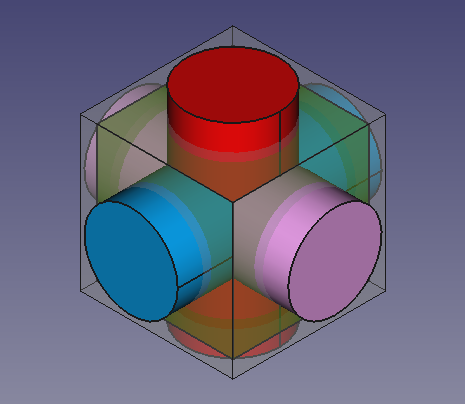
9. The previous operations create three cylinders that intersect with each other, and with the previously placed cubes. To visualize this better we can modify the View properties in the property editor.
- 9.1. Click on
View fit all to adjust the 3D view so that all elements are seen in the view.
- 9.2. Select
Cube, the larger cube, in the tree view, and change the transparency. In theViewtab, change the value ofTransparencyto70. - 9.4. Select
Cylinder, in theViewtab, click on theShape Colorvalue to open the "Select color" dialog, then choose a red color. - 9.5. Select
Cylinder001, in theViewtab, click on theShape Colorvalue to open the "Select color" dialog, then choose a blue color. - 9.6. Select
Cylinder002, in theViewtab, click on theShape Colorvalue to open the "Select color" dialog, then choose a pink color.
Solid cylinders that intersect themselves and the solid cubes.
Fuse and cut
10. In the tree view, select Cube001 (the inner, smaller cube), Cylinder, Cylinder001, and Cylinder002, and fuse them together by clicking on Fuse.
Note: Hold Ctrl while you click to select multiple items.
11. Then perform a boolean cut of the Cube and the new Fusion object.
- 11.1. In the tree view select
Cubefirst, and thenFusion. - 11.2. Then press
Cut.
- Note: the order in which you select the objects is important for the cut operation. The base object is selected first, and the subtracting object comes at the end.
- 11.3. If the colors look strange, select the new
Cutobject, go to theViewtab, click on theShape Colorvalue to open the "Select color" dialog, then choose a gray color.
Hollow shape produced from cutting a cube and three cylinders from a bigger cube.
Insert primitive cubes to cut shapes
12. Insert another cube that will be used to cut the previous partial solid.
- 12.1. Clicking on
Box.
- 12.2. Select
Cube002in the tree view, and change the dimensions and placement like with the previous objects. - 12.3. Change
Lengthto140 mm. - 12.4. Change
Widthto112 mm. - 12.5. Change
Heightto112 mm. - 12.6. Open the Placement dialog.
- 12.7. Change
Xto-70 mm. - 12.8. Change
Yto-56 mm. - 12.9. Change
Zto-56 mm. - 12.10. Press the OK button to close the dialog.
13. Insert another cube that will be used to cut the previous partial solid.
- 13.1. Clicking on
Box.
- 13.2. Select
Cube003in the tree view, and change the dimensions and placement like with the previous objects. - 13.3. Change
Lengthto180 mm. - 13.4. Change
Widthto180 mm. - 13.5. Change
Heightto180 mm. - 13.6. Open the Placement dialog.
- 13.7. Change
Xto-90 mm. - 13.8. Change
Yto-90 mm. - 13.9. Change
Zto-90 mm.
Now we'll duplicate the previous two objects to use them to cut the previously obtained Fusion solid.
14. Select only Cube002 in the tree view, and duplicate it. Go to Edit → Duplicate selection.
- 14.1. The resulting solid is
Cube004.
15. Select only Cube003 in the tree view, and duplicate it. Go to Edit → Duplicate selection.
- 15.1. The resulting solid is
Cube005.
Cutting the corners part 1
16. Select Cube003 and Cube002, but make sure, that Cube003 is selected FIRST.
- 16.1. Activate menu to change placement.
- 16.2. Tick option Apply incremental changes to object placement, notice that all values are reset.
- 16.3. Choose "Rotation: X-Axis" and "Angle: 45°" and click on Apply.
- 16.4. Choose "Rotation: Z-Axis" and "Angle: 45°" and click on Apply.
- 16.5. Click on OK to close the dialog.
17. Apply a boolean cut by clicking Cut, the resulting object will be named
Cut001.
Cutting the corners part 2
18. Select Cube005 and Cube004, but make sure, that Cube005 is selected FIRST.
- 18.1. Activate menu to change placement.
- 18.2. Tick option Apply incremental changes to object placement, notice that all values are reset.
- 18.3. Choose "Rotation: X-Axis" and "Angle: 45°" and click on Apply.
- 18.4. Choose "Rotation: Z-Axis" and "Angle: -45°" and click on Apply.
- 18.5. Click on OK to close the dialog.
- 18.6. Apply a boolean cut by clicking
Cut, the resulting object will be named
Cut002.
If everything went well your model should look like this:
Finishing the model
19. Select Cut and Cut001, but make sure, that Cut is selected FIRST.
- 19.1. Apply a boolean cut by clicking
Cut, the resulting object will be named
Cut003.
20. Select Cut003 and Cut002, but make sure, that Cut003 is selected FIRST.
- 20.1. Apply a boolean cut by clicking
Cut, the resulting object will be named
Cut004.


