Surface Filling: Difference between revisions
(More complete description of the usage) |
(The base edges that form the closed contour, as well as the auxiliary vertices and edges, can belong to 2D curves but can also belong to 3D solid objects.) |
||
| Line 25: | Line 25: | ||
<!--T:4--> |
<!--T:4--> |
||
# Make sure you have at lease three edges or curves in space forming a closed contour. For example, these can be created with tools of the [[File:Workbench_Draft.svg|24px]] [[Draft_Module|Draft Workbench]] or the [[File:Workbench_Sketcher.svg|24px]] [[Sketcher_Workbench|Sketcher]]. Using three edges would create a triangular surface; four edges a quadrilateral surface. |
# Make sure you have at lease three edges or curves in space forming a closed contour. For example, these can be created with tools of the [[File:Workbench_Draft.svg|24px]] [[Draft_Module|Draft Workbench]] or the [[File:Workbench_Sketcher.svg|24px]] [[Sketcher_Workbench|Sketcher]]. Using three edges would create a triangular surface; four edges a quadrilateral surface. |
||
#* Optionally |
#* Optionally, curves can be drawn inside the closed contour, not necessarily touching the edges. These curves can be used to control the curvature of the resulting surface. |
||
#* Likewise, a number of vertices can be used with the same purpose to indicate where the surface must go through. |
|||
# Press the {{Button|[[File:Surface_Filling.svg|16px]] [[Surface_Filling|Surface filling]]}} button. |
# Press the {{Button|[[File:Surface_Filling.svg|16px]] [[Surface_Filling|Surface filling]]}} button. |
||
# |
# Inside the {{MenuCommand|Filling}} section, press {{Button|Add edge}}. |
||
# Use the pointer to pick the desired edges in the [[3D_view|3D view]]; a preview of the final shape will be shown after selecting valid edges that form a closed contour. |
# Use the pointer to pick the desired edges in the [[3D_view|3D view]]; a preview of the final shape will be shown after selecting valid edges that form a closed contour. |
||
#* |
#* Optionally, to control the curvature of the surface, go to the {{MenuCommand|Unbound edges}} section, press {{Button|Add edge}}, and pick the desired edges from the [[3D_view|3D view]]. |
||
#* Optionally, to control the curvature by means of vertices, go to the {{MenuCommand|Vertices}} section, press {{Button|Add vertex}}, and pick the desired vertices from the [[3D_view|3D view]]. |
|||
# Press {{Button|OK}} to complete the operation. |
# Press {{Button|OK}} to complete the operation. |
||
The base edges that form the closed contour, as well as the auxiliary vertices and edges, can belong to 2D curves from [[File:Workbench_Draft.svg|24px]] [[Draft_Module|Draft]] or the [[File:Workbench_Sketcher.svg|24px]] [[Sketcher_Workbench|Sketcher]], but can also belong to 3D solid objects such as those created with the [[File:Workbench_Part.svg|24px]] [[Part_Module|Part]] or [[File:Workbench_PartDesign.svg|24px]] [[PartDesign_Workbench|PartDesign Workbenches]]. |
|||
==Options== <!--T:5--> |
==Options== <!--T:5--> |
||
Revision as of 03:16, 30 September 2020
This documentation is not finished. Please help and contribute documentation.
GuiCommand model explains how commands should be documented. Browse Category:UnfinishedDocu to see more incomplete pages like this one. See Category:Command Reference for all commands.
See WikiPages to learn about editing the wiki pages, and go to Help FreeCAD to learn about other ways in which you can contribute.
|
|
| Menu location |
|---|
| Surface → Filling... |
| Workbenches |
| Surface |
| Default shortcut |
| None |
| Introduced in version |
| - |
| See also |
| None |
Description
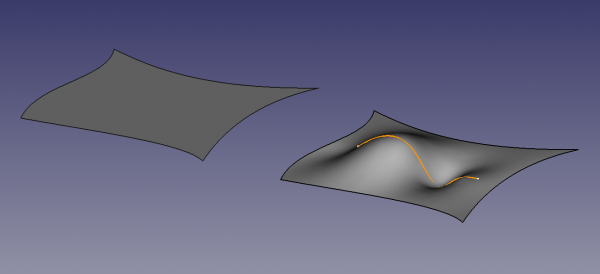
Example of a filled surface, delimited by four edges located in the XY plane; (left) only the four edges, and (right) one additional curve in space that defines the curvature of the surface
Usage
- Make sure you have at lease three edges or curves in space forming a closed contour. For example, these can be created with tools of the
Draft Workbench or the
Sketcher. Using three edges would create a triangular surface; four edges a quadrilateral surface.
- Optionally, curves can be drawn inside the closed contour, not necessarily touching the edges. These curves can be used to control the curvature of the resulting surface.
- Likewise, a number of vertices can be used with the same purpose to indicate where the surface must go through.
- Press the
Surface filling button.
- Inside the Filling section, press Add edge.
- Use the pointer to pick the desired edges in the 3D view; a preview of the final shape will be shown after selecting valid edges that form a closed contour.
- Press OK to complete the operation.
The base edges that form the closed contour, as well as the auxiliary vertices and edges, can belong to 2D curves from Draft or the
Sketcher, but can also belong to 3D solid objects such as those created with the
Part or
PartDesign Workbenches.
Options
Properties
- DataProperty: description of the property
- ViewProperty: description of the property
- Getting started
- Installation: Download, Windows, Linux, Mac, Additional components, Docker, AppImage, Ubuntu Snap
- Basics: About FreeCAD, Interface, Mouse navigation, Selection methods, Object name, Preferences, Workbenches, Document structure, Properties, Help FreeCAD, Donate
- Help: Tutorials, Video tutorials
- Workbenches: Std Base, Arch, Assembly, CAM, Draft, FEM, Inspection, Mesh, OpenSCAD, Part, PartDesign, Points, Reverse Engineering, Robot, Sketcher, Spreadsheet, Surface, TechDraw, Test Framework
- Hubs: User hub, Power users hub, Developer hub
