Manual:Creating and manipulating geometry/it: Difference between revisions
Renatorivo (talk | contribs) (Created page with "Quindi, per riassumere l'intero schema di una Part Shapes: Tutto comincia con i Vertici. Con uno o due vertici, si forma un bordo (i cerchi completi hanno un solo vertice). Co...") |
Renatorivo (talk | contribs) (Created page with "Ora proviamo a creare da zero forme complesse, con la costruzione di tutte le loro componenti una per una. Per esempio, cerchiamo di creare un volume come questo:") |
||
| Line 61: | Line 61: | ||
Quindi, per riassumere l'intero schema di una Part Shapes: Tutto comincia con i Vertici. Con uno o due vertici, si forma un bordo (i cerchi completi hanno un solo vertice). Con uno o più bordi, si forma un contorno, un Wire. Con uno o più contorni chiusi, si forma una faccia (i bordi aggiuntivi diventano "buchi" in una faccia). Con una o più facce, si forma un Guscio, un Shell. Quando un Shell è completamente chiusa (stagno), è possibile formare da esso un solido. E, infine, è possibile unire qualsiasi numero di forme di qualsiasi tipo, e produrre un Compoud, un Composto. |
Quindi, per riassumere l'intero schema di una Part Shapes: Tutto comincia con i Vertici. Con uno o due vertici, si forma un bordo (i cerchi completi hanno un solo vertice). Con uno o più bordi, si forma un contorno, un Wire. Con uno o più contorni chiusi, si forma una faccia (i bordi aggiuntivi diventano "buchi" in una faccia). Con una o più facce, si forma un Guscio, un Shell. Quando un Shell è completamente chiusa (stagno), è possibile formare da esso un solido. E, infine, è possibile unire qualsiasi numero di forme di qualsiasi tipo, e produrre un Compoud, un Composto. |
||
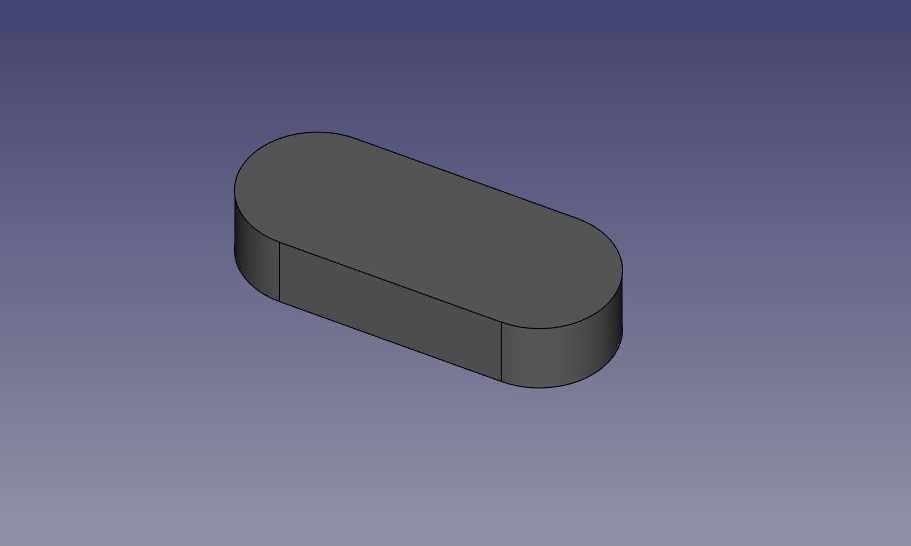
Ora proviamo a creare da zero forme complesse, con la costruzione di tutte le loro componenti una per una. Per esempio, cerchiamo di creare un volume come questo: |
|||
We can now try creating complex shapes from scratch, by constructing all their components one by one. For example, let's try to create a volume like this: |
|||
[[Image:Exercise_python_03.jpg]] |
[[Image:Exercise_python_03.jpg]] |
||
Revision as of 20:25, 3 October 2016
- Introduzione
- Scoprire FreeCAD
- Lavorare con FreeCAD
- Script Python
- La Comunità
Nei capitoli precedenti, abbiamo imparato a conoscere i diversi ambienti di FreeCAD, e che ciascuno di essi implementa i suoi propri strumenti e tipi di geometria. Gli stessi concetti si applicano quando si lavora con il codice Python.
Abbiamo anche visto che la grande maggioranza degli ambienti di FreeCAD dipendono da uno fondamentale: l'ambiente Part. Infatti, molti altri ambienti di lavoro, come ad esempio Draft o Arch, fanno esattamente quello che faremo in questo capitolo: usano del codice Python per creare e manipolare della geometria Part.
Quindi la prima cosa da fare per lavorare con la geometria Part, è di fare l'equivalente in Python passando all'ambiente Parte: importare il modulo Parte:
import Part
Dedicare un minuto per esplorare il contenuto del modulo parte, digitando Part. e navigare attraverso i diversi metodi proposti. Il modulo Parte offre diversi funzioni di convenienza, come makeBox, makeCircle, ecc ... che costruiscono immediatamente un oggetto. Provare questo, come esempio:
Part.makeBox(3,5,7)
Quando si preme Invio dopo aver digitato la linea precedente, nella vista 3D non appare nulla, ma nella console di Python viene stampato qualcosa di simile:
<Solid object at 0x5f43600>
Questo è dove avviene un concetto importante. Quello che abbiamo creato qui è una forma parte, una Part Shape. Non si tratta ancora di un document object di FreeCAD. In FreeCAD, gli oggetti e loro geometria sono indipendenti. Pensiamo a un document object di FreeCAD come un contenitore, destinato a ospitare una forma. Gli oggetti parametrici hanno anche delle proprietà, come lunghezza e larghezza, e la loro forma viene ricalcolata al-volo, ogni volta che cambia una delle proprietà. Quì abbiamo calcolato una forma manualmente.
Ora possiamo creare facilmente un "generico" document object nel documento corrente (assicuratevi di avere almeno un nuovo documento aperto), e assegnargli la forma box che abbiamo appena creato:
boxShape = Part.makeBox(3,5,7)
myObj = FreeCAD.ActiveDocument.addObject("Part::Feature","MyNewBox")
myObj.Shape = boxShape
FreeCAD.ActiveDocument.recompute()
Notare come abbiamo gestito myObj.Shape, vedere che abbiamo fatto esattamente come abbiamo fatto nel capitolo precedente, quando abbiamo cambiato altre proprietà di un oggetto, come ad esempio box.Height = 5. Infatti, Shape è anche una proprietà, proprio come Height. Solo che prende una Part Shape, non un numero. Nel prossimo capitolo daremo uno sguardo più approfondito su come sono costruiti tali oggetti parametrici.
Per il momento, esploriamo la Part Shape più in dettaglio. Alla fine del capitolo in merito alla [Manual:Traditional modeling, the CSG way/it|modellazione tradizionale con l'ambiente Parte] abbiamo mostrato una tabella che spiega come sono costruiti le forme Parte, e le loro diverse componenti (vertici, spigoli, facce, ecc). Quì esistono gli stessi esatti componenti e possono essere recuperati da Python. Tutte le Part Shape hanno sempre i seguenti attributi: Vertici, Bordi, Wire, Facce, Shell e Solid. Sono tutti elenchi, che possono contenere qualsiasi numero di elementi o essere vuoti:
print(boxShape.Vertexes)
print(boxShape.Edges)
print(boxShape.Wires)
print(boxShape.Faces)
print(boxShape.Shells)
print(boxShape.Solids)
Per esempio, troviamo l'area di ogni faccia della nostra forma box:
for f in boxShape.Faces:
  print(f.Area)
Oppure, il punto iniziale e il punto finale di ogni lato:
for e in boxShape.Edges:
  print("New edge")
  print("Start point:")
  print(e.Vertexes[0].Point)
  print("End point:")
  print(e.Vertexes[1].Point)
Come si vede, se il nostro boxShape ha un attributo "Vertexes", ogni Bordo del boxShape ha anche un attributo "Vertexes". Come ci si può aspettare, il boxShape ha 8 vertici, mentre il Bordo ne ha solo 2, che sono entrambi parte della lista degli 8.
Possiamo sempre controllare il tipo di una forma:
print(boxShape.ShapeType)
print(boxShape.Faces[0].ShapeType)
print (boxShape.Vertexes[2].ShapeType)
Quindi, per riassumere l'intero schema di una Part Shapes: Tutto comincia con i Vertici. Con uno o due vertici, si forma un bordo (i cerchi completi hanno un solo vertice). Con uno o più bordi, si forma un contorno, un Wire. Con uno o più contorni chiusi, si forma una faccia (i bordi aggiuntivi diventano "buchi" in una faccia). Con una o più facce, si forma un Guscio, un Shell. Quando un Shell è completamente chiusa (stagno), è possibile formare da esso un solido. E, infine, è possibile unire qualsiasi numero di forme di qualsiasi tipo, e produrre un Compoud, un Composto.
Ora proviamo a creare da zero forme complesse, con la costruzione di tutte le loro componenti una per una. Per esempio, cerchiamo di creare un volume come questo:
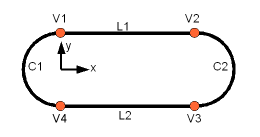
We will start by creating a planar shape like this:
First, let's create the four base points:
V1 = FreeCAD.Vector(0,10,0)
V2 = FreeCAD.Vector(30,10,0)
V3 = FreeCAD.Vector(30,-10,0)
V4 = FreeCAD.Vector(0,-10,0)
Then we can create the two linear segments:
L1 = Part.Line(V1,V2)
L2 = Part.Line(V4,V3)
Note that we didn't need to create Vertices? We could immediately create Part.Lines from FreeCAD Vectors. This is because here we haven't created Edges yet. A Part.Line (as well as Part.Circle, Part.Arc, Part.Ellipse or Part.BSpline) does not create an Edge, but rather a base geometry on which an Edge will be created. Edges are always made from such a base geometry, which is stored its Curve attribute. So if you have an Edge, doing:
print(Edge.Curve)
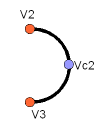
will show you what kind of Edge this is, that is, if it is based on a line, an arc, etc... But let's come back to our exercise, and build the arc segments. For this, we will need a third point, so we can use the convenient Part.Arc, which takes 3 points:
VC1 = FreeCAD.Vector(-10,0,0)
C1 = Part.Arc(V1,VC1,V4)
VC2 = FreeCAD.Vector(40,0,0)
C2 = Part.Arc(V2,VC2,V3)
Now we have 2 lines (L1 and L2) and 2 arcs (C1 and C2). We need to turn them into edges:
E1 = Part.Edge(L1)
E2 = Part.Edge(L2)
E3 = Part.Edge(C1)
E4 = Part.Edge(C2)
Alternatively, base geometries also have a toShape() function that do exactly the same thing:
E1 = L1.toShape()
E2 = L2.toShape()
...
Once we have a series of Edges, we can now form a Wire, by giving it a list of Edges. We don't need to take care of the order. OpenCasCade, the geometry "engine" of FreeCAD, is extraordinarily tolerant to unordered geometry. It will sort out what to do:
W = Part.Wire([E1,E2,E3,E4])
And we can check if our Wire was correctly understood, and that it is correclty closed:
print( W.isClosed() )
Which will print "True" or "False". In order to make a Face, we need closed Wires, so it is always a good idea to check that before creating the Face. Now we can create a Face, by giving it a single Wire (or a list of Wires if we had holes):
F = Part.Face(W)
Then we extrude it:
P = F.extrude(FreeCAD.Vector(0,0,10))
Note that P is already a Solid:
print(P.ShapeType)
Because when extruding a single Face, we always get a Solid. This wouldn't be the case, for example, if we had extruded the Wire instead:
S = W.extrude(FreeCAD.Vector(0,0,10))
print(s.ShapeType)
Which will of course give us a hollow shell, with the top and bottom faces missing.
Now that we have our final Shape, we are anxious to see it on screen! So let's create a generic object, and attribute it our new Solid:
myObj2 = FreeCAD.ActiveDocument.addObject("Part::Feature","My_Strange_Solid")
myObj2.Shape = P
FreeCAD.ActiveDocument.recompute()
Altenatively, the Part module also provides a shortcut that does the above operation quicker (but you cannot choose the name of the object):
Part.show(P)
All of the above, and much more, is explained in detail on the Part Scripting page, together with examples.
Read more:


