Arch Roof/es: Difference between revisions
(Created page with "La herramienta Techo le permite crear un techo inclinado a partir de un wire seleccionado. El objeto del techo creado es paramétrico, manteniendo su relación con el objeto b...") |
(Updating to match new version of source page) |
||
| (38 intermediate revisions by 5 users not shown) | |||
| Line 1: | Line 1: | ||
<languages/> |
|||
{{GuiCommand/es|Name=Arch Roof|Workbenches=[[Arch Module/es|Arquitectura]]|MenuLocation=Arquitectura → Techo|Shortcut=R F}} |
|||
{{Docnav |
|||
|[[Arch_Window|Window]] |
|||
|[[Arch_CompAxis|CompAxis]] |
|||
|[[Arch_Workbench|Arch]] |
|||
|IconL=Arch_Window.svg |
|||
|IconR=Arch_CompAxis.png |
|||
|IconC=Workbench_Arch.svg |
|||
}} |
|||
<div class="mw-translate-fuzzy"> |
|||
{{GuiCommand/es |
|||
|Name=Arch Roof |
|||
|Name/es=Arch Techo |
|||
|MenuLocation=Arquitectura → Techo |
|||
|Workbenches=[[Arch_Workbench/es|Arquitectura]] |
|||
|Shortcut={{KEY|R}} {{KEY|F}} |
|||
}} |
|||
</div> |
|||
<span id="Description"></span> |
|||
==Descripción== |
==Descripción== |
||
<div class="mw-translate-fuzzy"> |
|||
La herramienta Techo le permite crear un techo inclinado a partir de un wire seleccionado. El objeto del techo creado es paramétrico, manteniendo su relación con el objeto base. Tenga en cuenta que esta herramienta todavía está en desarrollo y puede fallar con formas muy complejas. El principio es que cada borde se ve asignando un perfil de techo (pendiente, ancho, saliente, espesor...). |
La herramienta Techo le permite crear un techo inclinado a partir de un wire seleccionado. El objeto del techo creado es paramétrico, manteniendo su relación con el objeto base. Tenga en cuenta que esta herramienta todavía está en desarrollo y puede fallar con formas muy complejas. El principio es que cada borde se ve asignando un perfil de techo (pendiente, ancho, saliente, espesor...). |
||
</div> |
|||
'''Note:''' This tool is still in development, and might fail with very complex shapes. |
|||
[[Image:RoofExample.png|600px]] |
[[Image:RoofExample.png|600px]] |
||
<div class="mw-translate-fuzzy"> |
|||
[[Image:RoofExample.png|600px]] |
|||
</div> |
|||
<span id="Usage_(wire_base)"></span> |
|||
==How to use== |
|||
<div class="mw-translate-fuzzy"> |
|||
==Utilización== |
|||
</div> |
|||
<div class="mw-translate-fuzzy"> |
|||
# Create a wire with following the conterclockwise direction and select it. |
|||
# Crea un wire siguiendo la dirección en sentido contrario a las agujas del reloj y selecciónalo. |
|||
#*[[Image:CounterclockwiseWire.png|600px]] |
|||
# * [[Image: CounterclockwiseWire.png | 600px]] |
|||
# Press the {{KEY|[[Image:Arch Roof.png|16px]] [[Arch Roof]]}} button, or press {{KEY|R}} then {{KEY|F}} keys |
|||
# Presiona el botón {{KEY|[[Image: Arch Roof.png|16px]] [[Arch Roof/es|Arch Roof]]}}, o presiona {{KEY|R}} luego las teclas {{KEY|F}} |
|||
# The default roof object could have a strange shape, it's because the tool have not all the needed informations. |
|||
# El objeto de techo predeterminado podría tener una forma extraña, es porque la herramienta no tiene toda la información necesaria. |
|||
# After creating the default roof, double click on the object in the tree view to access and edit all the properties. Angle must be between 0 and 90. |
|||
# Después de crear el techo predeterminado, haga doble clic en el objeto en la vista de árbol para acceder y editar todas las propiedades. El ángulo debe estar entre 0 y 90. |
|||
#*[[File:RoofTable.png]] |
|||
# * [[File: RoofTable.png]] |
|||
# Each line correspond to a roof pane. So you can set properties you want for each roof pane. |
|||
# Cada línea corresponde a un panel de techo. Entonces puede establecer las propiedades que desea para cada panel de techo. |
|||
# To help you, you can set Angle or Run to 0 and defined a Relative Id, this make automatic calculs to find the data relative to the relative Id. |
|||
# Para ayudarlo, puede establecer Ángulo o Run en 0 y definir un Id relativo, esto hace cálculos automáticos para encontrar los datos relativos al Id relativo. |
|||
# It work like this : |
|||
# Funciona así: |
|||
## If Angle = 0 and Run = 0 then profile is identical to the relative profile. |
|||
## |
## Si Angle = 0 y Run = 0, el perfil es idéntico al perfil relativo. |
||
## |
## Si Angle = 0, el ángulo se calcula de modo que la altura sea la misma que el perfil relativo. |
||
## Si Run = 0, Run se calcula para que la altura sea la misma que el perfil relativo. |
|||
# At the end, set an angle to 90° to make a gable. |
|||
# Al final, establece un ángulo de 90 ° para hacer un frontón. |
|||
#*[[Image:RoofProfil.png|600px]] |
|||
# * [[Image: RoofProfil.png | 600px]] |
|||
# '''Also you can check this video''' : https://www.youtube.com/watch?v=4Urwru71dVk |
|||
# '''También puedes consultar este video''': https://www.youtube.com/watch?v=4Urwru71dVk |
|||
</div> |
|||
==Usage (solid base)== |
|||
==Options== |
|||
If your roof has a complex shape (e.g. contains pitched windows or other non-standard features) you can create a custom solid object using various other FreeCAD workbenches ([[Part_Workbench|Part]], [[Sketcher_Workbench|Sketcher]] etc.). And then use this solid as the {{PropertyData|Base}} object of your roof: |
|||
* Roofs share the common properties and behaviours of all [[Arch Component|Arch Components]] |
|||
# Select the solid base object. |
|||
==Properties== |
|||
# Press the {{Button|[[Image:Arch_Roof.svg|16px]] [[Arch Roof|Arch Roof]]}} button, or press {{KEY|R}} then {{KEY|F}} keys. |
|||
==Subtracting a roof== |
|||
* {{PropertyData|Angles}}: List of the slope angle of the roof pane (an angle for each edge in the wire). |
|||
* {{PropertyData|Runs}}: List of the width of the roof pane (a run for each edge in the wire). |
|||
Roofs have an automatically generated subtraction volume ({{Version|1.0}} for roofs with a solid base). When a roof is [[Arch_Remove|removed]] from the walls of a building, both the roof itself as well as everything above it is subtracted from the walls. |
|||
* {{PropertyData|IdRel}}: List of relation Id The slope angle of the roof |
|||
* {{PropertyData|Thickness}}: List of thickness of the roof pane. (a thickness for each edge in the wire). |
|||
{{Version|1.0}}: It is possible to override the automatic subtraction volume by setting the {{PropertyData|Subvolume}} property of the roof to a custom solid object. |
|||
* {{PropertyData|Overhang}}: List of the overhang of the roof pane (an overhang for each edge in the wire). |
|||
* {{PropertyData|Face}}: The face index of the base object to be used #Not really used |
|||
[[File:Arch_Roof_Subtract_Default.png|x150px]] [[File:Arch_Roof_Subtract_Subvolume.png|x150px]] [[File:Arch_Roof_Subvolume_Example.png|x150px]] |
|||
{{Caption|Solid-based roof before (1st image) and after (2nd image) [[Arch_Remove|removing]] it from walls.<br> |
|||
The 3rd image shows the generated subtraction volume.}} |
|||
<span id="Options"></span> |
|||
==Opciones== |
|||
<div class="mw-translate-fuzzy"> |
|||
* Los techos comparten las propiedades y comportamientos comunes de todos los [[Arch Component/es|Arch Components]] |
|||
</div> |
|||
<span id="Properties"></span> |
|||
==Propiedades== |
|||
===Data=== |
|||
{{TitleProperty|Roof}} |
|||
<div class="mw-translate-fuzzy"> |
|||
* {{PropertyData/es|Angles}}: Lista del ángulo de inclinación del panel de techo (un ángulo para cada borde en el wire). |
|||
* {{PropertyData/es|Runs}}: Lista del ancho del panel del techo (una ejecución para cada borde en el wire). |
|||
* {{PropertyData/es|IdRel}}: Lista de la relación Id El ángulo de inclinación del techo |
|||
* {{PropertyData/es|Thickness}}: Lista de espesores del panel de techo. (un espesor para cada borde en el wire). |
|||
* {{PropertyData/es|Overhang}}: Lista del saliente del panel del techo (un saliente para cada borde en el wire). |
|||
* {{PropertyData/es|Face}}: El índice de la cara del objeto base que se utilizará #No realmente utilizado |
|||
</div> |
|||
==Scripting== |
==Scripting== |
||
<div class="mw-translate-fuzzy"> |
|||
The Roof tool can by used in [[macros]] and from the python console by using the following function: |
|||
==Programación== |
|||
</div> |
|||
<div class="mw-translate-fuzzy"> |
|||
La herramientas techo se puede utilizar en [[macros/es|macros]] y desde la consola de Python utilizando las siguientes funciones: |
|||
</div> |
|||
{{Code|code= |
{{Code|code= |
||
Roof = makeRoof(baseobj=None, facenr=0, angles=[45.,], run=[], idrel=[0,], thickness=[50.,], overhang=[100.,], name="Roof") |
|||
}} |
}} |
||
:Makes a roof based on a closed wire. You can provide a list of angles, run, idrel, thickness, overhang for each edges in the wire to define the roof shape. The default for angle is 45 and the list is automatically complete to match with number of edges in the wire. |
|||
<div class="mw-translate-fuzzy"> |
|||
Example: |
|||
: Hace un techo basado en un wire cerrado. Puede proporcionar una lista de ángulos, ejecutar, idrel, espesor, voladizo para cada borde en el wire para definir la forma del techo. El valor predeterminado para el ángulo es 45 y la lista se completa automáticamente para que coincida con el número de bordes en el wire. |
|||
</div> |
|||
Ejemplo: |
|||
{{Code|code= |
{{Code|code= |
||
import FreeCAD as App |
|||
import Arch, Draft |
import Arch, Draft |
||
rect = Draft.makeRectangle(30,40) |
|||
doc = App.newDocument() |
|||
Arch.makeRoof(rect,angles=[30.,]) |
|||
rect = Draft.makeRectangle(3000, 4000) |
|||
doc.recompute() |
|||
roof = Arch.makeRoof(rect, angles=[30.,]) |
|||
p1 = App.Vector(0, 0, 0) |
|||
p2 = App.Vector(1000, 1000, 0) |
|||
p3 = App.Vector(0, 2000, 0) |
|||
wire = Draft.make_wire([p1, p2, p3], closed=True) |
|||
doc.recompute() |
|||
roof1 = Arch.makeRoof(wire) |
|||
doc.recompute() |
|||
}} |
}} |
||
<languages/> |
|||
<div class="mw-translate-fuzzy"> |
|||
[[Category:Arch/es]] |
|||
</div> |
|||
{{Arch Tools navi{{#translation:}}}} |
|||
{{Userdocnavi{{#translation:}}}} |
|||
Latest revision as of 09:47, 21 April 2024
|
|
| Ubicación en el Menú |
|---|
| Arquitectura → Techo |
| Entornos de trabajo |
| Arquitectura |
| Atajo de teclado por defecto |
| R F |
| Introducido en versión |
| - |
| Ver también |
| Ninguno |
Descripción
La herramienta Techo le permite crear un techo inclinado a partir de un wire seleccionado. El objeto del techo creado es paramétrico, manteniendo su relación con el objeto base. Tenga en cuenta que esta herramienta todavía está en desarrollo y puede fallar con formas muy complejas. El principio es que cada borde se ve asignando un perfil de techo (pendiente, ancho, saliente, espesor...).
Note: This tool is still in development, and might fail with very complex shapes.
Utilización
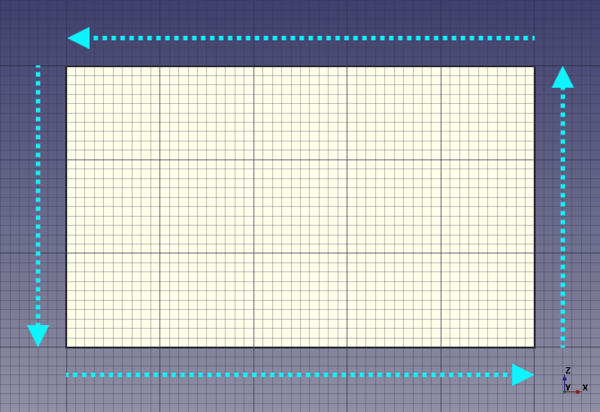
- Crea un wire siguiendo la dirección en sentido contrario a las agujas del reloj y selecciónalo.
- *
- Presiona el botón
 Arch Roof, o presiona R luego las teclas F
 - El objeto de techo predeterminado podría tener una forma extraña, es porque la herramienta no tiene toda la información necesaria.
- Después de crear el techo predeterminado, haga doble clic en el objeto en la vista de árbol para acceder y editar todas las propiedades. El ángulo debe estar entre 0 y 90.
- *
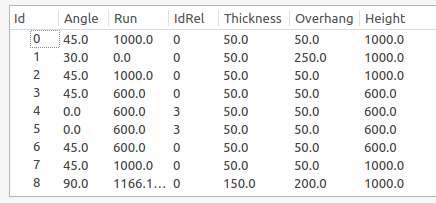
- Cada línea corresponde a un panel de techo. Entonces puede establecer las propiedades que desea para cada panel de techo.
- Para ayudarlo, puede establecer Ángulo o Run en 0 y definir un Id relativo, esto hace cálculos automáticos para encontrar los datos relativos al Id relativo.
- Funciona así:
- Si Angle = 0 y Run = 0, el perfil es idéntico al perfil relativo.
- Si Angle = 0, el ángulo se calcula de modo que la altura sea la misma que el perfil relativo.
- Si Run = 0, Run se calcula para que la altura sea la misma que el perfil relativo.
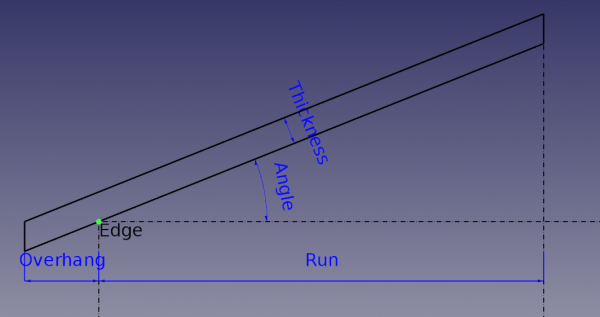
- Al final, establece un ángulo de 90 ° para hacer un frontón.
- *
- También puedes consultar este video: https://www.youtube.com/watch?v=4Urwru71dVk
Usage (solid base)
If your roof has a complex shape (e.g. contains pitched windows or other non-standard features) you can create a custom solid object using various other FreeCAD workbenches (Part, Sketcher etc.). And then use this solid as the DatosBase object of your roof:
- Select the solid base object.
- Press the
Arch Roof button, or press R then F keys.
Subtracting a roof
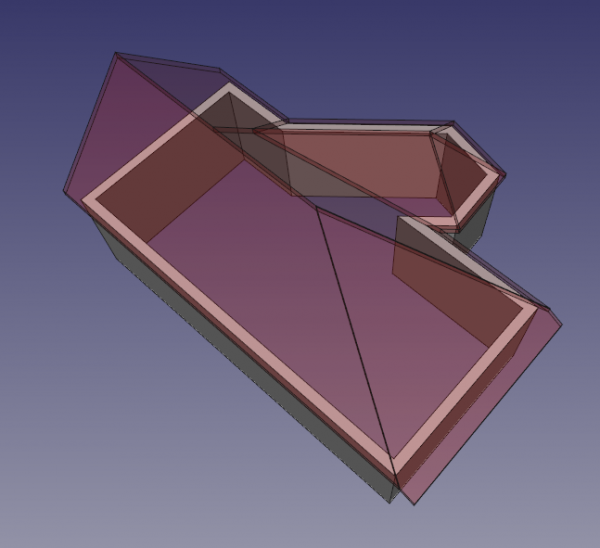
Roofs have an automatically generated subtraction volume (introduced in version 1.0 for roofs with a solid base). When a roof is removed from the walls of a building, both the roof itself as well as everything above it is subtracted from the walls.
introduced in version 1.0: It is possible to override the automatic subtraction volume by setting the DatosSubvolume property of the roof to a custom solid object.
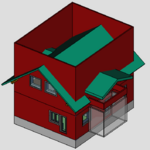
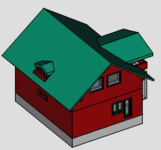
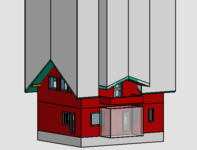
Solid-based roof before (1st image) and after (2nd image) removing it from walls.
The 3rd image shows the generated subtraction volume.
Opciones
- Los techos comparten las propiedades y comportamientos comunes de todos los Arch Components
Propiedades
Data
Roof
- DATOSAngles: Lista del ángulo de inclinación del panel de techo (un ángulo para cada borde en el wire).
- DATOSRuns: Lista del ancho del panel del techo (una ejecución para cada borde en el wire).
- DATOSIdRel: Lista de la relación Id El ángulo de inclinación del techo
- DATOSThickness: Lista de espesores del panel de techo. (un espesor para cada borde en el wire).
- DATOSOverhang: Lista del saliente del panel del techo (un saliente para cada borde en el wire).
- DATOSFace: El índice de la cara del objeto base que se utilizará #No realmente utilizado
Scripting
Programación
La herramientas techo se puede utilizar en macros y desde la consola de Python utilizando las siguientes funciones:
Roof = makeRoof(baseobj=None, facenr=0, angles=[45.,], run=[], idrel=[0,], thickness=[50.,], overhang=[100.,], name="Roof")
- Hace un techo basado en un wire cerrado. Puede proporcionar una lista de ángulos, ejecutar, idrel, espesor, voladizo para cada borde en el wire para definir la forma del techo. El valor predeterminado para el ángulo es 45 y la lista se completa automáticamente para que coincida con el número de bordes en el wire.
Ejemplo:
import FreeCAD as App
import Arch, Draft

doc = App.newDocument()

rect = Draft.makeRectangle(3000, 4000)
doc.recompute()

roof = Arch.makeRoof(rect, angles=[30.,])

p1 = App.Vector(0, 0, 0)
p2 = App.Vector(1000, 1000, 0)
p3 = App.Vector(0, 2000, 0)

wire = Draft.make_wire([p1, p2, p3], closed=True)
doc.recompute()

roof1 = Arch.makeRoof(wire)

doc.recompute()
- Elements: Wall, Structure, Curtain Wall, Window, Roof, Space, Stairs, Equipment, Frame, Fence, Truss, Profile, Pipe, Pipe Connector
- Reinforcements: Straight Rebar, U-Shape Rebar, L-Shape Rebar, Stirrup, Bent-Shape Rebar, Helical Rebar, Column Reinforcement, Beam Reinforcement, Slab Reinforcement, Footing Reinforcement, Custom Rebar
- Panels: Panel, Panel Cut, Panel Sheet, Nest
- Materials: Material, Multi-Material
- Organization: Building Part, Project, Site, Building, Level, External reference, Section Plane, Schedule
- Axes: Axis, Axes system, Grid
- Modification: Cut with plane, Add component, Remove component, Survey
- Utilities: Component, Clone component, Split Mesh, Mesh to Shape, Select non-manifold meshes, Remove Shape from Arch, Close Holes, Merge Walls, Check, Toggle IFC Brep flag, 3 Views from mesh, Create IFC spreadsheet, Toggle Subcomponents
- Additional: Preferences, Import Export Preferences (IFC, DAE, OBJ, JSON, 3DS, SHP), IfcOpenShell, IfcPlusPlus, Arch API
- Getting started
- Installation: Download, Windows, Linux, Mac, Additional components, Docker, AppImage, Ubuntu Snap
- Basics: About FreeCAD, Interface, Mouse navigation, Selection methods, Object name, Preferences, Workbenches, Document structure, Properties, Help FreeCAD, Donate
- Help: Tutorials, Video tutorials
- Workbenches: Std Base, Arch, Assembly, CAM, Draft, FEM, Inspection, Mesh, OpenSCAD, Part, PartDesign, Points, Reverse Engineering, Robot, Sketcher, Spreadsheet, Surface, TechDraw, Test Framework
- Hubs: User hub, Power users hub, Developer hub
