Tolerancing: Difference between revisions
(Removed page from translation) |
(Reinstated {{Clear}}.) |
||
| (4 intermediate revisions by 2 users not shown) | |||
| Line 1: | Line 1: | ||
{{VeryImportantMessage| |
|||
This roadmap is probably obsolete. For more information see [[Development_roadmap|Development roadmap]].<br> |
|||
If you are not involved with the development discussed here:<br> |
|||
!!! PLEASE DO NOT EDIT OR TRANSLATE !!! |
|||
}} |
|||
{{TOCright}} |
{{TOCright}} |
||
| Line 12: | Line 5: | ||
There's also a distinction between the terms "limits and fits" and "geometric tolerances and surface conditions". |
There's also a distinction between the terms "limits and fits" and "geometric tolerances and surface conditions". |
||
{{ |
{{Clear}} |
||
== Standards == |
== Standards == |
||
There are 2 ANSI/ISO standards: |
There are 2 ANSI/ISO standards: |
||
* ISO 1101 / ASME Y14.5 Stating and interpreting Geometric Dimensions and Tolerances (Definitions and symbols) |
* ISO 1101 / ASME Y14.5 Stating and interpreting Geometric Dimensions and Tolerances (Definitions and symbols) |
||
* ISO 16792 / ASME Y14.41 Model-based definitions (CAD data) 3D model presentation and geometric dimensioning and tolerancing |
* ISO 16792 / ASME Y14.41 Model-based definitions (CAD data) 3D model presentation and geometric dimensioning and tolerancing |
||
ISO 16792 is a part of "Geometrical Product Specification" (GPS), which defines dimensional and geometrical tolerancing, surface properties and the related verification principles, measuring equipment and calibration requirements, including the uncertainty of dimensional and geometrical measurement. |
ISO 16792 is a part of "Geometrical Product Specification" (GPS), which defines dimensional and geometrical tolerancing, surface properties and the related verification principles, measuring equipment and calibration requirements, including the uncertainty of dimensional and geometrical measurement. |
||
| Line 30: | Line 23: | ||
There are two approaches to specifying Product and Manufacturing Information (PMI). |
There are two approaches to specifying Product and Manufacturing Information (PMI). |
||
* The legacy approach (Traditional) of producing 2D drawings with GD&T symbols. In some industries, this approach is also referred to as Technical Product Documentation (TPD). How this is achieved with FreeCAD |
* The legacy approach (Traditional) of producing 2D drawings with GD&T symbols. In some industries, this approach is also referred to as Technical Product Documentation (TPD). How this is achieved with FreeCAD is described in [[TechDraw_Geometric_dimensioning_and_tolerancing|TechDraw Geometric dimensioning and tolerancing]]. |
||
* The modern 3D approach Model-Based Definition (MBD) which embeds GD&T data into the model and produces drawings with GD&T symbols |
* The modern 3D approach Model-Based Definition (MBD) which embeds GD&T data into the model and produces drawings with GD&T symbols. |
||
{| class="wikitable" |
{| class="wikitable" |
||
| Line 81: | Line 74: | ||
* [https://www.youtube.com/watch?v=-3tN7KvDUjQ GD&T for beginners | step by step approach to do GD&T for mechanical drawing (Video)] |
* [https://www.youtube.com/watch?v=-3tN7KvDUjQ GD&T for beginners | step by step approach to do GD&T for mechanical drawing (Video)] |
||
* [https://www.youtube.com/c/StraightToThePointEngineering/videos?view=0&sort=da&flow=grid Straight To The Point Engineering (Video tutorials)] |
* [https://www.youtube.com/c/StraightToThePointEngineering/videos?view=0&sort=da&flow=grid Straight To The Point Engineering (Video tutorials)] |
||
[[Category:Roadmap{{#translation:}}]] |
[[Category:Roadmap{{#translation:}}]] |
||
Latest revision as of 09:12, 8 August 2022

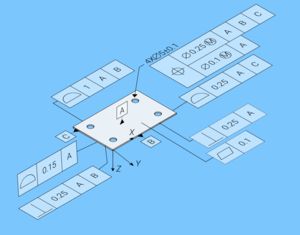
Geometric dimensioning and tolerancing (GD&T) means the specification of permissible limits/deviation of dimensions. Here we're talking strictly about geometric tolerances: a real-world error of shape, size, location, orientation in relation to the designed ideal.
There's also a distinction between the terms "limits and fits" and "geometric tolerances and surface conditions".
Standards
There are 2 ANSI/ISO standards:
- ISO 1101 / ASME Y14.5 Stating and interpreting Geometric Dimensions and Tolerances (Definitions and symbols)
- ISO 16792 / ASME Y14.41 Model-based definitions (CAD data) 3D model presentation and geometric dimensioning and tolerancing
ISO 16792 is a part of "Geometrical Product Specification" (GPS), which defines dimensional and geometrical tolerancing, surface properties and the related verification principles, measuring equipment and calibration requirements, including the uncertainty of dimensional and geometrical measurement.
There's also ISO 10303 (informally "STEP"), which defines the file format for exchanging product and manufacturing information, which is sourced from model-based definitions.
Approaches
There are two approaches to specifying Product and Manufacturing Information (PMI).
- The legacy approach (Traditional) of producing 2D drawings with GD&T symbols. In some industries, this approach is also referred to as Technical Product Documentation (TPD). How this is achieved with FreeCAD is described in TechDraw Geometric dimensioning and tolerancing.
- The modern 3D approach Model-Based Definition (MBD) which embeds GD&T data into the model and produces drawings with GD&T symbols.
| Traditional | MBD |
|---|---|
| 3D models with 2D drawings containing GD&T/PMI | 3D model with embedded GD&T/PMI |
| Human-readable | Human- and machine-readable |
| Relies on human interpretation | Relies on an automated process |
| Labour-intensive | Automated |
| Multiple files | Single data model |
| Manual synchronization between CMM/CAM/CAI software | Single source of truth |
Existing software
- Adding geometric tolerance with feature control frame in AutoCAD
- Working with Drawing Symbols in Fusion 360
- Tech Tip Tuesday: Using the GD&T Quick Creation Menu in GOM Inspect
- CATIA V5 - FUNCTIONAL TOLERANCING & ANNOTATION
- SmartProfile GD&T Analysis Software
Implementation so far
- TechDraw symbols SVG files
- GDT workbench
- TechDraw balloon macro
- A branch that introduced a new type of DocumentObject: DrawViewGDTReference
Forum threads
- Enhancing TechDraw with geometric tolerances and surface finishings - Developer discussion (2019)
- Geometrical tolerances - User feature request (2016)
- GD&T Workbench for FreeCAD - A workbench for FreeCAD 0.16 (2016)
- TechDraw balloons - A general-purpose TechDraw Macro which can be used to place GD&T symbols on a TechDraw page (2019)
- ISO 1101: 2017 Geometric Tolerancing Standard - A link to the ISO 1101:2017 PDF file (2019)
- Geometric Dimensioning & Tolerancing - Developer proposing contributions (2019)