SheetMetal Forming: Difference between revisions
(Data rearranged to match view properties - With complete set of properties the site looks a bit overloaded...) |
(Marked this version for translation) |
||
| (33 intermediate revisions by 4 users not shown) | |||
| Line 6: | Line 6: | ||
{{Docnav |
{{Docnav |
||
|[[SheetMetal_SketchOnSheet|SketchOnSheet]] |
|[[SheetMetal_SketchOnSheet|SketchOnSheet]] |
||
|[[SheetMetal_BaseShape|Add base shape]] |
|||
| |
|||
|[[SheetMetal_Workbench|SheetMetal |
|[[SheetMetal_Workbench|SheetMetal]] |
||
|IconL=SheetMetal_SketchOnSheet.svg |
|IconL=SheetMetal_SketchOnSheet.svg |
||
|IconR= |
|IconR=SheetMetal_BaseShape.svg |
||
|IconC=Sheetmetal_workbench_icon.svg |
|IconC=Sheetmetal_workbench_icon.svg |
||
}} |
}} |
||
| Line 26: | Line 26: | ||
The [[Image:SheetMetal_Forming.svg|24px]] '''SheetMetal Forming''' command creates an embossed shape in a SheetMetal wall using a separate solid object. |
The [[Image:SheetMetal_Forming.svg|24px]] '''SheetMetal Forming''' command creates an embossed shape in a SheetMetal wall using a separate solid object. |
||
<!--T:23--> |
|||
The back side plane of the shapedefining solid is used to position and orient the embossed shape, i.e. their local coordinate systems will have the same origin and the same orientation by default. </br> The angle around the z-axis and offsets in x, y, and z direction may be altered by changing the parameter values in the properties window. |
|||
The back side face of the solid defining the shape, and the face to be embossed are used to position and orient the solid, i.e. their local coordinate systems will have the same origin and the same orientation by default. The angle around the Z axis and offsets in the X, Y, and Z direction can be altered by changing their values in the [[Property_editor|Property editor]]. |
|||
<!--T:24--> |
|||
A sketch can be added to multiply and distribute the embossed shape in regular or irregular patterns (using the center points of circles or arcs). |
|||
<!--T:25--> |
|||
A small selection of features that can be created: |
|||
</translate> |
|||
[[Image:SheetMetal_Forming-08.png|200px]] |
|||
[[Image:SheetMetal_Forming-09.png|200px]]</br> |
|||
[[Image:SheetMetal_Forming-10.png|200px]] |
|||
[[Image:SheetMetal_Forming-11.png|200px]] |
|||
<translate> |
|||
<!--T:26--> |
|||
{{Caption|dimples, louvres, drawn cutouts, bridges}} |
|||
== Usage == <!--T:5--> |
== Usage == <!--T:5--> |
||
<!--T:57--> |
|||
# Select the wall of the SheetMetal object to be embossed |
|||
Make sure that the body containing the object to be embossed is the active body. If required double-click it in the [[Tree_view|Tree view]]. |
|||
# Select the '''back side''' of the shape defining solid |
|||
#*'''Note:''' Don't forget the {{KEY|Control}}/{{KEY|Command}} key! |
|||
===Dimple=== <!--T:27--> |
|||
# Activate the [[Image:SheetMetal_Forming.svg|16px]] [[SheetMetal_Forming|Make Forming in Wall]] command using: |
|||
#* {{Button|[[Image:SheetMetal_Forming.svg|16px]] [[SheetMetal_Forming|Make Forming in Wall]]}} button |
|||
<!--T:28--> |
|||
#* {{MenuCommand|SheetMetal → [[Image:SheetMetal_Forming.svg|16px]] Make Forming in Wall}} drop down menu |
|||
# Select the face of the SheetMetal object to be embossed. |
|||
#* keyboard shortcut: {{KEY|M}} then {{KEY|F}} |
|||
# Hold down the {{KEY|Ctrl}} key (or the {{KEY|Command}} key on macOS). |
|||
# Add the '''bottom face''' (back side) of the solid defining the shape to the selection. |
|||
# Release the {{KEY|Ctrl}} key (or the {{KEY|Command}} key). |
|||
# Activate the [[Image:SheetMetal_Forming.svg|16px]] [[SheetMetal_Forming|SheetMetal Forming]] command using one of the following: |
|||
#* The {{Button|[[Image:SheetMetal_Forming.svg|16px]] [[SheetMetal_Forming|SheetMetal Forming]]}} button. |
|||
#* The {{MenuCommand|SheetMetal → [[Image:SheetMetal_Forming.svg|16px]] Make Forming in Wall}} menu option. |
|||
#* The keyboard shortcut: {{KEY|M}} then {{KEY|F}}. |
|||
===Louvre=== <!--T:29--> |
|||
<!--T:30--> |
|||
# Select the face of the SheetMetal object to be embossed. |
|||
# Hold down the {{KEY|Ctrl}} key (or the {{KEY|Command}} key on macOS). |
|||
# Add the '''bottom face''' (back side) of the solid defining the shape to the selection. |
|||
# Add a '''side face''' adjoined the bottom face to indicate the position of the cut to the selection. |
|||
# Release the {{KEY|Ctrl}} key (or the {{KEY|Command}} key). |
|||
# Activate the [[Image:SheetMetal_Forming.svg|16px]] [[SheetMetal_Forming|SheetMetal Forming]] command (see above). |
|||
===Bridge=== <!--T:31--> |
|||
<!--T:32--> |
|||
# Select the face of the SheetMetal object to be embossed. |
|||
# Hold down the {{KEY|Ctrl}} key (or the {{KEY|Command}} key on macOS). |
|||
# Add the '''bottom face''' (back side) of the solid defining the shape to the selection. |
|||
# Add a '''side face''' adjoined the bottom face to indicate the position of the first cut to the selection. |
|||
# Add the '''opposite side face''' adjoined the bottom face to indicate the position of the second cut to the selection. |
|||
# Release the {{KEY|Ctrl}} key (or the {{KEY|Command}} key). |
|||
# Activate the [[Image:SheetMetal_Forming.svg|16px]] [[SheetMetal_Forming|SheetMetal Forming]] command (see above). |
|||
===Drawn Cutout=== <!--T:33--> |
|||
<!--T:34--> |
|||
# Select the face of the SheetMetal object to be embossed. |
|||
# Hold down the {{KEY|Ctrl}} key (or the {{KEY|Command}} key on macOS). |
|||
# Add the '''bottom face''' (back side) of the solid defining the shape to the selection. |
|||
# Add the '''top face''' opposite the bottom face to mark the area to be cut open to the selection. |
|||
# Release the {{KEY|Ctrl}} key (or the {{KEY|Command}} key). |
|||
# Activate the [[Image:SheetMetal_Forming.svg|16px]] [[SheetMetal_Forming|SheetMetal Forming]] command (see above). |
|||
===Multiply and Pattern=== <!--T:35--> |
|||
<!--T:36--> |
|||
To muliply and pattern the embossed feature a '''sketch''' containing circles and arcs can be added to the '''WallForming''' object's property {{PropertyData|Sketch}}. This pattern sketch must be '''coplanar''' with the face to be embossed. |
|||
<!--T:37--> |
|||
The centerpoints of the circles or arcs are used to provide positions to put instances of the embossed feature; they don't influence the instances' orientation. |
|||
<!--T:38--> |
|||
The orientation still depends on the orientation of the first selected face. |
|||
===Adding Fillets=== <!--T:39--> |
|||
<!--T:40--> |
|||
# Switch to the [[Image:Workbench_PartDesign.svg|16px]] [[PartDesign_Workbench|PartDesign]] workbench |
|||
# Select an edge on the upper side of the SheetMetal object to receive a fillet |
|||
# Activate the [[Image:PartDesign_Fillet.svg|16px]] [[PartDesign_Fillet|PartDesign Fillet]] command using one of the following: |
|||
#* The {{Button|[[Image:PartDesign_Fillet.svg|16px]] [[PartDesign_Fillet|PartDesign Fillet]]}} button. |
|||
#* The {{MenuCommand|PartDesign → Apply a dress-up feature → [[Image:PartDesign_Fillet.svg|16px]] Fillet}} menu option. |
|||
# Set the Fillet object's {{PropertyData|Refine}} property to {{TRUE}}. This is important for the next fillet. |
|||
# Select an edge on the bottom side of the SheetMetal object to receive a fillet. |
|||
# Activate the [[Image:PartDesign_Fillet.svg|16px]] [[PartDesign_Fillet|PartDesign Fillet]] command (see above) |
|||
== Notes == <!--T:58--> |
|||
<!--T:59--> |
|||
The embossed geometry is not restricted to planar walls and cylindrical connections and so after such a geometry is applied to a SheetMetal object '''the object is no longer unfoldable'''. |
|||
<!--T:60--> |
|||
The forming can be deactivated (by setting the property {{PropertyData|Suppress Feature}} to {{True}}) to unfold the object, but following fillets lose their defining edges and show an error when the forming is reactivated. |
|||
<!--T:61--> |
|||
Forming and fillets should be the last steps in creating a SheetMetal object. |
|||
== Properties == <!--T:6--> |
== Properties == <!--T:6--> |
||
<!--T:41--> |
|||
=== Data === |
|||
See also: [[Property_editor|Property editor]]. |
|||
<!--T:42--> |
|||
A SheetMetal WallForming object is derived from a [[Part_Feature|Part Feature]] object and inherits all its properties. It also has the following additional properties: |
|||
=== Data === <!--T:43--> |
|||
<!--T:44--> |
|||
{{Properties_Title|Base}} |
{{Properties_Title|Base}} |
||
<!--T:45--> |
|||
* {{PropertyData|Proxy|PythonObject|hidden}}: A custom class associated with this object. This only exists for the [[Python|Python]] version. See [[Part_Feature#Scripting|Scripting]]. |
|||
* {{PropertyData|Label|String}}: Default value: {{value|WallForming}} (+ a sequential number for second and following items). </br>The user editable name of this object, it may be any arbitrary UTF8 string. |
|||
* {{PropertyData|Base Feature|Link|hidden}}: Base Feature. Link to the parent feature. |
* {{PropertyData|Base Feature|Link|hidden}}: Base Feature. Link to the parent feature. |
||
* {{PropertyData|_Body|LinkHidden|hidden}}: |
* {{PropertyData|_Body|LinkHidden|hidden}}: |
||
* {{PropertyData|Shape|PartShape|hidden}}: A [[Part_TopoShape|Part TopoShape]] class associated with this object. |
|||
* {{PropertyData|Placement|Placement|hidden}}: The position of the object in the [[3D view|3D view]]. </br> The placement is defined by a {{incode|Base}} point (vector), and a {{incode|Rotation}} (axis and angle). See [[Placement|Placement]]. |
|||
** {{PropertyData|Angle||hidden}}: the angle of rotation around the {{PropertyData|Axis}}. By default, it is {{value|0°}} (zero degrees). |
|||
** {{PropertyData|Axis||hidden}}: the unit vector that defines the axis of rotation for the placement. Each component is a floating point value between {{value|0}} and {{value|1}}. If any value is above {{value|1}}, the vector is normalized so that the magnitude of the vector is {{value|1}}. By default, it is the positive Z axis, {{value|(0, 0, 1)}}. |
|||
** {{PropertyData|Position||hidden}}: a vector with the 3D coordinates of the base point. By default, it is the origin {{value|(0, 0, 0)}}. |
|||
* {{PropertyData|Label|String}}: "User name of the object (UTF8)", default: {{value|WallForming}} (+ a sequential number for second and following items).</br> The user editable name of this object, it may be an arbitrary UTF8 string. |
|||
* {{PropertyData|Label2|String}}: A longer, user editable description of this object, it is an arbitrary UTF8 string that may include newlines. By default, it is an empty string {{value|""}}. |
|||
* {{PropertyData|Expression Engine|ExpressionEngine|hidden}}: A list of expressions. By default, it is empty {{value|[]}}. |
|||
* {{PropertyData|Visibility|Bool|hidden}}: If it is {{TRUE}}, the object appears in the [[3D_view|3D view]]; otherwise it is invisible. </br> By default this property can be toggled on and off by pressing the {{KEY|Space}} bar on the keyboard. |
|||
<!--T:46--> |
|||
{{Properties_Title|Parameters}} |
{{Properties_Title|Parameters}} |
||
<!--T:47--> |
|||
* {{PropertyData|Suppress Feature|Bool}}: "Suppress Forming Feature". Default value is {{FALSE}}. |
* {{PropertyData|Suppress Feature|Bool}}: "Suppress Forming Feature". Default value is {{FALSE}}. |
||
* {{PropertyData|angle|Angle}}: "Tool Position Angle". Default angle: {{value|0,00°}}. |
* {{PropertyData|angle|Angle}}: "Tool Position Angle". Default angle: {{value|0,00°}}. |
||
| Line 66: | Line 155: | ||
* {{PropertyData|tool Object|LinkSub}}: "Forming Tool Object". Link to the planar face used to position the Forming Tool |
* {{PropertyData|tool Object|LinkSub}}: "Forming Tool Object". Link to the planar face used to position the Forming Tool |
||
<!--T:48--> |
|||
{{Properties_Title|Parameters1}} |
{{Properties_Title|Parameters1}} |
||
<!--T:49--> |
|||
* {{PropertyData|Sketch|Link}}: "Point Sketch on Sheetmetal". |
|||
* {{PropertyData|Sketch|Link}}: "Point Sketch on Sheetmetal". Link to the sketch containing information how to multiply and distribute instances of the Forming Tool. (Center points of circles and arcs are used to create and position these instances) |
|||
== Example == <!--T:50--> |
|||
{{Properties_Title|Base}} |
|||
* {{PropertyView|Proxy|PythonObject|hidden}}: a custom [[viewprovider|viewprovider]] class associated with this object. This only exists for the [[Python|Python]] version. See [[Part_Feature#Scripting|Scripting]]. |
|||
{{Properties_Title|Display Options}} |
|||
* {{PropertyView|Bounding Box|Bool|hidden}}: If it is {{TRUE}}, the object will show the bounding box in the [[3D view|3D view]]. |
|||
* {{PropertyView|Display Mode|Enumeration|hidden}}: {{value|Flat Lines}} (regular visualization), {{value|Shaded}} (no edges), {{value|Wireframe}} (no faces), {{value|Points}} (only vertices). |
|||
* {{PropertyView|Show In Tree|Bool|hidden}}: It defaults to {{TRUE}}, in which case the object will appear in the [[tree view|tree view]]; otherwise, the object will be hidden in the tree view. Once an object in the tree is invisible, you can see it again by opening the context menu over the name of the document (right-click), and selecting {{CheckBox|TRUE|Show hidden items}}. Then the hidden item can be chosen and {{PropertyView|Show In Tree}} can be switched back to {{TRUE}}. |
|||
* {{PropertyView|Visibility|Bool}}: If it is {{TRUE}}, the object appears in the [[3D view|3D view]]; otherwise it is invisible. By default this property can be toggled on and off by pressing the {{KEY|Space}} bar in the keyboard. |
|||
{{Properties_Title|Object Style}} |
|||
* {{PropertyView|Angular Deflection|Angle|hidden}}: It is a companion to {{PropertyView|Deviation}}. It is another way to specify how finely to generate the mesh for rendering on screen or when exporting. The default value is {{value|28.5 degrees}}, or {{value|0.5 radians}}. This is the maximum value, the smaller the value the smoother the appearance will be in the [[3D view|3D view]], and the finer the mesh that will be exported. |
|||
* {{PropertyView|Deviation|FloatConstraint|hidden}}: It is a companion to {{PropertyView|Angular Deflection}}. It is another way to specify how finely to generate the mesh for rendering on screen or when exporting. The default value is {{value|0.5%}}. This is the maximum value, the smaller the value the smoother the appearance will be in the [[3D view|3D view]], and the finer the mesh that will be exported. |
|||
* {{PropertyView|Diffuse Color|ColorList|hidden}}: It is a list of RGB tuples defining colors, similar to {{PropertyView|Shape Color}}. </br> It defaults to a list of one tuple {{value|[(0.8, 0.8, 0.8)]}}. |
|||
* {{PropertyView|Draw Style|Enumeration|hidden}}: {{value|Solid}} (default), {{value|Dashed}}, {{value|Dotted}}, {{value|Dashdot}}; defines the style of the edges in the [[3D view|3D view]]. |
|||
* {{PropertyView|Lighting|Enumeration|hidden}}: {{value|Two side}} (default), {{value|One side}}; the illumination comes from two sides or one side in the [[3D view|3D view]]. |
|||
* {{PropertyView|Line Color|Color|hidden}}: a tuple of three floating point RGB values {{value|(r,g,b)}} to define the color of the edges in the [[3D view|3D view]]; by default it is {{value|(0.09, 0.09, 0.09)}}, which is displayed as {{value|[25,25,25]}} on base 255, <span style="background-color:#222; color:#eee; width:3em; height:12pt; padding: 2px 1em 2px;"> almost black </span>. |
|||
* {{PropertyView|Line Color Array|ColorList|hidden}}: it is a list of RGB tuples defining colors, similar to {{PropertyView|Line Color}}. It defaults to a list of one {{value|[(0.09, 0.09, 0.09)]}}. |
|||
* {{PropertyView|Line Material|Material|hidden}}: an [[App_Material|App Material]] associated with the edges in this object. By default it is empty. |
|||
* {{PropertyView|Line Width|FloatConstraint|hidden}}: a float that determines the width in pixels of the edges in the [[3D view|3D view]]. It defaults to {{value|2.0}}. |
|||
* {{PropertyView|Point Color|Color|hidden}}: similar to {{PropertyView|Line Color}}, defines the color of the vertices. |
|||
* {{PropertyView|Point Color Array|ColorList|hidden}}: it is a list of RGB tuples defining colors, similar to {{PropertyView|Point Color}}. It defaults to a list of one {{value|[(0.09, 0.09, 0.09)]}}. |
|||
* {{PropertyView|Point Material|Material|hidden}}: an [[App_Material|App Material]] associated with the vertices in this object. By default it is empty. |
|||
* {{PropertyView|Point Size|FloatConstraint|hidden}}: similar to {{PropertyView|Line Width}}, defines the size of the vertices. |
|||
* {{PropertyView|Shape Color|Color|hidden}}: similar to {{PropertyView|Line Color}}, defines the color of the faces. It defaults to {{value|(0.8, 0.8, 0.8)}}, which is displayed as {{value|[204, 204, 204]}} on base 255, a <span style="background-color:#ccc; width:3em; height:12pt; padding: 2px 1em 2px;">light gray</span>. |
|||
* {{PropertyView|Shape Material|Material|hidden}}: an [[App_Material|App Material]] associated with this object. By default it is empty. |
|||
* {{PropertyView|Transparency|Percent|hidden}}: An integer from {{value|0}} to {{value|100}} (a percentage) that determines the level of transparency of the faces in the [[3D view|3D view]]. A value of {{value|100}} indicates completely invisible faces; the faces are invisible but they can still be picked as long as {{PropertyView|Selectable}} is {{TRUE}}. |
|||
{{Properties_Title|Selection}} |
|||
* {{PropertyView|On Top When Selected|Enumeration|hidden}}: It controls the way in which the selection occurs in the [[3D_view|3D view]] if the object has a [[Part_TopoShape|Shape]], and there are many objects partially covered by others. It defaults to {{value|Disabled}}, meaning that no special highlighting will occur; {{value|Enabled}} means that the object will appear on top of any other object when selected; {{value|Object}} means that the object will appear on top only if the entire object is selected in the [[tree_view|tree view]]; {{value|Element}} means that the object will appear on top only if a subelement (vertex, edge, face) is selected in the [[3D_view|3D view]]. |
|||
* {{PropertyView|Selectable|Bool}}: If it is {{TRUE}}, the object can be picked with the pointer in the [[3D view|3D view]]. Otherwise, the object cannot be selected until this option is set to {{TRUE}}. |
|||
* {{PropertyView|Selection Style|Enumeration|hidden}}: It controls the way the object is highlighted. If it is {{value|Shape}}, the entire shape (vertices, edges, and faces) will be highlighted in the [[3D view|3D view]]; if it is {{value|BoundBox}} a bounding box will appear surrounding the object and will be highlighted. |
|||
== Example == |
|||
</translate> |
</translate> |
||
[[Image:SheetMetal_Forming-01.png|300px]] [[Image:SheetMetal_Forming-02.png|300px]] |
[[Image:SheetMetal_Forming-01.png|300px]] [[Image:SheetMetal_Forming-02.png|300px]] |
||
<translate> |
<translate> |
||
<!--T:51--> |
|||
{{Caption|A hexagon bowl with embossed centre}} |
{{Caption|A hexagon bowl with embossed centre}} |
||
<!--T:52--> |
|||
<div class="mw-collapsible mw-collapsed"> |
<div class="mw-collapsible mw-collapsed"> |
||
<div class="mw-collapsible-content"> |
<div class="mw-collapsible-content"> |
||
| Line 123: | Line 177: | ||
This bowl is made of a folded sheet metal object with a shape embossed, both have to be prepared in advance. |
This bowl is made of a folded sheet metal object with a shape embossed, both have to be prepared in advance. |
||
<!--T:53--> |
|||
No need to work with coplanar sketches here. |
No need to work with coplanar sketches here. |
||
| Line 128: | Line 183: | ||
[[Image:SheetMetal_Forming-03.png|200px]] |
[[Image:SheetMetal_Forming-03.png|200px]] |
||
<translate> |
<translate> |
||
<!--T:54--> |
|||
{{Caption|SheetMetal bowl and embossing object}} |
{{Caption|SheetMetal bowl and embossing object}} |
||
=== Workflow === |
=== Workflow === <!--T:55--> |
||
<!--T:56--> |
|||
# Select the wall of the SheetMetal object to be embossed |
# Select the wall of the SheetMetal object to be embossed |
||
# Select the '''back side''' of the shape defining solid </br> [[Image:SheetMetal_Forming-04.png|240px]] |
# Select the '''back side''' of the shape defining solid </br> (Remember both the object to be embossed '''and''' the shape defining solid must be selected. Activate the multi-select method appropriate for your operating system: {{KEY|Control}}/{{KEY|Command}}.) </br>[[Image:SheetMetal_Forming-04.png|240px]] |
||
# Press the {{Button|[[Image:SheetMetal_Forming.svg|16px]] [[SheetMetal_Forming|Make Forming in Wall]]}} button </br> or use the keyboard shortcut: {{KEY|M}} then {{KEY|F}} </br> [[Image:SheetMetal_Forming-05.png|240px]] |
# Press the {{Button|[[Image:SheetMetal_Forming.svg|16px]] [[SheetMetal_Forming|Make Forming in Wall]]}} button </br> or use the keyboard shortcut: {{KEY|M}} then {{KEY|F}} </br> [[Image:SheetMetal_Forming-05.png|240px]] |
||
# Fillet the sharp edges: |
|||
# Alter orientation and position |
|||
#* Flip the bowl and select one or more edges for the smaller inner radii |
|||
## Activate the [[Image:SheetMetal_Forming.svg|16px]] WallForming object in the [[Tree view]] |
|||
# |
#* Press the {{Button|[[Image:PartDesign_Fillet.svg|16px]] [[PartDesign_Fillet|PartDesign Fillet]]}} button </br>[[Image:SheetMetal_Forming-12.png|240px]] '''-->''' [[Image:SheetMetal_Forming-02.png|240px]] |
||
#* Flip the bowl again and select one or more edges for the bigger outer radii |
|||
## Set the value of the parameter '''offset, x''' to e.g. greater than 0 </br> [[Image:SheetMetal_Forming-06.png|240px]] </br> Here it is plain to see that it doesn't make sense to move the embossed geometry outside the selected wall. </br> </br> |
|||
# |
#* Press the {{Button|[[Image:PartDesign_Fillet.svg|16px]] [[PartDesign_Fillet|PartDesign Fillet]]}} button </br>[[Image:SheetMetal_Forming-13.png|240px]] '''-->''' [[Image:SheetMetal_Forming-01.png|240px]] </br> </br> Done! </br> </br> |
||
# Alter orientation and position (should be done before filleting) |
|||
#* Activate the [[Image:SheetMetal_Forming.svg|16px]] WallForming object in the [[Tree view]] |
|||
#* Set the value of the property {{PropertyData|angle}} to e.g. 45° </br> [[Image:SheetMetal_Forming-14.png|240px]] |
|||
#* Set the value of the property {{PropertyData|offset, x}} to e.g. greater than 0 </br> [[Image:SheetMetal_Forming-06.png|240px]] </br> Here it is plain to see that it doesn't make sense to move the embossed geometry outside the selected wall. </br> </br> |
|||
#* Setting the value of the property {{PropertyData|offset, z}} to e.g. greater than 0 isn't any better: </br> [[Image:SheetMetal_Forming-07.png|240px]] </br> At least the FreeCAD doesn't crash when a part has two bodies... </br> </br> |
|||
# Some hints |
# Some hints |
||
## The height of the defining solid determines the depth of the embossed shape. </br> That means changing the parameter '''offset, z''' to alter the depth won't deliver expected results. |
## The height of the defining solid determines the depth of the embossed shape. </br> That means changing the parameter '''offset, z''' to alter the depth won't deliver expected results. |
||
## The embossed geometry is made of a shell object i.e. it has a constant thickness. </br> And so the defining solid has to be offsetable, otherwise the tool will fail to create the emboss. |
## The embossed geometry is made of a shell object i.e. it has a constant thickness. </br> And so the defining solid has to be offsetable, otherwise the tool will fail to create the emboss. |
||
## If the outer edges are filleted first it may rip the object into several pieces when the radii are set too large. |
|||
</div> <!-- End of collapsible element for content section. Do not remove! --> |
</div> <!-- End of collapsible element for content section. Do not remove! --> |
||
</div> <!-- End of collapsible element for ... section. Do not remove! --> |
</div> <!-- End of collapsible element for ... section. Do not remove! --> |
||
<!--T:7--> |
<!--T:7--> |
||
{{Docnav |
{{Docnav |
||
|[[SheetMetal_SketchOnSheet|SketchOnSheet]] |
|[[SheetMetal_SketchOnSheet|SketchOnSheet]] |
||
|[[SheetMetal_BaseShape|Add base shape]] |
|||
| |
|||
|[[SheetMetal_Workbench|SheetMetal |
|[[SheetMetal_Workbench|SheetMetal]] |
||
|IconL=SheetMetal_SketchOnSheet.svg |
|IconL=SheetMetal_SketchOnSheet.svg |
||
|IconR= |
|IconR=SheetMetal_BaseShape.svg |
||
|IconC=Sheetmetal_workbench_icon.svg |
|IconC=Sheetmetal_workbench_icon.svg |
||
}} |
}} |
||
Latest revision as of 13:35, 11 November 2023
This documentation is not finished. Please help and contribute documentation.
GuiCommand model explains how commands should be documented. Browse Category:UnfinishedDocu to see more incomplete pages like this one. See Category:Command Reference for all commands.
See WikiPages to learn about editing the wiki pages, and go to Help FreeCAD to learn about other ways in which you can contribute.
|
|
| Menu location |
|---|
| SheetMetal → Make Forming in Wall |
| Workbenches |
| SheetMetal |
| Default shortcut |
| M F |
| Introduced in version |
| - |
| See also |
| None |
Description
The SheetMetal Forming command creates an embossed shape in a SheetMetal wall using a separate solid object.
The back side face of the solid defining the shape, and the face to be embossed are used to position and orient the solid, i.e. their local coordinate systems will have the same origin and the same orientation by default. The angle around the Z axis and offsets in the X, Y, and Z direction can be altered by changing their values in the Property editor.
A sketch can be added to multiply and distribute the embossed shape in regular or irregular patterns (using the center points of circles or arcs).
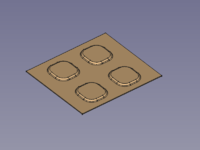
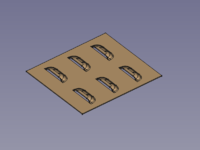
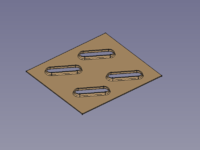
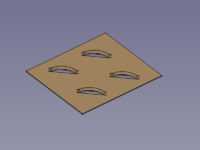
A small selection of features that can be created:
dimples, louvres, drawn cutouts, bridges
Usage
Make sure that the body containing the object to be embossed is the active body. If required double-click it in the Tree view.
Dimple
- Select the face of the SheetMetal object to be embossed.
- Hold down the Ctrl key (or the Command key on macOS).
- Add the bottom face (back side) of the solid defining the shape to the selection.
- Release the Ctrl key (or the Command key).
- Activate the
SheetMetal Forming command using one of the following:
- The
SheetMetal Forming button.
- The SheetMetal →
Make Forming in Wall menu option.
- The keyboard shortcut: M then F.
- The
Louvre
- Select the face of the SheetMetal object to be embossed.
- Hold down the Ctrl key (or the Command key on macOS).
- Add the bottom face (back side) of the solid defining the shape to the selection.
- Add a side face adjoined the bottom face to indicate the position of the cut to the selection.
- Release the Ctrl key (or the Command key).
- Activate the
SheetMetal Forming command (see above).
Bridge
- Select the face of the SheetMetal object to be embossed.
- Hold down the Ctrl key (or the Command key on macOS).
- Add the bottom face (back side) of the solid defining the shape to the selection.
- Add a side face adjoined the bottom face to indicate the position of the first cut to the selection.
- Add the opposite side face adjoined the bottom face to indicate the position of the second cut to the selection.
- Release the Ctrl key (or the Command key).
- Activate the
SheetMetal Forming command (see above).
Drawn Cutout
- Select the face of the SheetMetal object to be embossed.
- Hold down the Ctrl key (or the Command key on macOS).
- Add the bottom face (back side) of the solid defining the shape to the selection.
- Add the top face opposite the bottom face to mark the area to be cut open to the selection.
- Release the Ctrl key (or the Command key).
- Activate the
SheetMetal Forming command (see above).
Multiply and Pattern
To muliply and pattern the embossed feature a sketch containing circles and arcs can be added to the WallForming object's property DataSketch. This pattern sketch must be coplanar with the face to be embossed.
The centerpoints of the circles or arcs are used to provide positions to put instances of the embossed feature; they don't influence the instances' orientation.
The orientation still depends on the orientation of the first selected face.
Adding Fillets
- Switch to the
PartDesign workbench
- Select an edge on the upper side of the SheetMetal object to receive a fillet
- Activate the
PartDesign Fillet command using one of the following:
- The
PartDesign Fillet button.
- The PartDesign → Apply a dress-up feature →
Fillet menu option.
- The
- Set the Fillet object's DataRefine property to
true. This is important for the next fillet. - Select an edge on the bottom side of the SheetMetal object to receive a fillet.
- Activate the
PartDesign Fillet command (see above)
Notes
The embossed geometry is not restricted to planar walls and cylindrical connections and so after such a geometry is applied to a SheetMetal object the object is no longer unfoldable.
The forming can be deactivated (by setting the property DataSuppress Feature to true) to unfold the object, but following fillets lose their defining edges and show an error when the forming is reactivated.
Forming and fillets should be the last steps in creating a SheetMetal object.
Properties
See also: Property editor.
A SheetMetal WallForming object is derived from a Part Feature object and inherits all its properties. It also has the following additional properties:
Data
Base
- DataLabel (
String): Default value:WallForming(+ a sequential number for second and following items).
The user editable name of this object, it may be any arbitrary UTF8 string. - Data (hidden)Base Feature (
Link): Base Feature. Link to the parent feature. - Data (hidden)_Body (
LinkHidden):
Parameters
- DataSuppress Feature (
Bool): "Suppress Forming Feature". Default value isfalse. - Dataangle (
Angle): "Tool Position Angle". Default angle:0,00°. - Database Object (
LinkSub): "Base Object". Link to the planar face to be embossed. - Dataoffset (
VectorDistance): "Offset from Center of Face". Default:[0,00 mm, 0,00 mm, 0,00 mm]. - Datathickness (
Distance): "Thickness of Sheetmetal". Thickness of the Data (hidden)Base Feature:. - Datatool Object (
LinkSub): "Forming Tool Object". Link to the planar face used to position the Forming Tool
Parameters1
- DataSketch (
Link): "Point Sketch on Sheetmetal". Link to the sketch containing information how to multiply and distribute instances of the Forming Tool. (Center points of circles and arcs are used to create and position these instances)
Example
A hexagon bowl with embossed centre
Preparation
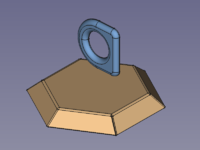
This bowl is made of a folded sheet metal object with a shape embossed, both have to be prepared in advance.
No need to work with coplanar sketches here.
SheetMetal bowl and embossing object
Workflow
- Select the wall of the SheetMetal object to be embossed
- Select the back side of the shape defining solid
(Remember both the object to be embossed and the shape defining solid must be selected. Activate the multi-select method appropriate for your operating system: Control/Command.)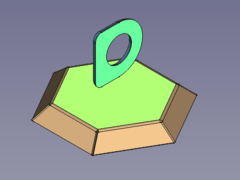
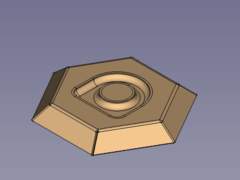
- Press the
Make Forming in Wall button
or use the keyboard shortcut: M then F
- Fillet the sharp edges:
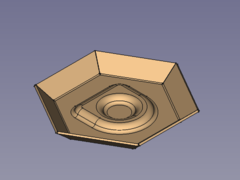
- Flip the bowl and select one or more edges for the smaller inner radii
- Press the
PartDesign Fillet button
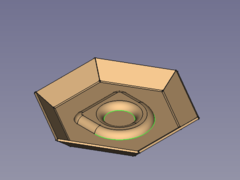 -->
--> 
- Flip the bowl again and select one or more edges for the bigger outer radii
- Press the
PartDesign Fillet button
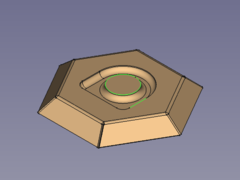 -->
--> 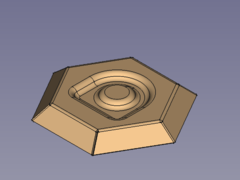
Done!
- Alter orientation and position (should be done before filleting)
- Activate the
WallForming object in the Tree view
- Set the value of the property Dataangle to e.g. 45°
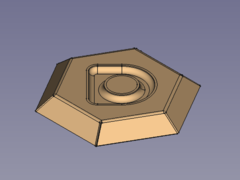
- Set the value of the property Dataoffset, x to e.g. greater than 0
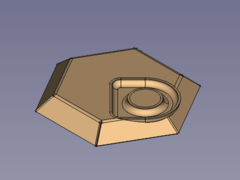
Here it is plain to see that it doesn't make sense to move the embossed geometry outside the selected wall.
- Setting the value of the property Dataoffset, z to e.g. greater than 0 isn't any better:
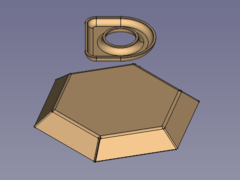
At least the FreeCAD doesn't crash when a part has two bodies...
- Activate the
- Some hints
- The height of the defining solid determines the depth of the embossed shape.
That means changing the parameter offset, z to alter the depth won't deliver expected results. - The embossed geometry is made of a shell object i.e. it has a constant thickness.
And so the defining solid has to be offsetable, otherwise the tool will fail to create the emboss. - If the outer edges are filleted first it may rip the object into several pieces when the radii are set too large.
- The height of the defining solid determines the depth of the embossed shape.
