PartDesign Thickness/es: Difference between revisions
(Created page with "==Uso==") |
(Created page with "# Seleccionar una o más caras del Body (cuerpo) activo. # Presionar el botón {{KEY|24px '''Espesor'''}}. # Definir los '''Parámetros de e...") |
||
| Line 24: | Line 24: | ||
==Uso== |
==Uso== |
||
# Seleccionar una o más caras del Body (cuerpo) activo. |
|||
# Select one or more face(s) on the active Body. |
|||
# |
# Presionar el botón {{KEY|[[Image:PartDesign_Thickness.svg|24px]] '''Espesor'''}}. |
||
# |
# Definir los '''Parámetros de espesor''' (see [[#Options/es|Options]]). |
||
# |
# Para añadir más caras a abrir, presionar el botón {{KEY|Añadir cara}} y seleccionarla(s) en [[3D_view/es|3D view]]. |
||
# Para eliminar una cara seleccionada previamente, presionar el botón {{KEY|Eliminar cara}} y seleccionar una nueva cara en la vista 3D, o pulsar con el botón derecho en la etiqueta del nombre de la cara de la lista y seleccionar ''Remove''. |
|||
# To remove a previously select face, press the {{KEY|Remove face}} button and select a face in the 3D view, or right-click on the Face label in the list and select ''Remove''. |
|||
# |
# Confirmar con {{KEY|OK}}. |
||
==Options== |
==Options== |
||
Revision as of 17:09, 25 May 2021
|
|
| Ubicación en el Menú |
|---|
| Part Design → Apply a dress up feature → Espesor |
| Entornos de trabajo |
| PartDesign |
| Atajo de teclado por defecto |
| Ninguno |
| Introducido en versión |
| 0.17 |
| Ver también |
| Part Thickness |
Descripción
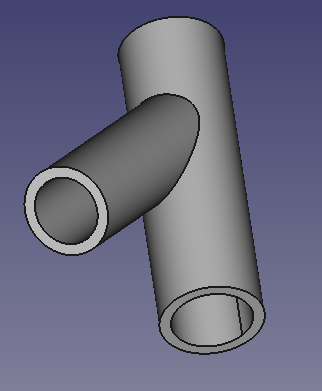
La herramienta Espesor trabaja sobre un cuerpo sólido y lo transforma en un objeto hueco con una pared de un grosor determinado, con al menos una cara abierta, dando a cada una de sus caras restantes un espesor uniforme. Con algunos sólidos permite un ahorro significativo de trabajo, evitando hacer extrusiones y vaciados innecesarios.
Uso
- Seleccionar una o más caras del Body (cuerpo) activo.
- Presionar el botón
Espesor.
- Definir los Parámetros de espesor (see Options).
- Para añadir más caras a abrir, presionar el botón Añadir cara y seleccionarla(s) en 3D view.
- Para eliminar una cara seleccionada previamente, presionar el botón Eliminar cara y seleccionar una nueva cara en la vista 3D, o pulsar con el botón derecho en la etiqueta del nombre de la cara de la lista y seleccionar Remove.
- Confirmar con OK.
Options
- Thickness: Wall thickness of the resulting object. Set the desired value.
- Mode
- Skin: Select this option if you want to get an item like a vase, headless but with the bottom
- Pipe: Select this option if you want to get an object like a pipe, headless and bottomless. In this case it may be convenient to select the faces to be deleted before you start the tool. Helping with predefined views buttons or use the numeric keys.
- Recto Verso:
- Join Type
- Arc: removes the outer edges and creates a fillet with a radius equal to the defined thickness.
- Intersection: when faces are offset outward, sharp edges are kept between faces.
- Make thickness inwards: when checked, faces are offset inward.
Limitations
- At least one face to be opened must be selected.
- If thickness goes inwards, the value must be smaller than the smallest height of the Body.
- The command may fail with complex shapes. In this context the surface of e.g. a cone has already to be regarded as complex.
- Additive Pipe or Additive Loft may work better to create complex shapes
Example
- Create a Pad from the sketch
- Create a second sketch on the XY plane
- Create a second Pad from the second sketch
As in the following pictures:
Then
Known Errors
- BRep_API: command not done
- BRep_Tool:: no parameter on edge
- Silently Fails
- Structure tools: Part, Group
- Helper tools: Create body, Create sketch, Edit sketch, Map sketch to face
- Modeling tools
- Datum tools: Create a datum point, Create a datum line, Create a datum plane, Create a local coordinate system, Create a shape binder, Create a sub-object(s) shape binder, Create a clone
- Additive tools: Pad, Revolution, Additive loft, Additive pipe, Additive helix, Additive box, Additive cylinder, Additive sphere, Additive cone, Additive ellipsoid, Additive torus, Additive prism, Additive wedge
- Subtractive tools: Pocket, Hole, Groove, Subtractive loft, Subtractive pipe, Subtractive helix, Subtractive box, Subtractive cylinder, Subtractive sphere, Subtractive cone, Subtractive ellipsoid, Subtractive torus, Subtractive prism, Subtractive wedge
- Transformation tools: Mirrored, Linear Pattern, Polar Pattern, Create MultiTransform, Scaled
- Dress-up tools: Fillet, Chamfer, Draft, Thickness
- Boolean: Boolean operation
- Extras: Migrate, Sprocket, Involute gear, Shaft design wizard
- Context menu: Set tip, Move object to other body, Move object after other object, Appearance, Color per face
- Getting started
- Installation: Download, Windows, Linux, Mac, Additional components, Docker, AppImage, Ubuntu Snap
- Basics: About FreeCAD, Interface, Mouse navigation, Selection methods, Object name, Preferences, Workbenches, Document structure, Properties, Help FreeCAD, Donate
- Help: Tutorials, Video tutorials
- Workbenches: Std Base, Arch, Assembly, CAM, Draft, FEM, Inspection, Mesh, OpenSCAD, Part, PartDesign, Points, Reverse Engineering, Robot, Sketcher, Spreadsheet, Surface, TechDraw, Test Framework
- Hubs: User hub, Power users hub, Developer hub
