Manual:Creating parametric objects/ro: Difference between revisions
(Created page with "Un ultim lucru este important de reținut: Când creați astfel de obiecte parametrice într-un document FreeCAD, atunci când salvați fișierul, codul python de mai sus nu e...") |
(Created page with "Mai jos, vom face un exercițiu mic, construind un obiect parametric care este o simplă fațetă parametrică dreptunghiulară. Exemple mai complexe sunt disponibile pe Scr...") |
||
| Line 33: | Line 33: | ||
Un ultim lucru este important de reținut: Când creați astfel de obiecte parametrice într-un document FreeCAD, atunci când salvați fișierul, codul python de mai sus nu este stocat în interiorul fișierului. Din motive de securitate, dacă un fișier FreeCAD conține cod, ar fi posibil ca cineva să distribuie fișiere FreeCAD care conțin cod malitios care ar putea dăuna computerelor altor persoane. Deci, dacă distribuiți un fișier care conține obiecte făcute cu codul de mai sus, un astfel de cod trebuie să fie prezent și pe computerul care va deschide fișierul. Cea mai ușoară modalitate de a realiza acest lucru este de a salva codul de mai sus într-o macrocomandă și de a distribui macro-ul împreună cu fișierul FreeCAD sau de a vă distribui macrocomanda în depozitul de macrocomanzi a FreeCAD [[Macros_recipes | FreeCAD repository]] de unde oricine îl poate descărca. |
Un ultim lucru este important de reținut: Când creați astfel de obiecte parametrice într-un document FreeCAD, atunci când salvați fișierul, codul python de mai sus nu este stocat în interiorul fișierului. Din motive de securitate, dacă un fișier FreeCAD conține cod, ar fi posibil ca cineva să distribuie fișiere FreeCAD care conțin cod malitios care ar putea dăuna computerelor altor persoane. Deci, dacă distribuiți un fișier care conține obiecte făcute cu codul de mai sus, un astfel de cod trebuie să fie prezent și pe computerul care va deschide fișierul. Cea mai ușoară modalitate de a realiza acest lucru este de a salva codul de mai sus într-o macrocomandă și de a distribui macro-ul împreună cu fișierul FreeCAD sau de a vă distribui macrocomanda în depozitul de macrocomanzi a FreeCAD [[Macros_recipes | FreeCAD repository]] de unde oricine îl poate descărca. |
||
Mai jos, vom face un exercițiu mic, construind un obiect parametric care este o simplă fațetă parametrică dreptunghiulară. Exemple mai complexe sunt disponibile pe [[Scripted_objects|parametric object example]] și în chiar însuși [https://github.com/FreeCAD/FreeCAD/blob/master/src/Mod/TemplatePyMod/FeaturePython.py FreeCAD source code] . |
|||
We will give our object two properties: Length and Width, which we will use to construct a rectangle. Then, since our object will already have a pre-built Placement property (all geometric object have one by default, no need to add it ourselves), we will displace our rectangle to the location/rotation set in the Placement, so the user will be able to move the rectangle anywhere by editing the Placement property. |
We will give our object two properties: Length and Width, which we will use to construct a rectangle. Then, since our object will already have a pre-built Placement property (all geometric object have one by default, no need to add it ourselves), we will displace our rectangle to the location/rotation set in the Placement, so the user will be able to move the rectangle anywhere by editing the Placement property. |
||
Revision as of 07:32, 3 September 2018
- Introducere
- Descoperind FreeCAD
- Lucrul cu FreeCAD
- Programarea prin script Python
- Comunitatea
În capitolul previous chapter, Am văzut cum este creată geometrie Pieselor și cum este afișată aceasta pe ecran, atașând-o la un documente obeict "dumb" (non-parametric). Acest lucru este obositor când vrem să schimbăm forma acestui obiect. Va trebui să creăm o nouă formă, apoi să o atribuim din nou obiectului nostru.
Cu toate acestea, am văzut, de asemenea, în toate capitolele anterioare ale acestui manual modul în care obiectele parametrice sunt puternice. Trebuie doar să schimbăm o proprietate, iar forma se recalculează în timp real.
Pe plan intern, obiectele parametrice nu fac nimic diferit de ceea ce am făcut: ele recalculează conținutul proprietății Shape, în mod repetat, de fiecare dată când o altă proprietate a fost modificată.
FreeCAD oferă un sistem foarte convenabil pentru crearea a unor astfel de obiecte parametrice complet în în Python. Ele constau dintr-o clasă Python simplă, care definește toate proprietățile de care are nevoie obiectul și ce se va întâmpla când se schimbă una dintre aceste proprietăți. Structura obiectului parametric este la fel de simplă:
class myParametricObject:

  def __init__(self,obj):
    obj.Proxy = self
    obj.addProperty("App::PropertyFloat","MyLength")
    ...

  def execute(self,obj):
    print ("Recalculating the shape...")
    print ("The value of MyLength is:")
    print (obj.MyLength)
    ...
Toate clasele Python au de obicei o metodă __init__. Ceea ce este în interiorul acestei metode este executat atunci când clasa este instanțiată (ceea ce înseamnă că, în argoul de programare, că un obiect Python este creat din această clasă). Înțelegem o clasă ca pe un "șablon" pentru crearea de copii în direct ale acestui șablon). Aici, în funcția noastră de inițializare (funcția __init__), facem două lucruri importante: 1 - pentru a stoca clasa însăși în atributul "Proxy" al obiectului în documentul nostru FreeCAD, adică documentul obiect FreeCAD va purta acest cod în sine și 2 - va crea toate proprietățile pe care le are obiectul nostru. Există multe tipuri de proprietăți disponibile, puteți obține lista completă introducând acest cod:
FreeCAD.ActiveDocument.addObject("Part::FeaturePython","dummy").supportedProperties()
Apoi, a doua parte importantă este metoda de executare. Orice cod din această metodă va fi executat atunci când obiectul este marcat pentru a fi recalculat, ceea ce se va întâmpla când o proprietate a fost schimbată. Acesta este tot ceea ce este de făcut. În interiorul execuției, trebuie să faceți tot ce trebuie făcut, adică să calculați o nouă formă și să atribuiți obiectului în sine ceva asemănător cu obj.Shape = myNewShape. Acesta este motivul pentru care metoda execută ia un argument "obj", care va fi obiectul documentului FreeCAD în sine, astfel încât să îl putem manipula în codul nostru python.
Un ultim lucru este important de reținut: Când creați astfel de obiecte parametrice într-un document FreeCAD, atunci când salvați fișierul, codul python de mai sus nu este stocat în interiorul fișierului. Din motive de securitate, dacă un fișier FreeCAD conține cod, ar fi posibil ca cineva să distribuie fișiere FreeCAD care conțin cod malitios care ar putea dăuna computerelor altor persoane. Deci, dacă distribuiți un fișier care conține obiecte făcute cu codul de mai sus, un astfel de cod trebuie să fie prezent și pe computerul care va deschide fișierul. Cea mai ușoară modalitate de a realiza acest lucru este de a salva codul de mai sus într-o macrocomandă și de a distribui macro-ul împreună cu fișierul FreeCAD sau de a vă distribui macrocomanda în depozitul de macrocomanzi a FreeCAD FreeCAD repository de unde oricine îl poate descărca.
Mai jos, vom face un exercițiu mic, construind un obiect parametric care este o simplă fațetă parametrică dreptunghiulară. Exemple mai complexe sunt disponibile pe parametric object example și în chiar însuși FreeCAD source code .
We will give our object two properties: Length and Width, which we will use to construct a rectangle. Then, since our object will already have a pre-built Placement property (all geometric object have one by default, no need to add it ourselves), we will displace our rectangle to the location/rotation set in the Placement, so the user will be able to move the rectangle anywhere by editing the Placement property.
class ParametricRectangle:

 def __init__(self,obj):
   obj.Proxy = self
   obj.addProperty("App::PropertyFloat","Length")
   obj.addProperty("App::PropertyFloat","Width")

 def execute(self,obj):
   # we need to import the FreeCAD module here too, because we might be running out of the Console
   # (in a macro, for example) where the FreeCAD module has not been imported automatically
   import Part,FreeCAD

   # first we need to make sure the values of Length and Width are not 0
   # otherwise the Part.Line will complain that both points are equal
   if (obj.Length == 0) or (obj.Width == 0):
     # if yes, exit this method without doing anything
     return

   # we create 4 points for the 4 corners
   v1 = FreeCAD.Vector(0,0,0)
   v2 = FreeCAD.Vector(obj.Length,0,0)
   v3 = FreeCAD.Vector(obj.Length,obj.Width,0)
   v4 = FreeCAD.Vector(0,obj.Width,0)

   # we create 4 edges
   e1 = Part.Line(v1,v2).toShape() # Warning. Since FC v0.17, use Part.LineSegment instead of Part.Line
   e2 = Part.Line(v2,v3).toShape()
   e3 = Part.Line(v3,v4).toShape()
   e4 = Part.Line(v4,v1).toShape()

   # we create a wire
   w = Part.Wire([e1,e2,e3,e4])

   # we create a face
   f = Part.Face(w)

   # All shapes have a Placement too. We give our shape the value of the placement
   # set by the user. This will move/rotate the face automatically.
   f.Placement = obj.Placement

   # all done, we can attribute our shape to the object!
   obj.Shape = f
Instead of pasting the above code in the Python console, we'd better save it somewhere, so we can reuse and modify it later. For example in a new macro (menu Tools -> Macros -> Create). Name it, for example, "ParamRectangle". However, FreeCAD macros are saved with a .FCMacro extension, which Python doesn't recognize when using import . So, before using the above code, we will need to rename the ParamRectangle.FCMacro file to ParamRectangle.py. This can be done simply from your file explorer, by navigating to the Macros folder indicated in menu Tools -> Macros.
Once that is done, we can now do this in the Python Console:
import ParamRectangle
By exploring the contents of ParamRectangle, we can verify that it contains our ParametricRectangle class.
To create a new parametric object using our ParametricRectangle class, we will use the following code. Observe that we use Part::FeaturePython instead of Part::Feature that we have been using in the previous chapters (The Python version allows to define our own parametric behaviour):
myObj = FreeCAD.ActiveDocument.addObject("Part::FeaturePython","Rectangle")
ParamRectangle.ParametricRectangle(myObj)
myObj.ViewObject.Proxy = 0 # this is mandatory unless we code the ViewProvider too
FreeCAD.ActiveDocument.recompute()
Nothing will appear on screen just yet, because the Length and Width properties are 0, which will trigger our "do-nothing" condition inside execute. We just need to change the values of Length and Width, and our object will magically appear and be recalculated on-the-fly.
Of course it would be tedious to have to type these 4 lines of Python code each time we want to create a new parametric rectangle. A very simple way to solve this is placing the 4 lines above inside our ParamRectangle.py file, at the end, after the end of the ParametricRectange class (We can do this from the Macro editor).
Now, when we type import ParamRectangle , a new parametric rectangle will automatically be created. Even better, we can add a toolbar button that will do just that:
- Open menu Tools -> Customize
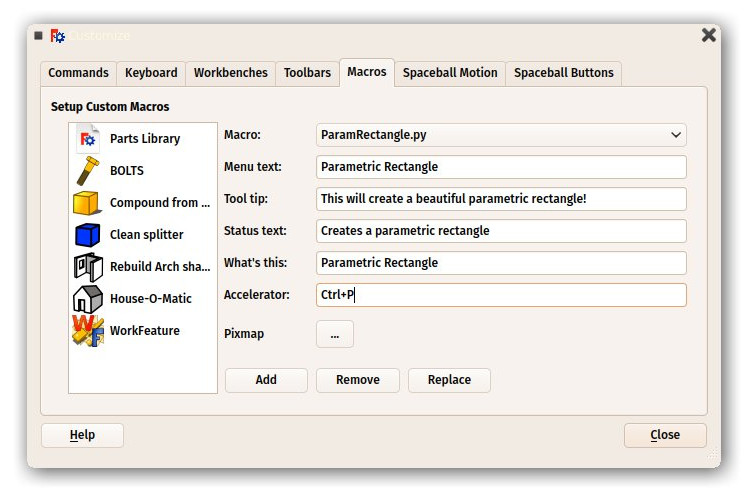
- Under the "Macros" tab, select our ParamRectangle.py macro, fill in the details as you wish, and press "Add":
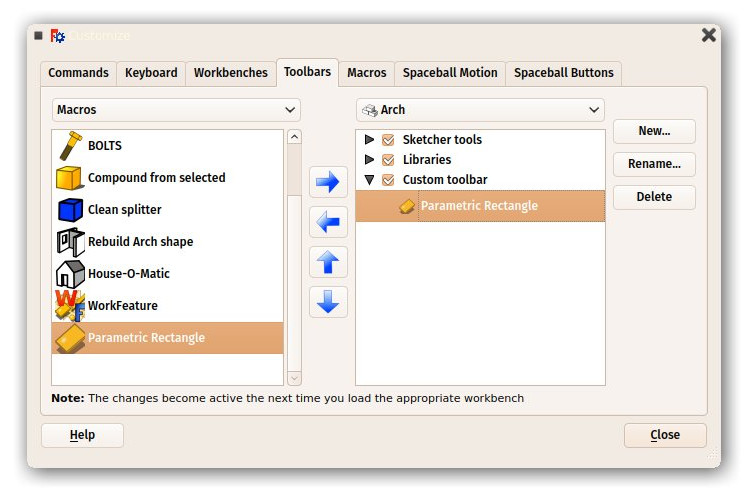
- Under the Toolbars tab, create a new custom toolbar in the workbench of your choice (or globally), select your macro and add it to the toolbar:
- That's it, we now have a new toolbar button which, when clicked, will create a parametric rectangle.
Remember, if you want to distribute files created with this new tool to other people, they must have the ParamRectangle.py macro installed on their computer too.
De citit în plus

