CAM Deburr/fr: Difference between revisions
(Created page with "{{GuiCommand/fr |Name=Path Deburr |Name/fr=Path Ebavurage |MenuLocation=Path → Ebavurer |Workbenches=Path |Version=0.18 }}") |
|||
| Line 10: | Line 10: | ||
}} |
}} |
||
{{GuiCommand |
{{GuiCommand/fr |
||
|Name=Path Deburr |
|Name=Path Deburr |
||
| |
|Name/fr=Path Ebavurage |
||
|MenuLocation=Path → Ebavurer |
|||
|Workbenches=[[Path_Workbench|Path]] |
|Workbenches=[[Path_Workbench/fr|Path]] |
||
|Version=0.18 |
|Version=0.18 |
||
}} |
}} |
||
Revision as of 09:23, 24 September 2022
|
|
| Emplacement du menu |
|---|
| Path → Ebavurer |
| Ateliers |
| Path |
| Raccourci par défaut |
| Aucun |
| Introduit dans la version |
| 0.18 |
| Voir aussi |
| Aucun |
Description
L'outil Path Ebavurage sert principalement à ébavurer un bord.
Utilisation
- Il existe plusieurs façons de lancer la commande :
- Appuyez sur le bouton
Ebavurer.
- Sélectionnez l'option Path →
Ebavurer dans le menu.
- Appuyez sur le bouton
- Le panneau de tâches Ebavurer s'ouvre. Voir Options.
- Sélectionnez Géométrie de base.
- Spécifiez les paramètres requis.
- Appuyez sur le bouton OK.
Options
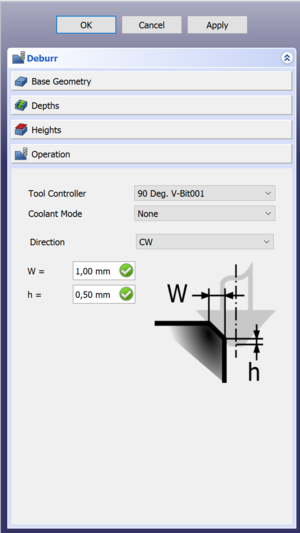
After selecting the geometry in the Base Geometry section of the task panel you can press Apply to see the tool path as defined by the default options.
Next you can check your depths/step down and heights, just like with other path commands.
The Final step is to activate the Operation section where you can specify the following:
- Tool controller: Select the tool to use.
- Coolant Mode: Select
None,FloodorMist. - Directions: Select
CW(clockwise) orCCW(counter-clockwise). - W: The dimension of your edge.
- h: The offset from the bottom of the tool. It's a safety feature because if the tip gets above the edge it won't cut anymore.
Properties
Data
Base
- DonnéesPlacement:
- DonnéesLabel: User name of the object (UTF-8)
Deburr
- DonnéesDirection:
CCWorCW. - DonnéesEntry Point: Change this to change the entry point, if set to 2 it will go in 2 corners from the default.
- DonnéesExtra depth: Extra depth (h in the task panel).
- Données (Hidden)Join: How to join chamfer segments,
RoundorMiter. - Données (Hidden)Side: Side of the operation,
OutsideorInside. - DonnéesWidth: The width of the chamfer (W in the task panel).
Depth
- DonnéesClearance Height: The height needed to clear clamps and obstructions (set by default to
OpStockZMax + SetupSheet.ClearanceHeightOffset). - DonnéesSafe Height: The height above which rapid motions are allowed. (set to
OpStockZMax + SetupSheet.SafeHeightOffset). - DonnéesStart Depth: Starting depth of of the tool, first cut depth in Z.
- DonnéesStep Down: Incremental step down of the tool.
Op Values
- DonnéesOp Stock ZMax: The maximum Z value of the stock.
- DonnéesOp Stock ZMin: The minimum Z value of the stock.
- DonnéesOp Tool Diameter: The diameter of the tool.
Path
- DonnéesActive: Make
false, to prevent operation from generating code. - DonnéesBase: The base geometry for this operation, edges or a face.
- DonnéesComment: An optional comment for this operation.
- DonnéesCoolant Mode: Coolant mode for this operation.
- DonnéesCycle Time: Estimated cycle time for this operation.
- DonnéesTool Controller: The tool controller that will be used to calculate the path.
- DonnéesUser Label: User assigned label.
- Démarrer avec FreeCAD
- Installation : Téléchargements, Windows, Linux, Mac, Logiciels supplémentaires, Docker, AppImage, Ubuntu Snap
- Bases : À propos de FreeCAD, Interface, Navigation par la souris, Méthodes de sélection, Objet name, Préférences, Ateliers, Structure du document, Propriétés, Contribuer à FreeCAD, Faire un don
- Aide : Tutoriels, Tutoriels vidéo
- Ateliers : Std Base, Arch, Assembly, CAM, Draft, FEM, Inspection, Mesh, OpenSCAD, Part, PartDesign, Points, Reverse Engineering, Robot, Sketcher, Spreadsheet, Surface, TechDraw, Test
