PySide Anfängerbeispiele
Einführung
Der Zweck dieser Seite ist es, Beispiele auf Anfängerniveau für die PySide GUI Verwalter (es gibt begleitende Seiten Zwischen PySide Beispiele und Fortgeschrittene PySide Beispiele).
Neulinge in der GUI Programmierung könnten über das Wort "Widget" stolpern. Seine Bedeutung außerhalb der Computerwelt wird gewöhnlich wie folgt angegeben
"eine kleine Spielerei oder mechanisches Gerät, insbesondere eines, dessen Name unbekannt oder unspezifiziert ist"
Für GUI Arbeiten wie PySide wird der Begriff "Widget" am häufigsten verwendet, um die sichtbaren Elemente der GUI zu bezeichnen - Fenster, Dialoge und Ein-/Ausgabefunktionen. Alle sichtbaren Elemente von PySide werden Widgets genannt, und für diejenigen, die daran interessiert sind, sie stammen alle von einer gemeinsamen Elternklasse ab, nämlich QWidget. Zusätzlich zu den sichtbaren Elementen bietet PySide auch Widgets für Netzwerk-, XML-, Multimedia- und Datenbankintegration.
A widget that is not embedded in a parent widget is called a window and usually windows have a frame and a title bar. The most common types of windows are the "main window" (from the Class QMainWindow) and the various subclasses of the dialog (from the Class QDialog). One big difference is that QDialog is modal (i.e. the user can not do anything outside of the Dialog window while it is open) and the QMainWindow is non-modal which allows the user to interact with other windows in parallel.
This guide is a shortcut list for getting a PySide program working quickly under FreeCAD, it isn't intended to teach Python or PySide. Some sites that do that are:
- PySide tutorial at zetcode.com
- PySide/PyQt Tutorial at PythonCentral.io
- PySide 1.0.7 Reference at Srinikom.github.io (note this is a reference, not a tutorial)
Import Anweisung
PySide is not loaded with Python by default, it must be requested prior to using it. The following command:
from PySide import QtCore
from PySide import QtGui
causes the 2 parts of PySide to be loaded - QtGui holds classes for managing the Graphic User Interface while QtCore contains classes that do not directly relate to management of the GUI (e.g. timers and geometry). Although it is possible to only import the one that is needed, generally they are both needed and both imported.
The import statements are not repeated in the snippets below; it is assumed that it is done at the beginning in each case.
Einfachstes Beispiel
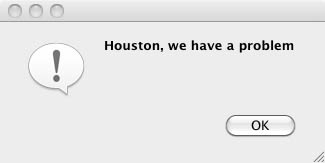
Die einfachste Interaktion mit PySide besteht darin, dem Benutzer eine Nachricht zu präsentieren, die er nur akzeptieren kann:
reply = QtGui.QMessageBox.information(None,"","Houston, we have a problem")
Ja oder keine Abfrage
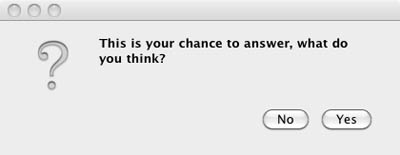
Die nächst einfachste Interaktion ist die Frage nach einer Ja/Nein Antwort:
reply = QtGui.QMessageBox.question(None, "", "This is your chance to answer, what do you think?",
         QtGui.QMessageBox.Yes | QtGui.QMessageBox.No, QtGui.QMessageBox.No)
if reply == QtGui.QMessageBox.Yes:
         # this is where the code relevant to a 'Yes' answer goes
         pass
if reply == QtGui.QMessageBox.No:
         # this is where the code relevant to a 'No' answer goes
         pass
Enter Text Query
The next code snippet asks the user for a piece of text - note this can be any key on the keyboard really:
reply = QtGui.QInputDialog.getText(None, "Ouija Central","Enter your thoughts for the day:")
if reply[1]:
	# user clicked OK
	replyText = reply[0]
else:
	# user clicked Cancel
	replyText = reply[0] # which will be "" if they clicked Cancel
Remember that even if the user enters only digits, "1234" for example, they are strings and must be converted to number representation with either of the following:
anInteger = int(userInput) # to convert to an integer from a string representation

aFloat = float(userInput) # to convert to a float from a string representation
More Than 2 Buttons
The final Beginner Level example is of how to build a dialog with an arbitrary number of buttons. This example is programmatically too complex to be invoked from a single Python statement so in some ways it should be on the next page which is PySide Medium examples. But on the other hand this is often all that is needed without getting into complex GUI definitions, so the code is placed at the end of the page of this Beginner PySide page rather than the beginning of the following Medium PySide page.
from PySide import QtGui, QtCore

class MyButtons(QtGui.QDialog):
	""""""
	def __init__(self):
		super(MyButtons, self).__init__()
		self.initUI()
	def initUI(self):
		option1Button = QtGui.QPushButton("Option 1")
		option1Button.clicked.connect(self.onOption1)
		option2Button = QtGui.QPushButton("Option 2")
		option2Button.clicked.connect(self.onOption2)
		option3Button = QtGui.QPushButton("Option 3")
		option3Button.clicked.connect(self.onOption3)
		option4Button = QtGui.QPushButton("Option 4")
		option4Button.clicked.connect(self.onOption4)
		option5Button = QtGui.QPushButton("Option 5")
		option5Button.clicked.connect(self.onOption5)
		#
		buttonBox = QtGui.QDialogButtonBox()
		buttonBox = QtGui.QDialogButtonBox(QtCore.Qt.Horizontal)
		buttonBox.addButton(option1Button, QtGui.QDialogButtonBox.ActionRole)
		buttonBox.addButton(option2Button, QtGui.QDialogButtonBox.ActionRole)
		buttonBox.addButton(option3Button, QtGui.QDialogButtonBox.ActionRole)
		buttonBox.addButton(option4Button, QtGui.QDialogButtonBox.ActionRole)
		buttonBox.addButton(option5Button, QtGui.QDialogButtonBox.ActionRole)
		#
		mainLayout = QtGui.QVBoxLayout()
		mainLayout.addWidget(buttonBox)
		self.setLayout(mainLayout)
		# define window		xLoc,yLoc,xDim,yDim
		self.setGeometry(	250, 250, 0, 50)
		self.setWindowTitle("Pick a Button")
		self.setWindowFlags(QtCore.Qt.WindowStaysOnTopHint)
	def onOption1(self):
		self.retStatus = 1
		self.close()
	def onOption2(self):
		self.retStatus = 2
		self.close()
	def onOption3(self):
		self.retStatus = 3
		self.close()
	def onOption4(self):
		self.retStatus = 4
		self.close()
	def onOption5(self):
		self.retStatus = 5
		self.close()

def routine1():
	print 'routine 1'

form = MyButtons()
form.exec_()
if form.retStatus==1:
	routine1()
elif form.retStatus==2:
	routine2()
elif form.retStatus==3:
	routine3()
elif form.retStatus==4:
	routine4()
elif form.retStatus==5:
	routine5()
Each piece of code under test would be in a function with the name 'routine1()', 'routine2()', etc. As many buttons as you can fit on the screen may be used. Follow the patterns in the code sample and add extra buttons as needed - the Dialog box will set it's width accordingly, up to the width of the screen.
Es gibt eine Codezeile:
buttonBox = QtGui.QDialogButtonBox(QtCore.Qt.Horizontal)
was dazu führt, dass die Schaltflächen in einer horizontalen Linie liegen. Um sie in eine vertikale Linie zu setzen, ändere die zu lesende Zeile des Codes:
buttonBox = QtGui.QDialogButtonBox(QtCore.Qt.Vertical)
- FreeCAD scripting: Python, Introduction to Python, Python scripting tutorial, FreeCAD Scripting Basics
- Modules: Builtin modules, Units, Quantity
- Workbenches: Workbench creation, Gui Commands, Commands, Installing more workbenches
- Meshes and Parts: Mesh Scripting, Topological data scripting, Mesh to Part, PythonOCC
- Parametric objects: Scripted objects, Viewproviders (Custom icon in tree view)
- Scenegraph: Coin (Inventor) scenegraph, Pivy
- Graphical interface: Interface creation, Interface creation completely in Python (1, 2, 3, 4, 5), PySide, PySide examples beginner, intermediate, advanced
- Macros: Macros, How to install macros
- Embedding: Embedding FreeCAD, Embedding FreeCADGui
- Other: Expressions, Code snippets, Line drawing function, FreeCAD vector math library (deprecated)
- Hubs: User hub, Power users hub, Developer hub


