Tutorial FreeCAD POV ray
| Topic |
|---|
| Rendering |
| Level |
| Intermediate |
| Time to complete |
| 60 minutes |
| Authors |
| vocx |
| FreeCAD version |
| 0.18 or greater |
| Example files |
| none |
| See also |
| None |
Introduction
This tutorial shows how to produce a rendered image in FreeCAD, using the POV-ray renderer. It assumes that the user already created a part or assembly in FreeCAD, or has imported one into it. It uses the Raytracing Workbench to produce the file for rendering.
This tutorial is based on the forum post by schupin FreeCAD / pov ray tutorial, which also includes the files required to produce the model and the rendering.
Setup the .pov file
Follow the basic workflow outlined in the Raytracing Workbench documentation.
1. Create a POV-ray project by clicking New. If the viewport is set as orthographic, change it to perspective, as the renderer will work with a camera with perspective view, so you need to see in the viewport how the image will look like.
2. Select all the objects that you want to add to your scene and click on InsertPart.
Note: beware of those objects that are not currently visible in the 3D viewport. If they are invisible but are included in the scene, they will still have an effect on light bounces, reflections, and shadows. On the other hand, if you really want to omit a body from being rendered, don't select it for inclusion into the POV-ray project.
Note 2: all objects in the POV-ray project will have a name based on their internal FreeCAD name. It's important to note which is the POV-ray name, as further options, for example, the material properties, will be assigned to these POV-ray names.
3. In the 3D viewport adjust the view that you want to render, then select the POV-ray project on the tree view and press ResetCamera.
4. The POV-ray file is now ready; it contains all the selected objects and the camera information. Press ExportProject to save the
.pov file.
5. The created .pov file can now be rendered directly from FreeCAD by clicking Render. For this to work, the executable must be set in Edit → Preferences → Raytracing → Render → POV-Ray executable, for example,
/usr/bin/povray.

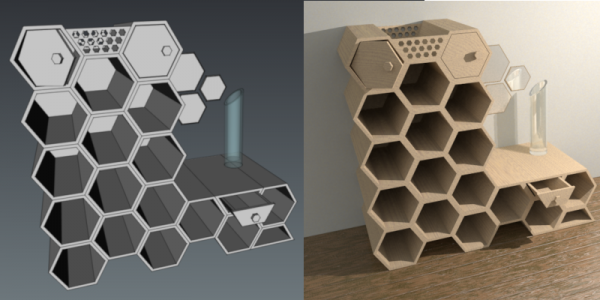
First render of the assembly produced with povray, with the default file written by the Raytracing Workbench.
It is also possible to run the the povray executable from the command line.
povray assembly.pov +w800 +h600
The command line options +wX +hY set the horizontal and vertical sizes of the final image.
The command line options +a and +am2 are useful to trigger antialiasing to produce a smoother image.
In this moment the rendered image will use general settings and might not look ideal, so the .pov file needs to be edited manually.
Editing the .pov file
6. The .pov file generated by FreeCAD may look complicated at first but 90% of its content is just mesh information that usually doesn't need to be modified as these meshes define the fixed bodies that we want to render.
The file is structured as follows:
- Global settings
- Sky sphere
- Plane
- Finishes and textures
- Camera
- Mesh and body information
- Light source
Each section encloses its content inside curly braces { }. The camera will not be touched, neither the meshes. The main modifications will be made on the other sections.
As the meshes won't be heavily modified, the file can be re-organized so this information is at the end of the file.
Basic re-organization
7. Open the .pov file with a text editor, go to the end of the file, select and cut the light_source section, and paste it before the first //face number1 line or similar.
The resulting file should have the camera and light_source sections next to each other, for example
// Persistence of Vision Ray Tracer Scene Description File
// for FreeCAD (http://www.freecadweb.org)

#version 3.6;
.
.
.
// Generated by FreeCAD (http://www.freecadweb.org/)
#declare cam_location =  <-191.422,1268.51,-2069.5>;
#declare cam_look_at  = <548.803,352.667,-113.581>;
#declare cam_sky      = <0.133269,0.915973,0.378461>;
#declare cam_angle    = 45;
camera {
  location  cam_location
  look_at   cam_look_at
  sky       cam_sky
  angle     cam_angle
  right x*800/600
}

//default light
light_source {
  cam_location + cam_angle * 100
  color rgb <10, 10, 10>
}
// Written by FreeCAD http://www.freecadweb.org/
// face number1 +++++++++++++++++++++++++++++++++++++++++++++++++++++++++++++++++++++
.
.
.
Prepare the body textures
8. The textures of each body need to be adjusted. This is the most time-consuming job of this process.
A body mesh is defined by faces, and each face is defined by a series of triangular elements that themselves are defined by vertex vectors, normal vectors, and face indices. This information doesn't need to be modified at all. Then, each body is defined as the union of the specified faces. Again, this information doesn't need modification.
Finally, each object to be rendered is defined as one of the specified bodies, with a particular texture, which itself can have some default properties like pigment and finish.
// instance to render
object {Pov_Body002
 texture {
      pigment {color rgb <1,0.54902,0>}
      finish {StdFinish } //definition on top of the project
  }
}
By searching for the keyword object, it's possible to go directly to the desired part in the file, and change its texture appropriately.
As indicated in the comment, the definition of a finish is usually at the top of the file, before the camera information. This information is comprised of declarations that assign different properties.
//#declare StdFinish = finish { diffuse 0.7 };
//#declare StdFinish = finish { phong 0.5 };
//#declare StdFinish = finish { ambient rgb <0.5,0.5,0.5> };
//#declare StdFinish = finish { crand 0.5 phong 0.9};
#declare StdFinish = finish { ambient 0.01 diffuse 0.9 phong 1.0 phong_size 70 metallic brilliance 1.5} ;
A texture is a general container that describes a material; it includes information like the pigment (color), normal (how the color changes with the curvature of the surface), finish (interaction of the surface with the light), patterns (checker, agate, spiral, radial, wood, etc.), and other properties. There are many options that can be combined together to produce a working texture. This mixing is not trivial, but there are many examples online to obtain the desired appearance of a material.
POV-ray comes with an extensive library of materials that can be readily used by name. By default, the project file makes available some materials by using #include statements at the beginning of the file. These materials can be included by name and further modified as desired.
#include "colors.inc"
#include "metals.inc"
For example, a silver texture is already defined in the metal.inc library, and can be readily used in a defined Tsilver texture.
#include "metals.inc"
#declare Tsilver = texture{ T_Silver_5E }
In the following example, the woods.inc library is imported; this defines a T_wood7 texture that is then modified with scale, translation, and finish.
#include "woods.inc"
#declare Twood = texture {
    T_Wood7
    scale 50.0
    translate x*1
    translate y*10
    finish { ambient 0.01 diffuse 0.9 phong 1.0 phong_size 70 brilliance 0.5} ;
}
Prepare planes
9. Planes are useful to serve as a floor or table top on which the model is standing. More planes can be added to serve as walls or other shapes, in order to obtain the right conditions of rendering.
By default, the project file defines a single plane, 1 millimeter below the model, that is slightly reflective.
plane {
  y, -1
  texture { pigment {rgb <0.0,0.0,0.0>} finish {ambient 0.0 reflection 0.05 specular 0.0} }
}
Beware that when adding planes, in POV-ray the X axis is defined as horizontal (left-right), the Y axis is defined as vertical (up-down), and the Z axis is defined as depth (front-rear).
Prepare lights
10. By default, the project file defines one light with a position and color.
//default light
light_source {
  cam_location + cam_angle * 100
  color rgb <10, 10, 10>
}
Like other objects, it can be modified with many options, including things like fade_distance, area_light, and jitter.
Prepare the global settings, radiosity
11. The global settings define ambient light.
global_settings {
    assumed_gamma 1.0
    ambient_light color rgb <1.0,1.0,1.0>
    max_trace_level 20
}
The radiosity property inside the global_settings controls the way POV-ray computes the light interactions with the objects. It's essential to thinker this property to obtain good results.
Because it can be time consuming to test different settings you can use a variable and a #switch statement to quickly use low, medium or high quality render settings.
#declare Rad_Quality = 3;

global_settings {
  assumed_gamma 1.0
  max_trace_level 10
#switch (Rad_Quality)
 #case (1)
  radiosity {             // --- Settings 1 (fast) ---
    pretrace_start 0.08
    pretrace_end   0.02
    count 50
    error_bound 0.5
    recursion_limit 1
  }
 #break
 #case (2)
  radiosity {             // --- Settings 2 (medium quality) ---
    pretrace_start 0.08
    pretrace_end   0.01
    count 120
    error_bound 0.25
    recursion_limit 1
  }
 #break
 #case (3)
  radiosity {             // --- Settings 3 (high quality) ---
    pretrace_start 0.08
    pretrace_end   0.005
    count 400
    error_bound 0.1
    recursion_limit 2
  }
 #break
 #end
}
Final structure
12. The edited .pov file can be saved when all adjustments have been done.
The final structure is as follows:
- Global settings, with radiosity parameters
- Sky sphere
- Planes, positioned as desired
- Finishes and textures, with custom texture definitions
- Camera
- Light source, with some additional properties
- Mesh and body information, using the textures defined previously
Note: the sections of the .pov file can be in any order, although it is probably easier to work with it if the mesh information is left to the end.
Final render
13. The final rendering can be done by clicking Render.

Final render of the assembly produced with povray, with the edited .pov file initially written by the Raytracing Workbench.
From the command line
povray assembly.pov +w800 +h600 +a
Final notes
POV-ray is a relatively old piece of software; its main advantage is that it is a tested solution whose properties are set only by a text file. Also, the renderer is available from the command line in many operating systems, and it runs in old hardware.
The user is advised to read more documentation and tutorials on POV-ray in order to set up the right settings for his or her needs.
- Getting started
- Installation: Download, Windows, Linux, Mac, Additional components, Docker, AppImage, Ubuntu Snap
- Basics: About FreeCAD, Interface, Mouse navigation, Selection methods, Object name, Preferences, Workbenches, Document structure, Properties, Help FreeCAD, Donate
- Help: Tutorials, Video tutorials
- Workbenches: Std Base, Arch, Assembly, CAM, Draft, FEM, Inspection, Mesh, OpenSCAD, Part, PartDesign, Points, Reverse Engineering, Robot, Sketcher, Spreadsheet, Surface, TechDraw, Test Framework
- Hubs: User hub, Power users hub, Developer hub