PartDesign tutorial/it: Difference between revisions
Renatorivo (talk | contribs) No edit summary |
Renatorivo (talk | contribs) No edit summary |
||
| Line 15: | Line 15: | ||
[[Image:Sketcher_tutorial_result.png|480px]] |
[[Image:Sketcher_tutorial_result.png|480px]] |
||
=== |
=== Requisiti === |
||
* FreeCAD |
* FreeCAD versione 0.16 o superiore |
||
* |
* Il lettore abbia terminato il [[Sketcher tutorial/it|tutorial di Schizzo]] |
||
=== Procedure === |
=== Procedure === |
||
Revision as of 21:50, 13 March 2017
| Argomento |
|---|
| Schizzo |
| Livello di difficoltà |
| Base |
| Tempo di esecuzione |
| 15 minuti |
| Autori |
| Drei |
| Versione di FreeCAD |
| 0.16 o superiore |
| Files di esempio |
| Vedere anche |
| Nessuno |
Introduzione
Questo tutorial ha lo scopo di introdurre il lettore al flusso di lavoro di base dell'ambiente PartDesign. Il lettore vedrà come creare oggetti 3D sulla base di schizzi, eseguire operazioni di sottrazione e come replicare caratteristiche specifiche in una schiera.
Requisiti
- FreeCAD versione 0.16 o superiore
- Il lettore abbia terminato il tutorial di Schizzo
Procedure
Creating 3D geometry
The purpose of the PartDesign Workbench is to allow the user to create geometry in 3D space. As such, it is equipped with tools to make use of sketches and convert them to 3D objects.
To achieve this, two tools are exist: ![]() Pad and
Pad and ![]() Revolution. Alongside their subtractive counterparts (
Revolution. Alongside their subtractive counterparts (![]() Pocket and
Pocket and ![]() Groove) they make up most of the common actions used by this workbench.
Groove) they make up most of the common actions used by this workbench.
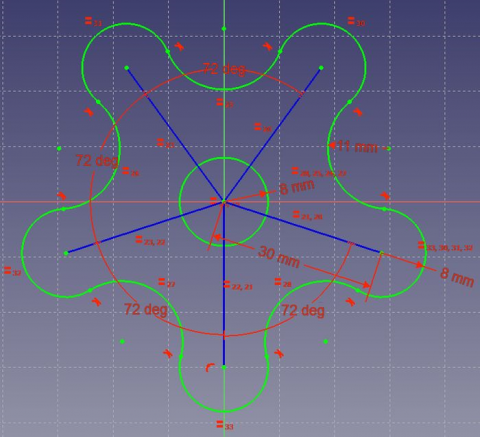
- Passare nell'ambiente PartDesign
- Selezionare lo schizzo creato nel tutorial di Schizzo
- Selezionare
 Pad
Pad - Impostare la distanza 5 mm
- Selezionare Ok
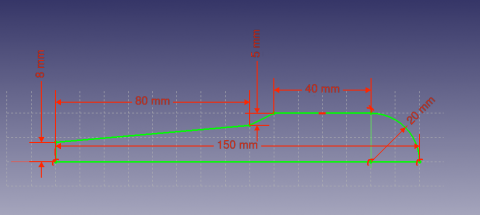
Un altro strumento per creare la geometria 3D è ![]() Rivoluzione.
Rivoluzione.
- Create a sketch based on the image above
- Select
 Revolution
 - Set the "Axis" to the "Horizontal Sketch Axis"
- Set the angle to 360°
Funzioni sottrattive
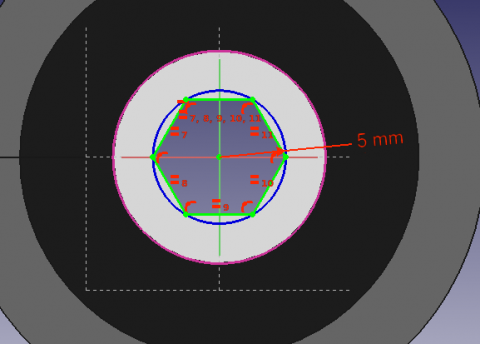
Iniziare creando un disegno con la forma da sottrarre.
- Select the top flat face of the "Revolution"
- Select
 New sketch
 - Select
 External Geometry
 - Approach the edge of the pad. An arc should be highlighted
- Select the arc. An arc of a different color should appear in the sketch
- Create a hexagon centered on the same point as the arc and set the radius of the reference circle to 5 mm
When a 3D element has been created it is possible to create references to it within a sketch.
- Select
 External Geometry.
 - Approach the element that you wish to reference, the edge of a Pad for example.
- Click on it
- New elements of a different color should appear on the sketch in the location of the feature you wish to reference.
Procedere applicando una funzione Cavità.
- Selezionare lo schizzo
- Selezionare
 Cavità
 - Impostare la lunghezza Attraversa tutto
Pattern Features
Recall the extruded profile that was created at the start of the tutorial.
- Select the top face of the object
- Create a new Sketch
- Create reference geometry linked to the top arm of the figure
- Create a circle constrained to the center of the reference arc
- Set its radius to 3 mm
- Pocket the sketch through all the workpiece
Instead of creating a circle for each hole in the sketch, we will introduce the concept of Pattern Features. These tools operate by replicating a feature in the workpiece that has already been created and that we wish to reproduce in a linear or circular arrangement. We will use a combination of Linear and Polar pattern features simulatneously to obtain the final workpiece.
- Select the Pockt feature that we just created in the Tree View
- Select
 MultiTransform
In the Combo View we are now asked to introduce the Transformations that we desire. Notice that in the MultiTransform parameters menu we see that FreeCAD has identified the Pocket as the Original feature and a second box requests us to Right click it to introduce the pattern features.
- Right click the box
- Select Add Linear Pattern
- Set the Direction to Vertical Sketch Axis
- Set length to 10 mm
- Leave occurrences at 2
- Click OK
- Right click the box again to add a Polar Pattern. Notice that the 3D view has now added the linear pattern.
- Set occurrences to 5
- Click OK twice
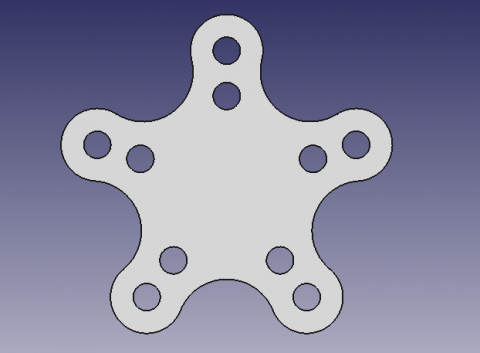
After completing this task you should have the following result.
If not, re-edit the MultiTransform operation by double clicking on it in the Tree View. Check both pattern features to detect necessary modifications, such as the Axis and if the Direction needs to be reversed.
We are now finished with the basic workflow for the PartDesign Workbench.


