Создание параметрических объектов
- Введение
- Открываем для себя FreeCAD
- Работа с FreeCAD
- Все верстаки одним взглядом
- Традиционное моделирование методом КБГ
- Традиционное двумерное черчение
- Моделирование для проектирования продукта
- Подготовка для объёмной печати
- Создание двумерных чертежей
- Моделирование BIM
- Использование электронных таблиц
- Создание анализа методом конечных элементов
- Визуализация проекта
- Написание скриптов на Python
- Сообщество
В предыдущей главе мы видели создание геометрии Part, и как показать её на экране присоединением её к "пустому" (непараметрическому) объекту документа. Это муторно, когда мы хотим изменить форму объекта. Нам нужно создать новую форму, затем снова приписать её к нашему объекту.
Однако мы видели в предыдущих главах этого руководства, как велики возможности параметрических объектов. Мы можем изменить один параметр, и форма пересчитывается на лету.
Внутри параметрические объекты не делают ничего иного кроме того, что мы делали: они пересчитывают содержимое параметра Shape, раз за разом когда другие параметры изменяются.
FreeCAD обеспечивает очень удобную систему для построения таких параметрических объектов полностью в Python. Они состоят из простых классов Python, которые определяют все нужные объекту параметры, и что случится если один из этих параметров изменится. Структура этих параметрических объектов так проста, как это:
class myParametricObject:

  def __init__(self,obj):
    obj.Proxy = self
    obj.addProperty("App::PropertyFloat","MyLength")
    ...

  def execute(self,obj):
    print ("Recalculating the shape...")
    print ("The value of MyLength is:")
    print (obj.MyLength)
    ...
Все классы Python обычно имеют метод __init__. Всё, что внутри этого метода, исполняется когда создаётся экземпляр этого класса (что знает, на программистском сленге, что объект Python создаётся из этого класса. Представляйте класс как "шаблон" для создания живых копий). В наших функциях __init__ мы здесь делаем две важные вещи: 1- сохраняем наш класс в атрибут "Proxy" объекта нашего документа FreeCAD, то есть документ FreeCAD будет носить этот код в себе, и 2- создает все параметры, которые нужны нашему объекту. Доступны множество типов параметров, Вы можете получить полный список, набрав следующий код:
FreeCAD.ActiveDocument.addObject("Part::FeaturePython","dummy").supportedProperties()
Следующая важная часть это исполняемый метод. Любой код в этом методе исполняется когда объект маркирован для пересчёта, что происходит когда объект изменяется. Это всё, что есть. Внутри исполнения требуется сделать всё, что надо, то есть вычисление новой формы, и приписывания объекту чего-то вроде obj.Shape = myNewShape. Вот почему исполняемый метод принимает аргумент "obj", которых будет самим документом FreeCAD, так что мы можем манипулировать им внутри нашего кода python.
Последняя вещь, которую важно запомнить: когда Вы создаёте такой параметрический объект в документе FreeCAD, когда Вы сохраняете файл, вышеуказанный код python не сохраняется в файле. Это происходит из соображений безопасности, если бы файлы FreeCAD содержали код, у злоумышленников была бы возможность распространять файлы FreeCAD с вредоносным кодом, который мог бы повреждать чужие компьютеры. Так что если Вы распространяете файл, который содержит объекты, сделанные с помощью вышеуказанного года, этот код должен так же находиться на компьютерах, которые откроют файл. Простейший путь достичь этого - сохранить код в макросе, и распространять макрос вместе с файлом, или делиться своим макросом на репозитории макросов FreeCAD, где каждый сможет загрузить его.
Ниже мы выполним маленькое упражнение, создав параметрический объект - простейшая параметрическая прямоугольная грань. Более сложные примеры доступны в примере параметрического объекта и в коде самого FreeCAD.
We will give our object two properties: Length and Width, which we will use to construct a rectangle. Then, since our object will already have a pre-built Placement property (all geometric object have one by default, no need to add it ourselves), we will displace our rectangle to the location/rotation set in the Placement, so the user will be able to move the rectangle anywhere by editing the Placement property.
class ParametricRectangle:

 def __init__(self,obj):
   obj.Proxy = self
   obj.addProperty("App::PropertyFloat","Length")
   obj.addProperty("App::PropertyFloat","Width")

 def execute(self,obj):
   # we need to import the FreeCAD module here too, because we might be running out of the Console
   # (in a macro, for example) where the FreeCAD module has not been imported automatically
   import Part,FreeCAD

   # first we need to make sure the values of Length and Width are not 0
   # otherwise the Part.Line will complain that both points are equal
   if (obj.Length == 0) or (obj.Width == 0):
     # if yes, exit this method without doing anything
     return

   # we create 4 points for the 4 corners
   v1 = FreeCAD.Vector(0,0,0)
   v2 = FreeCAD.Vector(obj.Length,0,0)
   v3 = FreeCAD.Vector(obj.Length,obj.Width,0)
   v4 = FreeCAD.Vector(0,obj.Width,0)

   # we create 4 edges
   e1 = Part.Line(v1,v2).toShape()
   e2 = Part.Line(v2,v3).toShape()
   e3 = Part.Line(v3,v4).toShape()
   e4 = Part.Line(v4,v1).toShape()

   # we create a wire
   w = Part.Wire([e1,e2,e3,e4])

   # we create a face
   f = Part.Face(w)

   # All shapes have a Placement too. We give our shape the value of the placement
   # set by the user. This will move/rotate the face automatically.
   f.Placement = obj.Placement

   # all done, we can attribute our shape to the object!
   obj.Shape = f
Instead of pasting the above code in the Python console, we'd better save it somewhere, so we can reuse and modify it later. For example in a new macro (menu Tools -> Macros -> Create). Name it, for example, "ParamRectangle". However, FreeCAD macros are saved with a .FCMacro extension, which Python doesn't recognize when using import . So, before using the above code, we will need to rename the ParamRectangle.FCMacro file to ParamRectangle.py. This can be done simply from your file explorer, by navigating to the Macros folder indicated in menu Tools -> Macros.
Once that is done, we can now do this in the Python Console:
import ParamRectangle
By exploring the contents of ParamRectangle, we can verify that it contains our ParametricRectangle class.
To create a new parametric object using our ParametricRectangle class, we will use the following code. Observe that we use Part::FeaturePython instead of Part::Feature that we have been using in the previous chapters (The Python version allows to define our own parametric behaviour):
myObj = FreeCAD.ActiveDocument.addObject("Part::FeaturePython","Rectangle")
ParamRectangle.ParametricRectangle(myObj)
myObj.ViewObject.Proxy = 0 # this is mandatory unless we code the ViewProvider too
FreeCAD.ActiveDocument.recompute()
Nothing will appear on screen just yet, because the Length and Width properties are 0, which will trigger our "do-nothing" condition inside execute. We just need to change the values of Length and Width, and our object will magically appear and be recalculated on-the-fly.
Of course it would be tedious to have to type these 4 lines of Python code each time we want to create a new parametric rectangle. A very simple way to solve this is placing the 4 lines above inside our ParamRectangle.py file, at the end, after the end of the ParametricRectange class (We can do this from the Macro editor).
Now, when we type import ParamRectangle , a new parametric rectangle will automatically be created. Even better, we can add a toolbar button that will do just that:
- Open menu Tools -> Customize
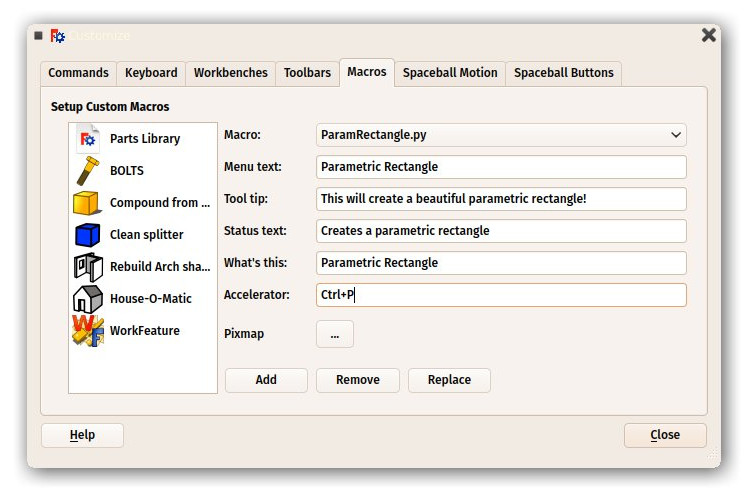
- Under the "Macros" tab, select our ParamRectangle.py macro, fill in the details as you wish, and press "Add":
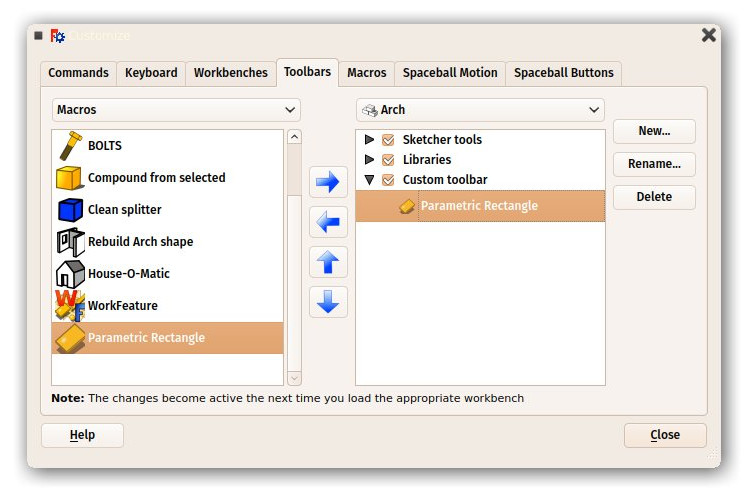
- Under the Toolbars tab, create a new custom toolbar in the workbench of your choice (or globally), select your macro and add it to the toolbar:
- That's it, we now have a new toolbar button which, when clicked, will create a parametric rectangle.
Remember, if you want to distribute files created with this new tool to other people, they must have the ParamRectangle.py macro installed on their computer too.
Read more

