Manual:Creating parametric objects/it: Difference between revisions
Renatorivo (talk | contribs) No edit summary |
Renatorivo (talk | contribs) (Created page with "Esplorando i contenuti di ParamRectangle, possiamo verificare che contenga la nostra classe ParamRectangle.") |
||
| Line 83: | Line 83: | ||
import ParamRectangle |
import ParamRectangle |
||
Esplorando i contenuti di ParamRectangle, possiamo verificare che contenga la nostra classe ParamRectangle. |
|||
By exploring the contents of ParamRectangle, we can verify that it contains our ParametricRectangle class. |
|||
To create a new parametric object using our ParametricRectangle class, we will use the following code. Observe that we use Part::FeaturePython instead of Part::Feature that we have been using in the previous chapters (The Python version allows to define our own parametric behaviour): |
To create a new parametric object using our ParametricRectangle class, we will use the following code. Observe that we use Part::FeaturePython instead of Part::Feature that we have been using in the previous chapters (The Python version allows to define our own parametric behaviour): |
||
Revision as of 21:03, 5 October 2016
- Introduzione
- Scoprire FreeCAD
- Lavorare con FreeCAD
- Script Python
- La Comunità
Nel precedente capitolo, abbiamo visto come creare una geometria Parte, e come visualizzarla sullo schermo, collegandola ad un document object "muto" (non parametrico). Questo è noioso quando vogliamo cambiare la forma di tale oggetto. Dovremmo creare una nuova forma, poi attribuirla di nuovo al nostro oggetto.
Ma, in tutti i capitoli precedenti di questo manuale abbiamo visto anche quanto sono potenti gli oggetti parametrici. Basta cambiare una loro proprietà, e la forma viene ricalcolata al volo.
Internamente, gli oggetti parametrici non fanno nulla di diverso da quello che abbiamo appena fatto: essi ricalcolano i contenuti delle loro proprietà Shape, più e più volte, ogni volta che viene cambiata una proprietà.
FreeCAD fornisce un sistema molto vantaggioso per costruire questi oggetti parametrici completamente in Python. Esso consiste in una semplice classe Python, che definisce tutte le proprietà di cui l'oggetto ha bisogno, e che cosa succede quando una di queste proprietà cambia. La struttura di questo oggetto parametrico è semplice come questa:
class myParametricObject:

  def __init__(self,obj):
    obj.Proxy = self
    obj.addProperty("App::PropertyFloat","MyLength")
    ...

  def execute(self,obj):
    print ("Recalculating the shape...")
    print ("The value of MyLength is:")
    print (obj.MyLength)
    ...
All Python classes usually have an __init__ method. What is inside that method is executed when that class is instantiated (which means, in programming slang, that a Python Object is created from that class. Think of a class as a "template" to create live copies of it). In our __init__ function here, we do two important things: 1) store our class itself into the "Proxy" attribute of our FreeCAD documetn object, that is, the FreeCAD document object will carry this code, inside itself, and 2) create all the properties our object needs. There are many types of properties available, you can get the full list by typing this code:
FreeCAD.ActiveDocument.addObject("Part::FeaturePython","dummy").supportedProperties()
Quindi, la seconda parte importante è il metodo execute. Tutto il codice contenuto in questo metodo viene eseguito quando l'oggetto viene contrassegnato per il ricalcolo, il che avviene quando si modifica una proprietà. Questo è tutto quello che c'è da fare. All'interno di execute, è necessario fare tutto ciò che deve essere fatto, vale a dire, calcolare una nuova forma e attribuirla all'oggetto stesso con qualcosa di simile a obj.Shape = myNewShape. Ecco perché il metodo execute prende un argomento "obj", che sarà il FreeCAD document object stesso, e in questo modo possiamo manipolarlo all'interno del nostro codice Python.
Un'ultima cosa importante da ricordare: se si creano questi oggetti parametrici in un documento di FreeCAD, quando si salva il file, il codice Python di cui sopra non viene memorizzato nel file. Questo viene fatto per motivi di sicurezza. Se un file di FreeCAD contenesse del codice, sarebbe possibile che qualcuno distribuisca dei file di FreeCAD contenenti del codice dannoso che potrebbe danneggiare i computer di altri. Quindi, se si distribuisce un file che contiene degli oggetti realizzati con il codice di cui sopra, tale codice deve essere presente anche sul computer che apre il file. Il modo più semplice per raggiungere questo obiettivo è di solito quello di salvare il codice di cui sopra in una macro, e poi distribuire la macro insieme con il file FreeCAD o condividere la macro nel FreeCAD macros repository dove chiunque può scaricarlo.
Ora faremo un piccolo esercizio, costruiremo un oggetto parametrico composto da una semplice faccia rettangolare parametrica. Esempi più complessi sono disponibili negli esempi di oggetti parametrici e nello stesso codice sorgente di FreeCAD .
Diamo al nostro oggetto due proprietà: Length e Width, che useremo per costruire un rettangolo. Poi, dato che l'oggetto ha già una proprietà Placement pre-costruita (tutti gli oggetti geometrici ne hanno una di default, quindi non è necessario aggiungerla), collochiamo il rettangolo nella posizione e rotazione impostata in Placement, per fare in modo che l'utente possa poi essere in grado di spostare il rettangolo ovunque desideri modificando solo la proprietà Placement.
class ParametricRectangle:

 def __init__(self,obj):
   obj.Proxy = self
   obj.addProperty("App::PropertyFloat","Length")
   obj.addProperty("App::PropertyFloat","Width")

 def execute(self,obj):
   # we need to import the FreeCAD module here too, because we might be running out of the Console
   # (in a macro, for example) where the FreeCAD module has not been imported automatically
   import Part,FreeCAD

   # first we need to make sure the values of Length and Width are not 0
   # otherwise the Part.Line will complain that both points are equal
   if (obj.Length == 0) or (obj.Width == 0):
     # if yes, exit this method without doing anything
     return

   # we create 4 points for the 4 corners
   v1 = FreeCAD.Vector(0,0,0)
   v2 = FreeCAD.Vector(obj.Length,0,0)
   v3 = FreeCAD.Vector(obj.Length,obj.Width,0)
   v4 = FreeCAD.Vector(0,obj.Width,0)

   # we create 4 edges
   e1 = Part.Line(v1,v2).toShape()
   e2 = Part.Line(v2,v3).toShape()
   e3 = Part.Line(v3,v4).toShape()
   e4 = Part.Line(v4,v1).toShape()

   # we create a wire
   w = Part.Wire([e1,e2,e3,e4])

   # we create a face
   f = Part.Face(w)

   # All shapes have a Placement too. We give our shape the value of the placement
   # set by the user. This will move/rotate the face automatically.
   f.Placement = obj.Placement

   # all done, we can attribute our shape to the object!
   obj.Shape = f
Invece di incollare il codice precedente nella console Python, è meglio salvarlo da qualche parte, in modo da poterlo riutilizzare e modificare in un secondo tempo. Per esempio in una nuova macro (menu Strumenti -> Macro -> Crea). Dargli un nome, ad esempio, "ParamRectangle". Le macro FreeCAD vengono salvate con estensione .FCMacro, che però Python non riconosce quando si utilizza l'importazione. Quindi, prima di utilizzare il codice di cui sopra, bisogna rinominare il file ParamRectangle.FCMacro in ParamRectangle.py. Questo può essere fatto semplicemente, navigando con il file explorer nella cartella delle macro indicata nel menu Strumenti -> Macro.
Dopo, nella console Python possiamo fare questo:
import ParamRectangle
Esplorando i contenuti di ParamRectangle, possiamo verificare che contenga la nostra classe ParamRectangle.
To create a new parametric object using our ParametricRectangle class, we will use the following code. Observe that we use Part::FeaturePython instead of Part::Feature that we have been using in the previous chapters (The Python version allows to define our own parametric behaviour):
myObj = FreeCAD.ActiveDocument.addObject("Part::FeaturePython","Rectangle")
ParamRectangle.ParametricRectangle(myObj)
myObj.ViewObject.Proxy = 0 # this is mandatory unless we code the ViewProvider too
FreeCAD.ActiveDocument.recompute()
Nothing will appear on screen just yet, because the Length and Width properties are 0, which will trigger our "do-nothing" condition inside execute. We just need to change the values of Length and Width, and our object will magically appear and be recalculated on-the-fly.
Of course it would be tedious to have to type these 4 lines of Python code each time we want to create a new parametric rectangle. A very simple way to solve this is placing the 4 lines above inside our ParamRectangle.py file, at the end, after the end of the ParametricRectange class (We can do this from the Macro editor).
Now, when we type import ParamRectangle , a new parametric rectangle will automatically be created. Even better, we can add a toolbar button that will do just that:
- Open menu Tools -> Customize
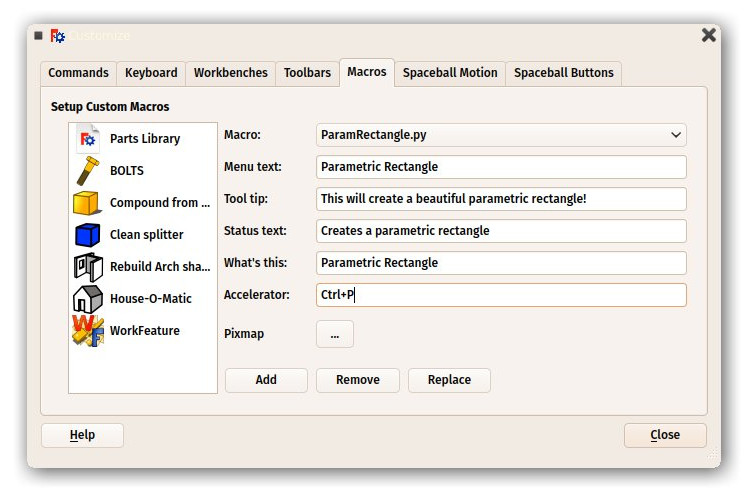
- Under the "Macros" tab, select our ParamRectangle.py macro, fill in the details as you wish, and press "Add":
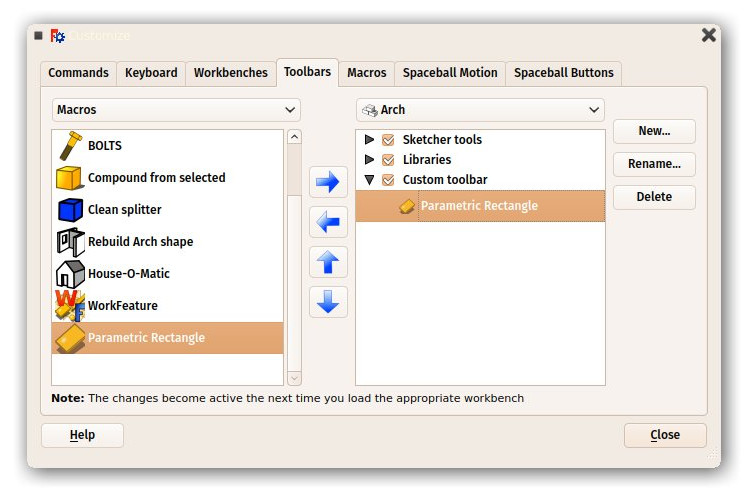
- Under the Toolbars tab, create a new custom toolbar in the workbench of your choice (or globally), select your macro and add it to the toolbar:
- That's it, we now have a new toolbar button which, when clicked, will create a parametric rectangle.
Remeber, if you want to distribute files created with this new tool to other people, they must have the ParamRectangle.py macro installed on their computer too.
Read more

