Manuel : Création d'objets paramétriques
- Introduction
- Découvrir FreeCAD
- Travailler avec FreeCAD
- Tous les ateliers en un coup d'œil
- Modélisation traditionnelle, mode CSG
- Dessin 2D traditionnel
- Modélisation pour la conception de produits
- Préparation de modèles pour l'impression 3D
- Génération de dessins 2D
- Modélisation BIM
- Utilisation de feuilles de calcul
- Création d'analyses FEM
- Création de rendus réalistes
- Programmation Python
- La communauté
Dans le chapitre précédent, nous avons vu comment créer la géométrie Part et comment l'afficher sur l’écran, en l'attachant à un objet de document "dumb" (non paramétrique). C'est fastidieux quand nous voulons changer la forme de cet objet. Nous devrions créer une nouvelle forme, puis l’attribuer à nouveau à notre objet.
Cependant, nous avons également vu dans tous les chapitres précédents de ce manuel comment les objets paramétriques sont puissants. Il suffit de changer une propriété, et la forme est recalculée à la volée.
En interne, les objets paramétriques ne font rien de différent de ce que nous venons de faire : ils recalculent le contenu de leur propriété Shape, à plusieurs reprises, chaque fois qu'une autre propriété a été modifiée.
FreeCAD fournit un système très pratique pour créer de tels objets paramétriques complètement en Python. Ils consistent en une classe Python simple, qui définit toutes les propriétés dont l'objet a besoin, et ce qui se passera quand une de ces propriétés changera. La structure de l'objet paramétrique est aussi simple que ceci :
class myParametricObject:

  def __init__(self,obj):
    obj.Proxy = self
    obj.addProperty("App::PropertyFloat","MyLength")
    ...

  def execute(self,obj):
    print ("Recalculating the shape...")
    print ("The value of MyLength is:")
    print (obj.MyLength)
    ...
Toutes les classes Python ont généralement une méthode d'initialisation (__init__ method). Ce qui est à l'intérieur de cette méthode est exécuté lorsque cette classe est instanciée (ce qui signifie, en argot de programmation, qu'un objet Python est créé à partir de cette classe. Comprenez une classe comme un "modèle" pour en créer des copies en direct). Ici dans notre fonction d'initialisation (__init__ function), nous faisons deux choses importantes : 1- stocker notre classe elle-même dans l'attribut "Proxy" de notre document objet FreeCAD, c'est-à-dire que le document objet de FreeCAD portera ce code en lui-même, et 2- créer toutes les propriétés dont notre objet a besoin. Il existe de nombreux types de propriétés disponibles, vous pouvez obtenir la liste complète en tapant ce code :
FreeCAD.ActiveDocument.addObject("Part::FeaturePython","dummy").supportedProperties()
Ensuite, la deuxième partie importante est la méthode d'exécution. Tout code dans cette méthode sera exécuté lorsque l'objet est marqué pour être recalculé, ce qui se produira lorsqu'une propriété a été modifiée. C'est tout ce qu'il y a à faire. Dans l'exécution, vous devez faire tout ce qui doit être fait, c'est-à-dire calculer une nouvelle forme, et attribuer à l'objet lui-même quelque chose comme obj.Shape = myNewShape. C'est pourquoi la méthode d'exécution prend un argument "obj" qui sera l'objet du document FreeCAD lui-même, afin que nous puissions le manipuler dans notre code python.
Une dernière chose est importante à retenir : lorsque vous créez de tels objets paramétriques dans un document FreeCAD, lorsque vous enregistrez le fichier, le code python ci-dessus n'est pas stocké dans le fichier. C'est pour des raisons de sécurité, si un fichier FreeCAD contenait un code, n’importe qui pourrait distribuer des fichiers FreeCAD contenant des codes malveillants qui pourraient nuire à d'autres personnes les utilisant sur leurs ordinateurs. Donc, si vous distribuez un fichier contenant des objets fabriqués avec ce qui précède, ce code doit également être présent sur l'ordinateur qui ouvrira le fichier. La manière la plus simple de faire est généralement de sauvegarder le code ci-dessus dans une macro et de distribuer la macro avec votre fichier FreeCAD ou de partager votre macro sur le dépôt de macros FreeCAD (FreeCAD macros repository) où n'importe qui peut la télécharger.
Below, we will do a small exercise, building a parametric object that is a simple parametric rectangular face. More complex examples are available on the parametric object example and in the FreeCAD source code itself.
We will give our object two properties: Length and Width, which we will use to construct a rectangle. Then, since our object will already have a pre-built Placement property (all geometric object have one by default, no need to add it ourselves), we will displace our rectangle to the location/rotation set in the Placement, so the user will be able to move the rectangle anywhere by editing the Placement property.
class ParametricRectangle:

 def __init__(self,obj):
   obj.Proxy = self
   obj.addProperty("App::PropertyFloat","Length")
   obj.addProperty("App::PropertyFloat","Width")

 def execute(self,obj):
   # we need to import the FreeCAD module here too, because we might be running out of the Console
   # (in a macro, for example) where the FreeCAD module has not been imported automatically
   import Part,FreeCAD

   # first we need to make sure the values of Length and Width are not 0
   # otherwise the Part.Line will complain that both points are equal
   if (obj.Length == 0) or (obj.Width == 0):
     # if yes, exit this method without doing anything
     return

   # we create 4 points for the 4 corners
   v1 = FreeCAD.Vector(0,0,0)
   v2 = FreeCAD.Vector(obj.Length,0,0)
   v3 = FreeCAD.Vector(obj.Length,obj.Width,0)
   v4 = FreeCAD.Vector(0,obj.Width,0)

   # we create 4 edges
   e1 = Part.Line(v1,v2).toShape() # Warning. Since FC v0.17, use Part.LineSegment instead of Part.Line
   e2 = Part.Line(v2,v3).toShape()
   e3 = Part.Line(v3,v4).toShape()
   e4 = Part.Line(v4,v1).toShape()

   # we create a wire
   w = Part.Wire([e1,e2,e3,e4])

   # we create a face
   f = Part.Face(w)

   # All shapes have a Placement too. We give our shape the value of the placement
   # set by the user. This will move/rotate the face automatically.
   f.Placement = obj.Placement

   # all done, we can attribute our shape to the object!
   obj.Shape = f
Instead of pasting the above code in the Python console, we'd better save it somewhere, so we can reuse and modify it later. For example in a new macro (menu Tools -> Macros -> Create). Name it, for example, "ParamRectangle". However, FreeCAD macros are saved with a .FCMacro extension, which Python doesn't recognize when using import . So, before using the above code, we will need to rename the ParamRectangle.FCMacro file to ParamRectangle.py. This can be done simply from your file explorer, by navigating to the Macros folder indicated in menu Tools -> Macros.
Once that is done, we can now do this in the Python Console:
import ParamRectangle
By exploring the contents of ParamRectangle, we can verify that it contains our ParametricRectangle class.
To create a new parametric object using our ParametricRectangle class, we will use the following code. Observe that we use Part::FeaturePython instead of Part::Feature that we have been using in the previous chapters (The Python version allows to define our own parametric behaviour):
myObj = FreeCAD.ActiveDocument.addObject("Part::FeaturePython","Rectangle")
ParamRectangle.ParametricRectangle(myObj)
myObj.ViewObject.Proxy = 0 # this is mandatory unless we code the ViewProvider too
FreeCAD.ActiveDocument.recompute()
Nothing will appear on screen just yet, because the Length and Width properties are 0, which will trigger our "do-nothing" condition inside execute. We just need to change the values of Length and Width, and our object will magically appear and be recalculated on-the-fly.
Of course it would be tedious to have to type these 4 lines of Python code each time we want to create a new parametric rectangle. A very simple way to solve this is placing the 4 lines above inside our ParamRectangle.py file, at the end, after the end of the ParametricRectange class (We can do this from the Macro editor).
Now, when we type import ParamRectangle , a new parametric rectangle will automatically be created. Even better, we can add a toolbar button that will do just that:
- Open menu Tools -> Customize
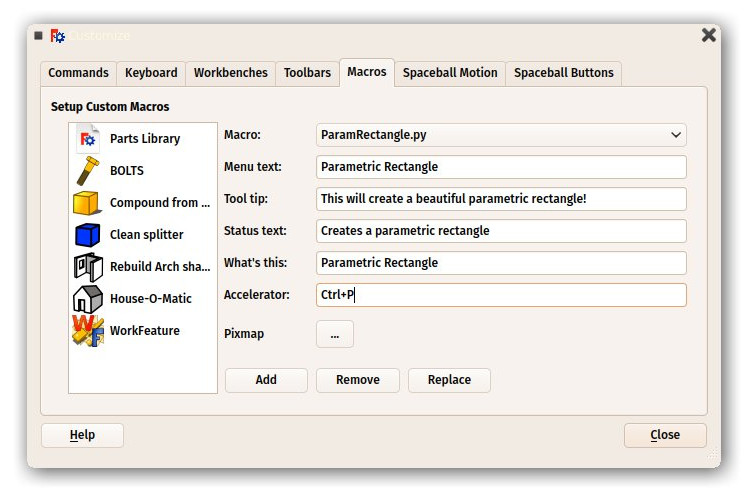
- Under the "Macros" tab, select our ParamRectangle.py macro, fill in the details as you wish, and press "Add":
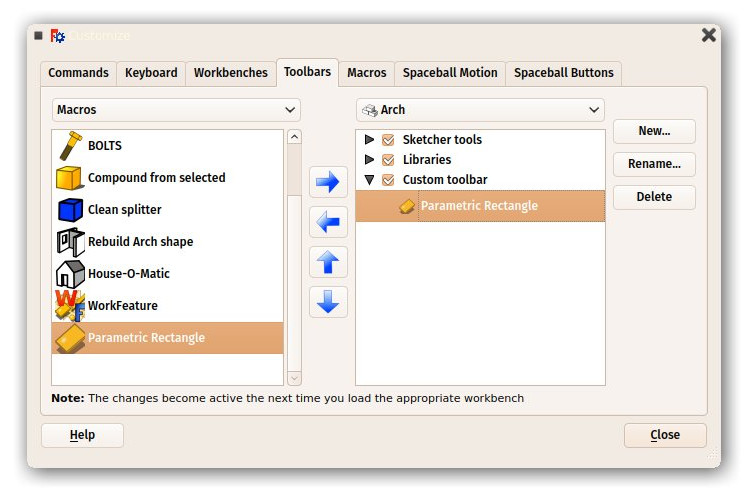
- Under the Toolbars tab, create a new custom toolbar in the workbench of your choice (or globally), select your macro and add it to the toolbar:
- That's it, we now have a new toolbar button which, when clicked, will create a parametric rectangle.
Remember, if you want to distribute files created with this new tool to other people, they must have the ParamRectangle.py macro installed on their computer too.
Read more

