Taslak Boyut
|
|
| Menü konumu |
|---|
| Taslak → Boyut |
| Tezgahlar |
| Taslak, Yapı |
| Varsayılan kısayol |
| D I |
| Versiyonda tanıtıldı |
| - |
| Ayrıca bkz |
| FlipDimension |
Açıklama
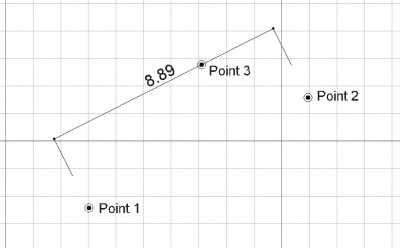
Boyut aracı, geçerli belgede, ölçülecek mesafeyi tanımlayan iki nokta ve boyut çizgisinin geçtiği yeri belirten üçüncü bir nokta olan bir boyut oluşturur.
Nasıl kullanılır
-
 Boyut düğmesine basın veya D ardından I tuşlarına basın
 - 3D görünümünde bir noktaya tıklayın veya bir Koordinat yazın
- 3D görünümünde ikinci bir noktaya tıklayın veya bir Koordinat yazın
- 3D görünümünde üçüncü bir noktayı tıklayın veya bir Koordinat yazın
Kullanılabilir boyut tipleri
- Doğrusal boyutlar: ALT tuşuna basarak herhangi bir 2 nokta veya düz bir kenar seçerek.
- Yatay/dikey boyutlar: ikinci nokta seçiliyken SHIFT tuşuna basarak.
- Çap boyutları: ALT tuşuna basarak eğri bir kenar seçerek.
- Yarıçap boyutları: ALT tuşunu kullanarak eğri bir kenar seçerek, ardından SHIFT tuşuna basın.
- Açısal boyutlar: ALT tuşuna basarak 2 düz kenar seçerek.
Options
- Press X, Y or Z after a point to constrain the next point on the given axis.
- To enter coordinates manually, simply enter the numbers, then press ENTER between each X, Y and Z component.
- Press CTRL while drawing to force snapping your point to the nearest snap location, independently of the distance.
- Pressing SHIFT will constrain the dimension horizontally or vertically, or, when working on a circular edge, switches between diameter and radius modes.
- Press R or click the checkbox to check/uncheck the Relative button. If relative mode is on, the coordinates of the next point are relative to the last one. If not, they are absolute, taken from the (0,0,0) origin point.
- Press T or click the checkbox to check/uncheck the Continue button. If continue mode is on, you will be able to draw continued dimensions, one after the other, that share the same baseline.
- Press ESC or the Cancel button to abort the current Line command.
- By picking an existing edge with ALT, instead of entering measurement points, the dimension will become parametric and remember which edge it is bound to. If the endpoints of that edge move later on, the dimension will follow them.
- If an edge is selected before starting the Dimension command, the created dimension will also be parametric.
- The direction of the dimension can be changed afterwards, by modifying its "Direction" property
Properties
- VeriStart: The start point of the distance to measure
- VeriEnd: The end point of the distance to measure
- VeriDimline: A point through which the dimension line must pass
- GörünümDisplay Mode: Specifies if the text is aligned to the dimension lines or always faces the camera
- GörünümFont Size: The size of the letters
- GörünümExt Lines: The size of the extension lines (between the measurement points and the dimension line)
- GörünümText Position: Can be used to force the text to be displayed at a certain position
- GörünümText Spacing: Specifies the space between the text and the dimension line
- GörünümOverride: Specifies a text to display instead of the measurement. Insert "$dim", inside that text, to display the measurement value
- GörünümFont Name: The font to use to draw the text. It can be a font name, such as "Arial", a default style such as "sans", "serif" or "mono", or a family such as "Arial,Helvetica,sans" or a name with a style such as "Arial:Bold". If the given font is not found on the system, a generic one is used instead.
- GörünümArrow Type: The type of arrow to use
- GörünümArrow Size: The size of the arrows
- GörünümDecimals: The number of decimal places to display on the dimension
- GörünümFlip Arrows: Reverse the orientation of arrows
- GörünümUnit Override: Expresses the distance in the given unit (leave blank to use the system unit) introduced in version 0.17
Scripting
The Dimension tool can by used in macros and from the python console by using the following functions:
makeDimension (p1,p2,[p3])
or
makeDimension (object,i1,i2,p3)
or
makeDimension (objlist,indices,p3)
- Creates a Dimension object with the dimension line passing through p3.
- The Dimension object takes the Draft linewidth and color set in the command bar.
- There are multiple ways to create a dimension, depending on the arguments you pass to it:
- (p1,p2,p3): creates a standard dimension from p1 to p2.
- (object,i1,i2,p3): creates a linked dimension to the given object, measuring the distance between its vertices indexed i1 and i2.
- (object,i1,mode,p3): creates a linked dimension to the given object, i1 is the index of the (curved) edge to measure, and mode is either "radius" or "diameter". Returns the newly created object.
makeAngularDimension (center,[angle1,angle2],p3)
- creates an angular Dimension from the given center, with the given list of angles, passing through p3.
- Returns the newly created object.
Example:
import FreeCAD,Draft
p1 = FreeCAD.Vector(0,0,0)
p2 = FreeCAD.Vector(1,1,0)
p3 = FreeCAD.Vector(2,0,0)
Draft.makeDimension(p1,p2,p3)
Links
- Tutorial: Projecting dimensions on a Drawing Page
